Flame
The Flame connector provides integration with NIM from within Flame or Flare to create published shots in NIM, add exported elements to NIM shots, export clips to NIM dailies and edits, and round-trip NIM elements back to the Flame timeline and batchFX.
For an in depth look at the NIM Flame Connector functionality, check out the video here:
NIM Flame Connector from NIM Labs on Vimeo.
Additional NIM videos can be found here: https://nim-labs.com/videos
Installation
The following procedures describes how to install the Flame NIM connector. The connector creates a NIM menu in the Flame library context menu. Right click on a clip in reels or the library to access the context menu. The script and the following installation procedures have been tested with Flame 2017 and later.
The NIM Connector folder structure is as follows:
nim             <-- NIM_CONNECTOR_ROOT
    css
    img
    nim-core
    plugins
In the following examples [NIM_CONNECTOR_ROOT] is the path to the top level NIM scripts folder.
Replace all instances of [NIM_CONNECTOR_ROOT] with the actual path to the folder.
Set Environment
Flame uses the DL_PYTHON_HOOK_PATH environment variable to determine the location of it’s python hooks. The NIM connector uses the Flame python hooks to add to the context menu and including NIM functionality. Follow the instructions below to install the connector on the corresponding operating system.
Linux:
The DL_PYTHON_HOOK_PATH environment variable needs to be set to the “[NIM_CONNECTOR_ROOT]/plugins/Flame/python/pyX” location, where X is the major version of python used by Flame.
Important
Versions of Flame prior to 2022 use Python 2.7 (2), and starting with Flame 2022 the version of Python used is 3.7 (3).
To do this, edit the .bashrc or .cshrc file (depending upon your default shell environment) found in the users home directory to include the following:
For Flame 2022 and greater:
setenv DL_PYTHON_HOOK_PATH [NIM_CONNECTOR_ROOT]/plugins/Flame/python/py3
For versions of Flame prior to 2022:
setenv DL_PYTHON_HOOK_PATH [NIM_CONNECTOR_ROOT]/plugins/Flame/python/py2
Replace [NIM_CONNECTOR_ROOT] with the full path to the NIM Connector root folder.
OSX +10.11.x:
OSX uses plist files to set environment variables for applications. A new plist file needs to be added to set the DL_PYTHON_HOOK_PATH for Flame.
Open the setenv.DL_PYTHON_HOOK_PATH.plist file found in the folder “[NIM_CONNECTOR_ROOT]/plugins/Flame/install/pyX”, where X is the major version of python used by Flame.
Important
Versions of Flame prior to 2022 use Python 2.7 (2), and starting with Flame 2022 the version of Python used is 3.7 (3).
For Flame 2022 and greater:
[NIM_CONNECTOR_ROOT]/plugins/Flame/install/py3/setenv.DL_PYTHON_HOOK_PATH.plist
For versions of Flame prior to 2022:
[NIM_CONNECTOR_ROOT]/plugins/Flame/install/py2/setenv.DL_PYTHON_HOOK_PATH.plist
Edit the file, replacing [NIM_CONNECTOR_ROOT] with the full path to the NIM Connector root folder.
Copy the edited file to: /Library/LaunchAgents/setenv.DL_PYTHON_HOOK_PATH.plist
Execute the folowing lines at the OSX Terminal prompt to modify the plist permissions:
sudo chown root /Library/LaunchAgents/setenv.DL_PYTHON_HOOK_PATH.plist
sudo chgrp wheel /Library/LaunchAgents/setenv.DL_PYTHON_HOOK_PATH.plist
sudo chmod o-w /Library/LaunchAgents/setenv.DL_PYTHON_HOOK_PATH.plist
Warning
The plist will not run if the permissions are not correct.
You must now reboot for the settings to take place.
The next time Flame is started, a NIM menu should appear in the library context main menu. If you don’t see the NIM menu, it’s likely that the path to the DL_PYTHON_HOOK_PATH is incorrect or not set properly.
Setting Preferences
If you have already installed and launched other NIM Connectors your connection preferences will already be saved in the nim.prefs file.
The NIM preferences are in the following locations:
Windows: |
drive:/Users/[USERNAME]/.nim |
OSX: |
/Users/[USERNAME]/.nim |
Linux: |
/home/[USERNAME]/.nim |
If this is the first time accessing a NIM Connector, after launching Flame a dialog box will appear to enter the path of the NIM API.
Enter the path as follows:
http://[hostname]/nimAPI.php
where [hostname] is the address you have assigned to the NIM server.
After successfully entering the API path, you will be asked to enter your NIM username. Once done the NIM preferences will be created.
API Keys
NIM API keys are an optional security feature that restricts API access with time limited per user keys. Requiring API keys restricts all API access to only those users with an API key.
If Require API Keys is enabled in ADMIN/Security - Options, users will be presented with a dialog box the first time they attempt to use a NIM Connector. API keys are unique to each user. Enter the NIM API key provided to you by your NIM administrator. For more information on enabling NIM API Keys please refer to the API Keys section of the documentation. For information on creating user API keys please refer to the Users Grid section of the Administration documentation.
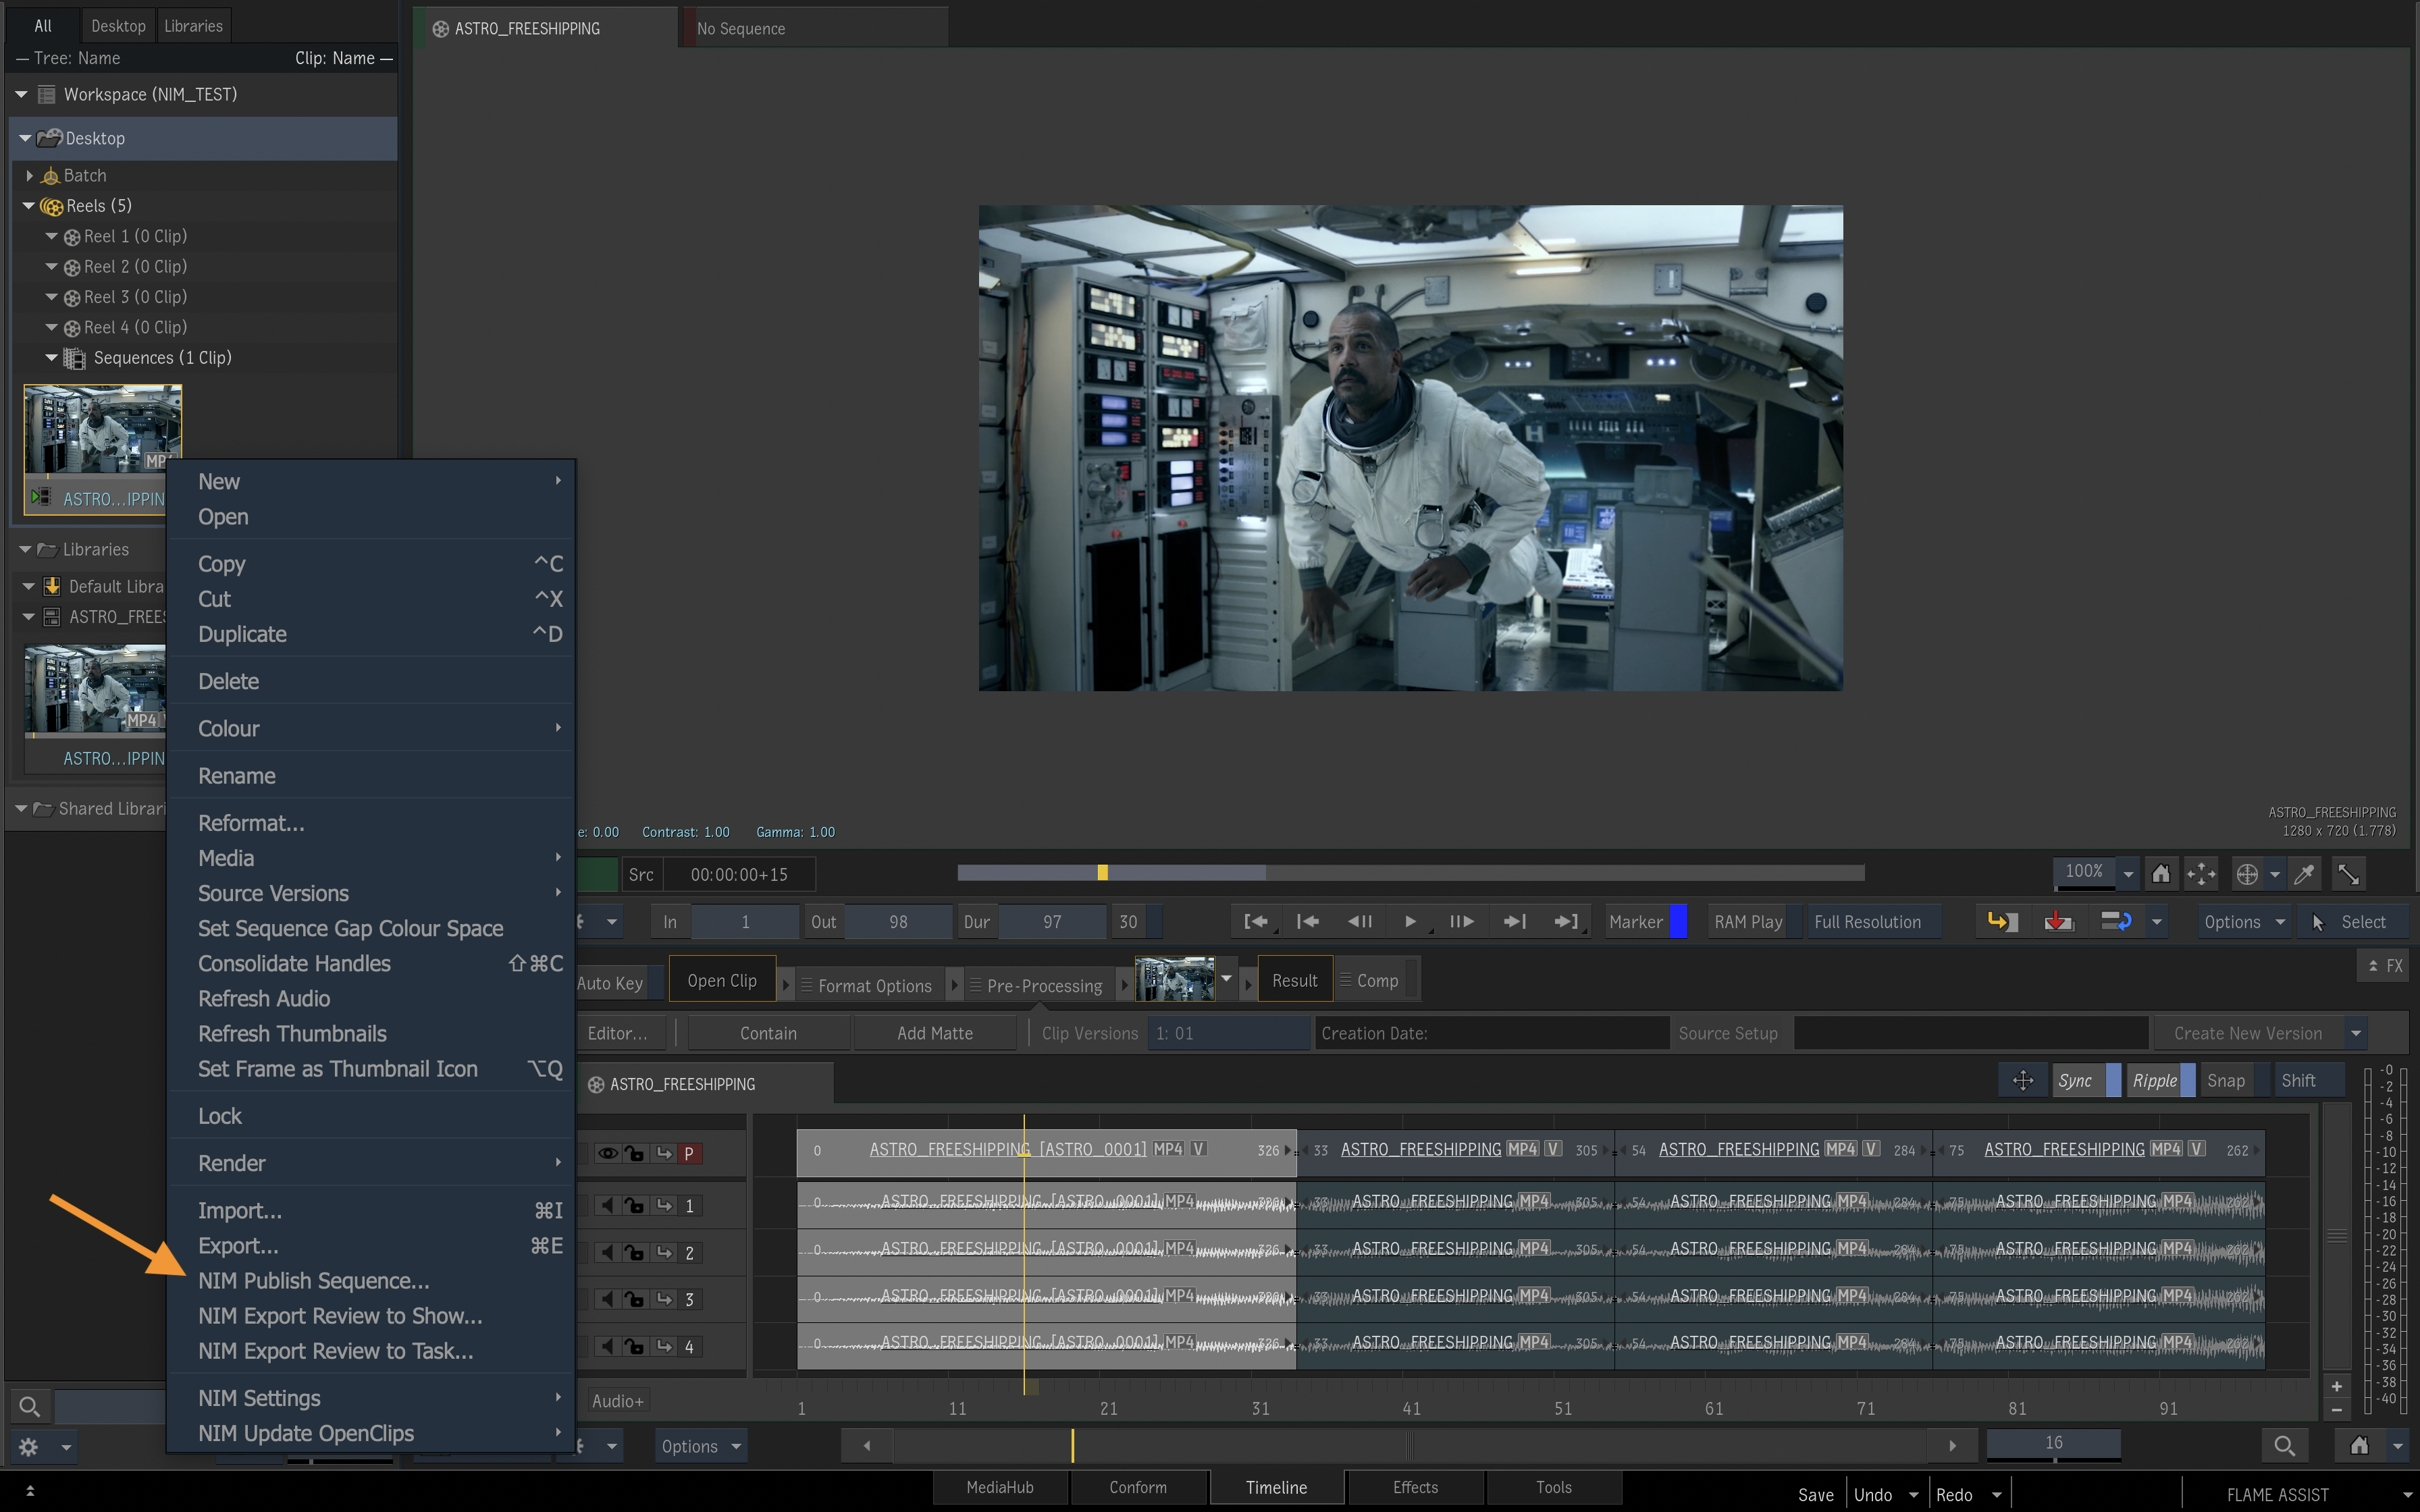
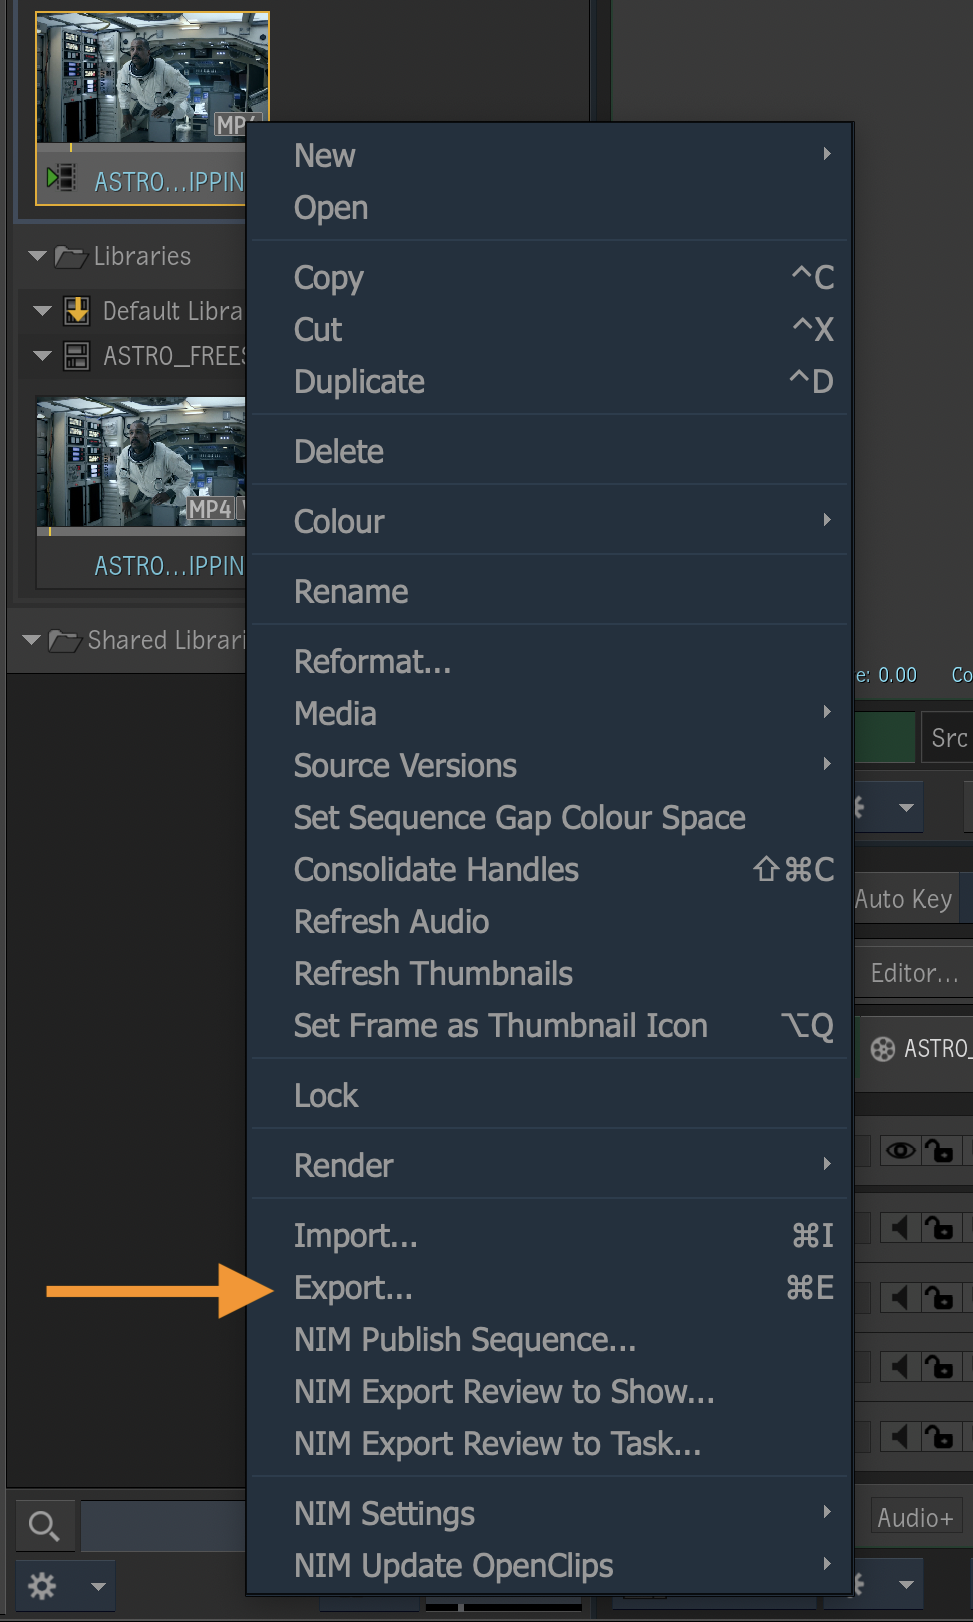
Menu Options
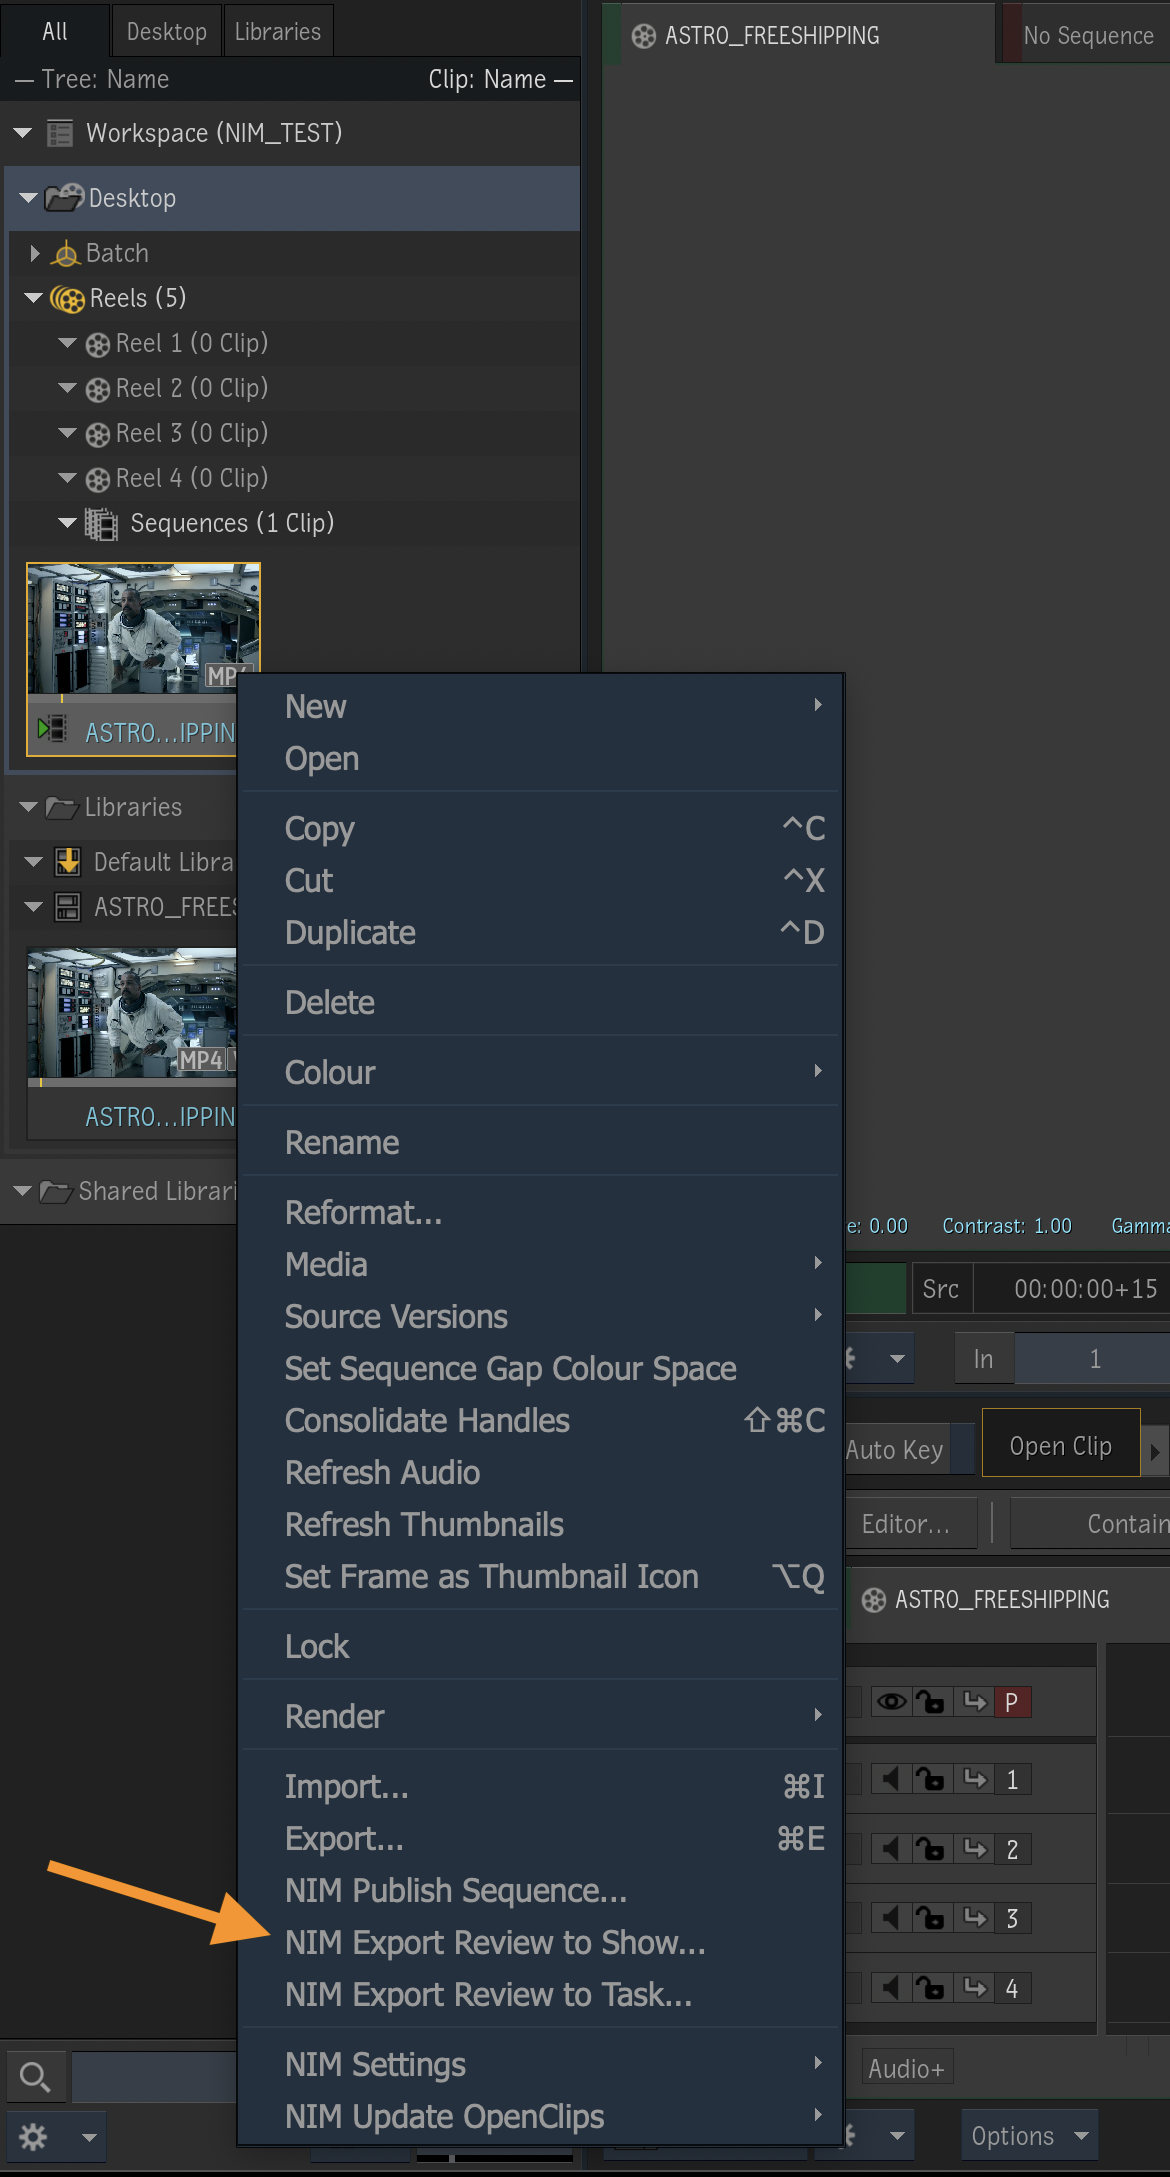
Right clicking on a clip in a desktop reel or library will bring up a context menu which includes actions for NIM.
The NIM Menu provides options for the following actions
NIM Publish Sequence
NIM Export Review to Show
NIM Export Review to Task
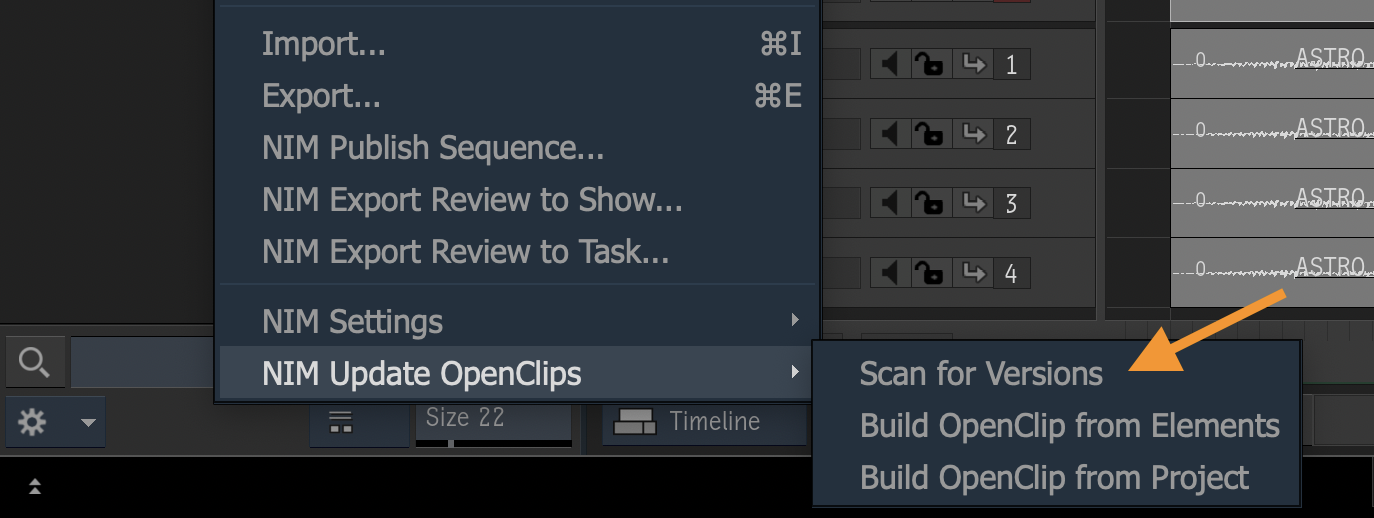
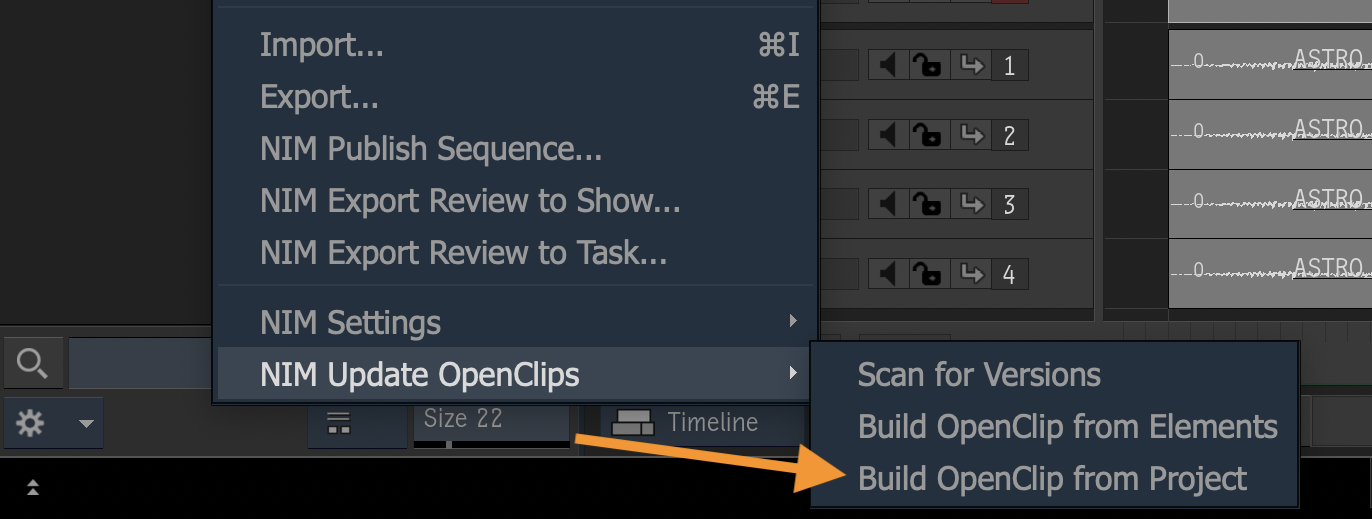
NIM Update OpenClips
Scan For Version
Build OpenClips from Elements
Build OpenClips from Project
NIM Settings
Change User
NIM Export Review to Task

Flame clips can be exported direct to a review item in NIM using the Export Review to Task menu option.
A movie file will be created on disk in the project structure as well as uploaded to NIM media.
To export a clip, right click on the media you wish to export from a desktop reel or library folder and choose NIM Export Review to Task…
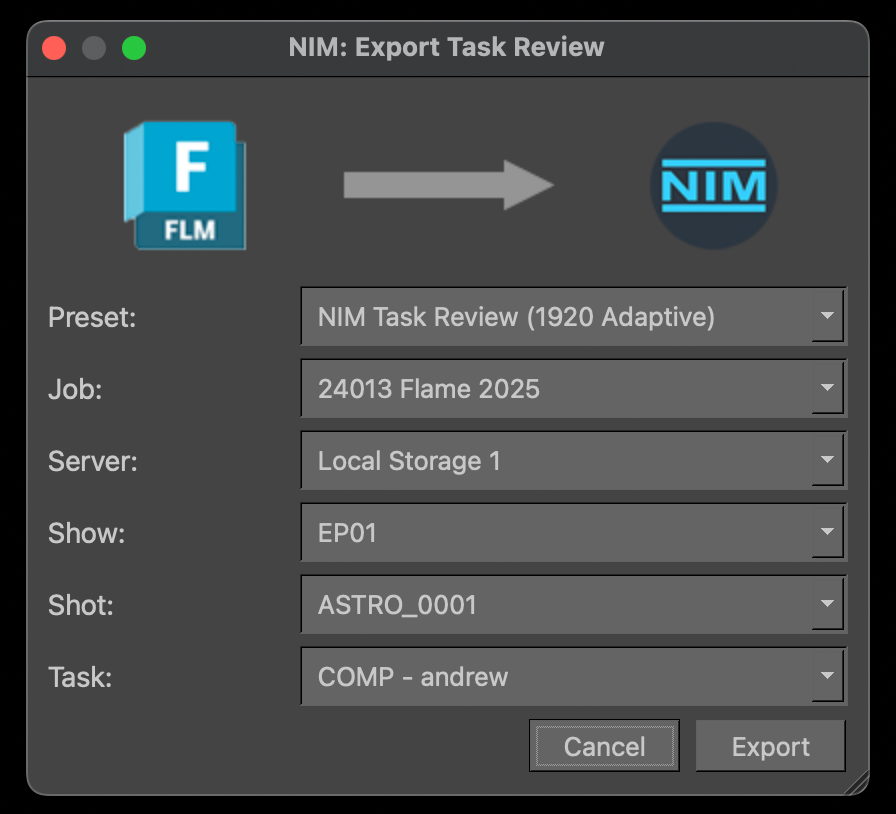
This will bring up the Export Review dialog with several dropdown options to select the destination for the clip.
Export Preset |
The list of available export presets. The selected export preset is used when converting a clip to a video file for upload. |
Job |
The list of jobs the user is current assigned to. Select the appropriate job for the review item. |
Server |
The list of servers attached to the job. The job server which the export should write the review item to. If no servers are present the job may not be online. Please bring the job online before exporting files. |
Show |
The list of shows for the selected job. Select the show containing the shot the review item is being exported to. |
Shot |
The list of shots for the selected show. The shot which contains the task you are exporting the review item to. |
Task |
The list of tasks for the selected shot. Select the task that the review item is being uploaded to. |
After selected the appropriate export settings, click the Export button. The conversion of the clip will begin. Once completed the video will be automatically uploaded to the task in NIM as a new review item.
NIM Export Review to Show
Flame clips can be exported direct to a review item in NIM using the Export Review to Show menu option.
A movie file will be created on disk in the project structure as well as uploaded to NIM media.
To export a clip, right click on the media you wish to export from a desktop reel or library folder and choose NIM Export Review to Show…
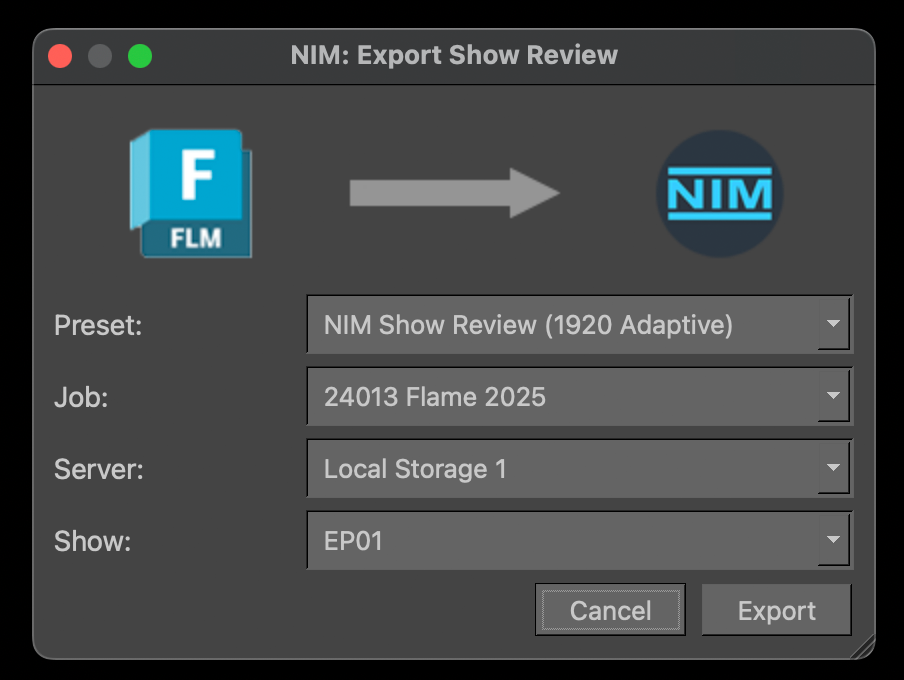
This will bring up the Export Edit dialog with several dropdown options to select the destination for the clip.
Export Preset |
The list of available export presets. The selected export preset is used when converting a clip to a video file for upload. |
Job |
The list of jobs the user is current assigned to. Select the appropriate job for the review item. |
Server |
The list of servers attached to the job. The job server which the export should write the review item to. If no servers are present the job may not be online. Please bring the job online before exporting files. |
Show |
The list of shows for the selected job. Select the show the review item is being exported to. |
After selected the appropriate export settings, click the Export button. The conversion of the clip will begin. Once completed the video will be automatically uploaded to the show in NIM as a new review item.
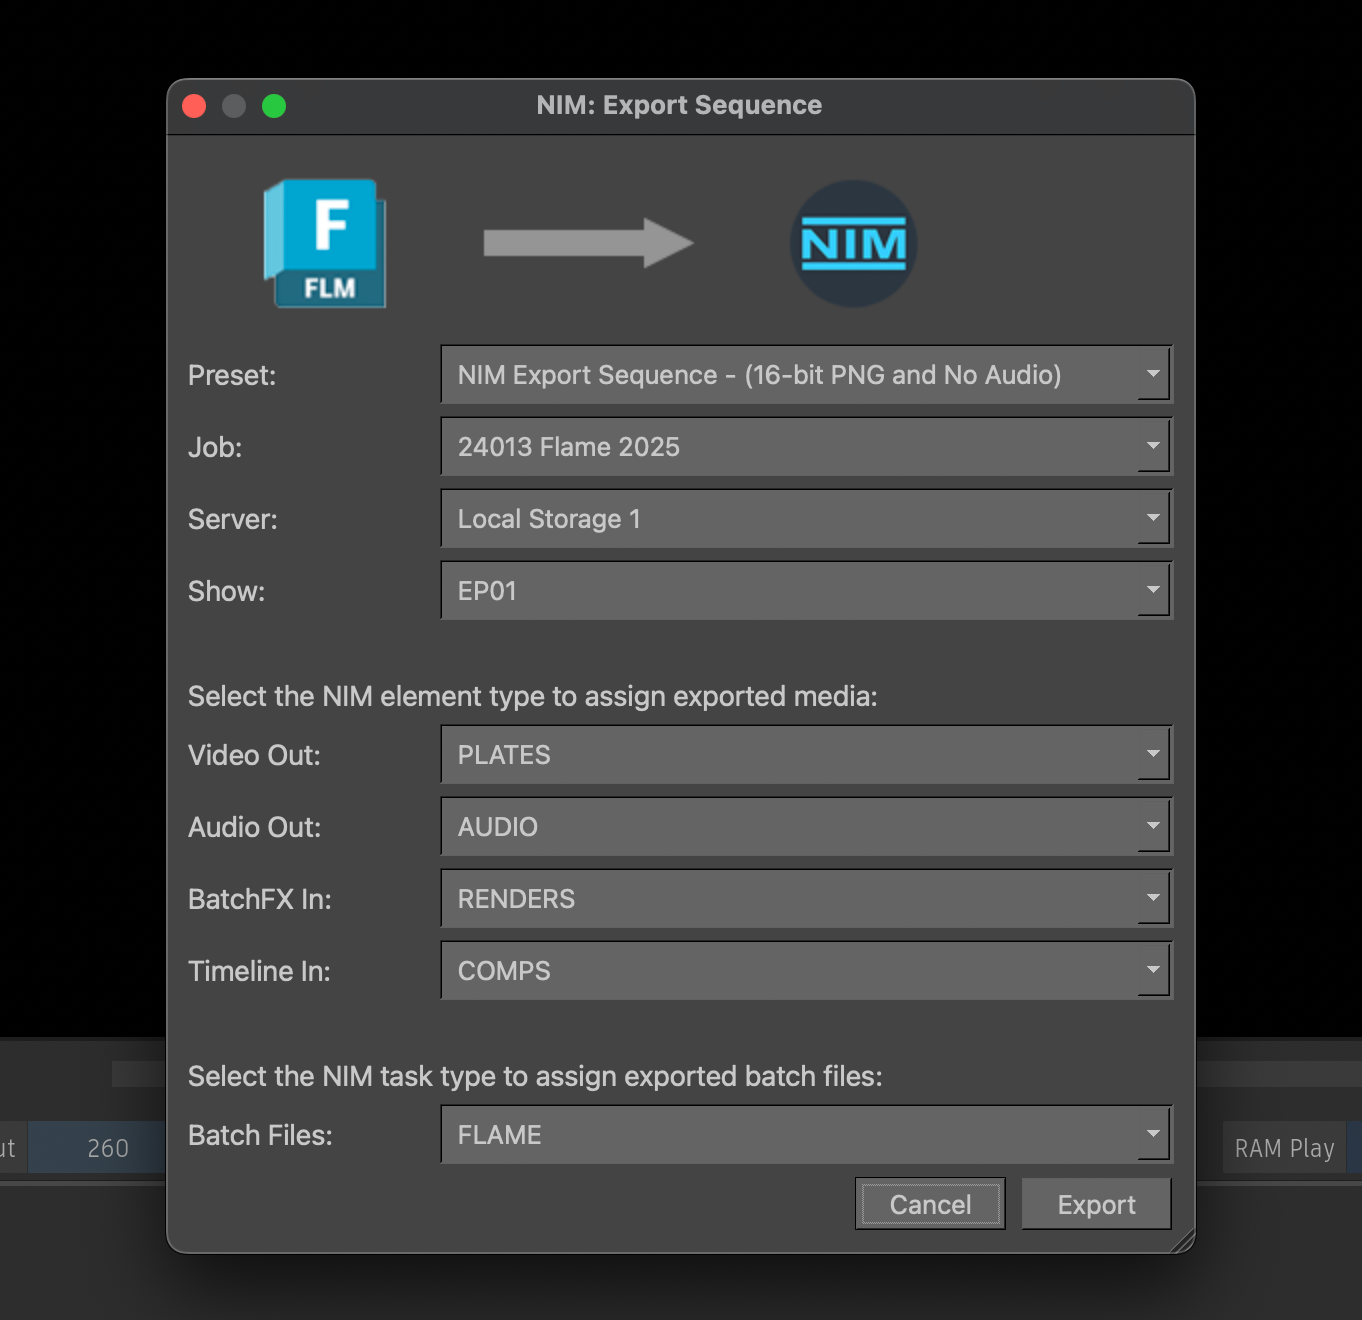
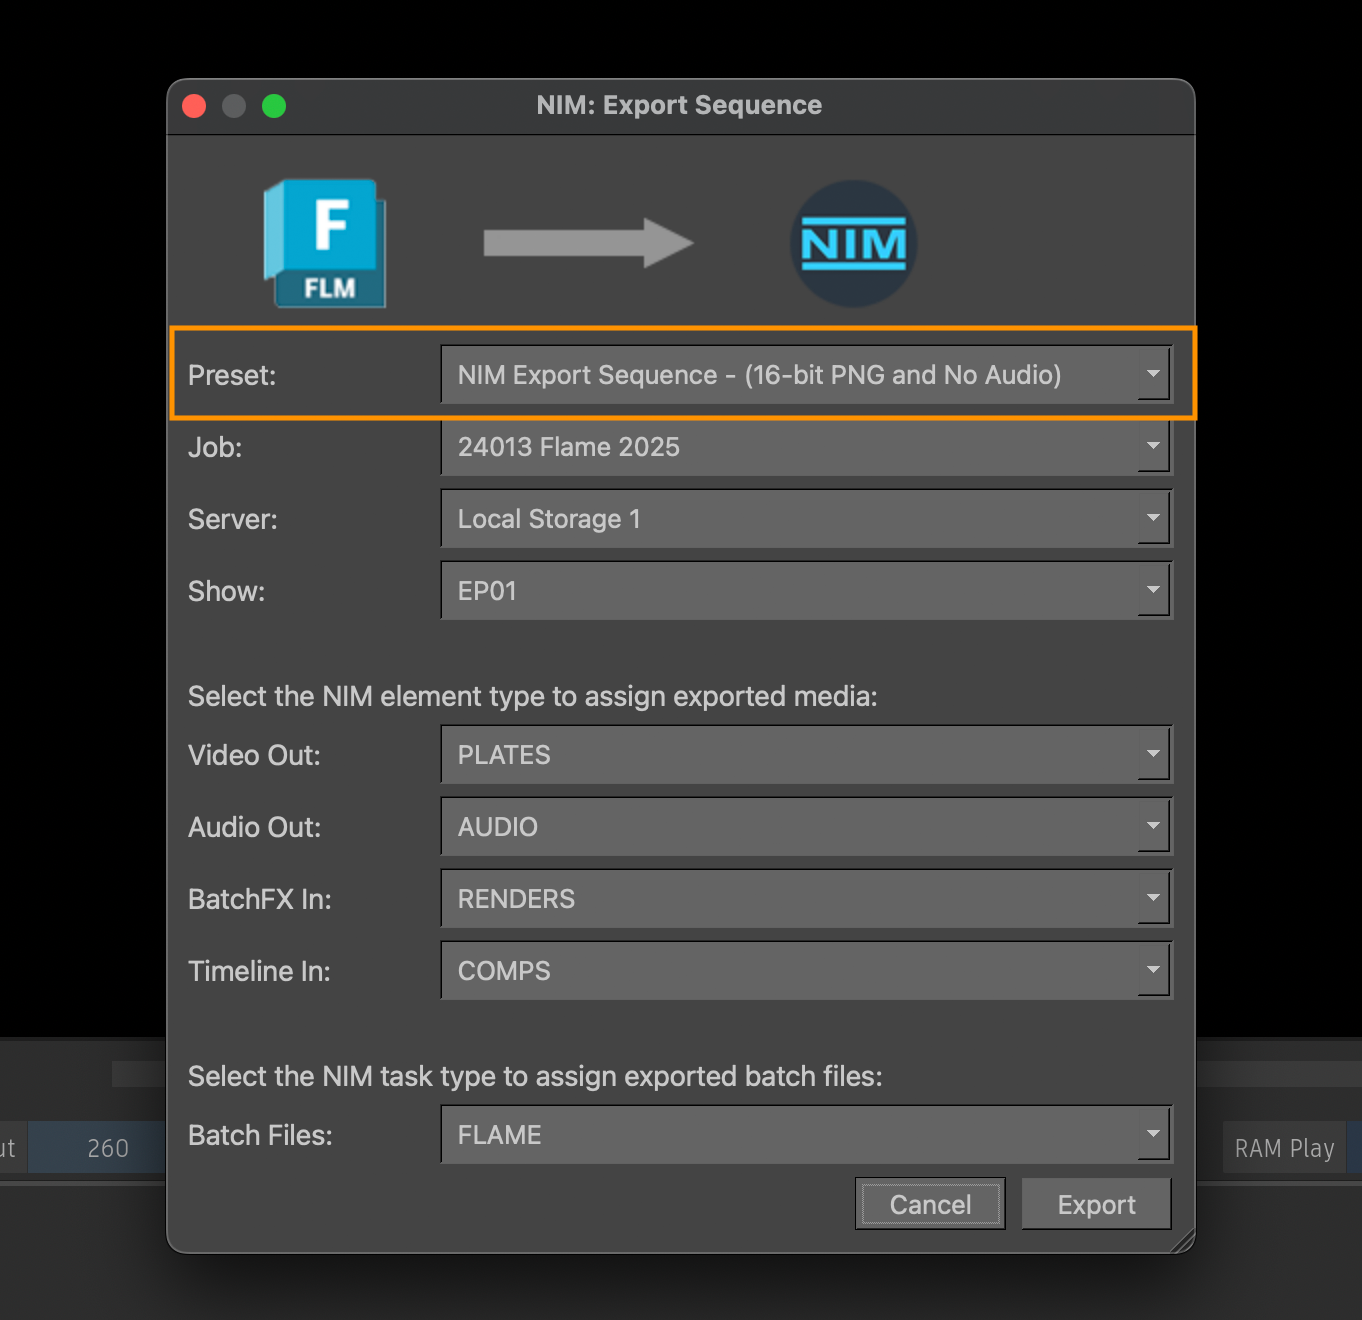
Publish Sequence
Use Publish Sequence to export an existing Flame timeline to NIM. This action is essentially the same as using the standard Flame Export option for a Sequence Publish with additional functionality built-in to link with NIM project structures and shots. What this means is that the export will follow the rules established by the Export Preset including what items are exported. By default the NIM sequence preset exports the following:
Video |
The video files to be exported from the timeline clips. |
Audio |
The audio files to be exported from the timeline clips. |
BatchFX In |
The Flame openClip associated with the input node of the batchFX file. (Source OpenClips) |
Timeline In |
The Flame openClip associated with the shot clip on the timeline. (Batch OpenClips) |
Batch Files |
The batch file associated with each timeline version. |
Publishing a sequence will create new shots in a NIM show if shots do not exist. If shots exist with matching shot names, NIM will associate the exported shots with the corresponding NIM shots. The exported elements and files will then be logged in NIM for each corresponding shot.
Rename Shots
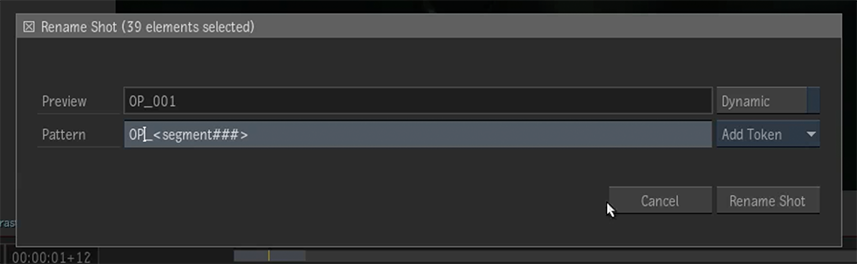
The first step before publishing a sequence is to ensure that all clips on the timeline have a shot name. This is different than the asset name which is set by default based on the source media name. To rename shots in Flame, select the shots on the timeline, right click, and choose Rename Shot from the popup menu.
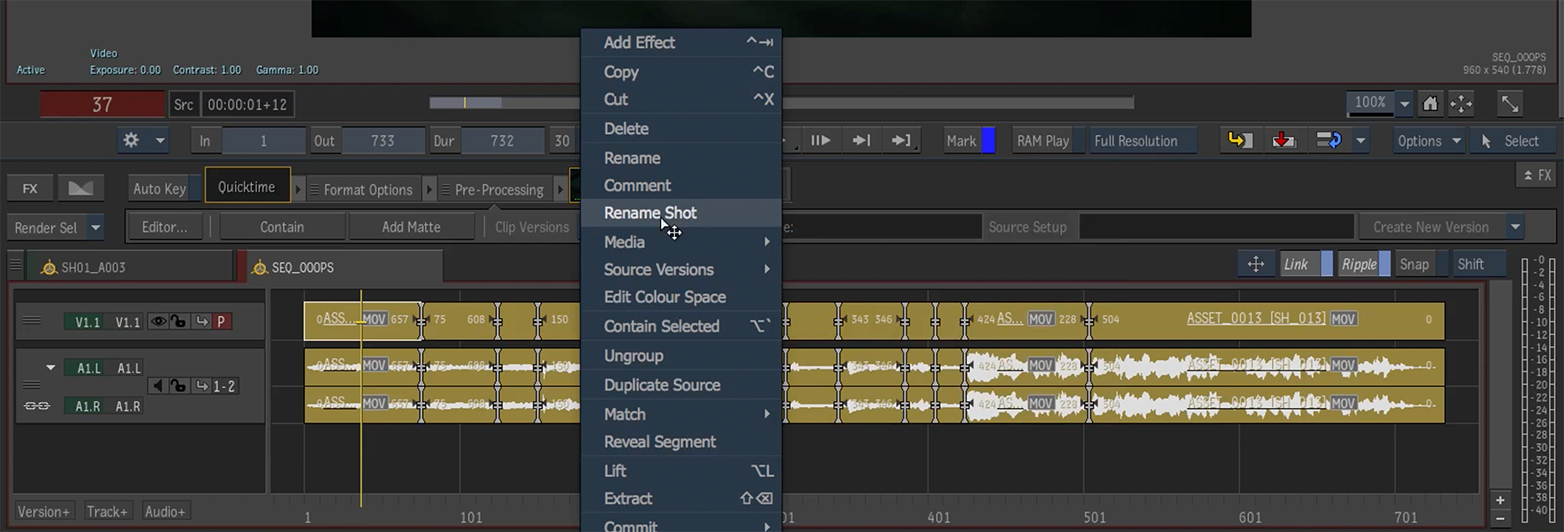
In the Rename Shot dialog, the desired shot names can be set including an auto-incrementing value to rename an entire sequence at once. In the below example, the token <segment###> is used to include the segment number of each shot with a 3 digit pad. A preview of the resulting shot name is shown above the input field. Each shot on the timeline needs a unique name in the sequence. The shot names are displayed on the timeline to the right of the asset name in brackets.
Publish Dialog

Once your shots have been uniquely named, right click on the sequence you wish to export from a desktop reel or library folder and choose NIM Publish Sequence…
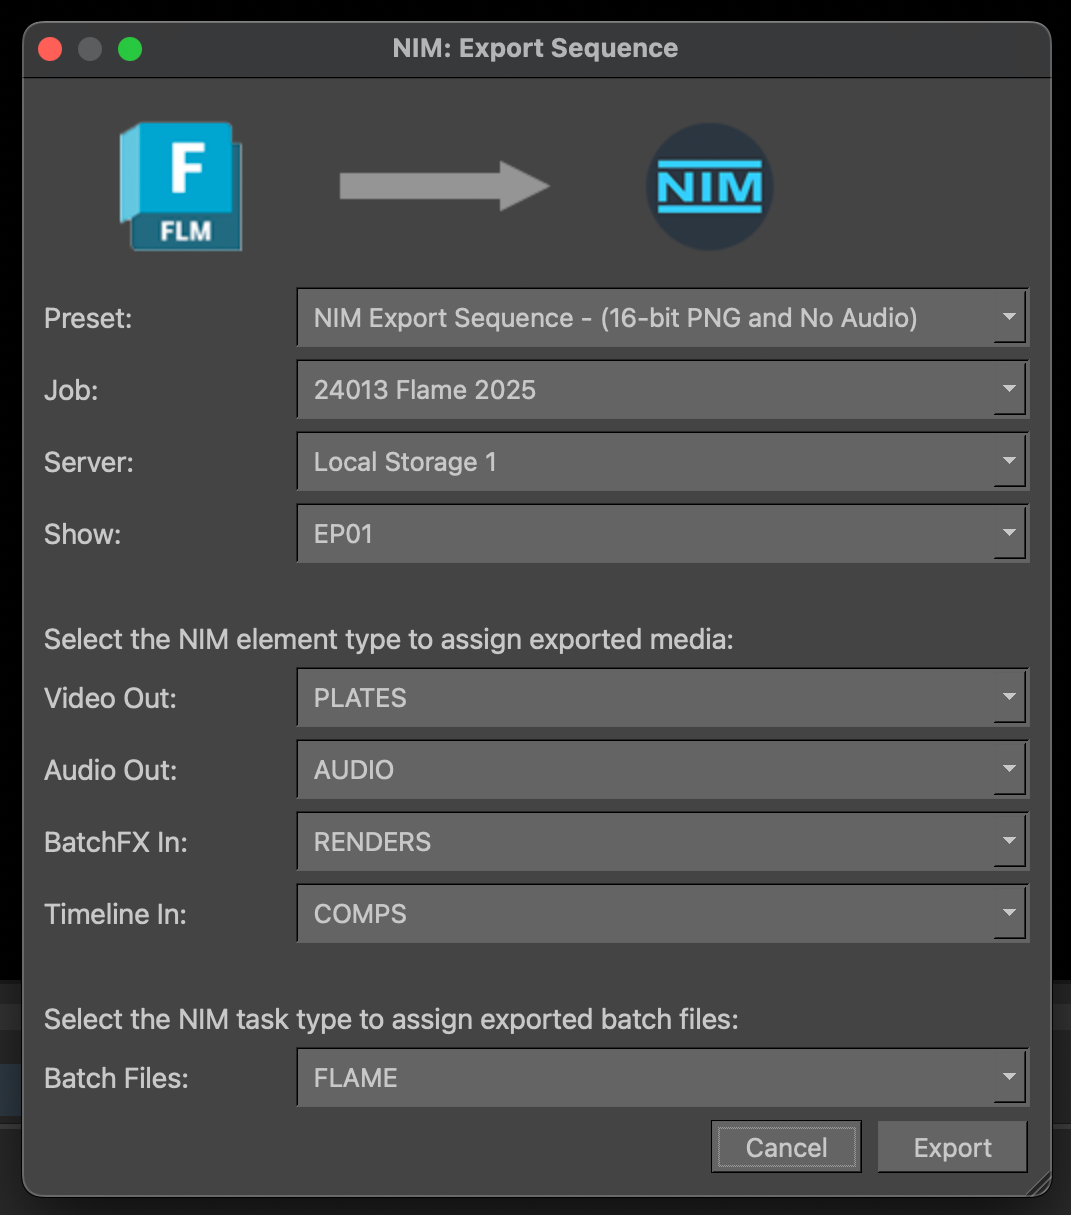
The following dialog box will appear with several dropdown options to determine the proper method of export.
Export Settings: These settings are used to determine the export preset and location for the sequence.
Export Preset |
The list of available export presets. The selected export preset is used to determine the exported media setting including file types and locations. |
Job |
The list of jobs the user is current assigned to. Select the appropriate job for the sequence. |
Server |
The list of servers attached to the job. The job server which the export should write the sequence files to. If no servers are present the job may not be online. Please bring the job online before exporting files. |
Show |
The list of shows for the selected job. Select the show the sequence is to be exported to. |
Element & File Associations: These settings are used to determine the NIM element type association with the exported files. These associations are used when round-tripping media back onto the Flame timeline.
For Example
If the “Timeline In” element is associated with the “COMP” element type, and a Nuke compositor logs their render in NIM with a “COMP” element type, when Scan For Versions is selected in Flame, the openClip will be updated with all files on the shot that have the matching “COMP” element type. The Nuke render will now appear in the version list for the shot on the Flame timeline.
Video |
The list of NIM element types. Select the element type to associate with the exported video files. |
Audio |
The list of NIM element types. Select the element type to associate with the exported audio files. |
BatchFX In |
The list of NIM element types. Select the element type to associate with the source openClip file for each shot. |
Timeline In |
The list of NIM element types. Select the element type to associate with the batch openClip file for each shot. |
Batch |
The list of NIM task types. Select the task type to associate with the batch file. |
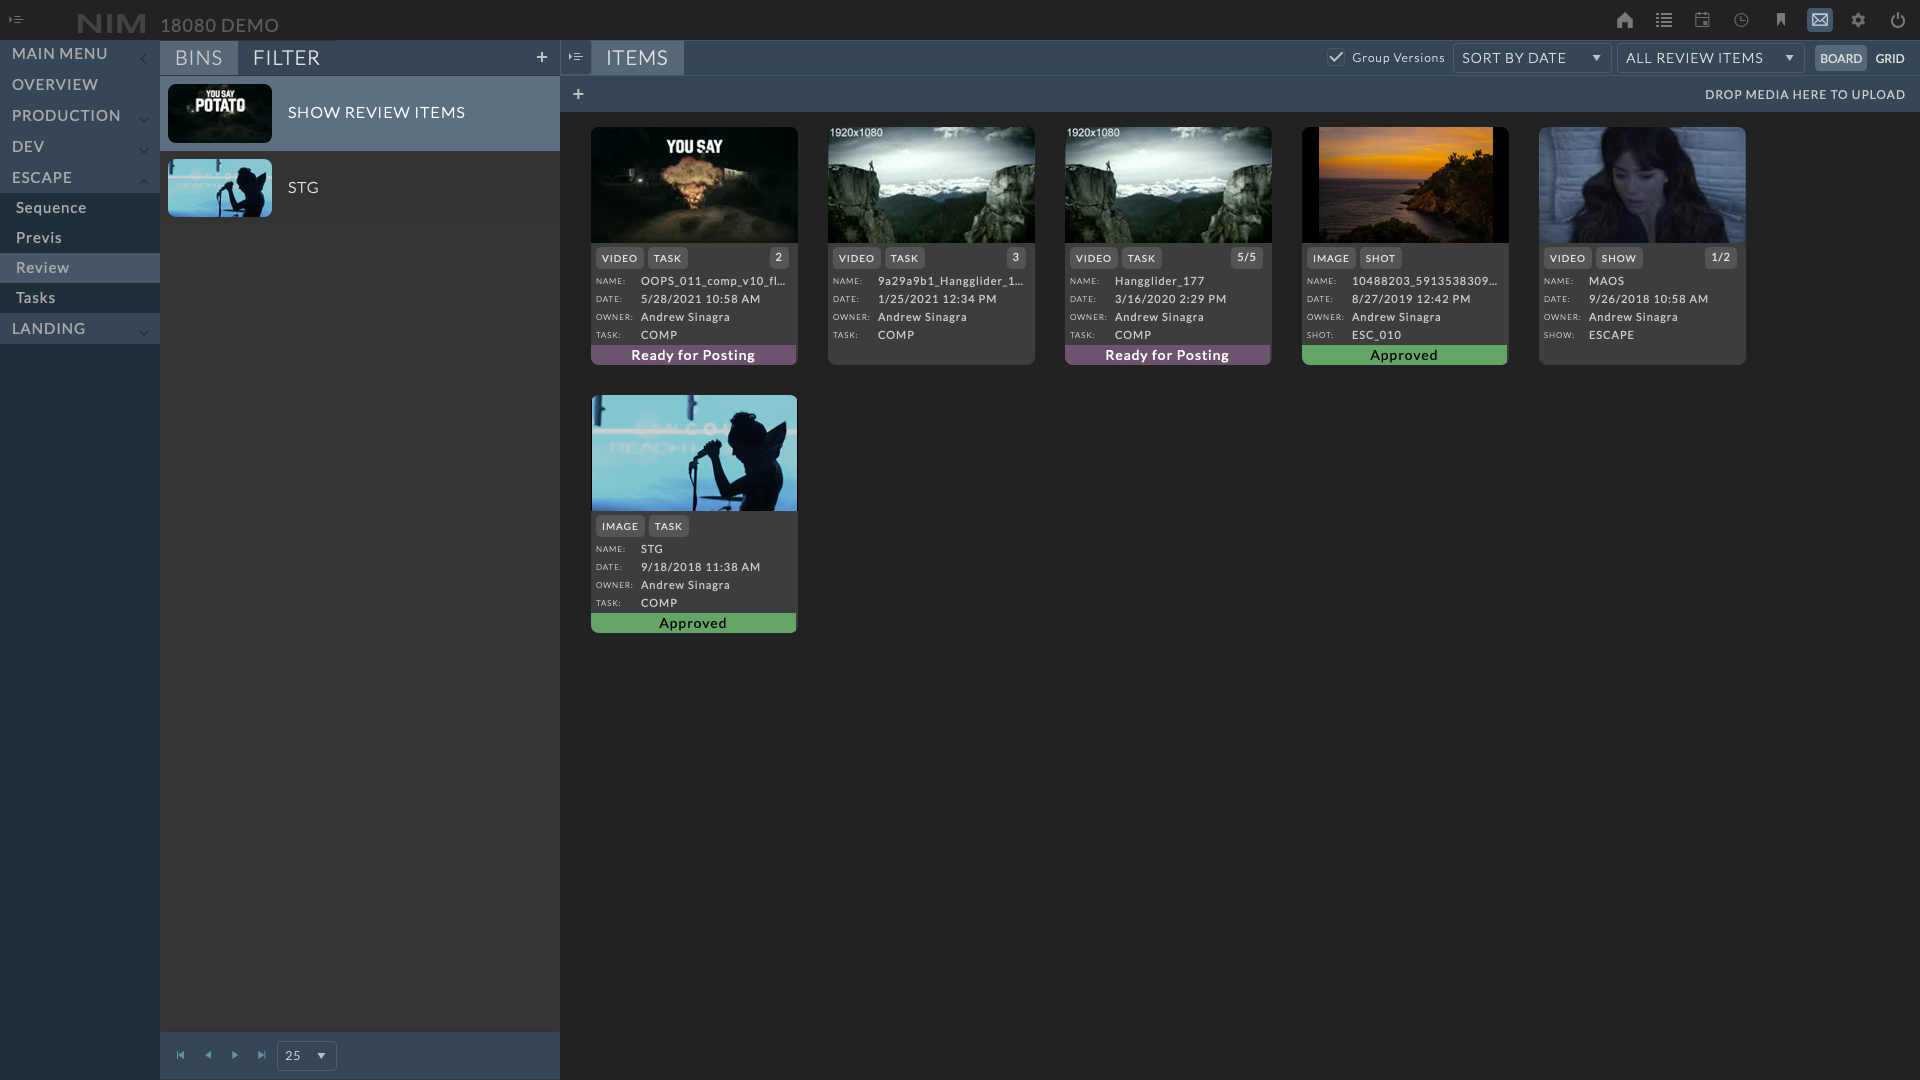
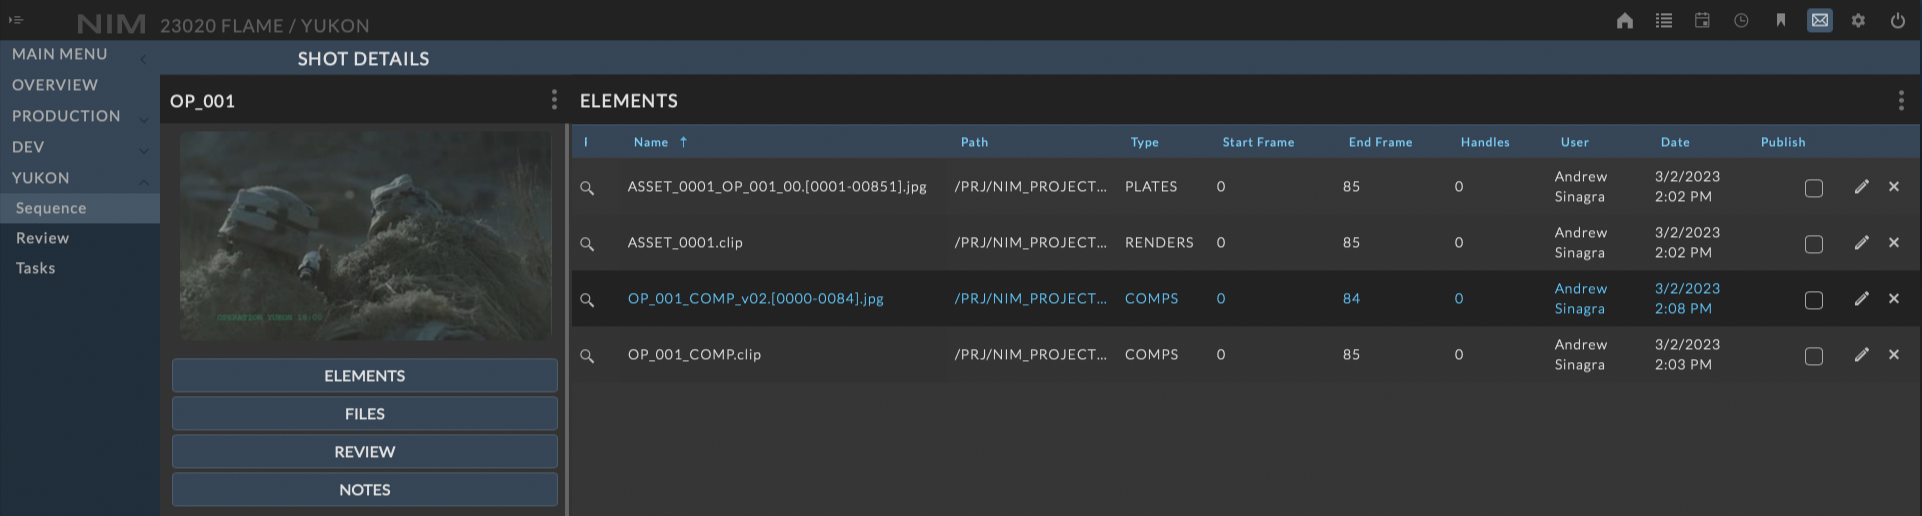
When the sequence export is complete, the newly exported shots will exist in the selected show in NIM along with updated shot icons and frame length.
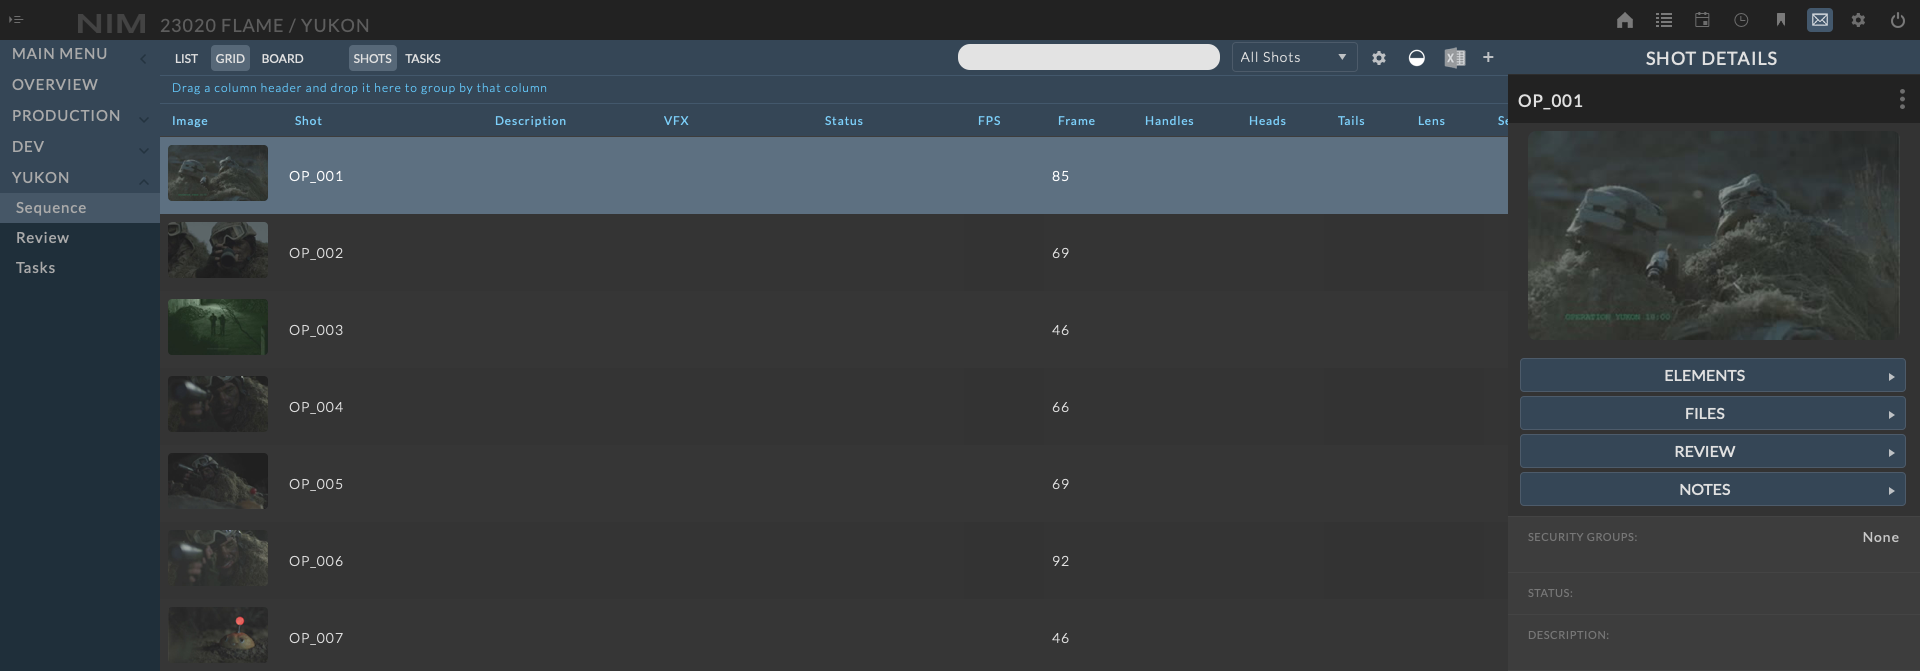
Selecting the shot information in NIM and navigating to the elements list will display all exported elements for that particular shot.
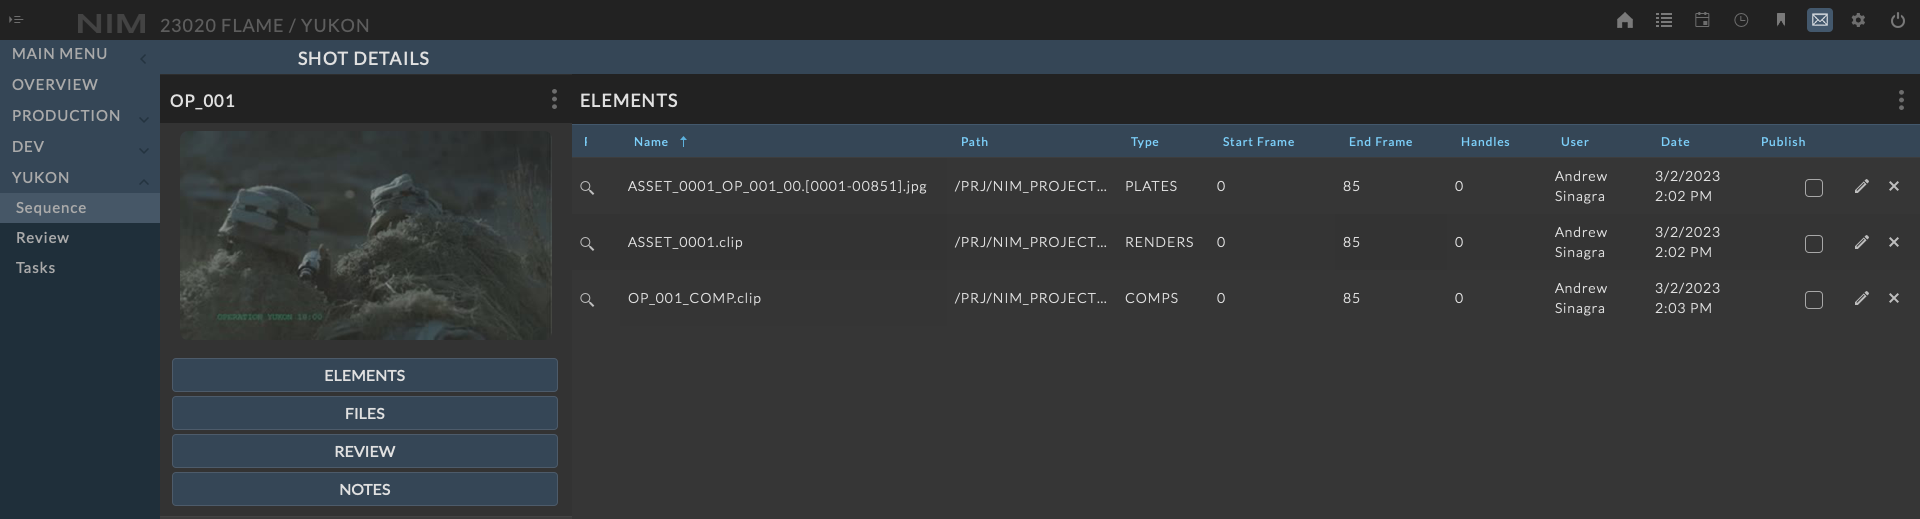
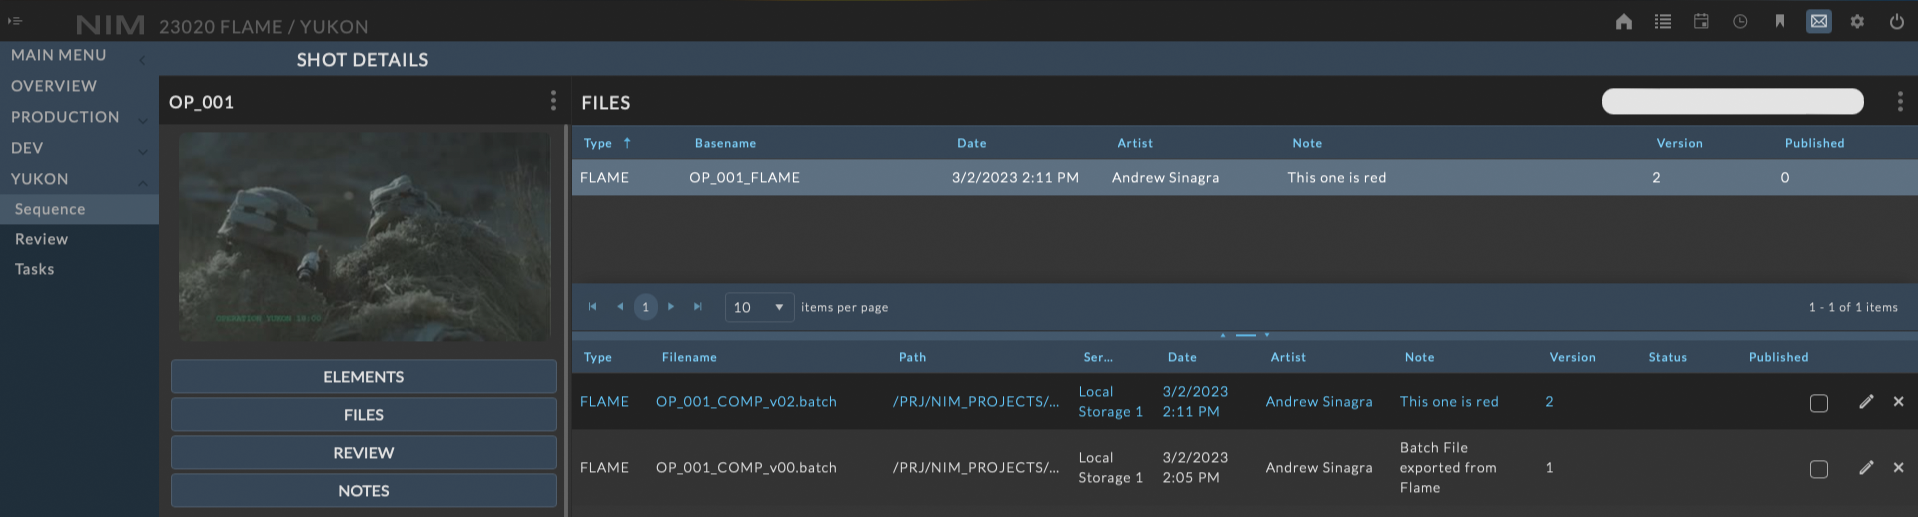
Selecting the shot information in NIM and navigating to the files list will display all exported batch files for that particular shot.
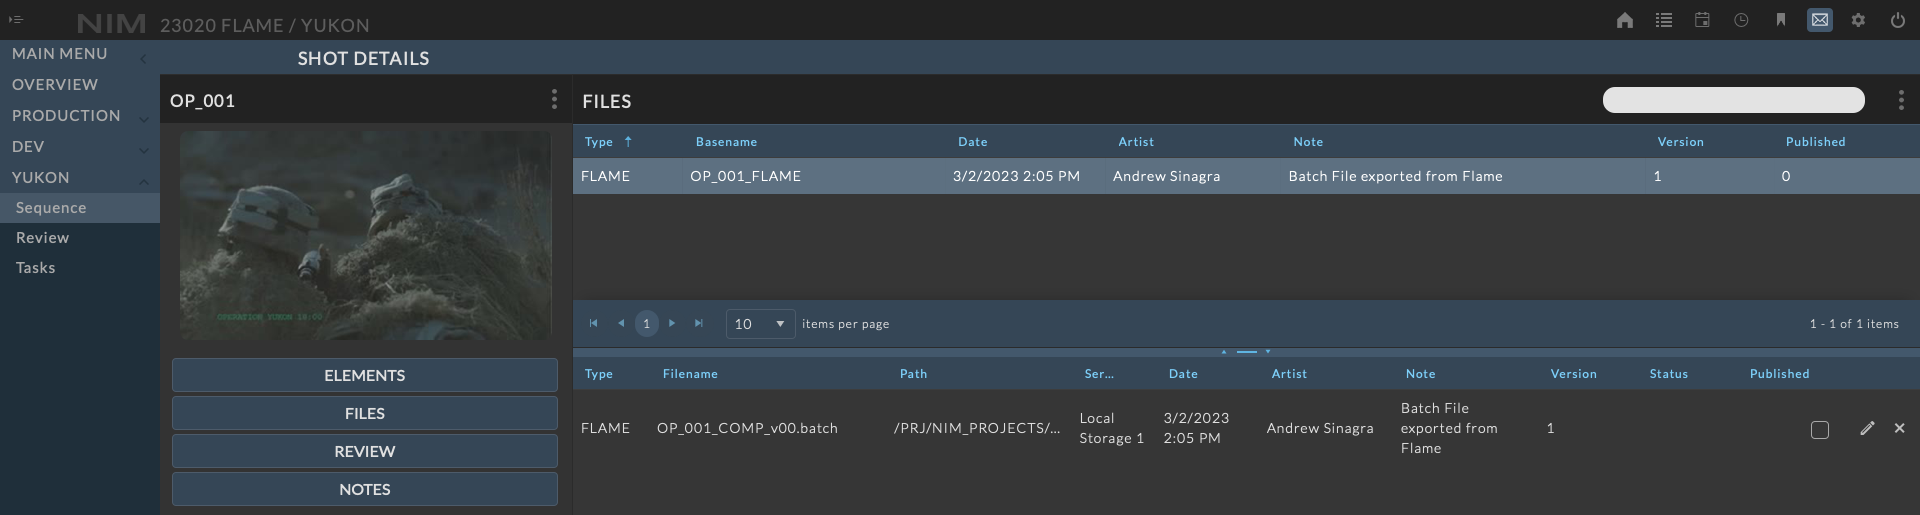
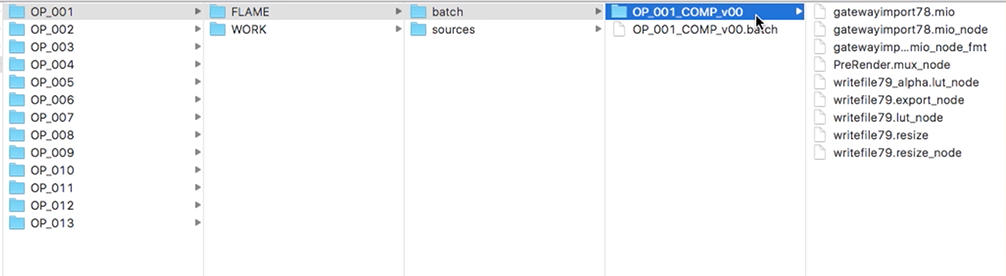
On the corresponding project server, the files that have been exported will be properly organized according to the NIM project structure selected when the job was brought online.
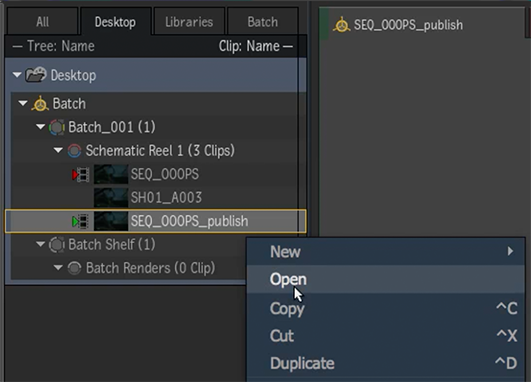
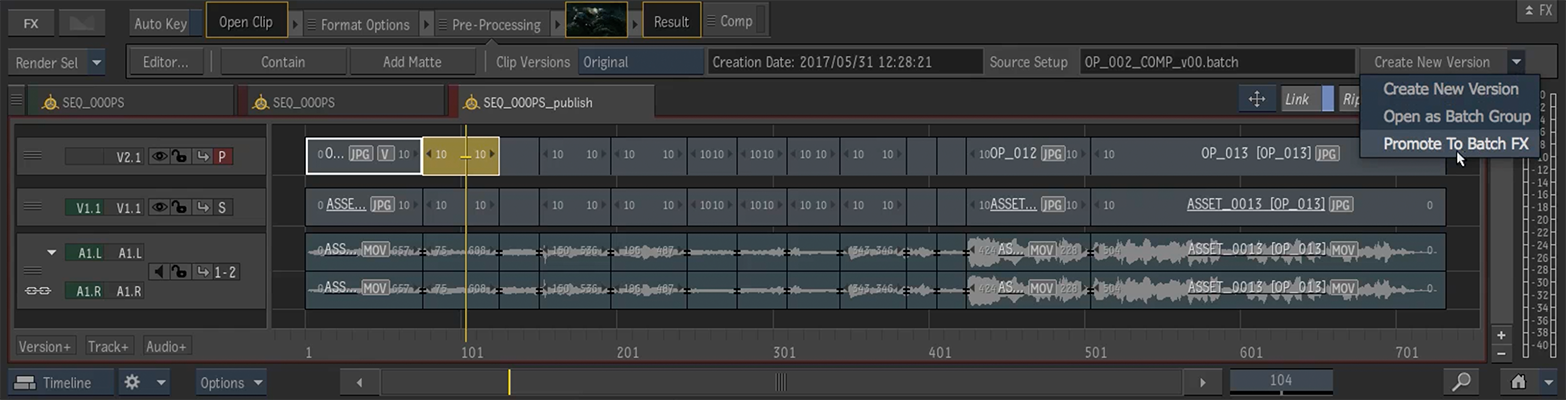
Flame will create a new version of the sequence with an “_publish” suffix. Right click on this item to open the new sequence. The bottom track will point to the original source media, and the top track will point to the new video files exported on disk. From the top track, new versions of shots can be created as well as round-tripped through NIM to automatically update versions.
Timeline Version
When publishing a sequence to NIM, file associations are made that allow for the logging for timeline version updates as well as round-tripped through NIM to automatically update versions. To use timeline versioning, start by opening the “_publish” clip created during the publish process. Once open, select the shot you wish to version and press the “Create New Version” at the top right of the timeline. This will load a batch schematic to start making changes to the comp.
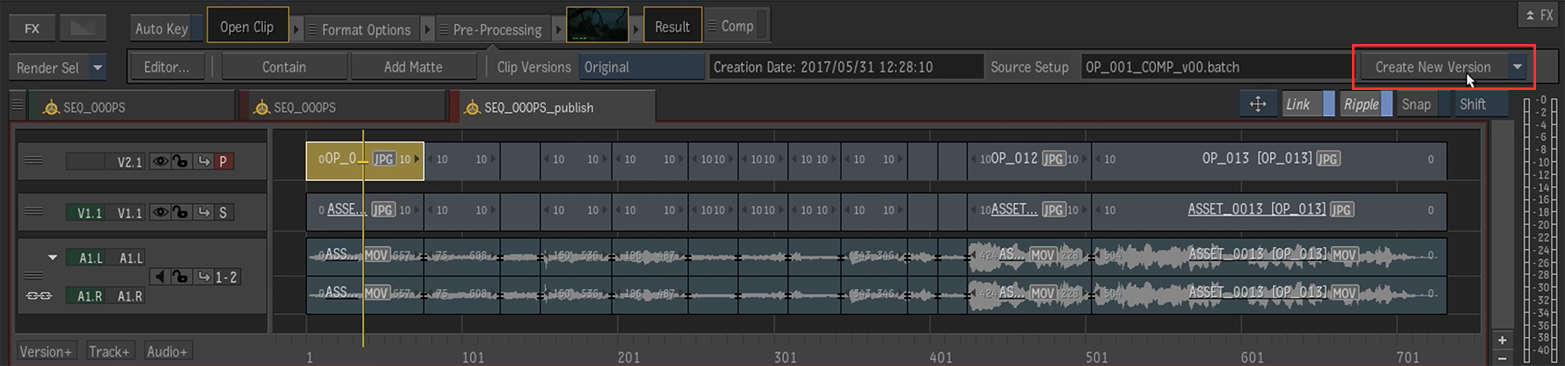
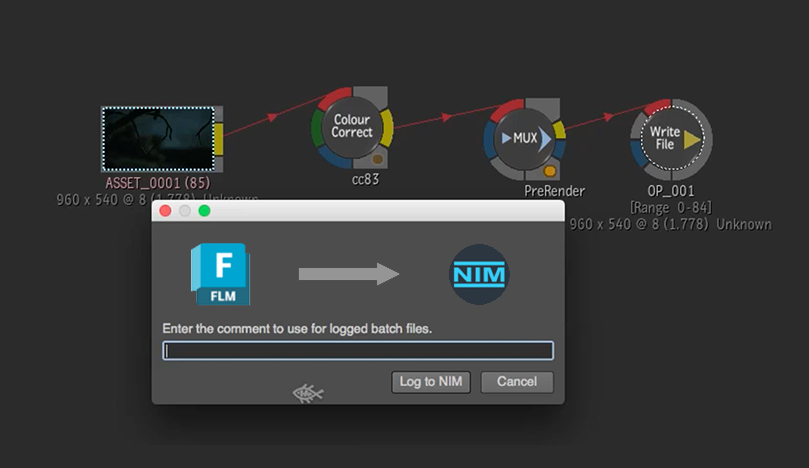
Once the changes have been made, select the Return button. A dialog will appear to enter a comment for the corresponding batch file. When done entering the comment, click the “Log to NIM” button.
The changes will be rendered to the appropriate location on disk based on the Export Preset selected during the Publish Sequence and the NIM project structure selected for the job.
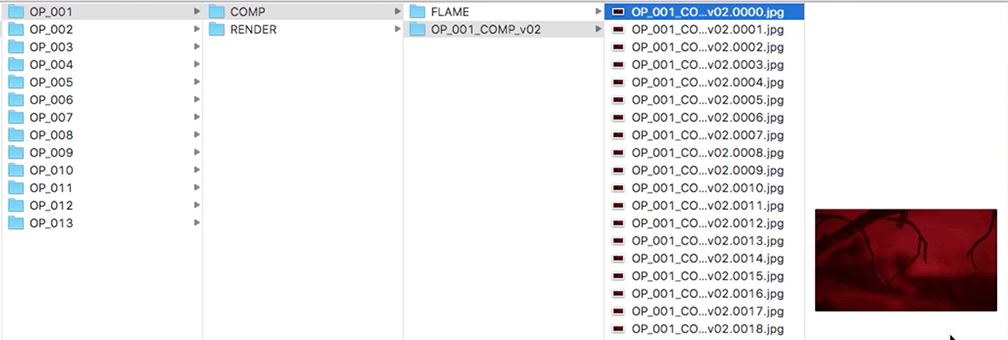
The output will be logged as a new element in NIM under the corresponding shot…
and a new file version will be created for the updated batch.
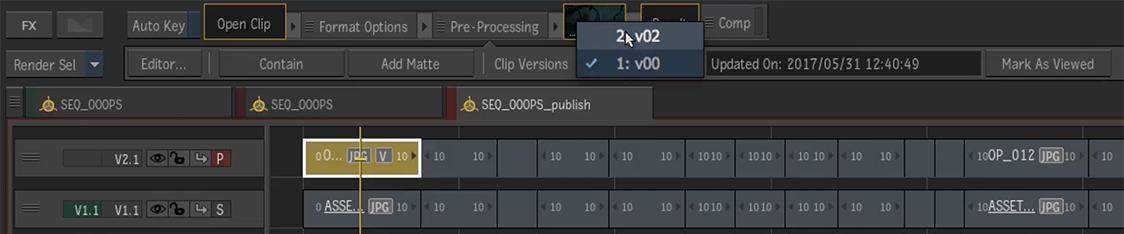
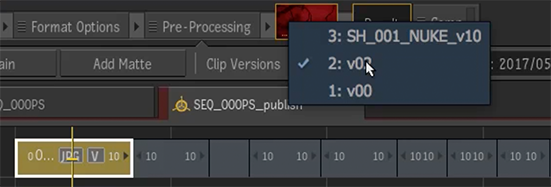
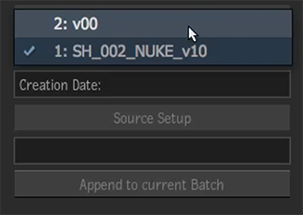
On the timeline, use the Clip Versions dropdown to select the version of the shot you wish to view.
Scan for Versions
Use Scan For Versions to update openClips exported from Export Sequence with NIM elements. NIM elements are matched to the exported openClips based on the element type selected at the time of export. This function requires that the sequence to be updated has been previously exported using the NIM Publish Sequence action to establish the correct file associations.
For Example
If the “Timeline In” element is associated with the “COMP” element type, and a Nuke compositor logs their render in NIM with a “COMP” element type, when Scan For Versions is selected in Flame, the openClip will be updated with all files on the shot that have the matching “COMP” element type. The Nuke render will now appear in the version list for the shot on the Flame timeline.
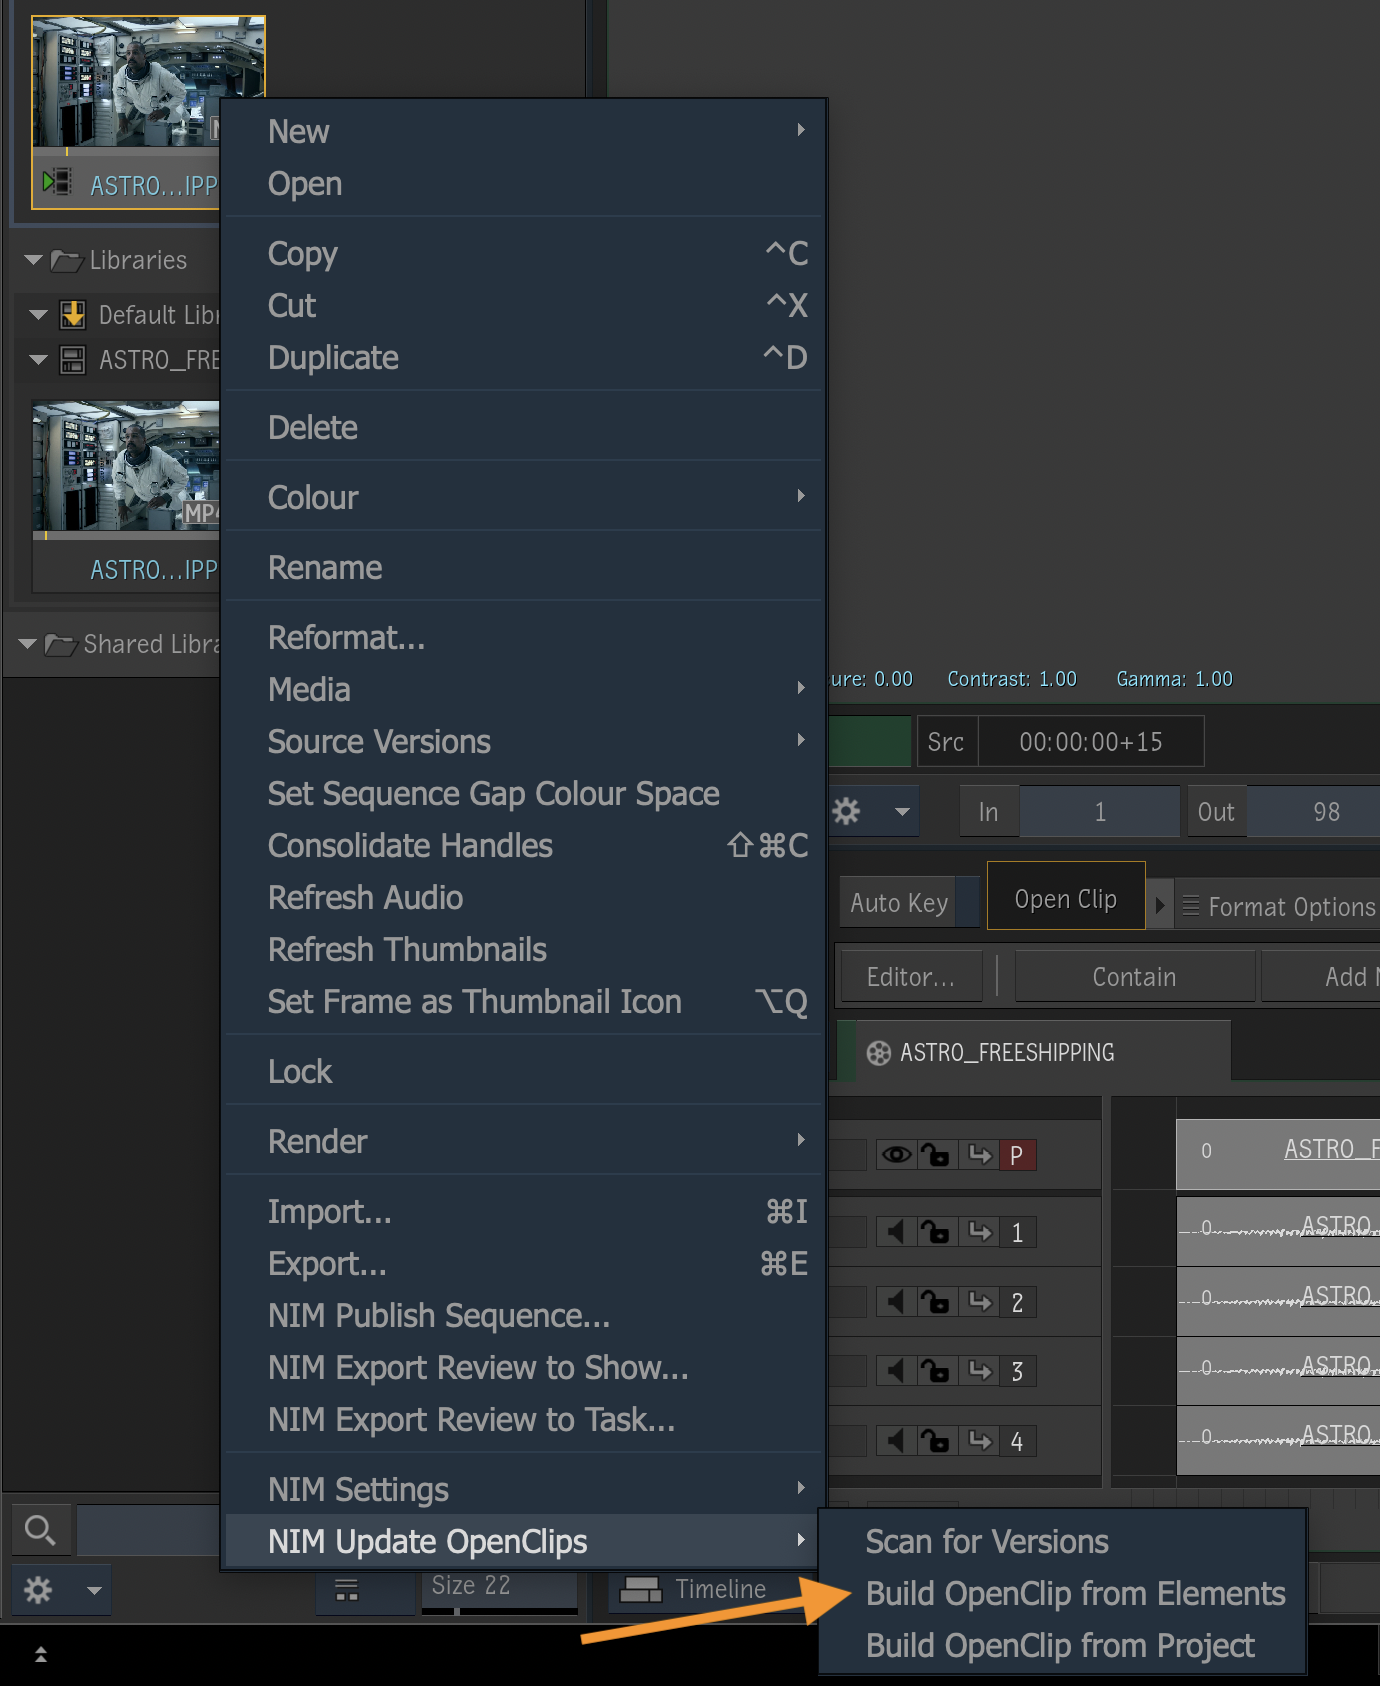
To scan for versions, right click on the clip you wish to update in the desktop reel or library folder and choose NIM Update OpenClips / Scan For Versions.
A dialog will appear with dropdown options to select the job and show to scan for new versions of matching element types. Click the Scan For Versions button to begin.
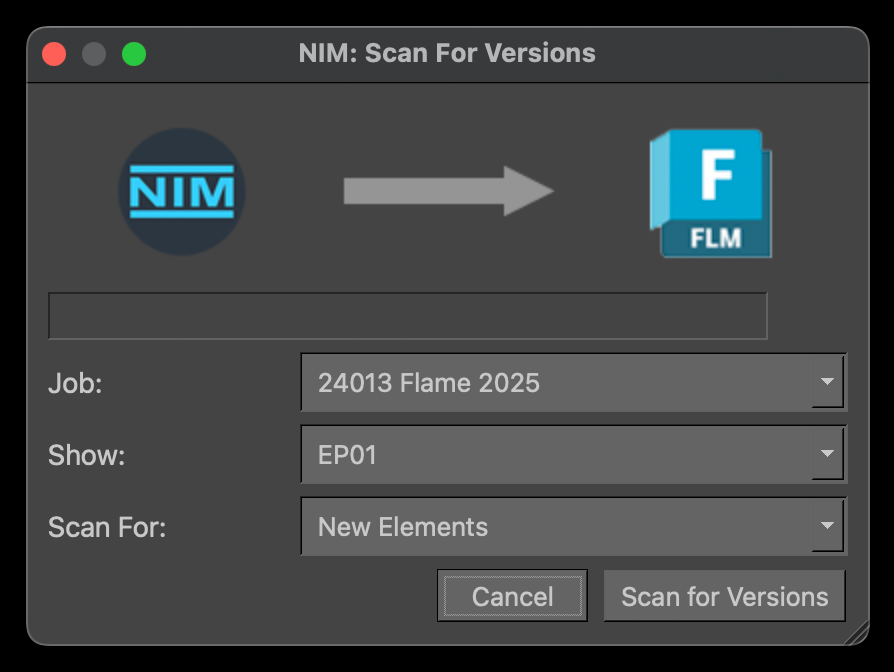
Job |
The list of jobs the user is current assigned to. |
Show |
The list of shows for the selected job. |
Scan For |
Options include New Elements which will skip any elements NIM has already attached to an open clip, or All Elements which will attempt to reattach all found elements to open clips. |

When the scan is complete, a dialog will appear listing the number of items found.
If any found items could not be including in the openClip, a message will appear indicating that some items have not been included.
Timeline
Elements types matched with the “Timeline In” exported during the Publish Sequence will appear as a timeline version option for the corresponding shot. Use the Clip Versions dropdown to select the version of the shot you wish to view.
BatchFX
Shots that have been promoted to batchFX using the “Promote to BatchFX” option can be updated by associations with the “BatchFX In” field in the Publish Sequence options.
When scanning for new versions, matching “BatchFX In” element types will update the Batch FX Input Node with new versions found.
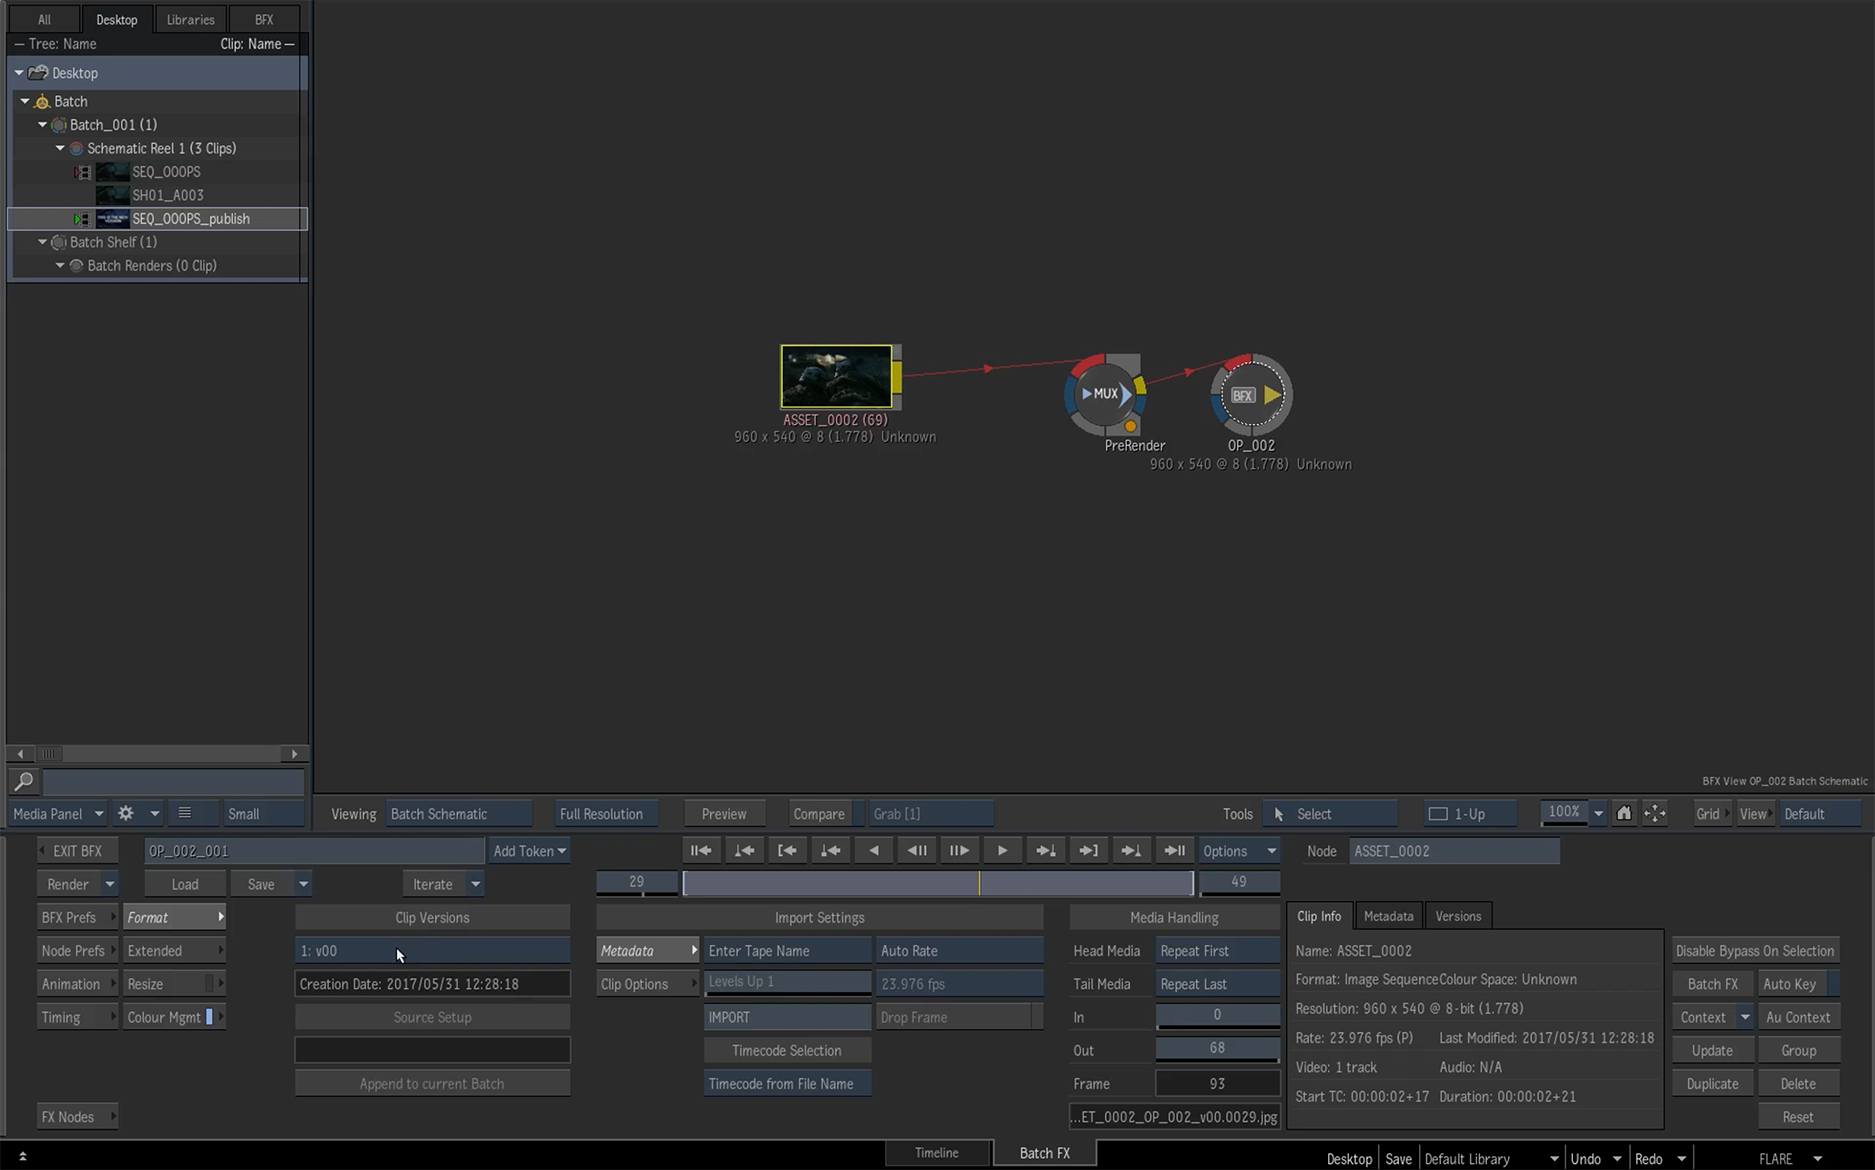
After the scan is complete, it may be necessary to right click on the Batch FX input node and select “Reload” to update the version list.
After the clip is reloaded, new versions can be selected using the Clip Versions dropdown.
Build OpenClips from Elements
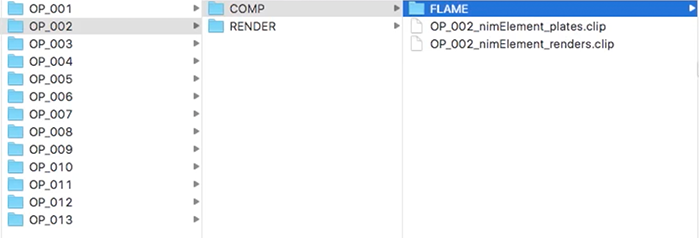
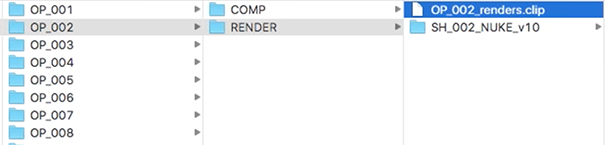
New OpenClip files can be generated from NIM elements logged on shots. Elements of matching NIM element types will be consolidated into a single OpenClip in the NIM SHOT_COMPS defined in the job’s project structure with the following naming convention: <shot_name>_nimElement_<element_type>.clip
To build open clips from NIM elements, right click on a clip in the desktop reel or library folder and choose NIM Update OpenClips / Build OpenClips from Elements.
A dialog will appear with dropdown options to select the job, server, and show to scan for elements. Click the Build Open Clips button to begin searching NIM for matching element types.
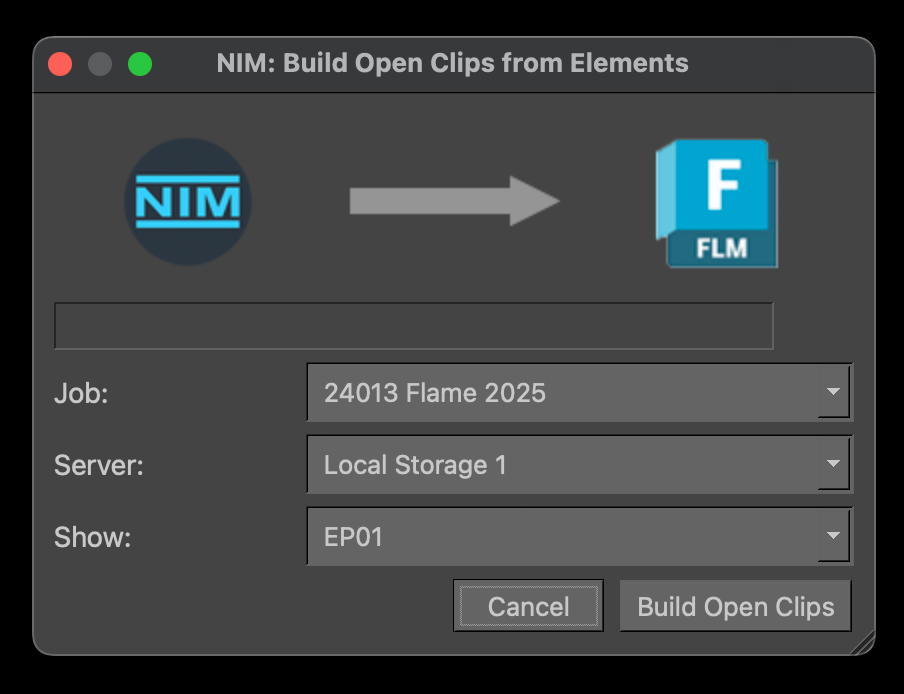
Job |
The list of jobs the user is current assigned to. |
Server |
The list of servers associated with the job. Select the server you wish to scan. |
Show |
The list of shows for the selected job. Select the show with the shots to scan. |
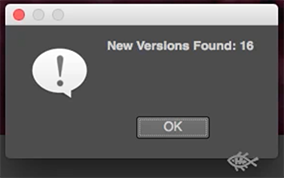
When the scan is complete, a dialog will appear listing the number of items found.
If any found items could not be including in the openClip, a message will appear indicating that some items have not been included.
New .clip files will be created for each element type found.
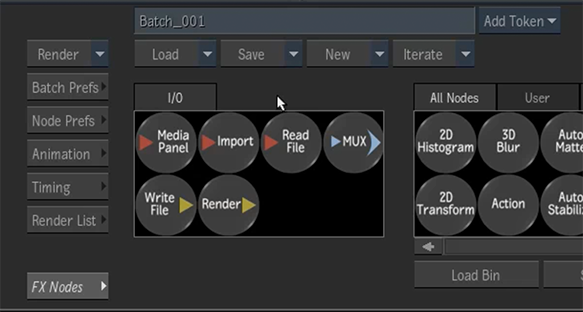
To start working with the newly created clips, add a Read File node to a comp.
A dialog will appear asking to select the file. Choose the corresponding .clip file for the element type you wish to use.
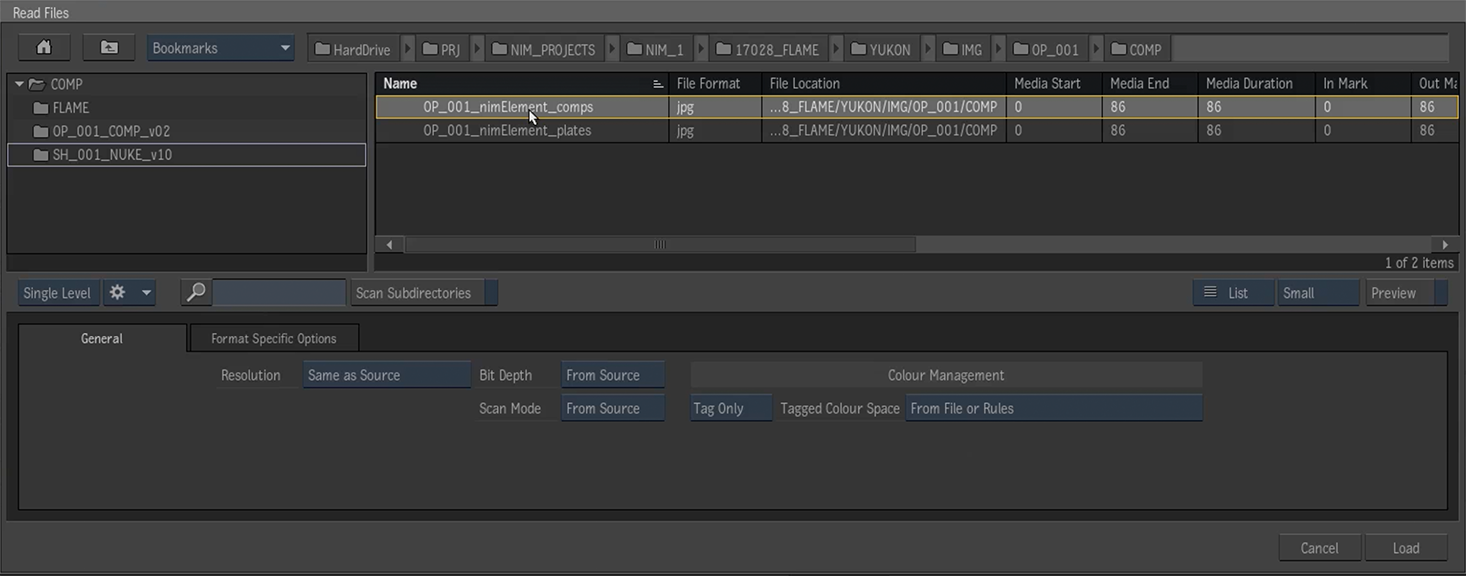
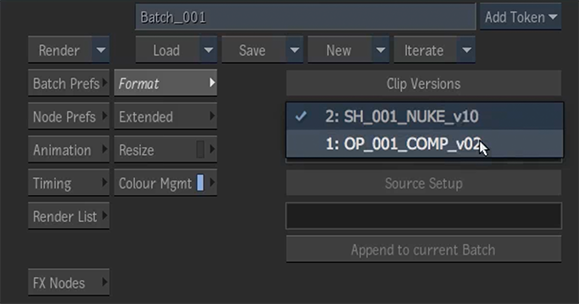
Once imported, use the Clip Versions dropdown to select the version to be displayed.
All files with matching element types and compatible formats will be included in the list of versions.
To update the OpenClips based on NIM elements, simply run the Build OpenClips from Elements scan again. Existing clips will be updates and new clips will be created for any elements that did not have a previous clip file.
Build OpenClips from Project
If no elements are logged on shots in NIM you can still use Build OpenClips from Project to create .clip files based on the NIM project structure. This action scans the NIM project structure SHOT_RENDERS, SHOT_COMPS, and SHOT_PLATES folders, as defined by the project structure template used when the NIM job was brought online. It will then create a new .clip file containing all files in the corresponding folder using the naming convention: <shot_name>_<nim_special_folder>.clip.
To build open clips from a NIM project structure, right click on a clip in the desktop reel or library folder and choose NIM Update OpenClips / Build OpenClips from Project.
A dialog will appear with dropdown options to select the job, server, and show to scan for files. Click the Build Open Clips button to begin searching the project structure.
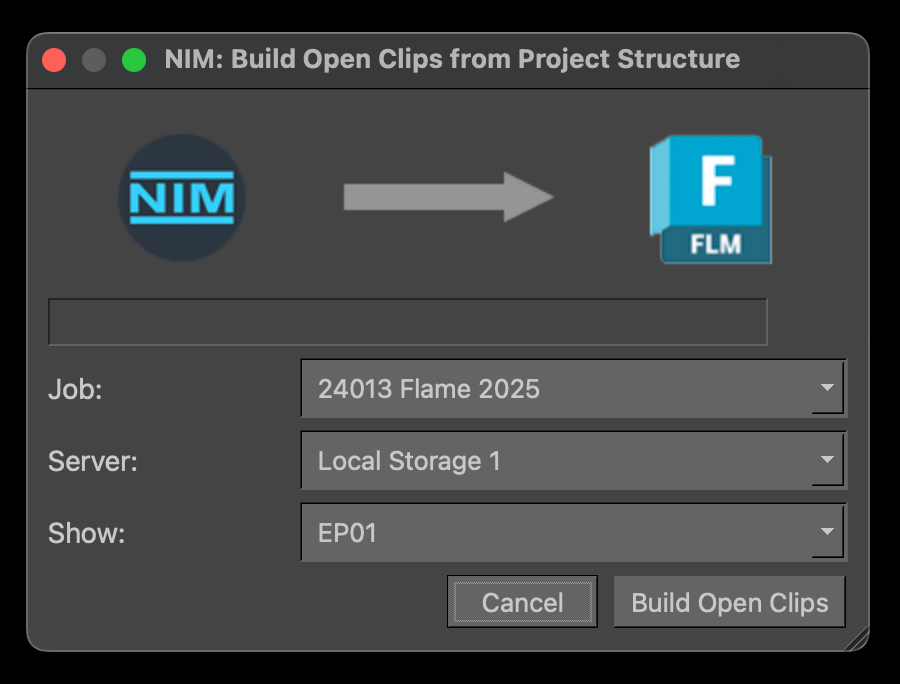
Job |
The list of jobs the user is current assigned to. |
Server |
The list of servers associated with the job. Select the server you wish to scan. |
Show |
The list of shows for the selected job. Select the show with the shots to scan. |
When the scan is complete, a dialog will appear listing the number of items found.
If any found items could not be including in the openClip, a message will appear indicating that some items have not been included.
New .clip files will be created for each element type found.
Working with these .clip files is the same as ones built from elements. To start working with the newly created clips, add a Read File node to a comp. A dialog will appear asking to select the file. Choose the corresponding .clip file for the files you wish to use. Once imported, use the Clip Versions dropdown to select the version to be displayed. All files found in the NIM folders with compatible formats will be included in the list of versions.
To update the OpenClips based on a NIM project structure, simply run the Build OpenClips from Project scan again. Existing clips will be updates with any new files found.
Export Presets
Export presets define the file types and locations that are exported during the Publish Sequence and Export Review functions.
These export presets are created from Flames export presets and are located in the [NIM_CONNECTOR_ROOT]/plugins/Flame/presets/XXXXX folder where XXXX is the Flame major version.
If a folder matching the Flame major version is not found, the folder “_default” will be used.
The subfolders in this location are used to differentiate presets for the Publish Sequence (sequence), Export to Show (edit), and Export to Task (daily) templates.
For example:
If the current version of Flame is Flame 2022.0.1, the major version is 2022 and the connector will look for presets in the following path:
[NIM_CONNECTOR_ROOT]/plugins/Flame/presets/2022
New Preset
A new preset can be created using the standard Flame Export function.
Right click on a clip in a desktop reel or library to bring up the context menu and select “Export…”.
The Flame Export dialog will appear and in the lower panel choose the export type you wish to create. In this example the “Sequence Publish” type was selected. Dailies and Edits use the “Movie” type.

Select the “Show Advanced Options” to select the desired settings. In the Video Options tab, use the Pattern field to set the desired location for exported images. In this example the <nim_shot_plates> keyword is used. NIM will resolve this value on export to the job’s project structure template.
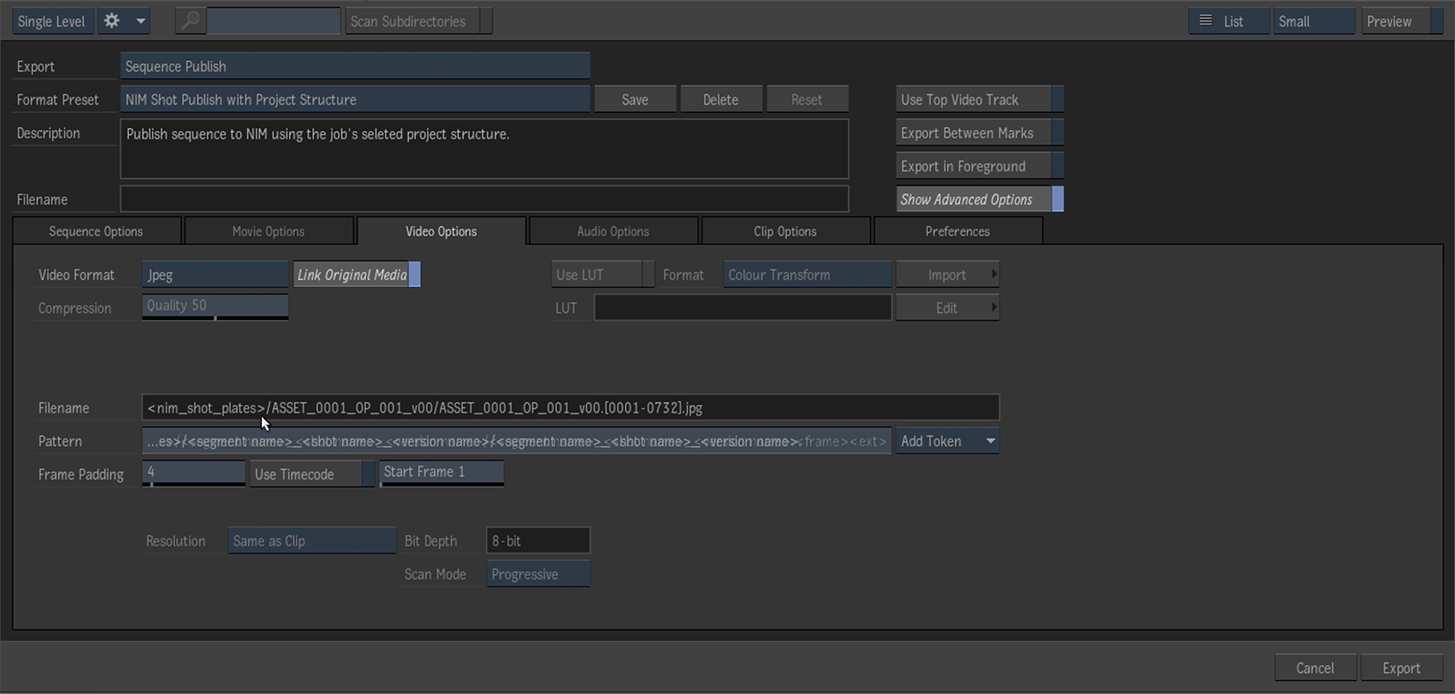
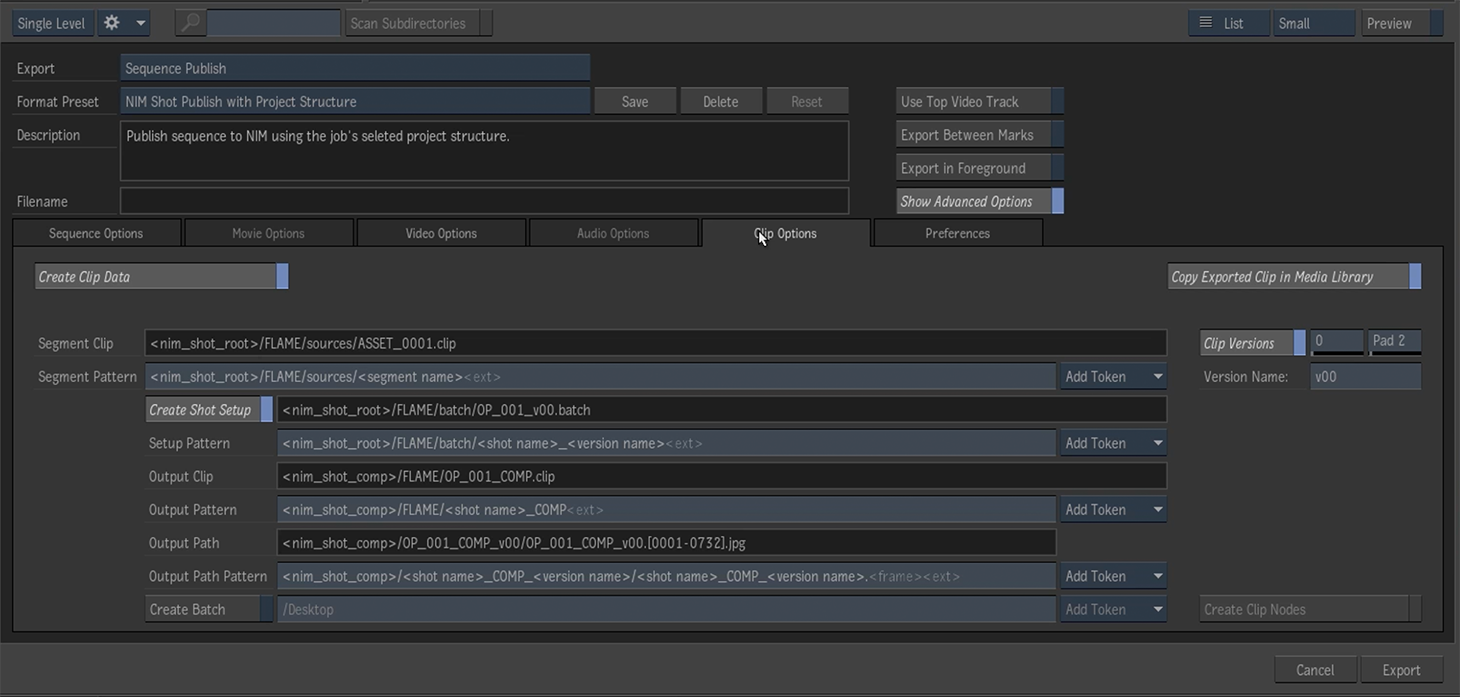
The Clip Options tab displays additional paths for associated output clips and the batch file media. Additional NIM keywords are shown here to resolve folders based on the job’s project structure template. A full list of recognized NIM keywords is available below.
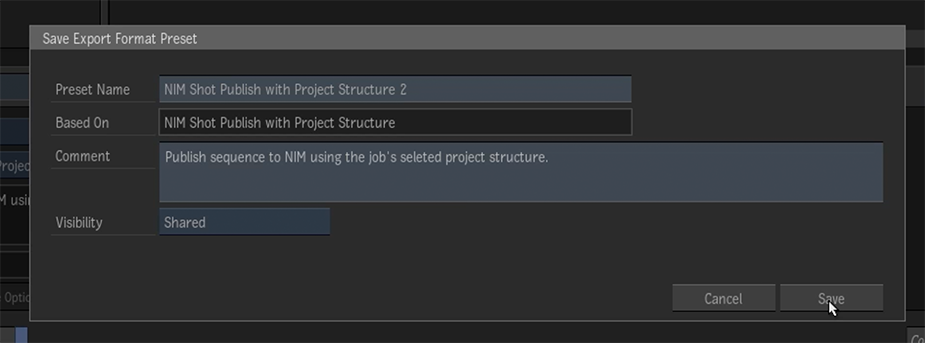
When you are done making changes, press the Save button to save the preset to disk. A dialog will appear with the option to name the preset and add a comment. Select the “Shared” option from the Visibility dropdown to share this preset across all jobs.
Once saved, the preset will exist as a XML file with a corresponding name in the shared preset path /opt/Autodesk/shared/export/presets/sequence_publish. To use this preset in a NIM connector, copy the .xml file to the appropriate [NIM_CONNECTOR_ROOT]/plugins/Flame/presets folder.
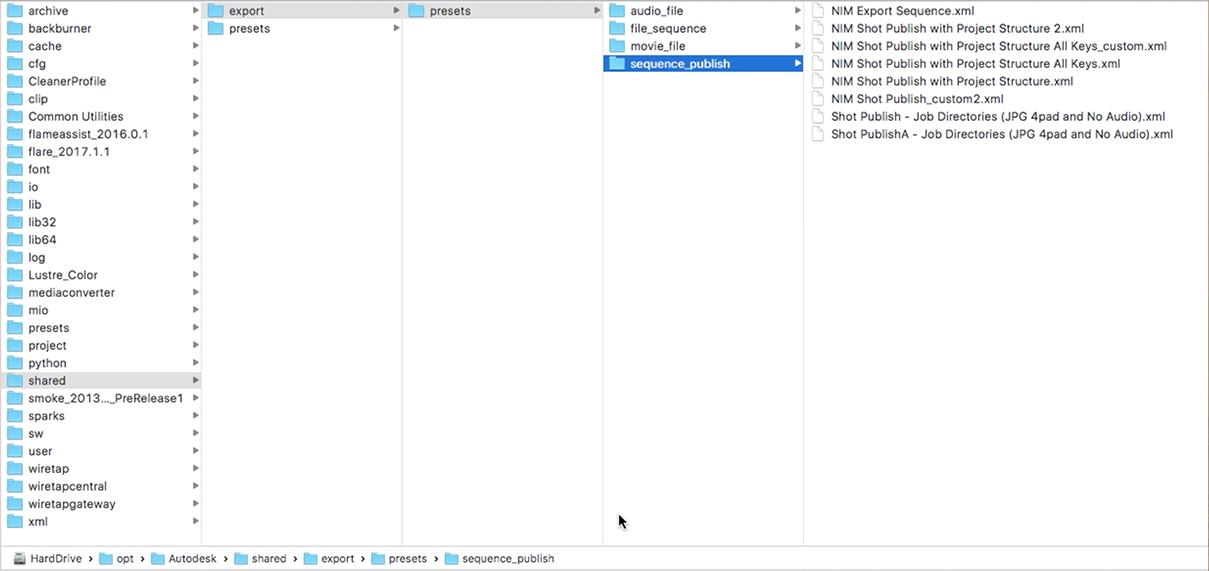
The NIM preset folder for the Flame connector is available at [NIM_CONNECTOR_ROOT]/plugins/Flame/presets. Within this directory, three subfolders exist to differentiate sequence, edit, and daily templates. Copy the new XML file to the appropriate location.

Preset Keywords
The following keywords are available in Flame for export presets paths.
Keyword |
Description |
|---|---|
<nim_job_root> |
The job root as defined by the NIM project structure |
<nim_job_root> |
The job root as defined by the NIM project structure |
<nim_job_number> |
The NIM job number |
<nim_job_name> |
The NIM job name |
<nim_show_root> |
The show root as defined by the NIM project structure |
<nim_show_name> |
The NIM show name |
<nim_shot_root> |
The shot root as defined by the NIM project structure |
<nim_shot_plates> |
The plates root as defined by the NIM project structure |
<nim_shot_render> |
The render root as defined by the NIM project structure |
<nim_shot_comp> |
The comp root as defined by the NIM project structure |