Job Crew
Job Crews determine which users are eligible to be assigned to tasks within the job. Additionally, being a crew member determines who has access to the job based on permissions. Users added to the crew will have the job appear in their dashboard, as well as NIM Connectors if the Job Status is ACTIVE. If jobs are marked as private, only users added to the crew will have access. The Job Crew list is also the location to set override user rates and hours for actualization purposes.
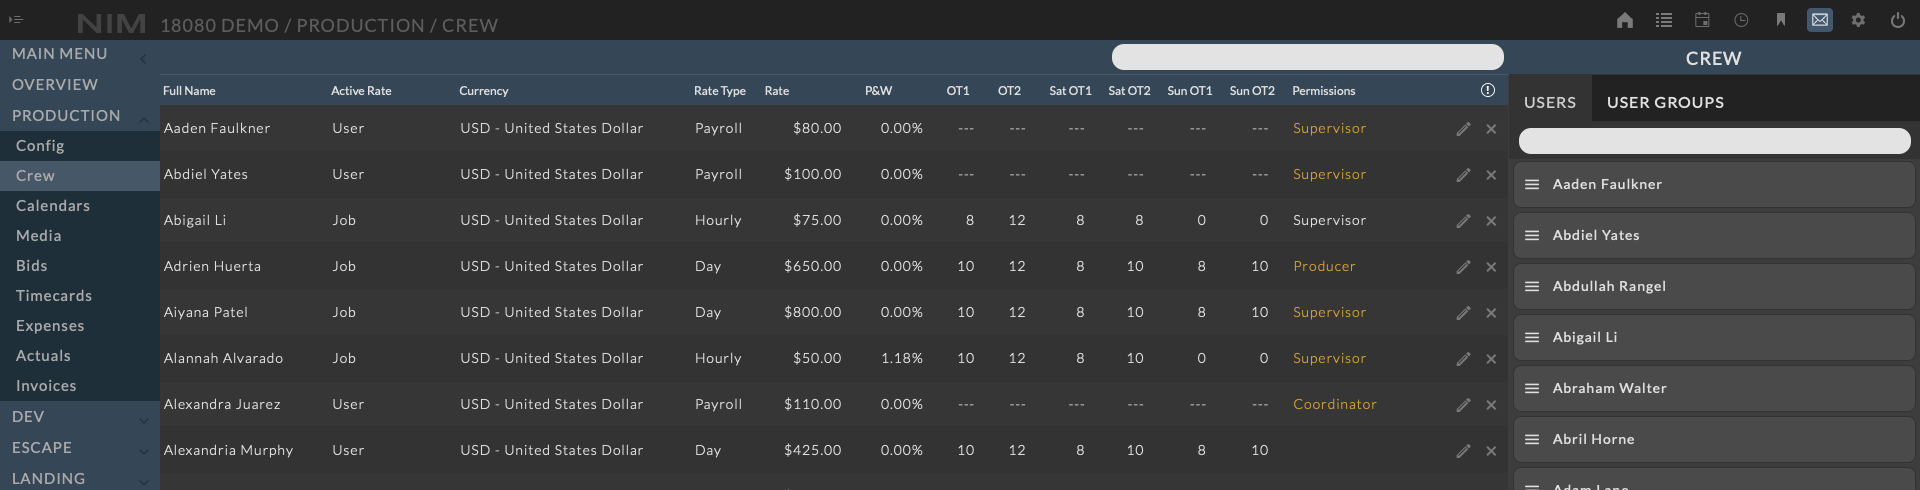
To access the job crew, navigate to Production > Crew from the job menu.
Note
Users with access to the studio job list will have access to all non-private jobs.
Adding Users
Crew can be added to the job by dragging and dropping users from the Add Job Users panel. There are two tabs in the panel, Users and User Groups. The user lists includes all users in NIM and while the Groups tab is a list of all defined user groups. Either list can be filtered by entering the user or group name in the search field at the top of the Add Job Users panel.
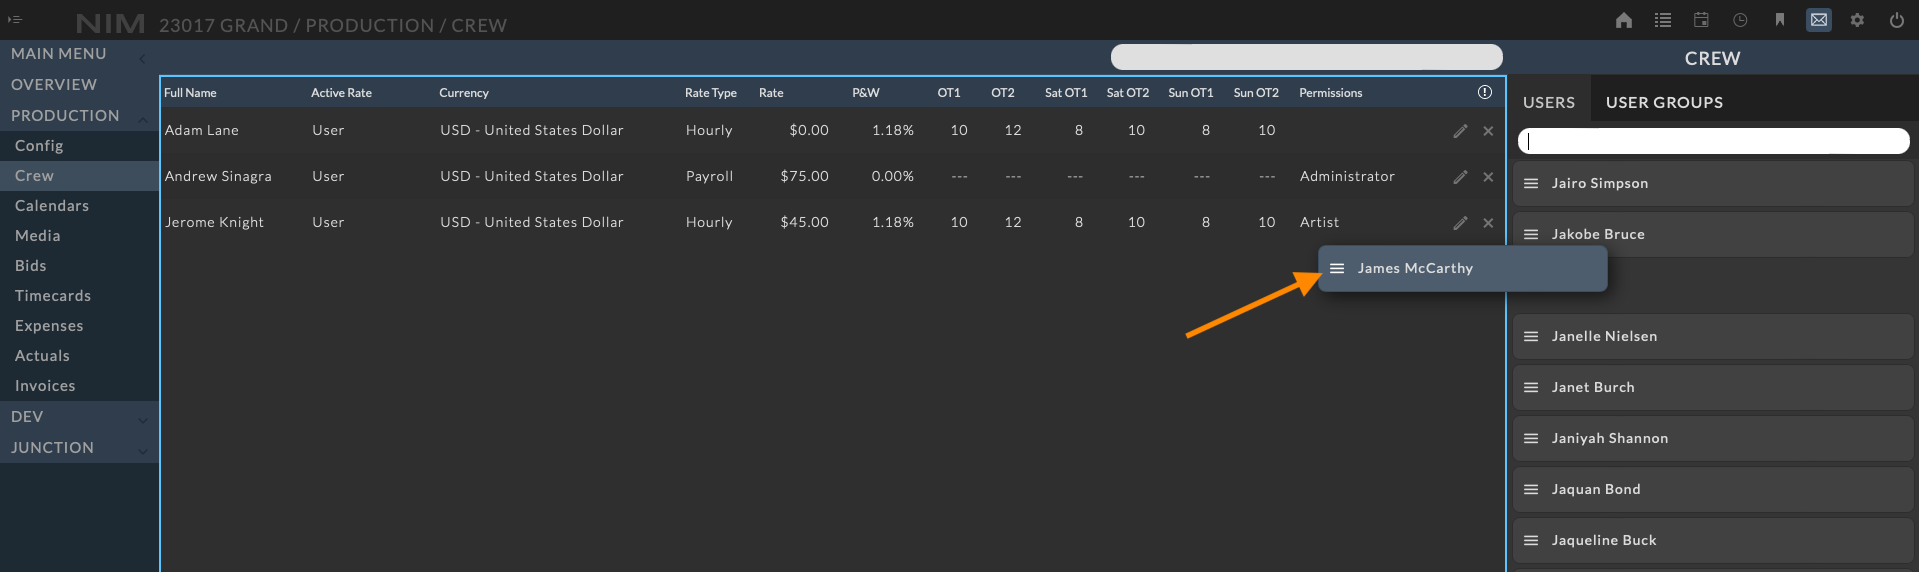
To add a user or group of users, click and drag on the drag handle at the left of the user/group name. Drop the item in the center panel and the user(s) will be added to the crew.
To cancel a drag action, either drop the item back onto the Users list or press the escape button before releasing the drag handle.
Note
If you attempt to add a user that has already been added to the job, you will be alerted with a message indicating that the user is already a member of the crew.
Edit Crew
To edit the crew member details, click the  button at the right of the user’s row. The selected row will be placed into edit mode allowing for the fields to be edited in-line.
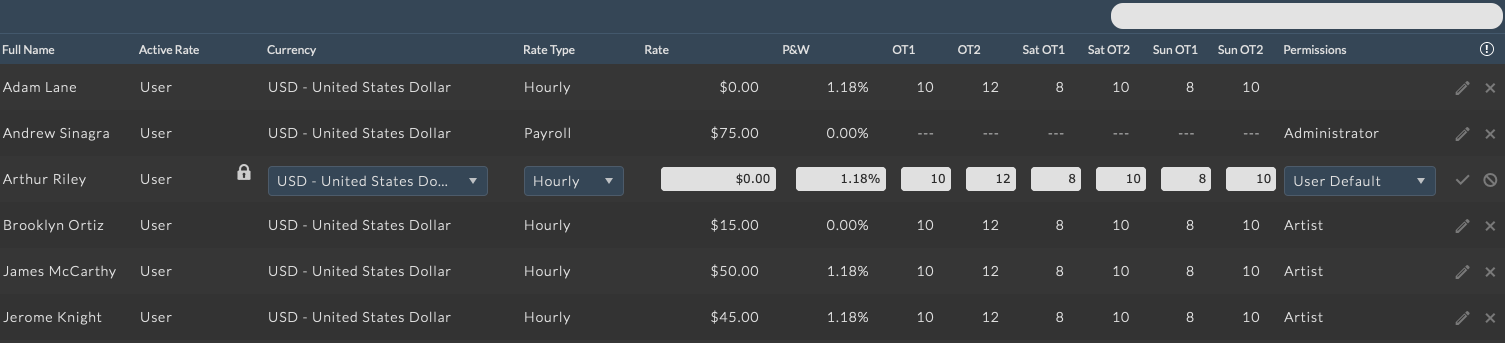
After making the necessary changes, click the check mark button to save. Click the cancel button to return to the view mode without saving changes.
Crew Rates
Once the crew is added, you can optionally set their rate for this specific job.
Note
When adding a user to the crew who does not have a User Rate set, the user row will be highlighted and the OT1 and OT2 thresholds will be represented as “—”. If left in this state, any timecards created for the job will only use the RT rate, and never apply OT1 or OT2 rates.
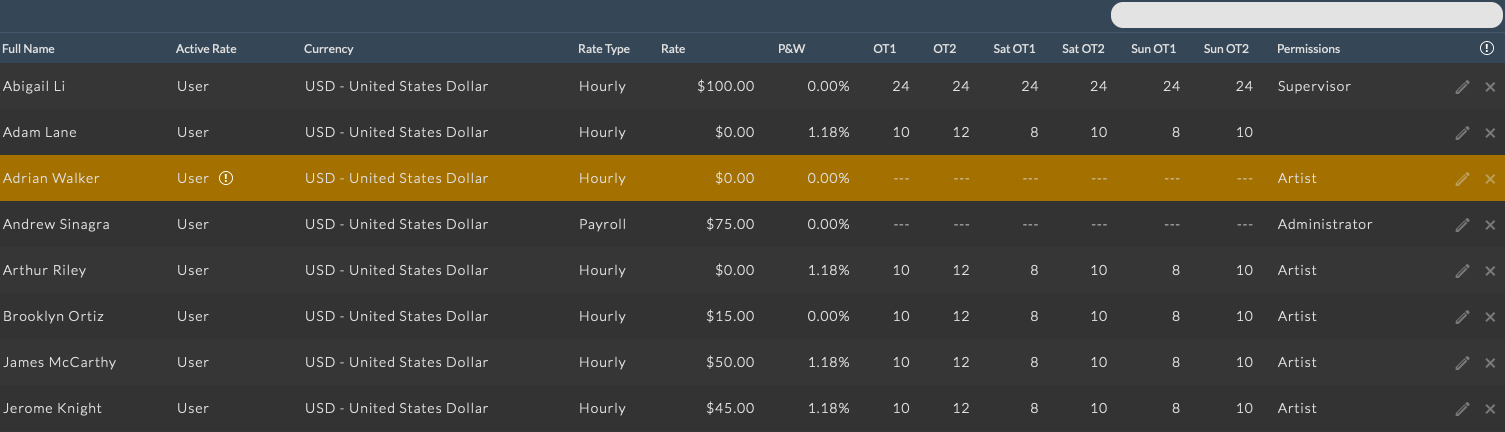
Active Rate
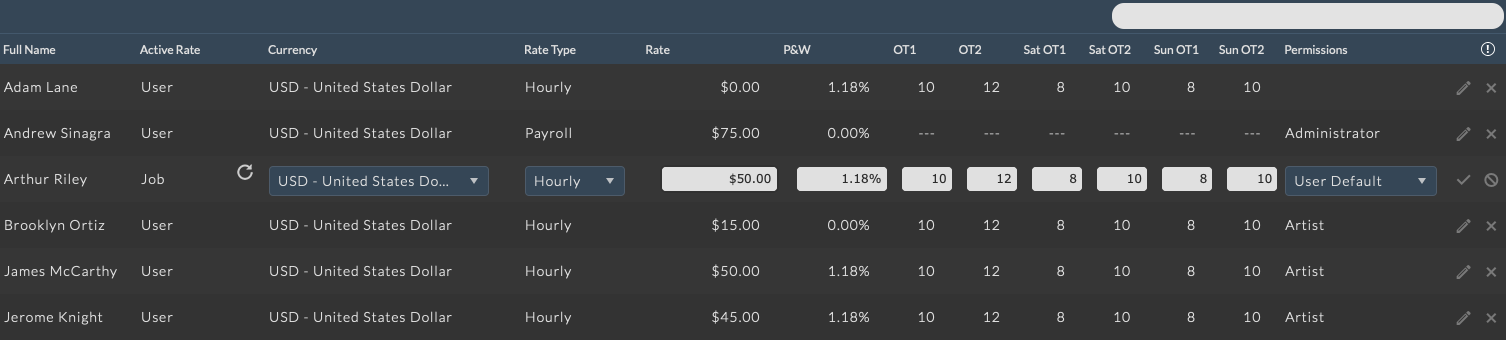
The crew member’s active rate will either be User or Job. A crew member who’s “Active Rate” is listed as User will have their rate tied to the active rate in their user settings. A crew member who’s “Active Rate” is listed as Job means that their rate is linked to the job and will not be modified if changes are made at the user level.

By default, the user’s rate will be set to User when they are first added to the crew. In edit mode, next to the “Active Rate” will be a lock icon. Clicking the lock will lock the user rate to the job. You will be prompted for confirmation prior to locking the rate.
If a user’s rate is locked to the job, the “Active Rate” will be listed as Job. In edit mode a reset icon will appear. Clicking the reset icon will unlock the rate from the job and reset the user to use their current user rate. You will be prompted for confirmation prior to unlocking the rate.
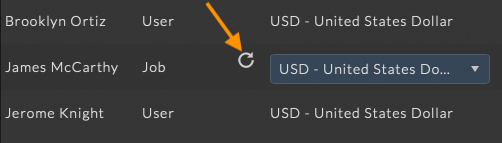
Currency
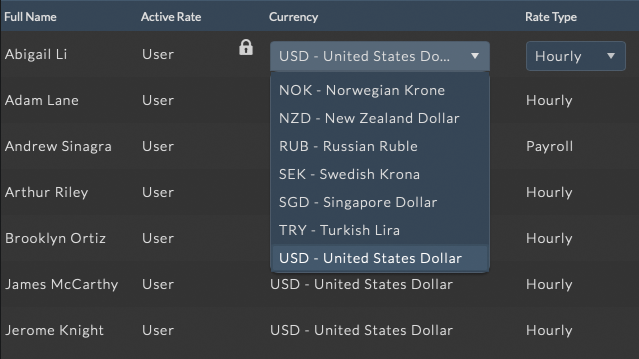
The currency setting determines what currency the user will be paid in.
Currencies not matching the job currency will be converted to the job currency for actualization purposes using the exchange rate which corresponds to the date of the timecards entered.
When viewing studio actualization, the users rate will be converted to the studio currency using the exchange rate which corresponds to the date of the timecards entered.
Rate Type
There are four different rate types available:
Hourly Rate |
Ah hourly rate actualizes the time entered on timecards using OT1 and OT2 rates when the hours exceed the threshold for the day. |
Day Rate |
A day rate is actualized as a full day with no overtime rates for any and all timecards that are entered for a given day. While this is actualized as single per day cost, in the Timecard views, OT1 and OT2 are still displayed for the user based on the overtime threshold rules determined here. |
Fixed Rate |
A fixed rate is entered as a one time fee regardless of the number of timecards entered. For this rate to be actualized, at least one timecard needs to be entered for the user on the job. While this is actualized as single fixed cost, in the Timecard views, OT1 and OT2 are still displayed for the user based on the overtime threshold rules determined here. |
Payroll |
Payroll uses the users currently assigned Payroll Group and the rules defined within to determine the users cost. |
Note
If a user’s rate type is Payroll, the rate options will not be editable as they are determined by the rules of the Payroll Group currently assigned to the user.
Rate Options
Next to the rate type, you can enter the rate as well as a percentage for P&W. The next 6 columns determine settings for overtime and double time. The first two columns, OT and DT indicate the time overtime and double time starts on weekdays, respectively. Then we have additional columns for Saturday and Sunday overtime and double time (Sat OT, Sat DT, Sun OT, Sun DT). The values entered here are the hours at which overtime and double time kick in.
Available Options:
Rate |
Enter the rate that the user will be paid or the overall cost to the business. |
Currency |
The currency that this user is paid in. Their rate will be displayed in this currency and converted to the job or studio currency (using exchange rates entered in the Admin > Finance section) when viewing job or studio actuals. |
P&W |
This stands for Pension & Welfare. When calculating crew rates, this is the amount a payroll company would charge to process the crews timecards and pay checks. The amount entered here is a default value expressed as a percentage and can be overridden on a per job basis when the user is added to the job crew. This value is factored into the Job Actuals. |
Rate Type |
This is the default rate type for the user. This value can be overridden on a per job basis when the user is added to the job crew. |
OT Rate 1 |
Default number of hours at which overtime rate 1 starts on weekdays. This value can be overridden on a per job basis when the user is added to the job crew. This value is factored into the actuals when calculating user cost. |
OT Rate 2 |
Default number of hours at which overtime rate 2, for example double-time, starts on weekdays. This value can be overridden on a per job basis when the user is added to the job crew. This value is factored into the actuals when calculating user cost. |
Sat OT Rate 1 |
Default number of hours at which overtime rate 1 starts on Saturday. This value can be overridden on a per job basis when the user is added to the job crew. This value is factored into the actuals when calculating user cost. |
Sat OT Rate 2 |
Default number of hours at which overtime rate 2 starts on Saturday. This value can be overridden on a per job basis when the user is added to the job crew. This value is factored into the actuals when calculating user cost. |
Sun OT Rate 1 |
Default number of hours at which overtime rate 1 starts on Sunday. This value can be overridden on a per job basis when the user is added to the job crew. This value is factored into the actuals when calculating user cost. |
Sun OT Rate 2 |
Default number of hours at which overtime rate 2 starts on Sunday. This value can be overridden on a per job basis when the user is added to the job crew. This value is factored into the actuals when calculating user cost. |
For example:
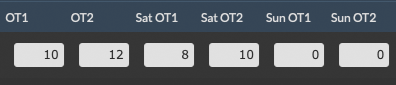
In the example to the right, overtime rate 1 will be used after 10 hours and overtime rate 2 will be used after 12 during the week.
On Saturday, 8 hrs for overtime rate 1 and overtime rate 2 after 10 hrs. On Sunday, OT2 rates will instantly be used since the minimum threshold for hours is set to 0.
Permission Overrides
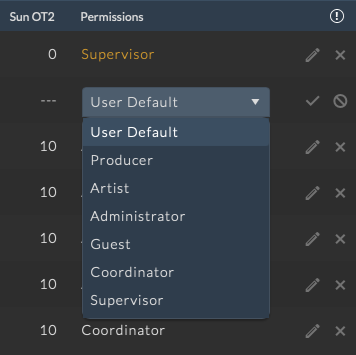
The permissions column displays the current permission group setting per user. By default, user permissions will be determined by the permission group associated with their user account. This value can be overrode on a per job basis when editing the crew member by selecting a new permission group from the dropdown.
Note
Permission groups that have been overrode will be highlighted.
Remove Crew
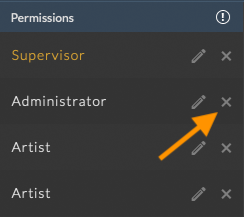
To remove a crew member, click the  on the row of the user you wish to remove. You will be prompted to confirm removing the user from the crew.