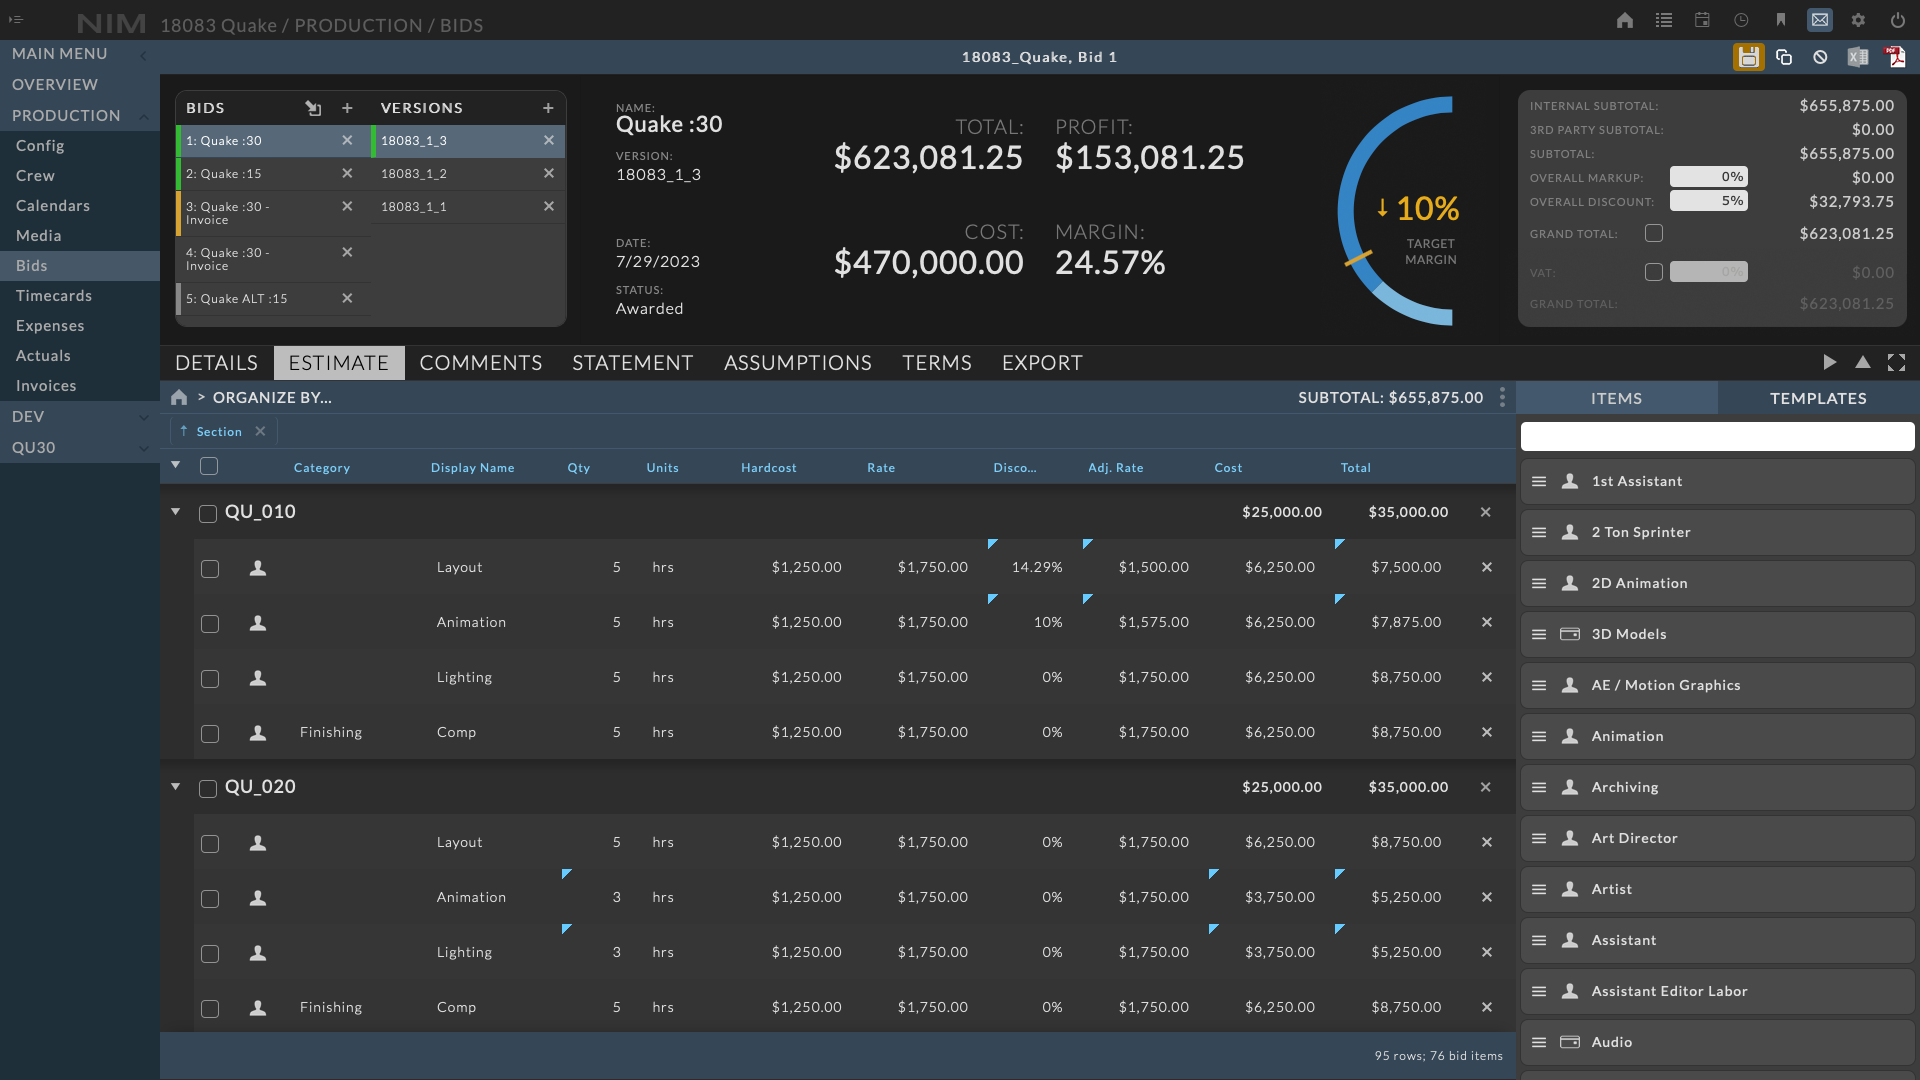
Bid Estimate
The bid estimate is the workspace of the bid where users will add line items that will encompass all of the financial calculations to determine the bid total. Estimates can be created from scratch or from a bid template to quickly construct a bid. The estimate workspace provides a convenient method to organize bid items by grouping line items by any column, or number of columns to create a hierarchical structure within the bid. The estimate workspace includes an Organizational menu to compartmentalize bids by any column within the estimate. This level of organization allows users to step into discrete areas of the bid to focus on specific line items. Bid Sections provide unique structures to bids which allow for segmenting a bid in to Sections that include images, descriptions, and notes.
Estimate Workspace
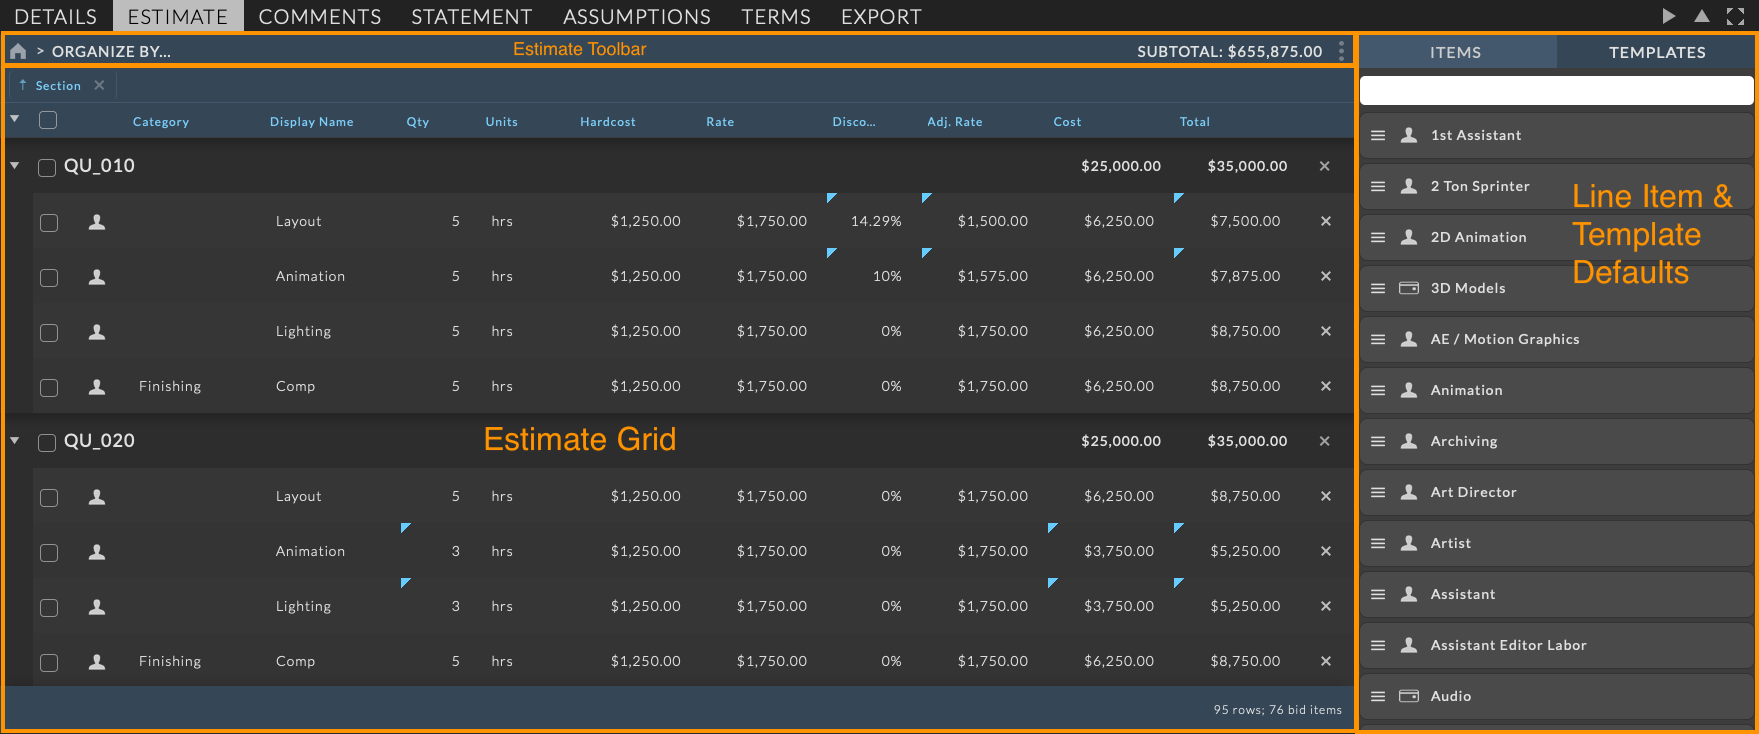
The Estimate workspace is comprised of 3 key areas to create and manage bid line items
Estimate Toolbar - This is the toolbar at the top of the Estimate UI that provides access to the Organization menu, the subtotal for the current organizational view, and a menu for working with bid sections and items.
Estimate Grid - This is the area that contains all of the bid line items in a spreadsheet style grid. This grid can be sorted, filtered, reordered, and grouped by one or more columns.
Line Item & Template Defaults - This area contains tabs to access the default line items and templates that be added to the estimate via drag and drop from their respective list.
Estimate Toolbar
The Estimate Toolbar provides access to the Organization menu, the subtotal for the current organizational view, and a menu for working with bid sections and items.
Organization Menu
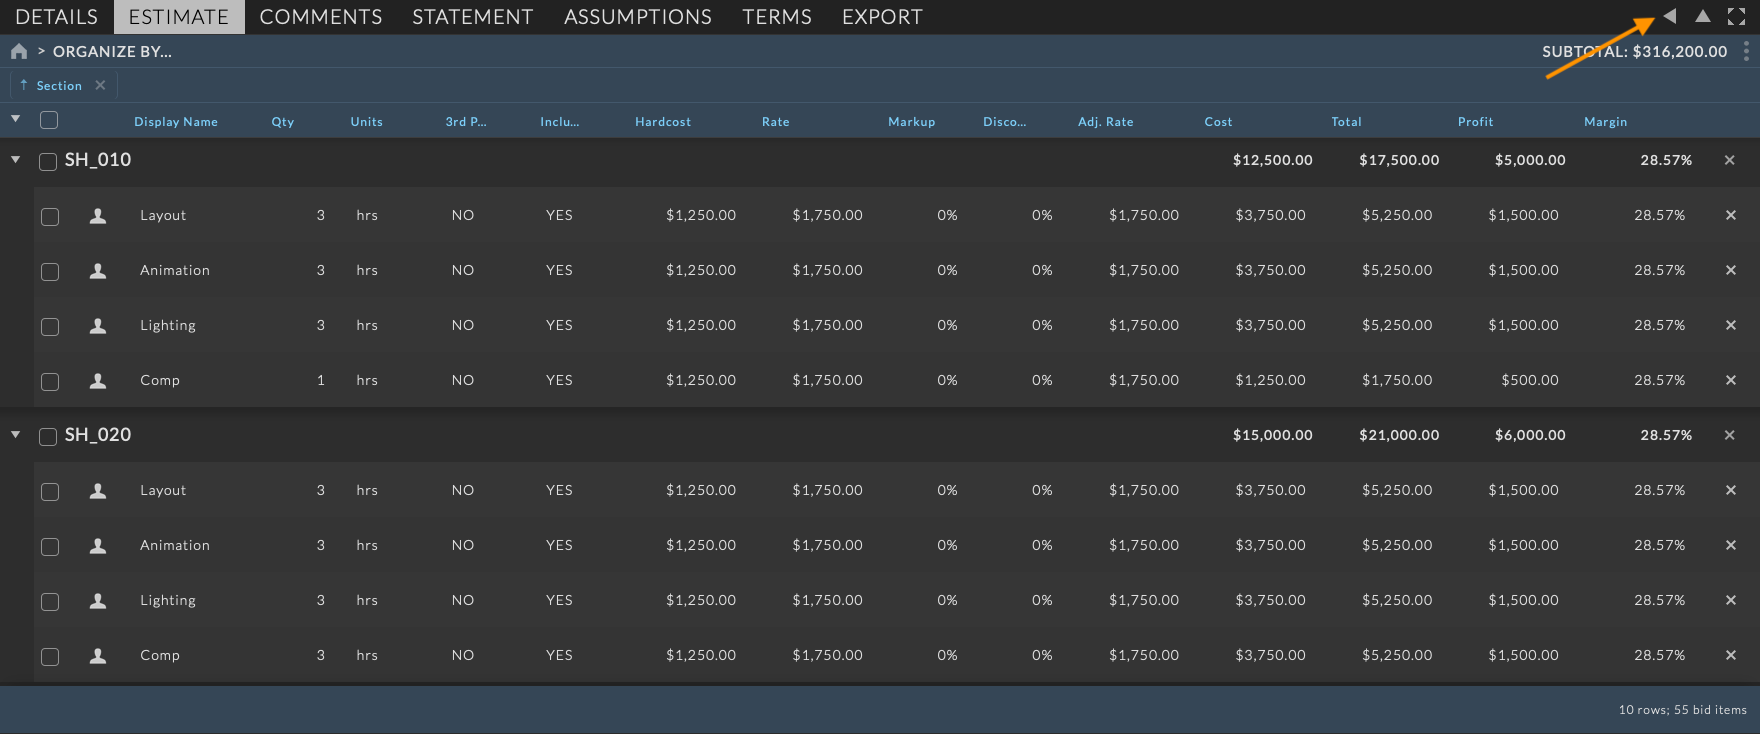
The Organization menu provides a method to organize the bid by any line item column within the estimate. This level of organization allows users to step into discrete areas of the bid to focus on specific line items and view the count, cost, total, profit and margin per organizational view.
For example:
Users can organize a bid by Section and then step into that section to work only with those line items contained within the section. Similarly, users can organize a bid by Category to work with line items associated with a specific category, or organize by Item Name to work with all line items with a specific name.
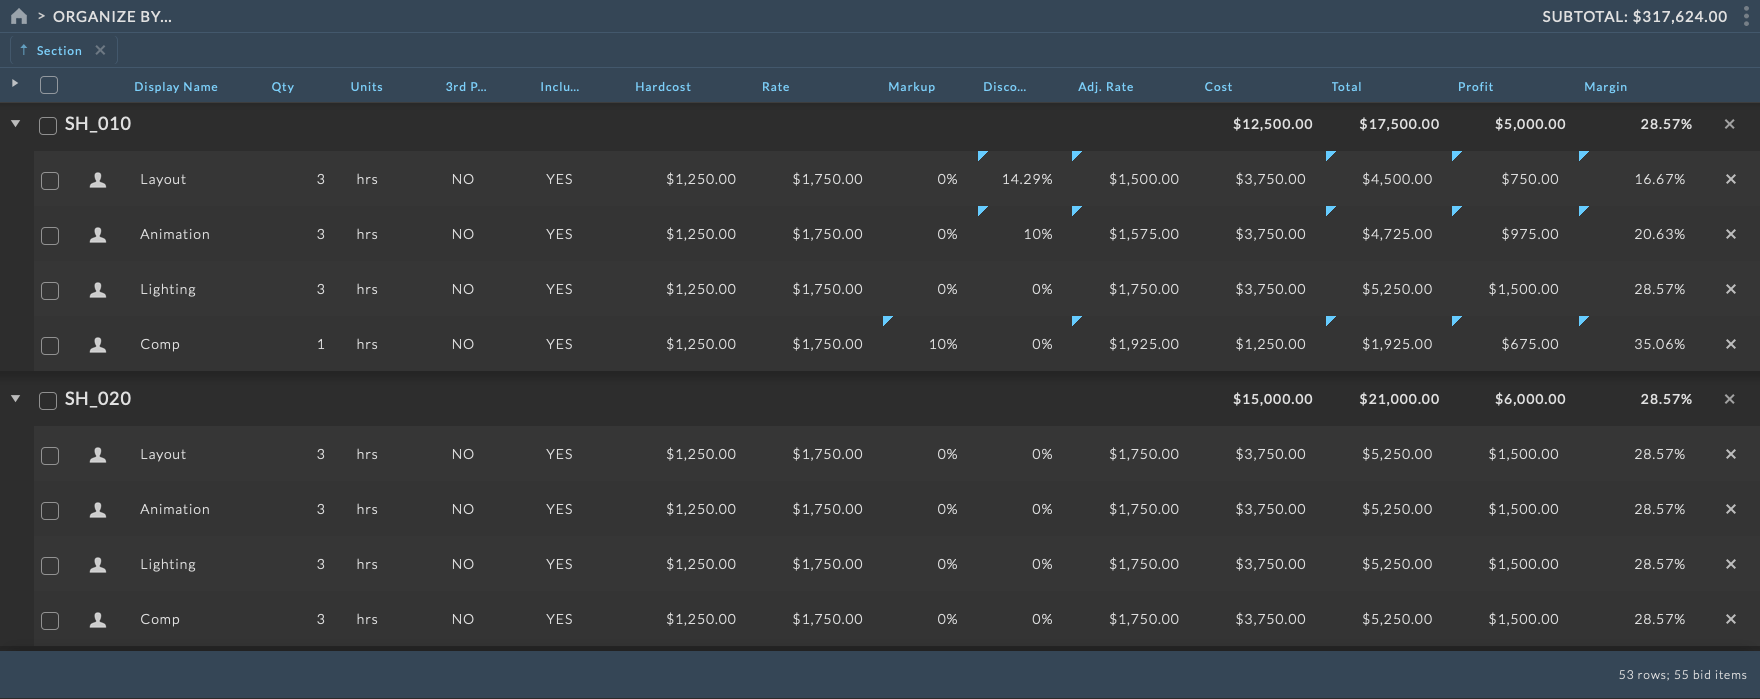
The Organization menu is comprised of multiple tiers with different views and information provided for each. The first level of organization will display the aggregate count, cost, total, profit and margin for the selected organization. The second level of organization will provide direct access to those line items contained within the organization. When organizing by Section, two additional levels of organization are available to further refine working within a Section.
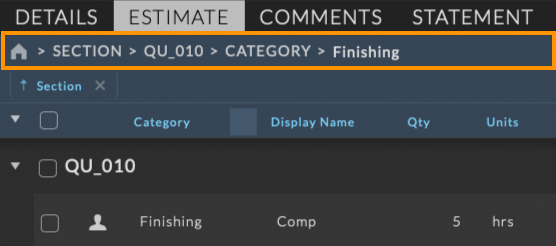
The base level of organization displays all line items for the entire estimate. This level of organization is the default view when opening an estimate. The base level of organization is indicated by the Organize By… label in the Organization menu. Users can return to the base level of organization at any time by clicking the  icon in the Organization menu.
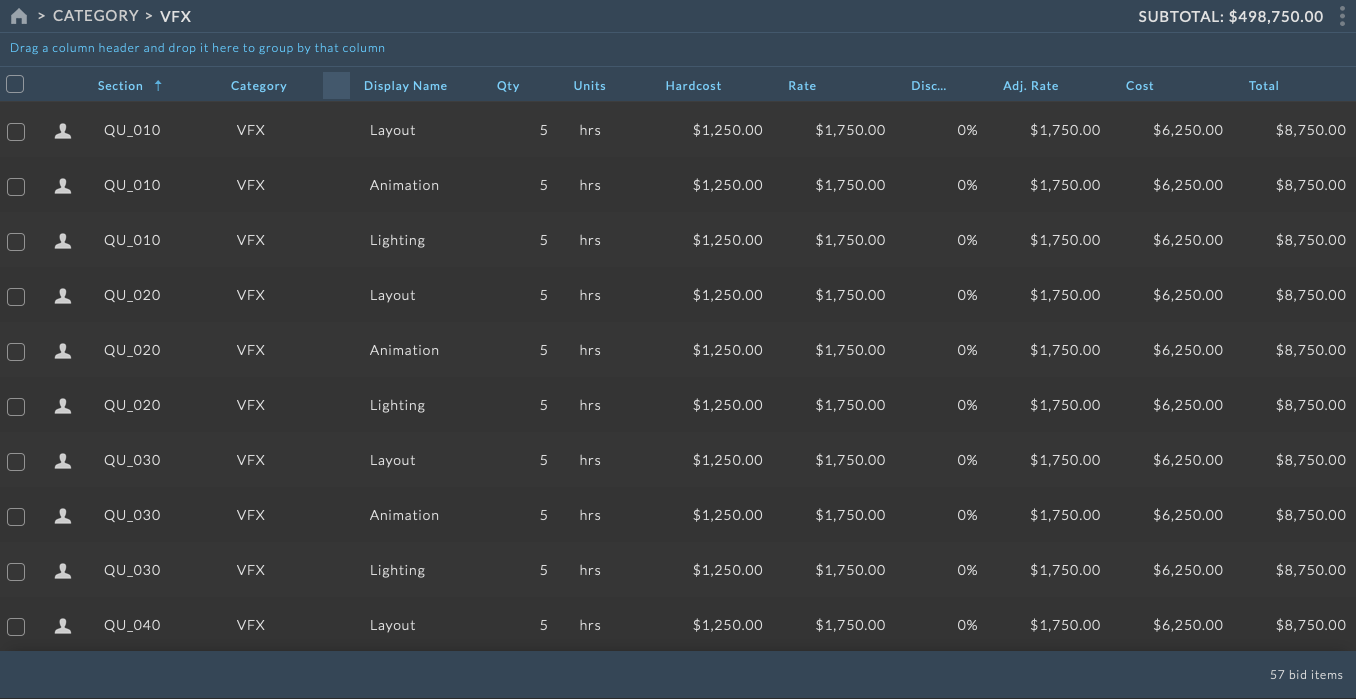
Organize By Column
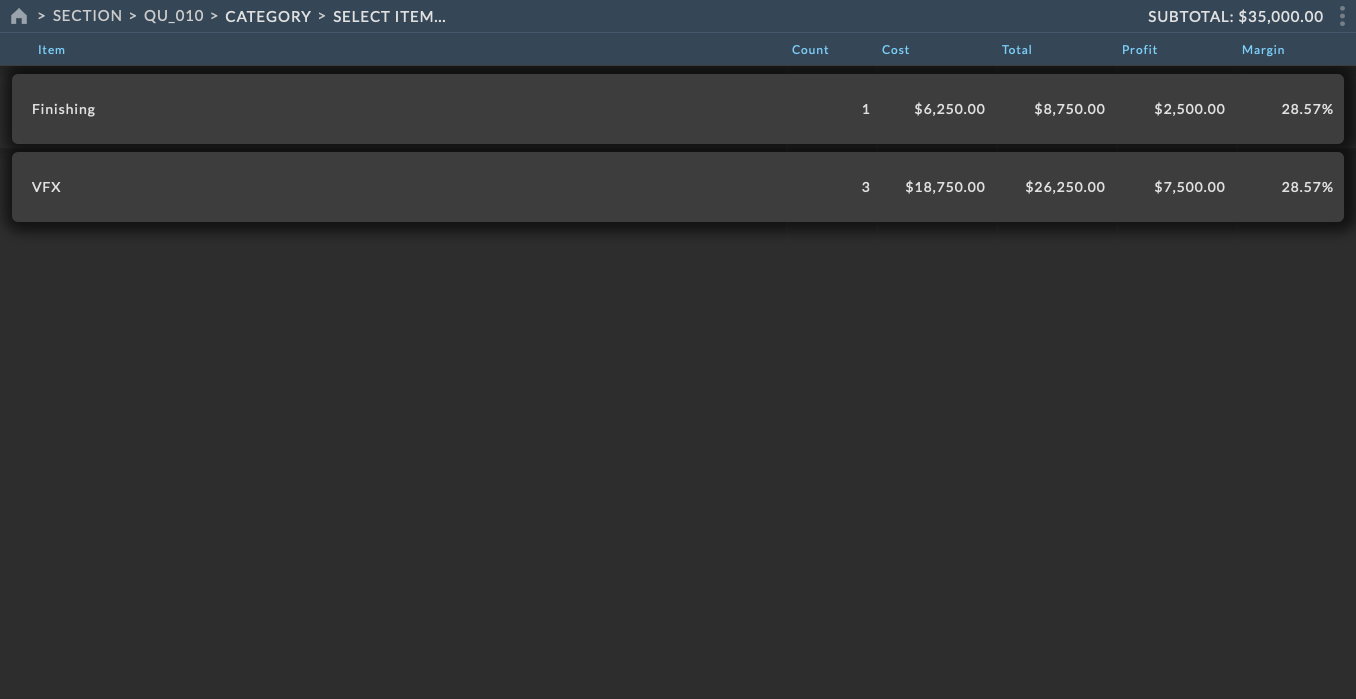
To organize the bid by a specific column, click on the Organize By… label in the Organization menu and select the column to organize by. The first level of organization includes all available line item columns.
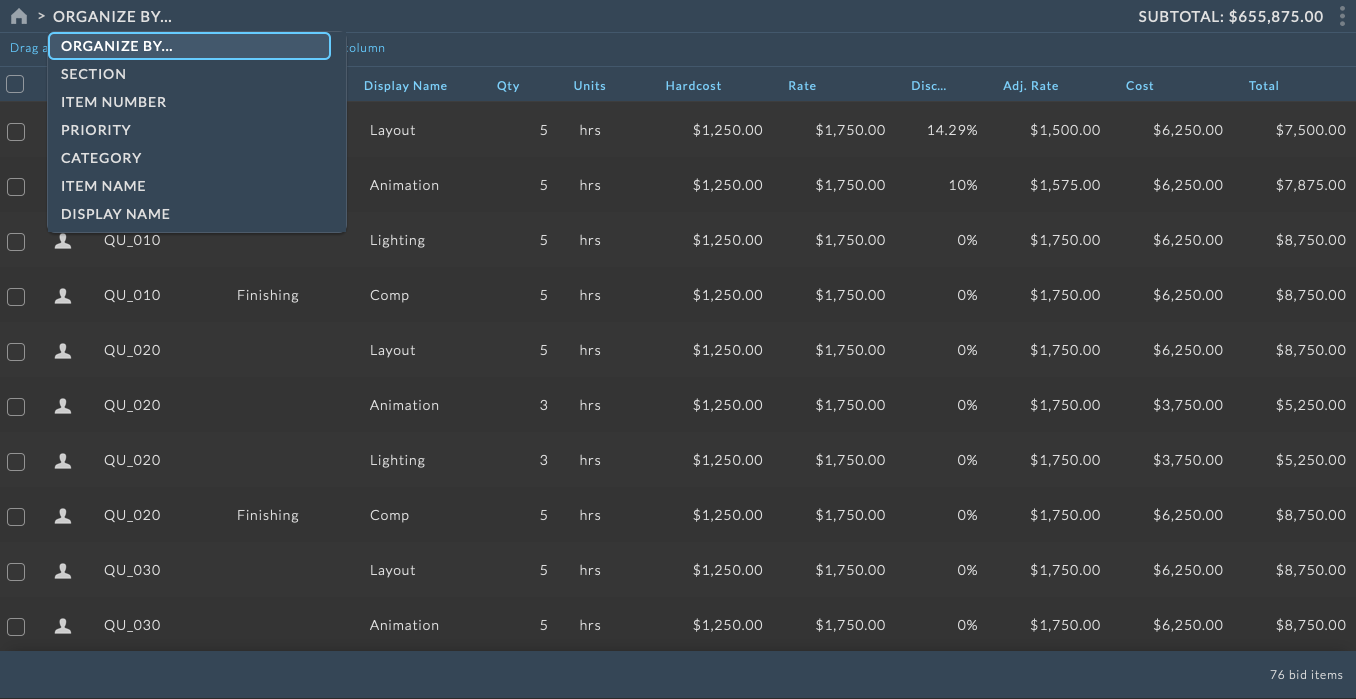
Upon selecting an item in the list, the Organization menu will update the Estimate Grid to display the selected column items contained within the estimate and their corresponding aggregate count, cost, total, profit and margin.

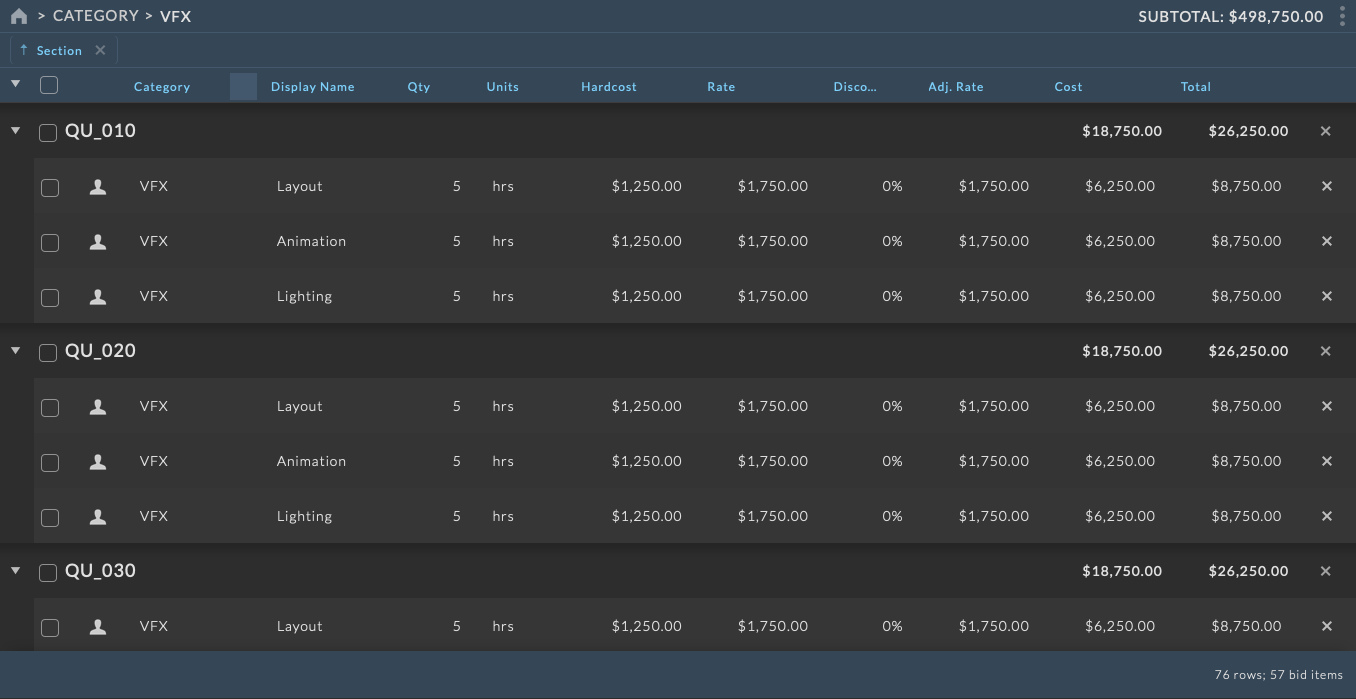
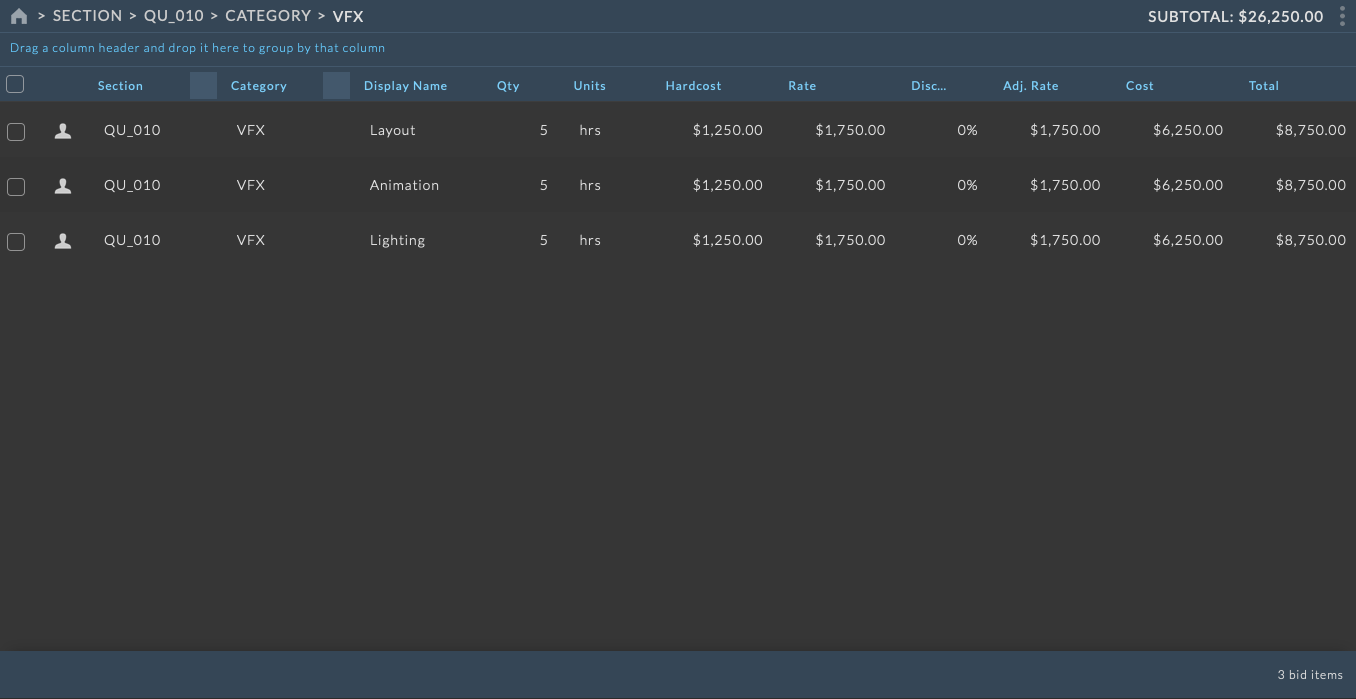
The second level of organization provides direct access to those line items contained within the organization. Users can click on the organization row in the Estimate Grid or select an Item by clicking on the Select Item label in the Organization menu to step into the organization and view the line items contained within. The Estimate Grid will update to display all of the line items contained within the selected column value. Additionally the Estimate Toolbar will update to display the subtotal for the current items. Users can step through items independently by clicking on the item name in the organization menu and selecting a new item from the list.
Estimate Grid features, such as sorting, filtering, and grouping by column are all available when viewing individual line items. For more information on working with the Estimate Grid, see the Estimate Grid section below.
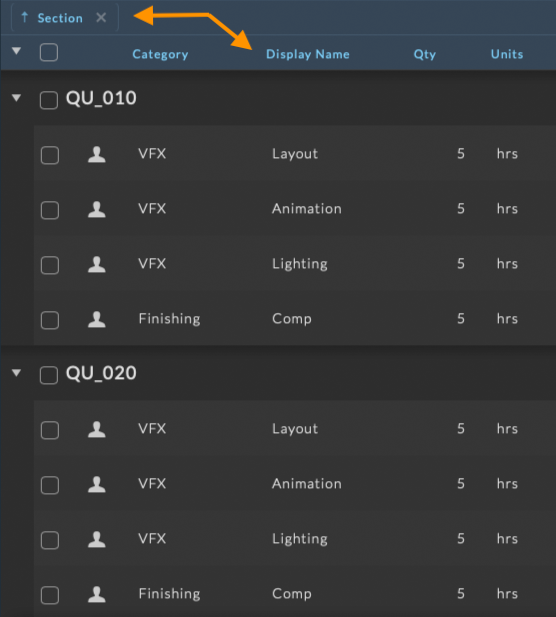
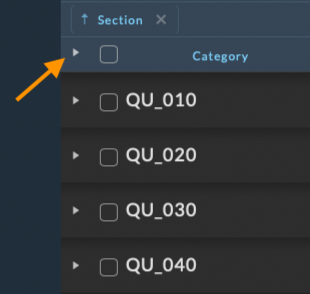
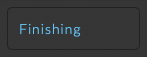
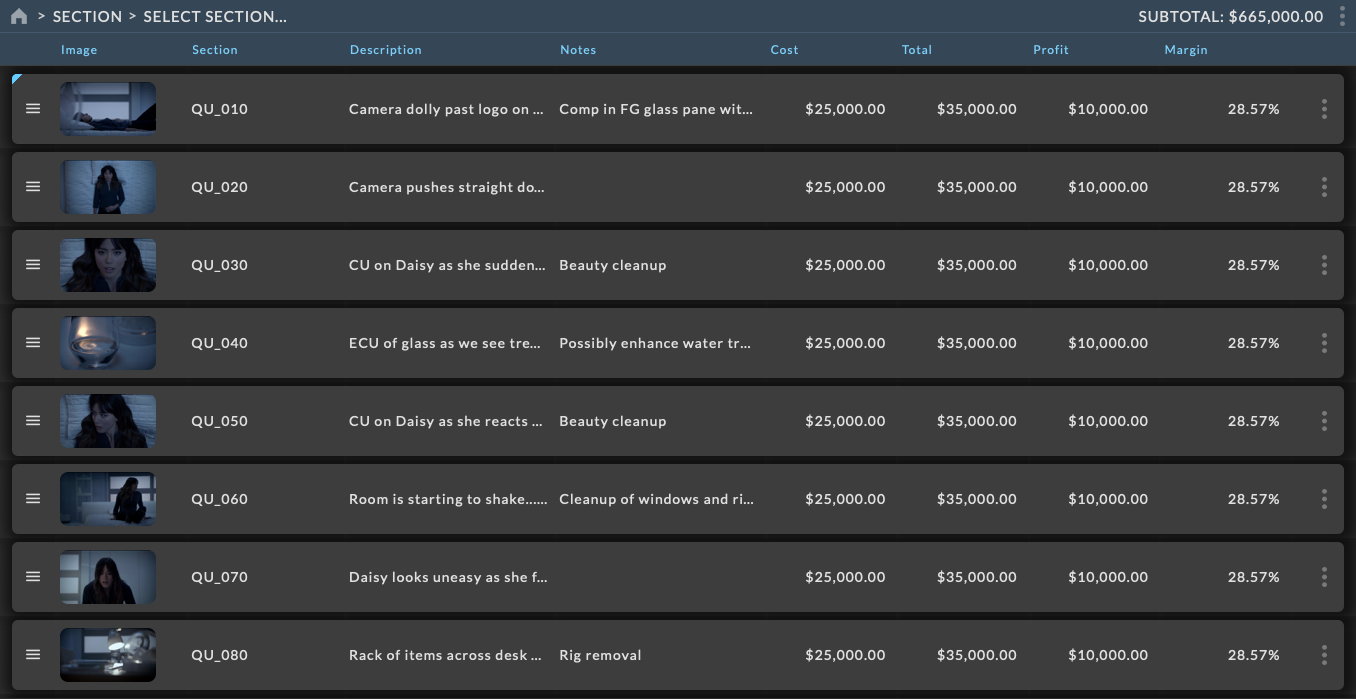
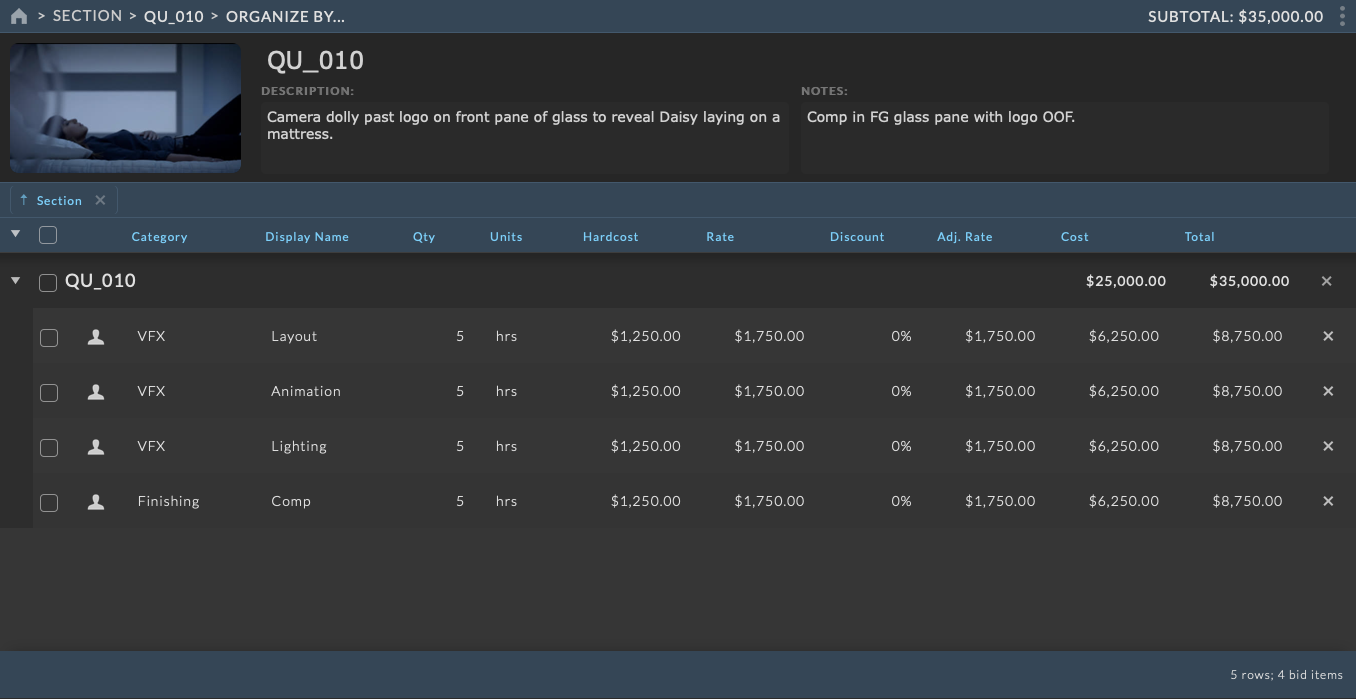
Organize By Section
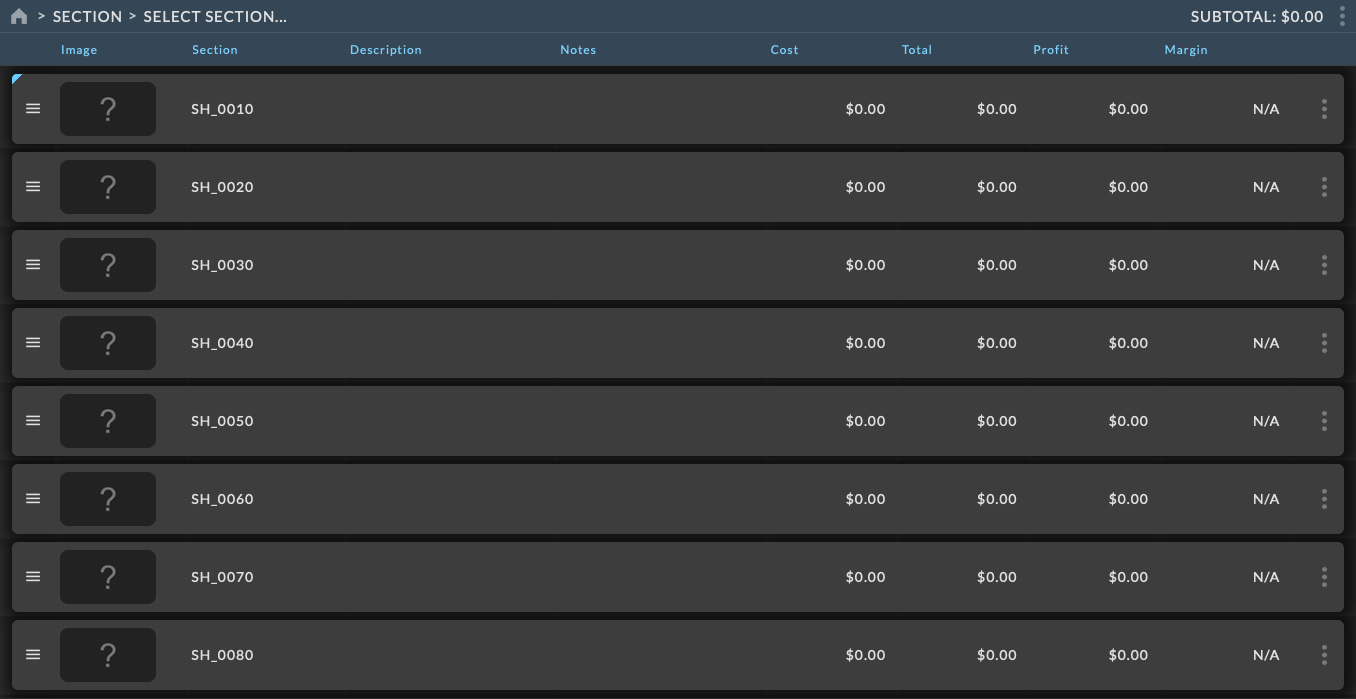
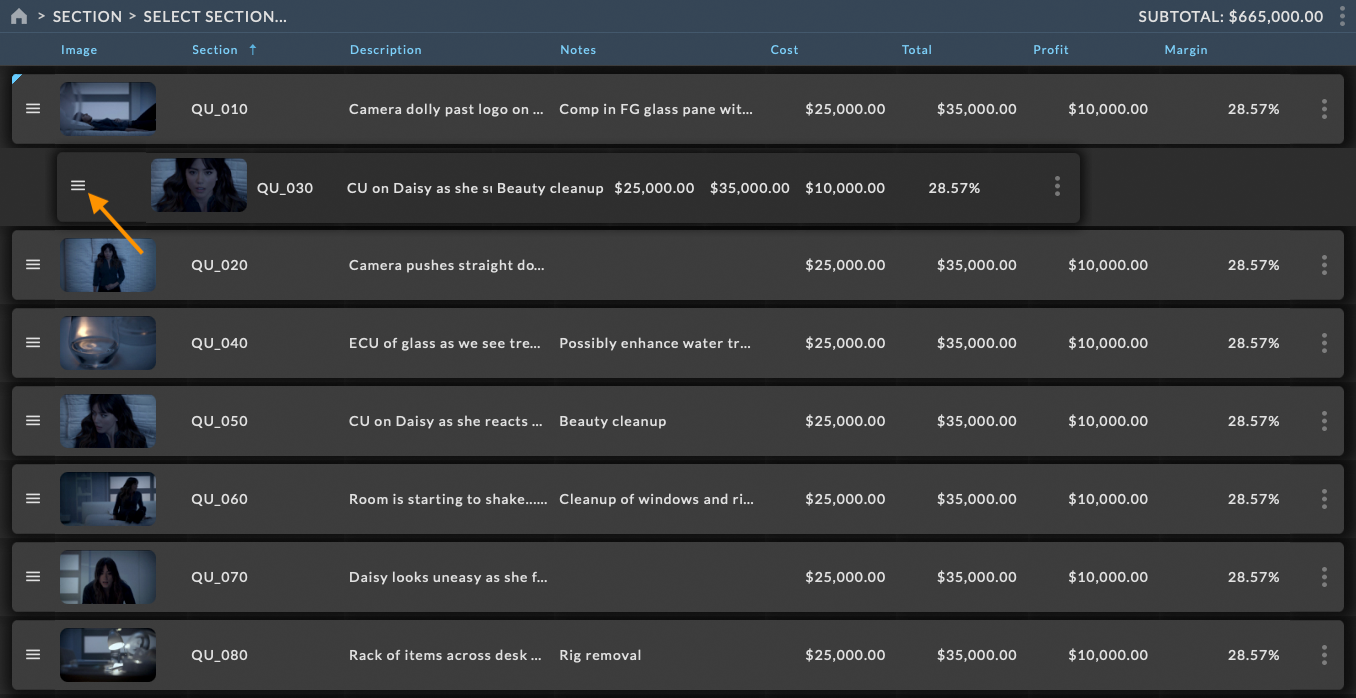
When organizing by Section, two additional levels of organization are available to further refine working within a section. The first level of organization will display the section information including the section images, description, and notes as well as the aggregate count, cost, total, profit and margin for each section. Users can click on the section row in the Estimate Grid or select a section by clicking on the Select Section… label in the Organization menu to step into the section and view the line items contained within.

The second level of organization will provide direct access to those line items contained within the Section and the section details. Users can step through Sections by clicking on the section name in the organization menu and selecting a new section from the list. When selecting a section, the Estimate Toolbar will update to display the subtotal for the selected section.
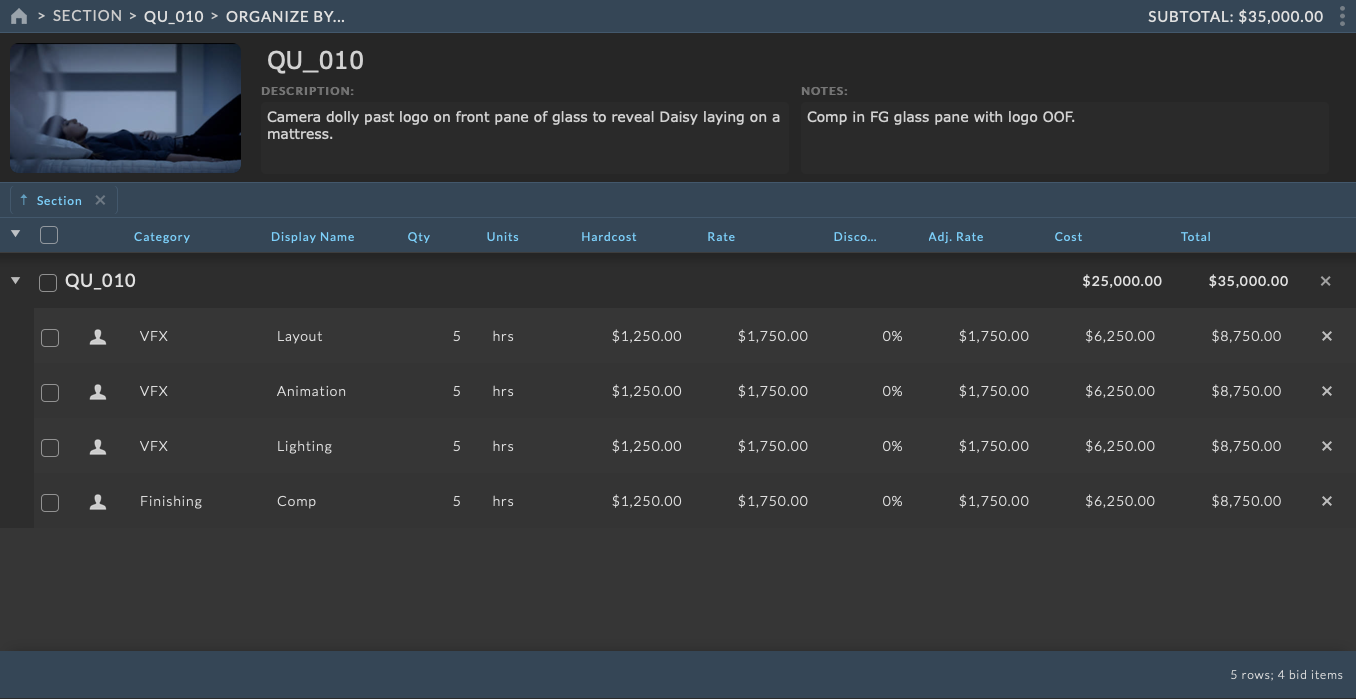
Within each Section, users can further refine the organization by selecting a column to organize by from the Organize By.. dropdown. This third level of organization includes all available line item columns and behaves the same as the base level of organization.
Upon selecting a line item column value in the Section list, the Organization menu will update the Estimate Grid to display the selected line items contained within the section and the selected column value. Additionally the Estimate Toolbar will update to display the subtotal for the current items. This level of organization is the same as the second level of organization when organizing by a column at the base level of organization.
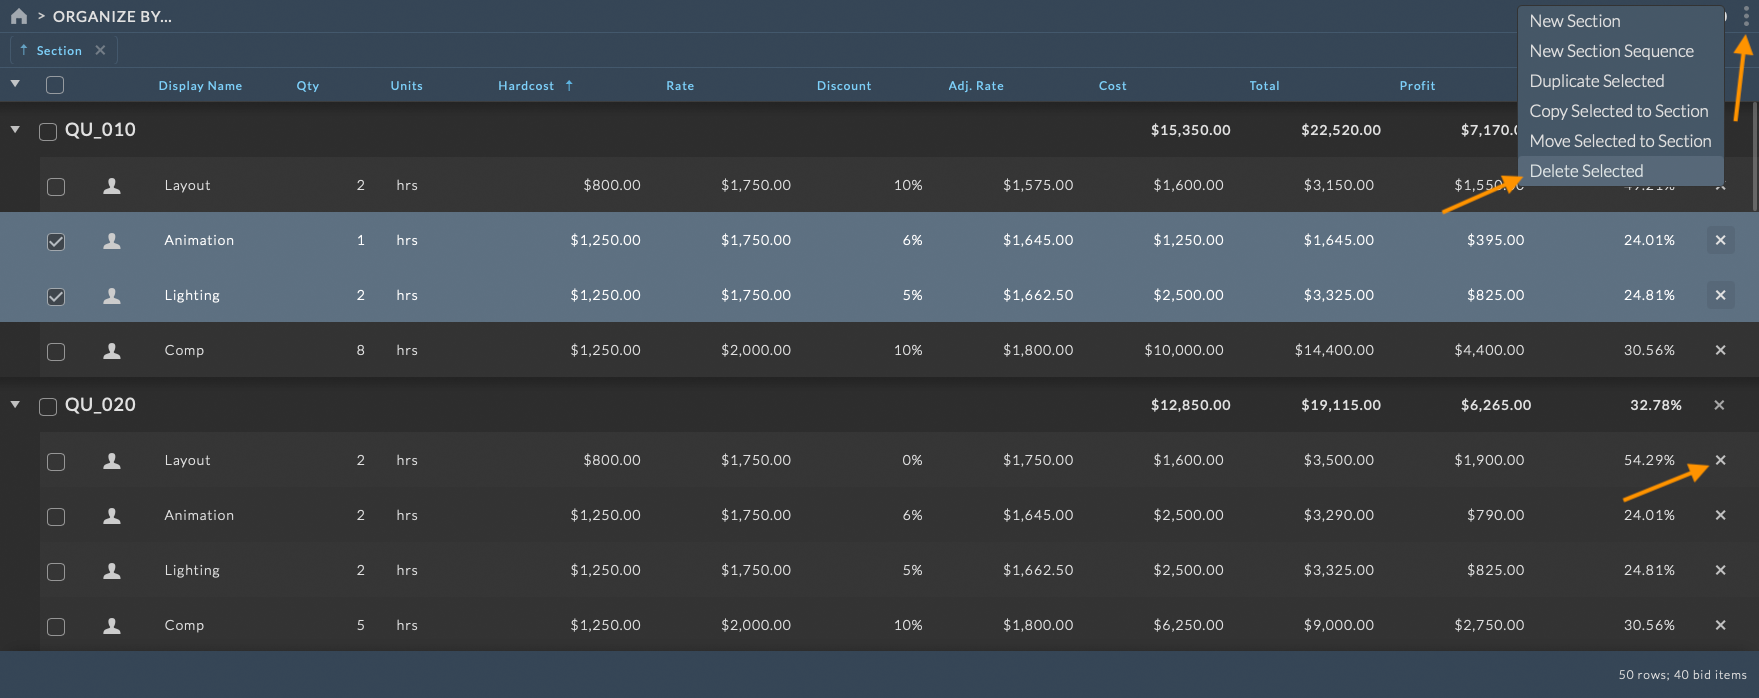
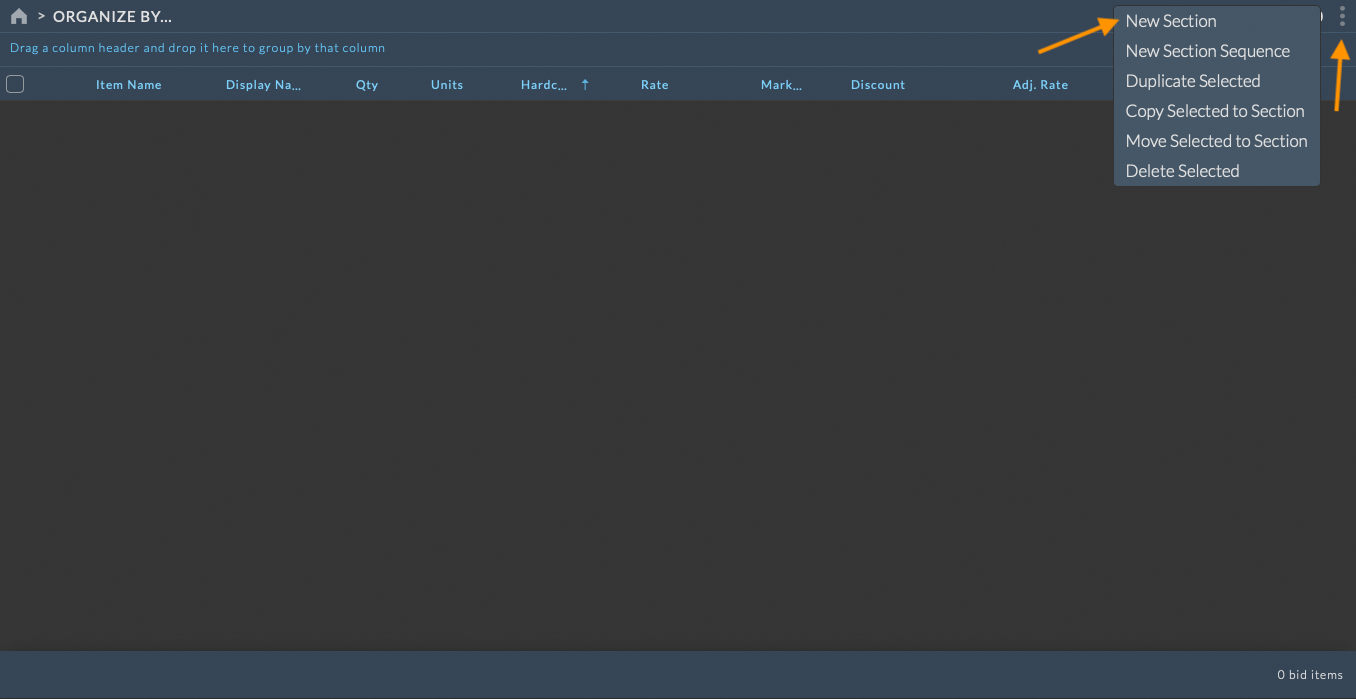
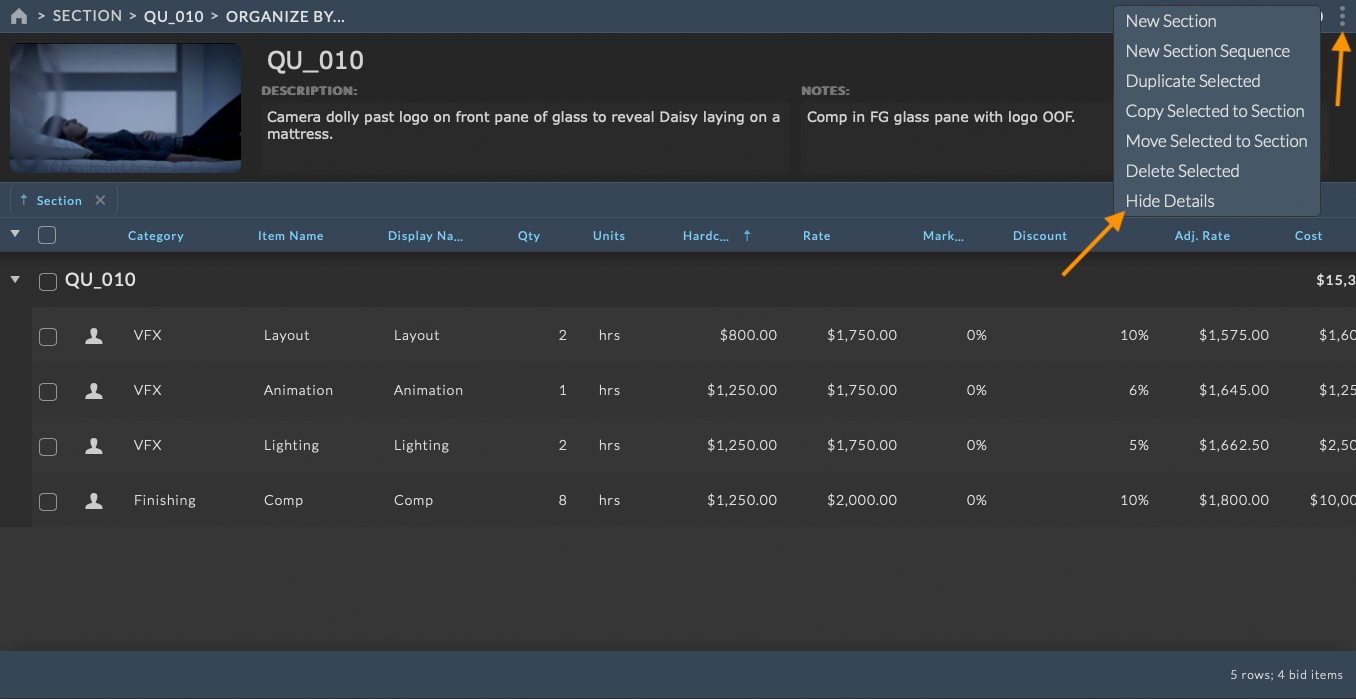
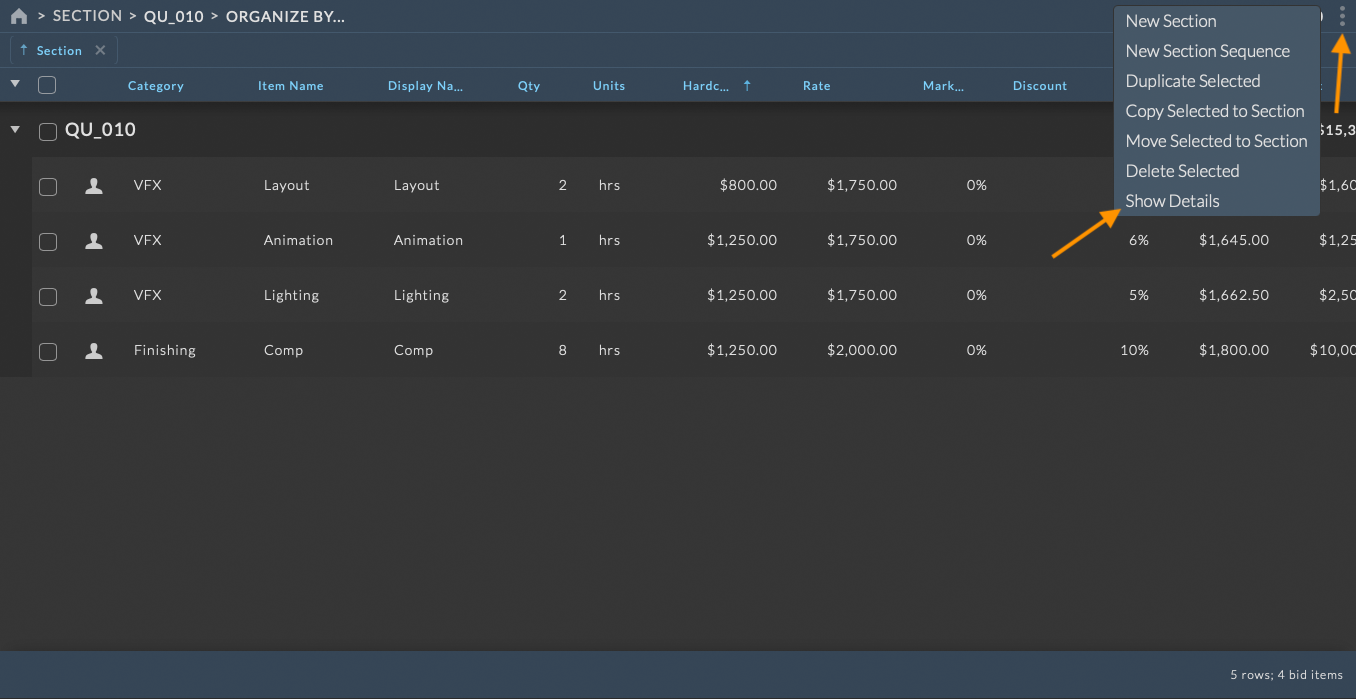
Toolbar Menu
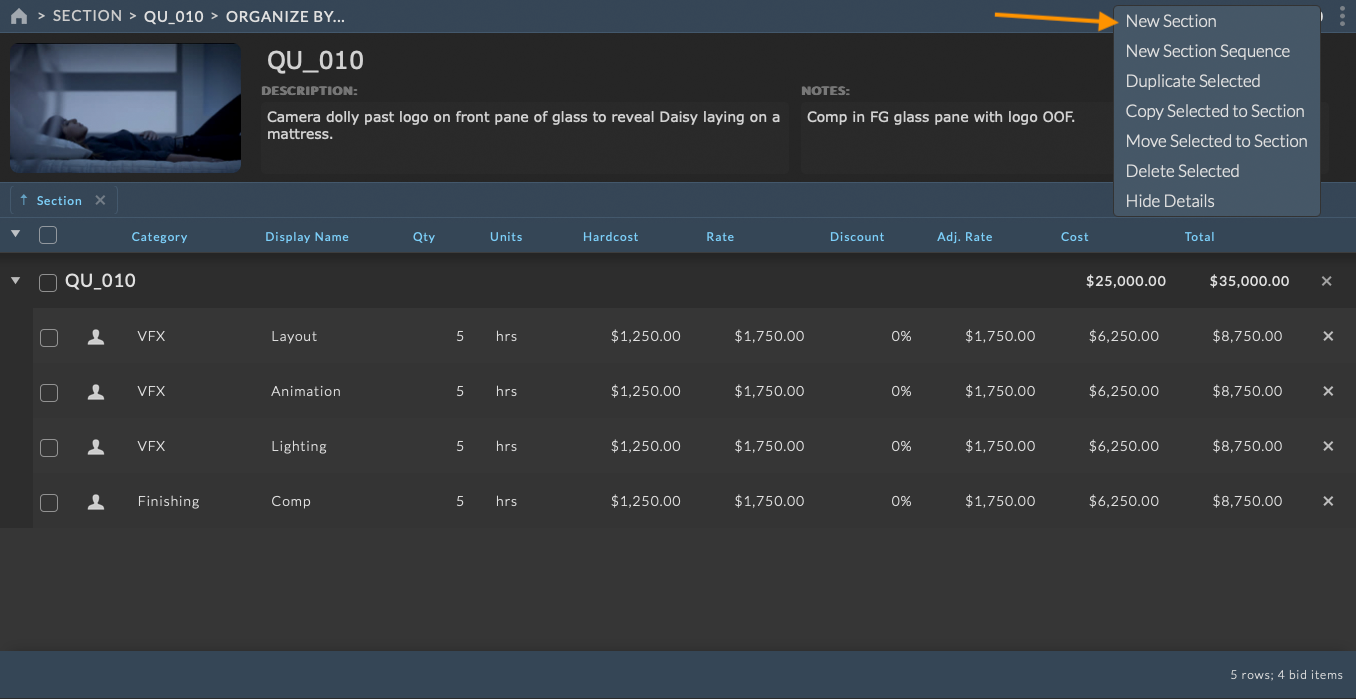
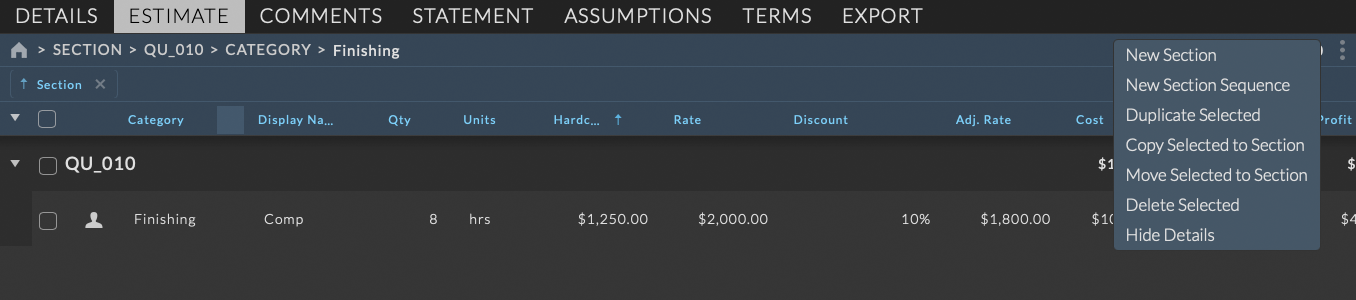
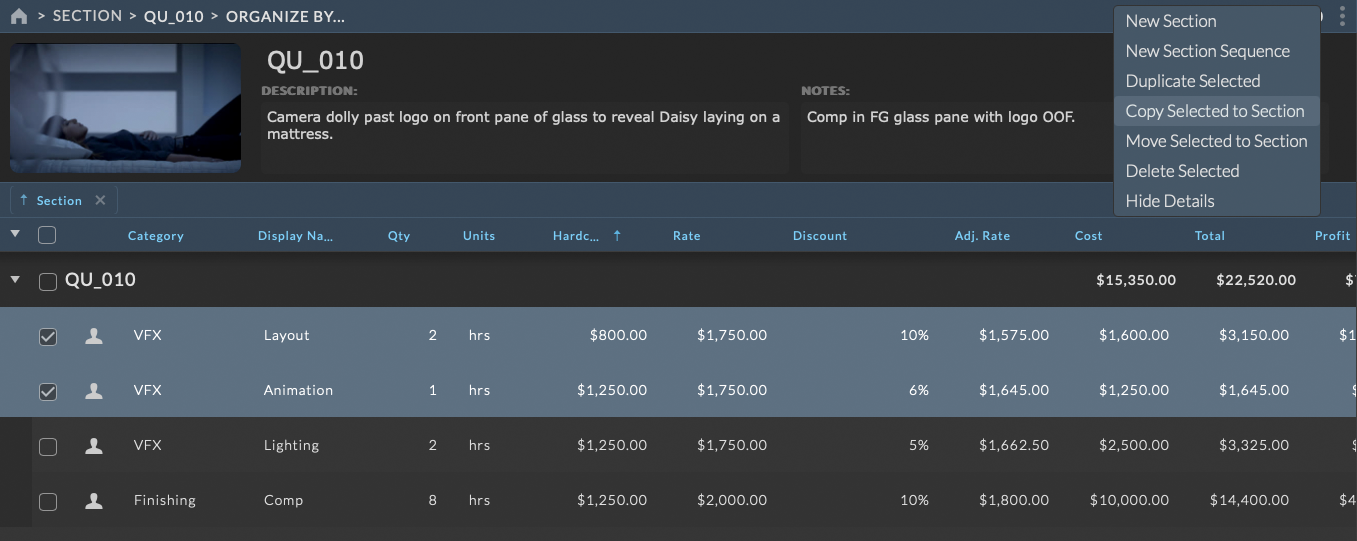
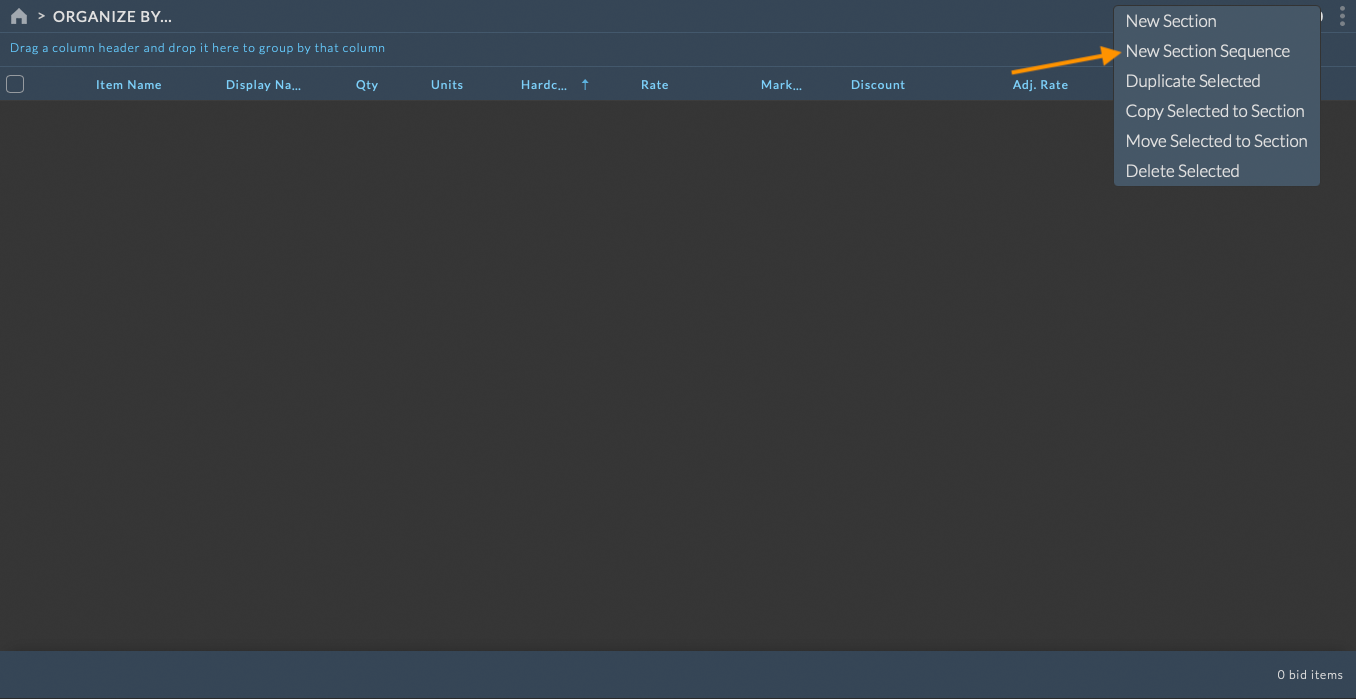
The Estimate Toolbar Menu provides access to the following actions depending on the current view:
New Section - Create a new section within the estimate.
New Section Sequence - Create a new section sequence within the estimate.
Duplicate Selected - Duplicate the selected line items within the estimate. Available when viewing line items.
Copy Selected to Section - Copies the selected line items to a different section. Available when viewing line items.
Move Selected to Section - Moves the selected line items to a different section. Available when viewing line items.
Delete Selected - Delete the selected line items within the estimate. Available when viewing line items.
Hide Details - Hides the details within the selected section. Available only when within a section.
To open the Estimate Toolbar Menu, click on the ellipsis at the far right of the Estimate Toolbar. The Toolbar Menu will open and display the available actions for the current view. Select an action from the list to perform the action.
For more information on working with sections, see the Estimate Sections section below.
For more information on selecting line items, see the Estimate Line Items section below.
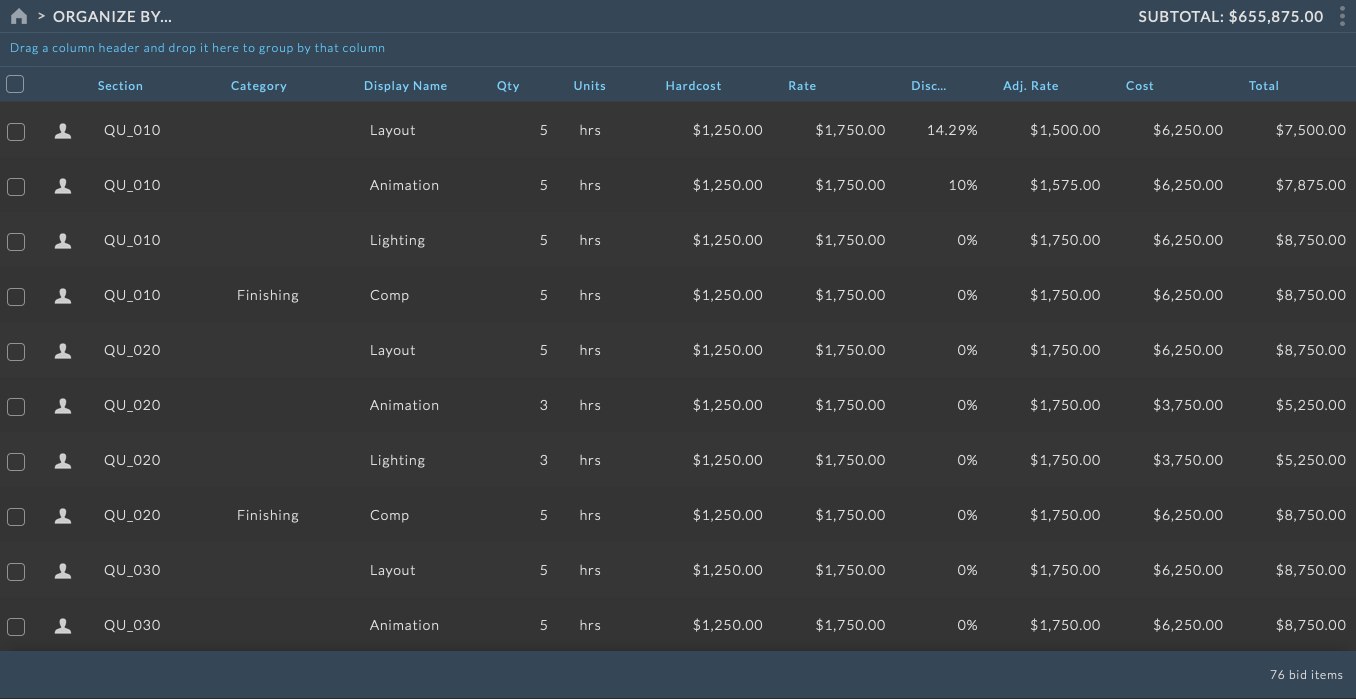
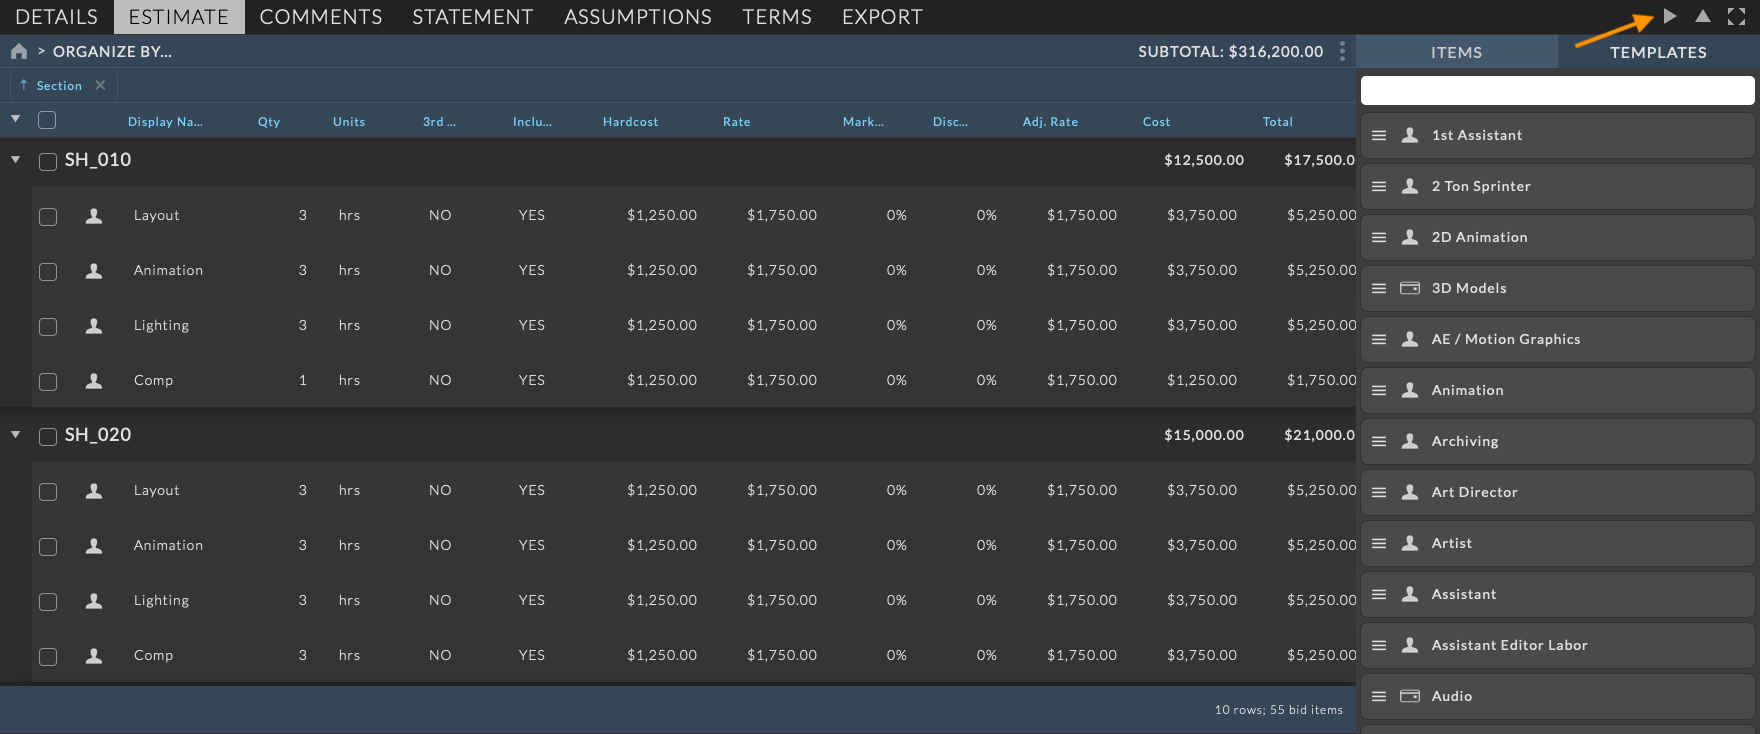
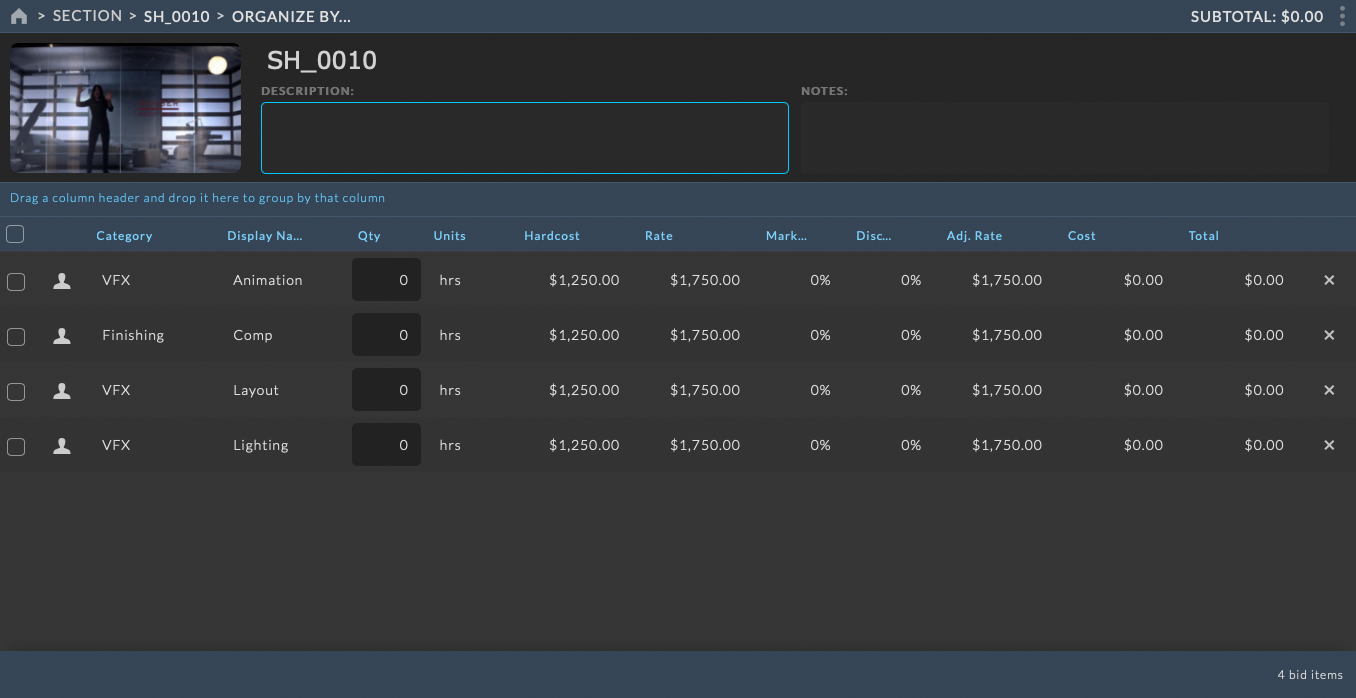
Estimate Grid
The Estimate Grid is the primary interface for working with line items within the estimate. The Estimate Grid displays each bid line item as a row within in the grid and is comprised of multiple columns of information for each line item. The columns displayed in the grid can be customized by the user to display the information most relevant to the current bid needs. The grid supports sorting, filtering, grouping, and column reordering. The grid also supports inline editing of line item information.

Column Filters
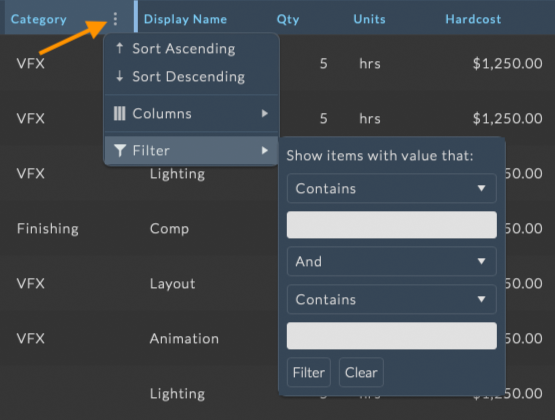
The Estimate Grid supports column menu filtering for all columns within the grid. Filtering by grid column menus provides access to complex filtering options per column. Column filters can be used in conjunction with the other filters to create more refined filter rules.
To filter the Estimate Grid by a column menu, hover over the column you wish to filter. This will display the column ellipsis menu. Click the ellipsis to the right of the column header to reveal the full column menu. Select your filter parameters from the Filter menu option and click Filter to filter the grid.
Column Ordering
The columns of the grid can be ordered to present the information as you see fit. To reorder the columns in a grid, click on a column header and drag it to the new desired location. Drop the column header over its new position to set its location.
Column Sorting

The line items of the grid can be sorted to reorder the rows based on a column value. To sort the grid, click on the column header you wish to use as the basis of the sort. An arrow indicating the direction of sorting will appear next the the header label.
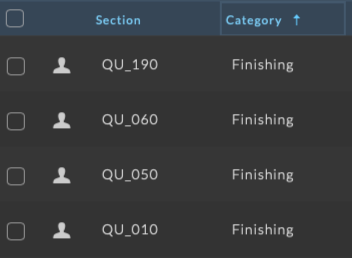
Click the header again to reverse the sorting order.
Click the header a third time to return to the default sorting state.
Additionally, users can click on the column menu ellipsis and select Sort Ascending or Sort Descending to sort the grid by the selected column.
Column Grouping
The Estimate Grid view contains functionality to group line items by information in any column. To group by column, drag and drop a column header to the bar labeled Drag a column header and drop it here to group by that column.
Multiple columns can be grouped by dragging and dropping additional column headers to the grouping bar. The grouping columns can be reordered by dragging and dropping the column headers within the grouping bar.
To remove a grouping column, click on the X to the right of the column name in the grouping bar.
Column groups can be sorted by clicking on the column name in the grouping bar. The sort direction will be indicated by an arrow next to the column name in the grouping bar.
Column groups can be collapsed by clicking on the arrow at the left of the column group row. Collapsed column groups can be expanded by clicking on the arrow again.
All column groups can be collapsed by clicking on the arrow at the far left of the grid column header bar. Clicking the arrow button again will expand all column groups.
Columns used as a grouping field will be automatically hidden from the column display. To display a grouped column, click on the column menu ellipsis and re-select the column from the Columns menu.
Hide Columns

Columns in the Estimate Grid may be hidden to customize the grid view. To hide a column click on the ellipsis menu that appears at the right of any column while hovering over the column header.
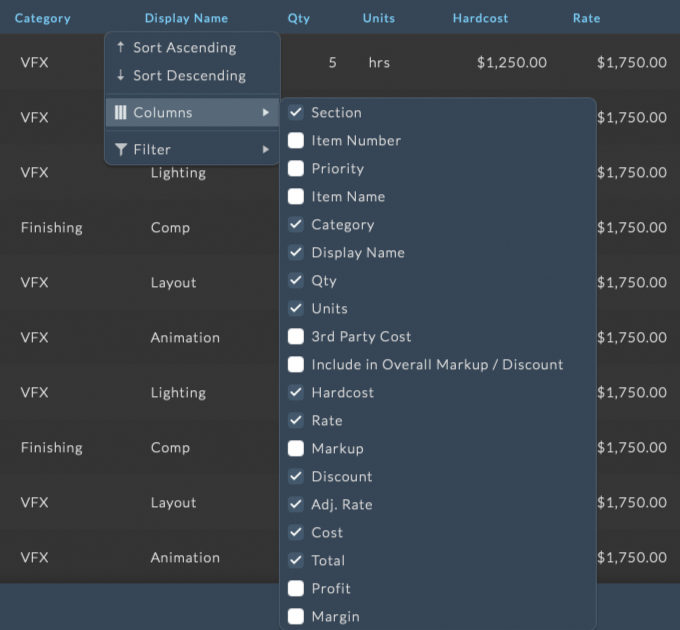
An expanded list will appear displaying all the column names within the grid.
Columns in the grid that are checked will be visible.
Click on the checkbox to the left of the column name to deselected the item and hide it from the grid.
Reselect the checkbox to display the column.
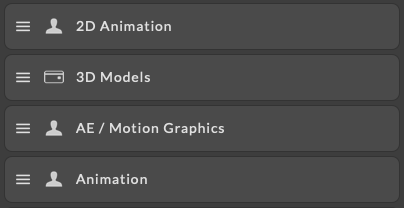
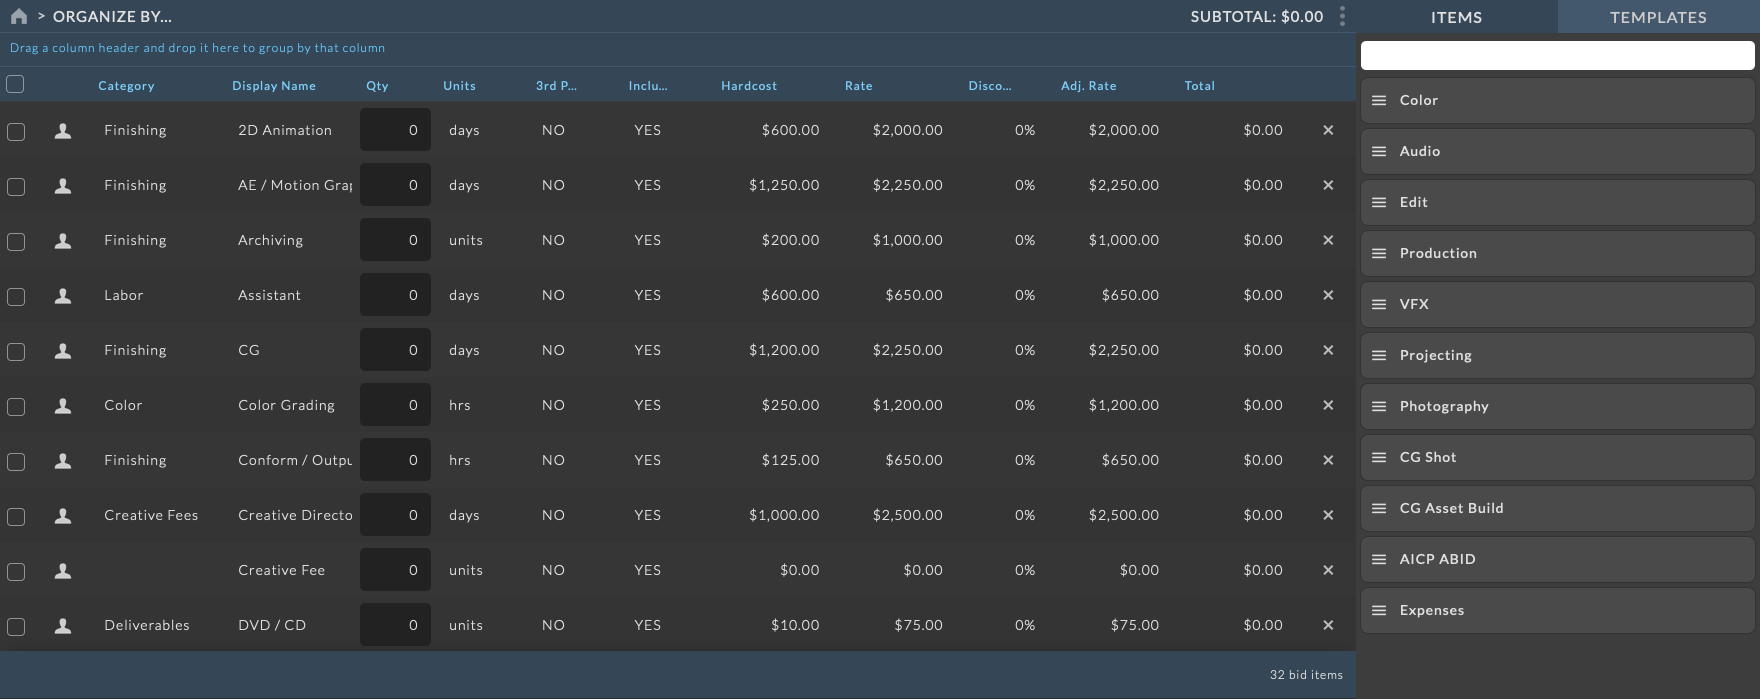
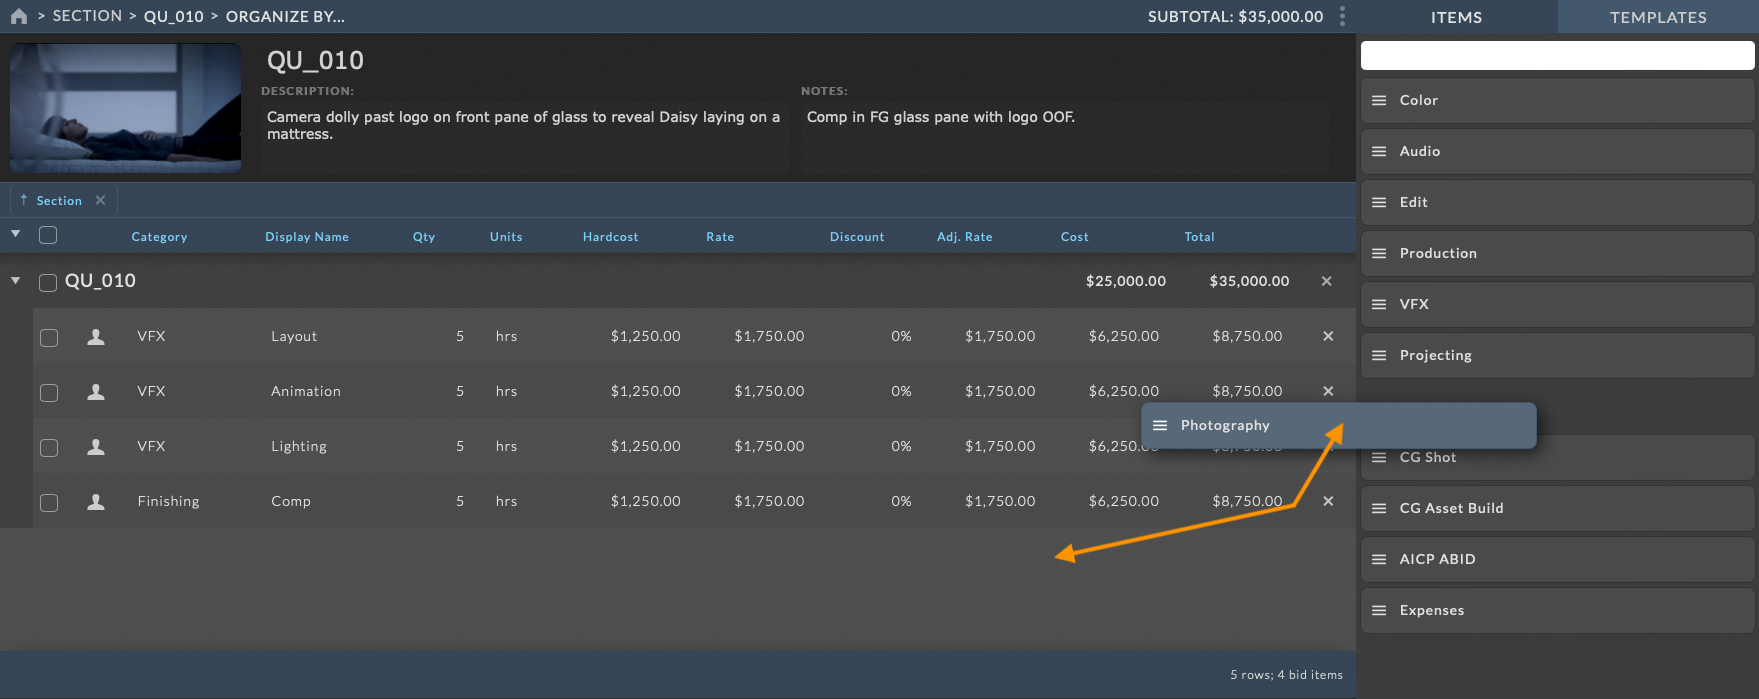
Line Items & Templates Defaults
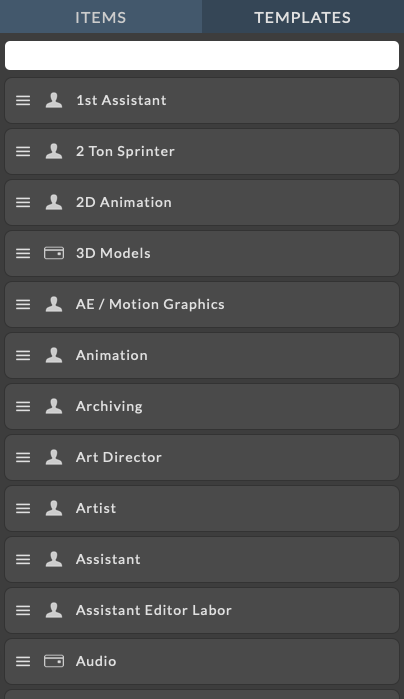
The Items and Templates tabs contain the full list of default line items and bid templates as defined in the Admin > Bidding section of NIM. These lists are used to populate the Estimate Grid with line items.
Individual line items can be added to the Estimate Grid by dragging and dropping the line item from the Items list to the Estimate Grid. For more information on creating default line items please refer to the Adding a Bid Item section of this documentation.
A Template is a collection of line items. A collection of line items can be added to the Estimate Grid at once by dragging and dropping a template from the Templates list to the Estimate Grid. For more information on Bid Templates please refer to the Creating Bid Templates section of this documentation.
For instructions on how to add a line item or template to the Estimate Grid, see the Adding Line Items section below.
Hide Items & Templates Tabs
The Items and Templates tabs can be hidden to provide more space for the Estimate Grid. To hide the Items and Templates tabs, click on the  button to the right of the Bid Component tabs. This will slide the tabs to the right and hide them from view.
To display the tabs again, click on the  button to the right of the Bid Component tabs. This will slide the tabs to the left, revealing them in the view.
Estimate Line Items
Estimates are comprised of line items with pre-defined values set in the Admin > Bidding section of NIM. These line items are used to calculate the total cost of the bid.
Line Items Types
Line items are defined as either a Labor item or an Expense item which denotes how they will be actualized when calculating the job actuals.
Labor Items - Labor items are are actualized against job timecards and indicated with a
 icon.
icon.Expense Items - Expense items are actualized against the job expenses and indicated with a
 icon.
icon.
Line Items Details
Each line items contains pertinent information to the organization and total cost of the bid. The table below describes the details of each line item.
ITEM DETAIL |
DESCRIPTION |
|---|---|
Section |
The line item section denotes which section a line item belongs to. Sections are used to group line items together for display purposes. All estimates start with a default section. |
Category |
The line item category is set in the line item defaults and is used to group line items together for display purposes. |
Item Number |
This value is a user defined field to correlate this bid item with an external value such as a corresponding spreadsheet line item number. |
Priority |
A priority value used for custom sorting of items. |
Item Name |
The internal name of the line item and is not editable in the estimate. |
Display Name |
This is the name that will appear on the final bid and is editable within the form. The default value is taken from the bid items settings in the administrative section of NIM. |
Quantity |
The total quantity of units for this line item. All line items will initially be added to the estimate with a quantity of 0. When saving a bid, any line items that remain with a quantity of 0 will be removed from the estimate. |
Units |
The type of units for this line item. Options include units, hrs, and days. The default value is taken from the bid items settings in the administrative section of NIM. |
Third Party Costs |
This is a flag that allows these values to be broken out as a separate total. The total of all 3rd party costs are displayed independently in the bid totals. Items marked as a third party cost can optionally be flagged in the bid PDF with a indicator to denote that they are a third party cost. |
Included In Overall Markup / Discount |
This checkbox determines whether or not a particular line item is discounted when an Overall Discount is applied. Items not included in the overall markup or discount will be displayed in the bid PDF with a indicator to denote that they are not included. |
Hardcost |
This is the hard cost per unit for the line item. The default value is taken from the bid items settings in the administrative section of NIM. |
Rate |
This is the initial rate per unit for the line item. The default value is taken from the bid items settings in the administrative section of NIM. |
Markup |
This is an individual line item markup applied to the rate. Adjusting this value will modify the Adjusted Rate and Cost accordingly. |
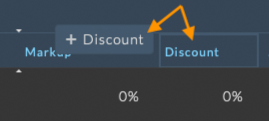
Discount |
This is an individual line item discount applied to the rate. Adjusting this value will modify the Adjusted Rate and Cost accordingly. |
Adjusted Rate |
The adjusted line item rate as defined by the rate factored against the markup and discount. Adjusting this value will modify the Markup or Discount accordingly. |
Cost |
The total hard cost of the line item by factoring the Hardcost by the number of units. This is a derived value from the line item and not editable in the estimate. |
Total |
The total cost of the line item by factoring the Adjusted Rate by the number of units. This is a derived value from the line item and not editable in the estimate. |
Profit |
Calculated as the bid Total minus the bid Cost. This is a derived value from the line item and not editable in the estimate. |
Margin |
Calculated as the bid Profit divided by the bid Total. This is a derived value from the line item and not editable in the estimate. |
Adding Line Items
Line items can be added to the Estimate Grid by dragging and dropping an individual line item from the Items list or a group of line items from the Templates list to the Estimate Grid. For more information on creating default line items please refer to the Adding a Bid Item section of this documentation.
Add Single Line Item
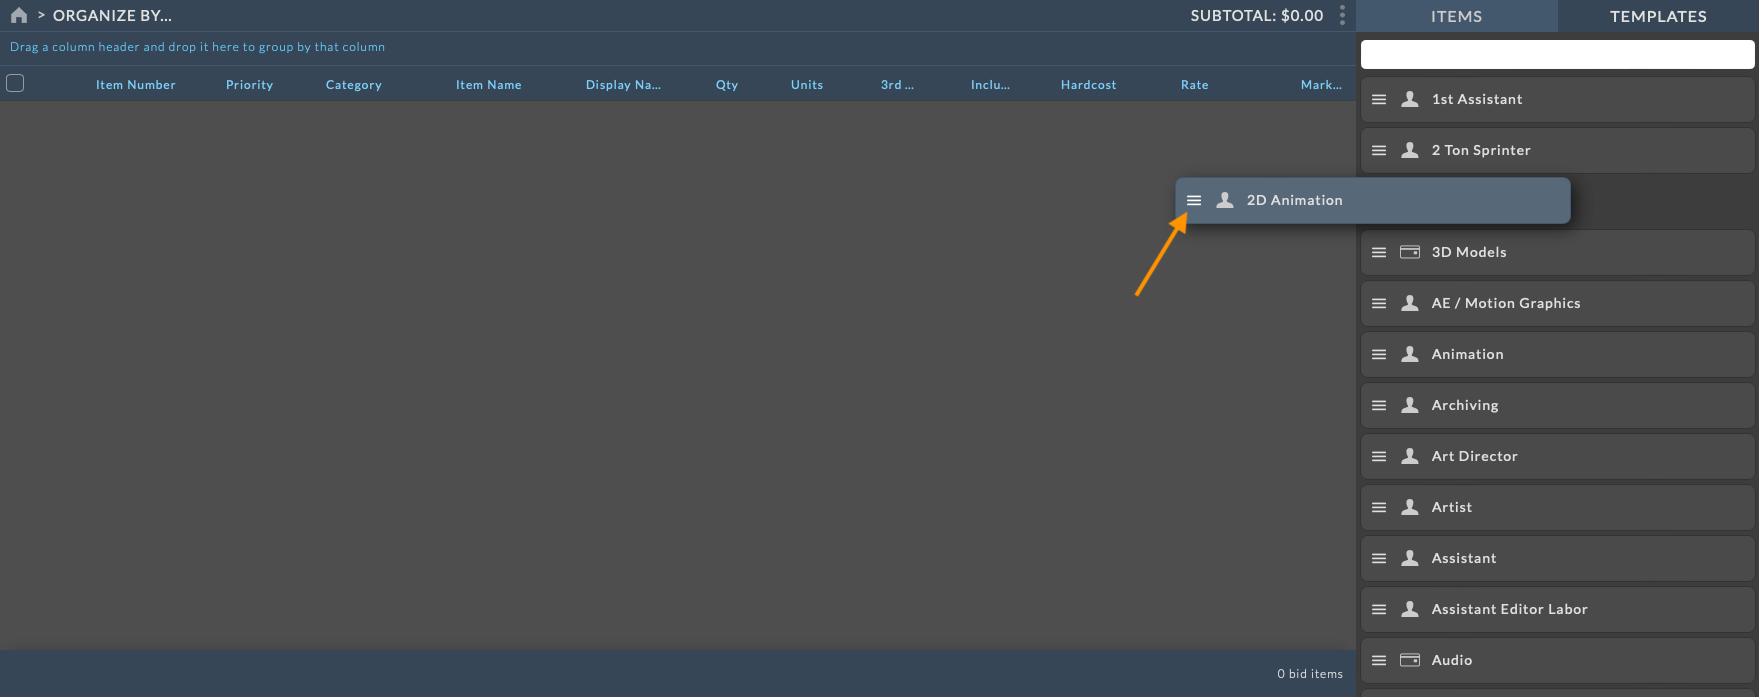
To add an individual line item to a bid, click on the Items tab from the Line Item & Templates lists. Then click on the line item drag handle and drag the line item from the list to the Estimate Grid.

Drop the line item over the Estimate Grid to add the line item to the estimate. The line item will be added to the estimate with a quantity of 0. All line items with a quantity of 0 will have a dark quantity cell background to quickly identify line items with 0 quantity.
Add Template Items
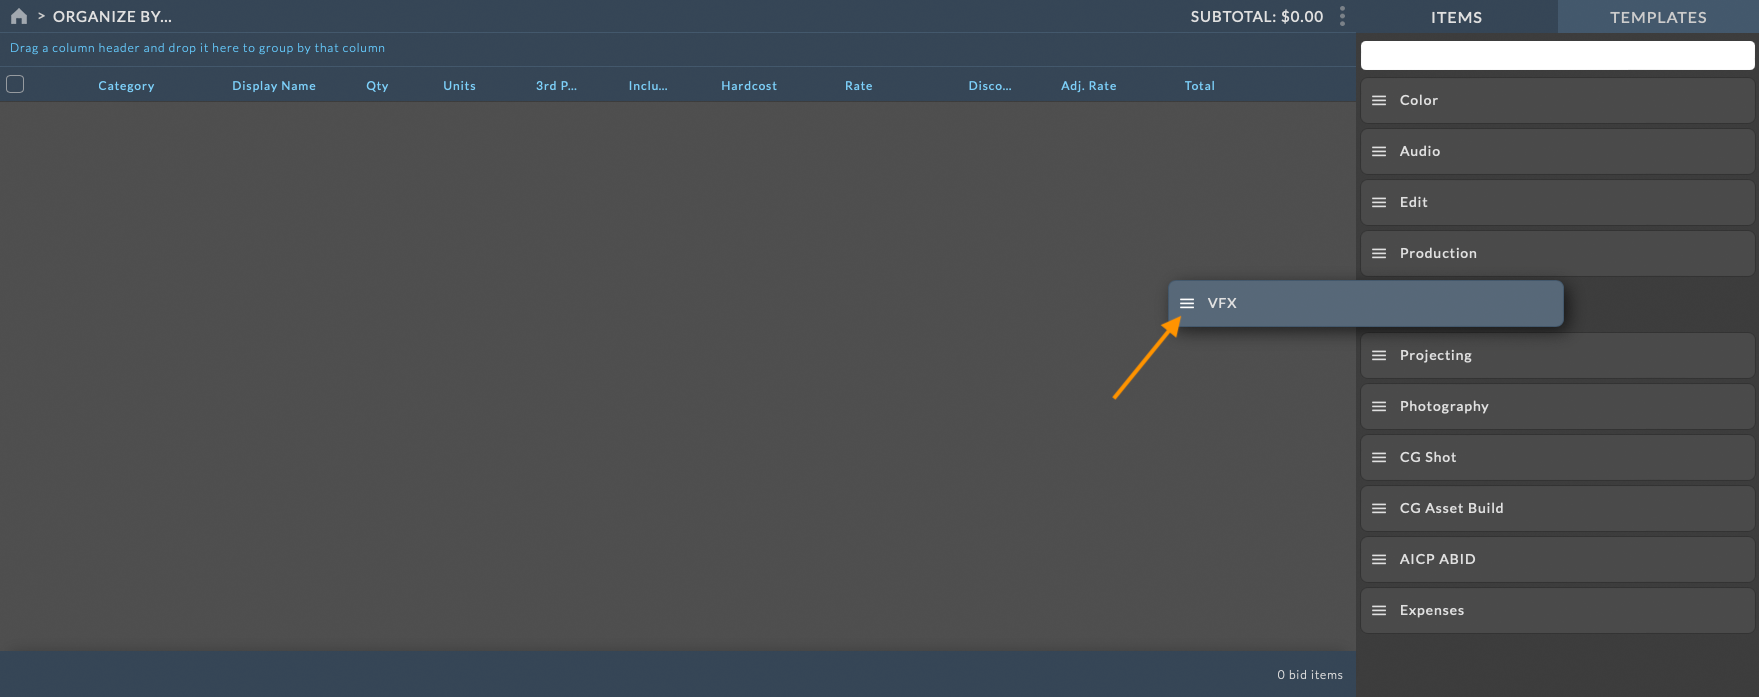
To add a collection of line items to a bid, click on the Templates tab from the Line Item & Templates lists. Then click on the template drag handle and drag the template from the list to the Estimate Grid.
Drop the template over the Estimate Grid to add the collection of line items to the estimate. The line items will be added to the estimate with a quantity of 0. All line items with a quantity of 0 will have a dark quantity cell background to quickly identify line items with 0 quantity.
Note
Any item left with a quantity of 0 when the bid is saved will be removed from the bid.
Editing Line Items
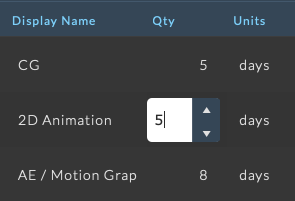
To edit a line item value, click in the desired cell to be edited. The cell will become editable with an input field appearing in the cell. Enter the desired value for the field and press the Enter key. The cell will return to its default state and the cursor will disappear from the cell. Clicking the ESC key will discard any changes made to the cell and return the cell to its default state.
Keyboard navigation can also be used to complete a cell entry. Clicking the Tab key will complete the entry and move the cursor to the next cell to the right. For more information on keyboard navigation within the Estimate Grid please refer to the Keyboard Navigation section below.

Editable cells will have a blue border when the cursor is over the cell. Clicking on an editable cell will display the input field for the selected cell. Pressing Enter when a cell is in the edit state will save the value and return the cell to its default state.
Non-editable cells will have a dark border if the cell is selected. Non-editable cells include the Section, Category, Item Name, Cost, Total, Profit, and Margin. These cells are derived from the line item and are not editable in the estimate.
When a cell has been edited, or a derived value has been altered, a blue tick will appear in the top left corner of the cell. This indicates that the value has been changed and will be saved when the bid is saved.

Derived Values
Some fields within the line item row are read only values derived from other fields within the line item. These fields include the Cost, Total, Profit, and Margin. These values are calculated based on the quantity, hardcost, and adjusted rate of the line item. These fields are not editable in the estimate and are calculated based on the values of the line item.
The Markup, Discount, and Adjusted Rate columns are editable, but are also values that can be derived from entries in the other fields. For example, adding a 10% Discount will automatically lower the Adjusted Rate. The Markup can also be entered and the Adjusted Rate will be automatically calculated. The Adjusted Rate can also be manually entered and the corresponding Markup or Discount will be automatically calculated. When a Discount is applied to a line item either directly or indirectly, the Markup will be set to 0%. Similarly, when a Markup is applied to a line item either directly or indirectly, the Discount will be set to 0%.
Keyboard Navigation
The Estimate Grid can be navigated using keyboard controls. When a cell has been selected, users can navigate up, down, left, and right to other cells with the arrow keys.
Clicking the Tab key will move the cursor to the next cell to the right. Clicking the Shift + Tab keys will move the cursor to the next cell to the left.
Selecting Line Items
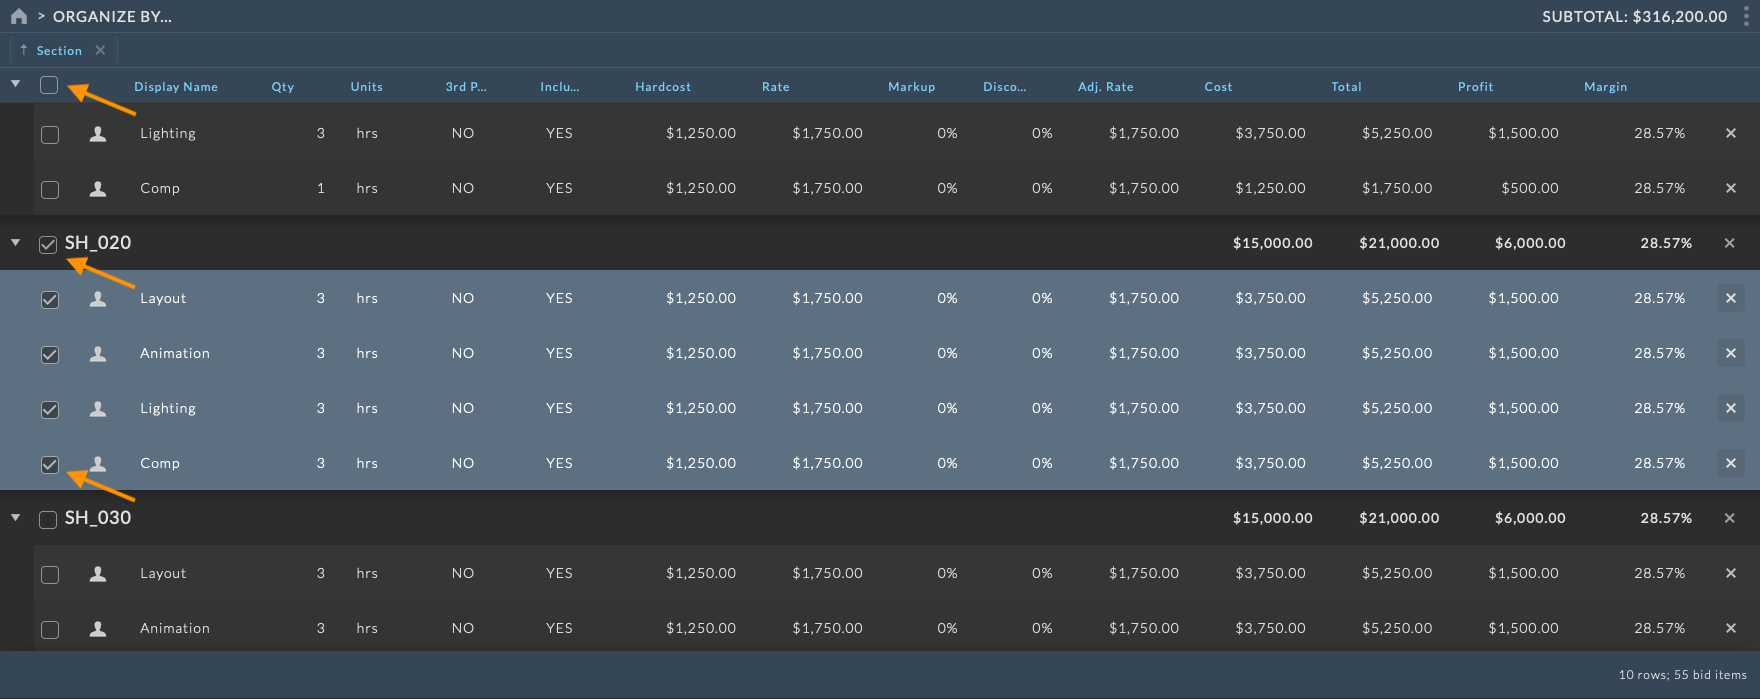
Multiple bid line items can be modified at once by selecting the checkbox to the left of a bid line items. Entire groups can be selected by checking the box to the left of the group name, and all items in a bid can be selected or deselected by clicking the checkbox at the left of the Estimate Grid header row.
Duplicating Line Items
Bid line items may be duplicated at once or multiple at a time by selecting the desired line items to be duplicated, opening the Toolbar Menu, and then selecting Duplicate Selected.

When duplicating items, you will be prompted to confirm the duplication. Clicking OK will duplicate the selected items. Clicking Cancel will cancel the duplication. When the items are duplicated, the new items will be selected.
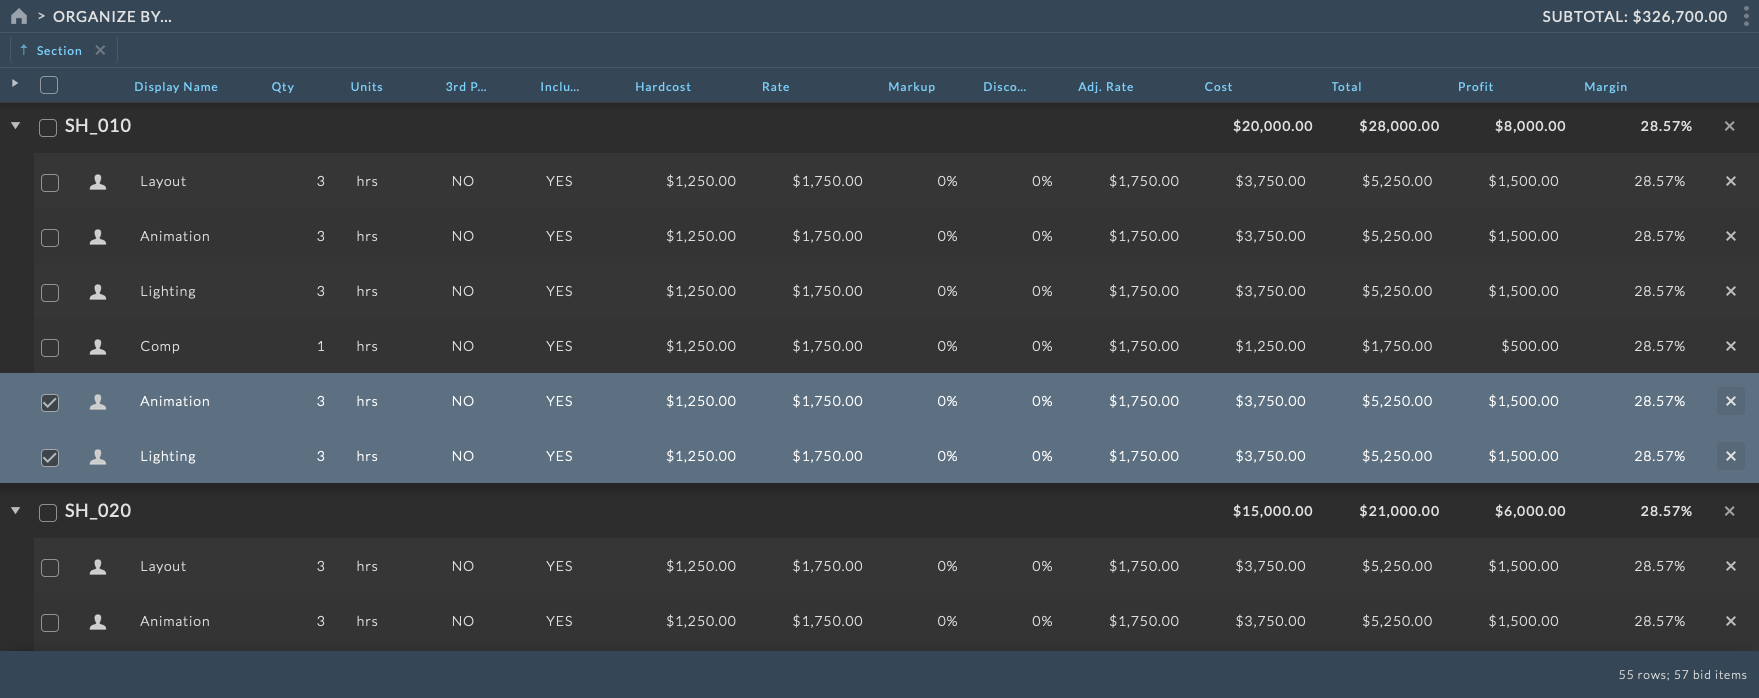
Copy/Move Line Items to Section
Bid line items may be copied or moved to a different section by selecting the desired line items to be copied or moved, opening the Toolbar Menu, and then selecting Copy Selected to Section or Move Selected to Section respectively.
A popup will appear with a dropdown menu to select the section to copy or move the selected items to. Select the desired section from the dropdown and click OK to copy or move the selected items to the selected section. Click Cancel to cancel the copy or move.
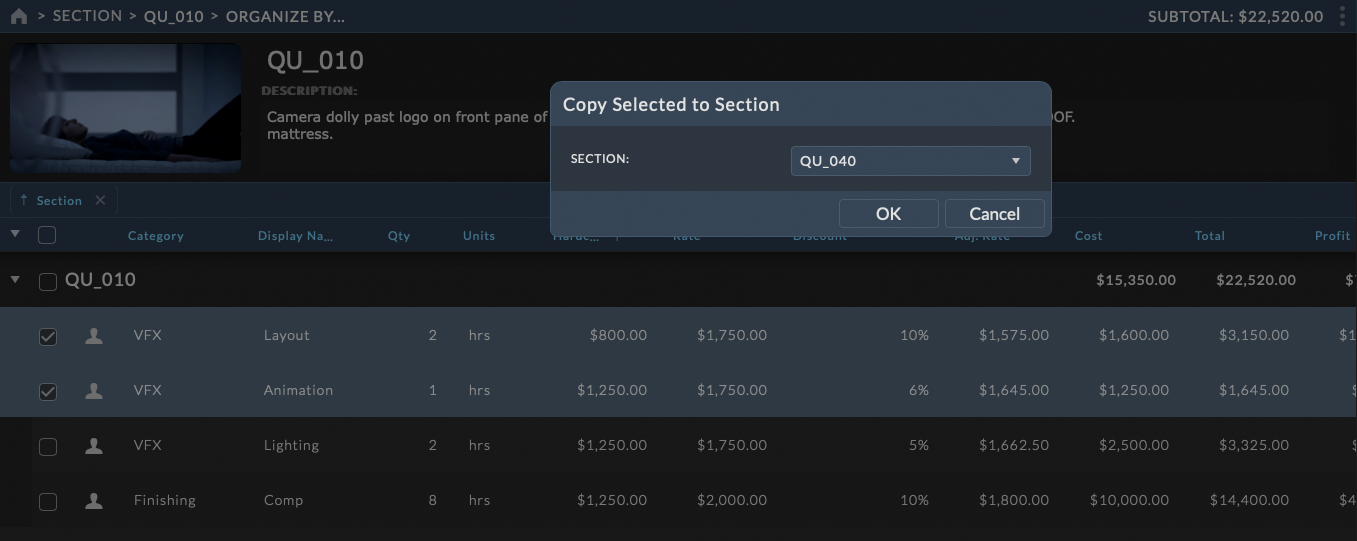
Note
When items are copied or moved, the new items will be selected. If the section the items are copied or moved to is not currently visible in the Estimate Grid, the new items will be deselected.
Saving Line Items

If there are unsaved changes, the Save button will be highlighted. To save a bid, click the save button  at the top right of the bid toolbar. This will save any changes made to the current version of the bid. When a bid has unsaved changes the save button will be highlighted. When all changes to the bid have been successfully saved, the Save button will no longer be highlighted.
Revert Changes
If you are editing an individual cell in the Estimate Grid and wish to undo those changes, click the ESC key to discard any changes made to the cell during the edit and return the cell to its default state.
If you have multiple changes that have been committed to cells in the Estimate Grid but not saved, and wish to undo those changes, click the Revert Changes button  at the top right of the bid toolbar. This will undo any change made to the bid version and return it to the last save state.
Important
There is no undo option for reverting changes. Once the bid version has been reverted the last save state, any unsaved changes prior to reverting the bid version are gone.
Deleting Line Items
Bid line items may be deleted at once or multiple at a time. To delete an individual line item, click the X button at the right of the line item row. To delete multiple line items, begin by selecting the desired line items to be deleted by, opening the Toolbar Menu, and then selecting Delete Selected. When deleting items, you will be prompted to confirm the deletion. Clicking OK will delete the selected items. Clicking Cancel will cancel the deletion.
Important
There is no undo option for deleting a line item. Once a line item is deleted, it is gone.
Estimate Sections
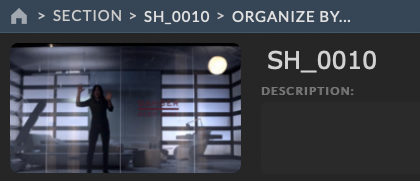
Estimate Sections provide a top level organizational structure for the bid estimate. Sections can be accessed via the Organization Menu by selecting Sections from the Organize By… dropdown. In addition to providing an organizational structure to the bid estimate, Sections include options to add images, descriptions, and notes to each section.
Creating Sections
All bid estimates start with one section set as the default section named Section. Line items added to the estimate at the top level of the Organization Menu will be added to the default section. Items added to the estimate while within a section will be assigned to that section. Additional sections can be created individually or in a sequence. To create a new Section, open the Toolbar Menu, and then select New Section from the popup menu.
This will immediately create a new section and navigate to the newly created section within the estimate. The new section will be named New Section. Hovering over the Section details will display a blue border on editable items. To rename the section, click on the section name and enter the new name. Clicking outside of the section name input, or pressing TAB will set the new section name.
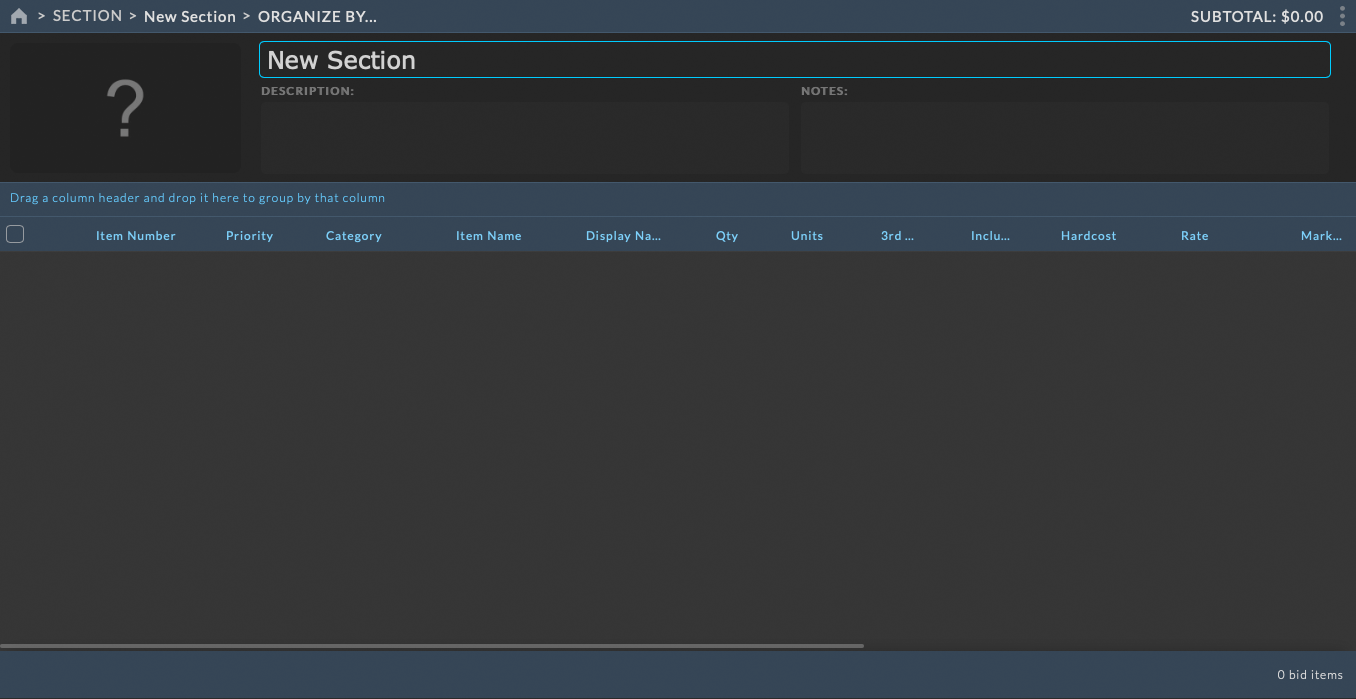
For more information on editing sections, see Editing Sections below.
Section Sequences
Sections can be created in sequence with a Template added per section to quickly create multiple sections with line items. To create a new Section Sequence, open the Toolbar Menu, and then select New Section Sequence from the popup menu.
The New Section Sequence dialog box will appear with options to create the new sections.
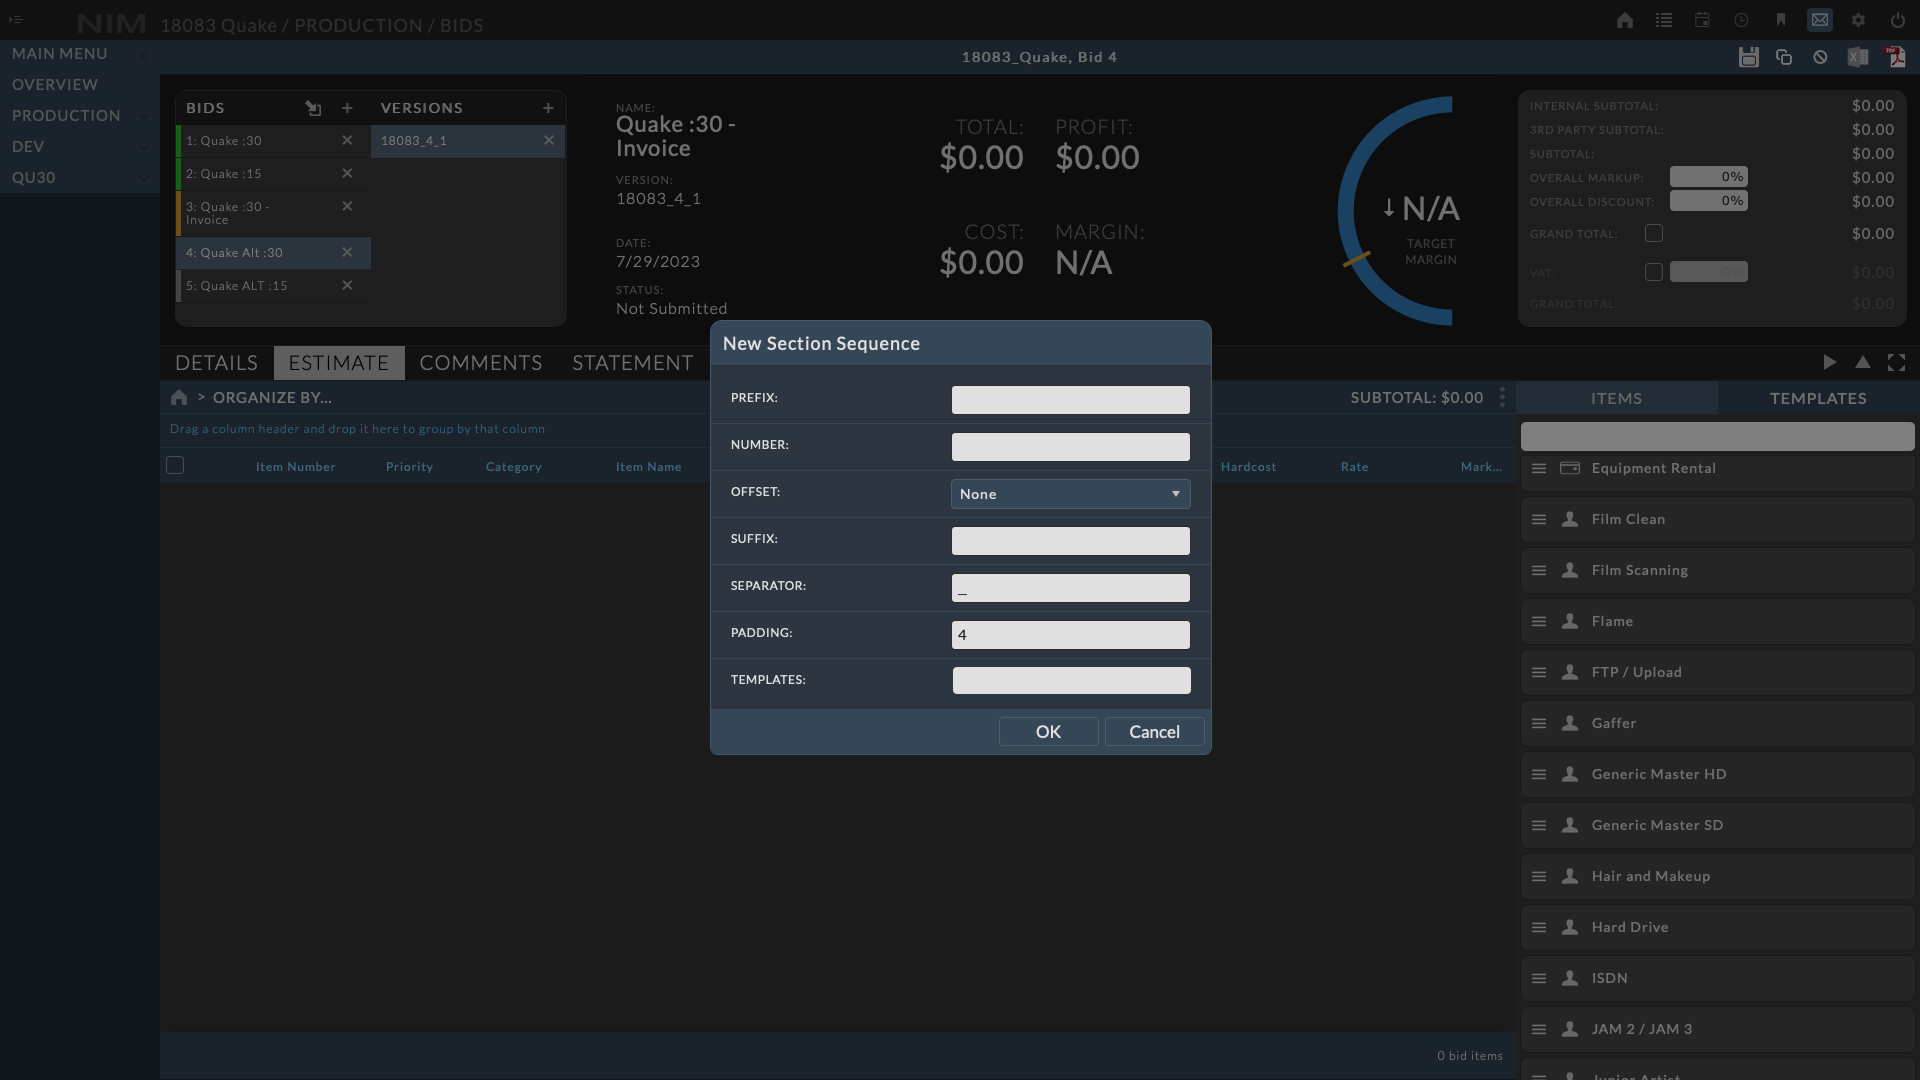
Options for creating a new Section Sequence include:
Prefix |
|
Number |
|
Offset |
|
Suffix |
|
Separator |
|
Padding |
|
Templates |
|
Note
Default values for the section separator and padding can be defined in ADMIN > Bid Defaults.
After the Section Sequence settings have been entered, click OK to create the new sections. Click Cancel to return to the estimate without creating any new sections. To start working with the new sections, click on a section row in the Estimate Grid, select a section from the Organization Menu, or select Edit Section from the Section ellipsis menu.
Default Section
All bid estimates start with a default section named Section. The section marked as the default section cannot be deleted, but it can be renamed and reassigned. When viewing Sections, the default section is denoted with a light blue tick at the upper left of the section row.
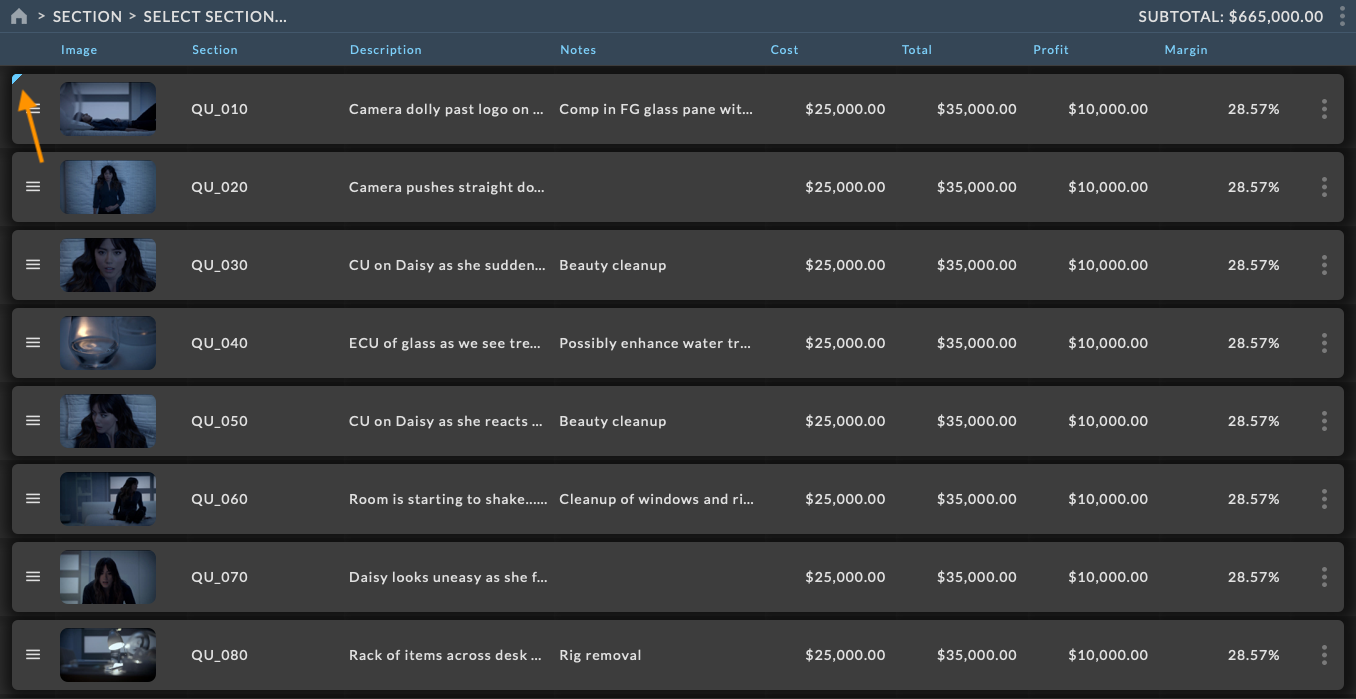
The default section can be changed by clicking on the Section ellipsis menu at the right of the row and choosing Set As Default Section from the popup menu.
Note
All items added to the bid at the top level of the Organization Menu will be added to the default section. Items added to the bid while within a section will be assigned to that section.
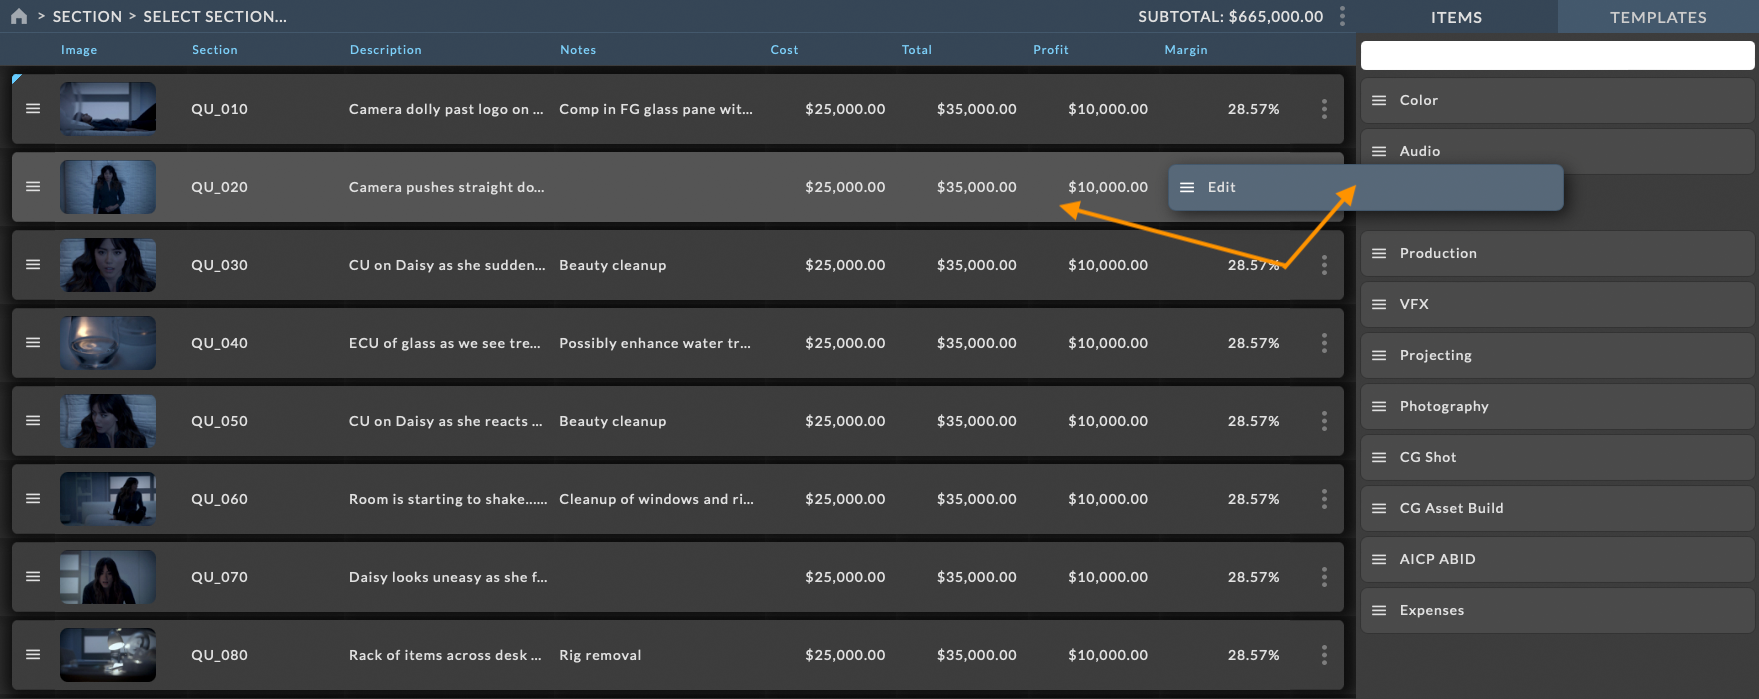
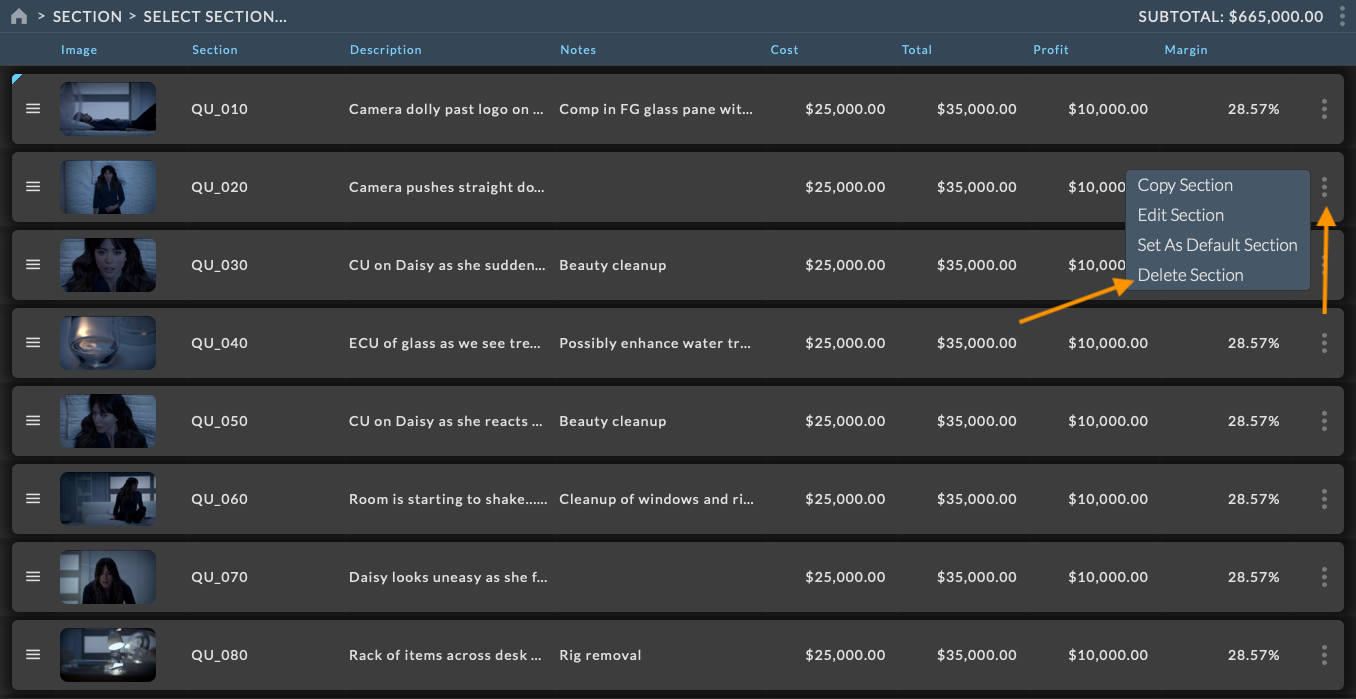
Editing Sections
When working with sections, each section can be duplicated, set as the default section or deleted using the Section Menu. Section information including images, descriptions, and notes can be edited directly from the section list by selecting Edit Section from the Section Menu or by entering the section and working directly with the Section Details Panel.
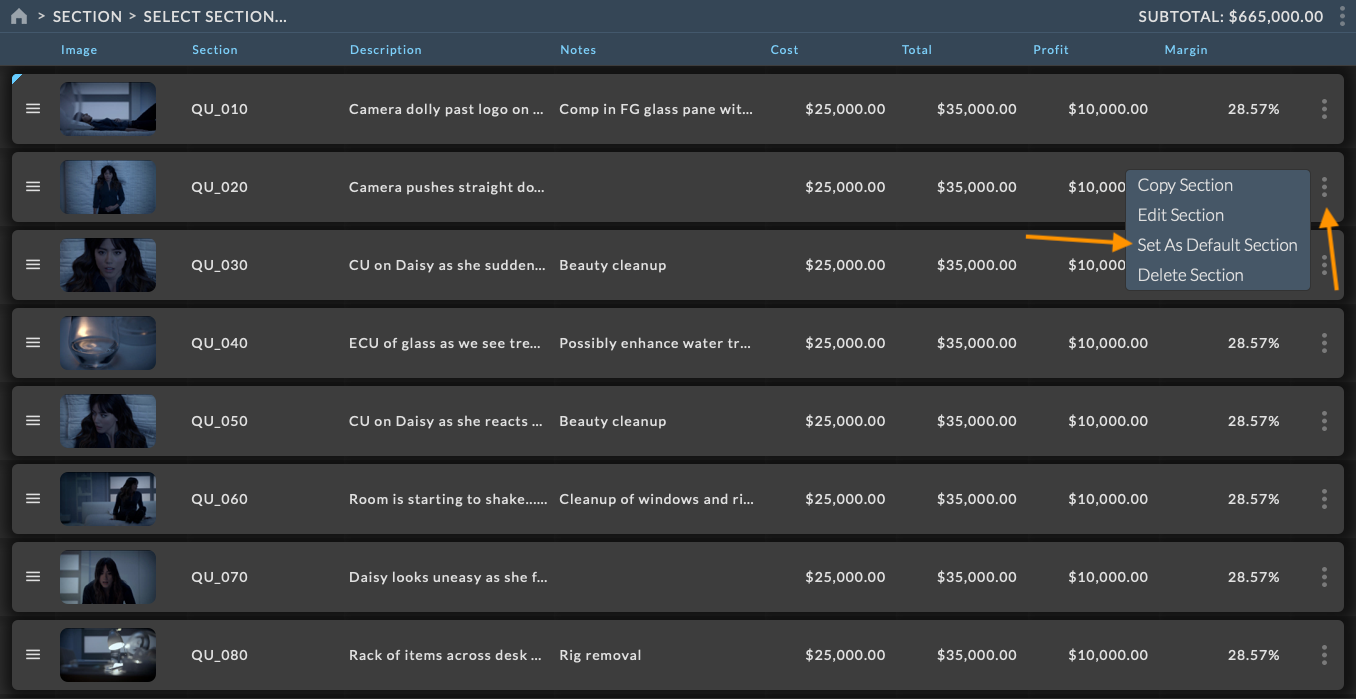
Section Menu
The Section Menu can be accessed by clicking on the ellipsis menu at the right of the section row.
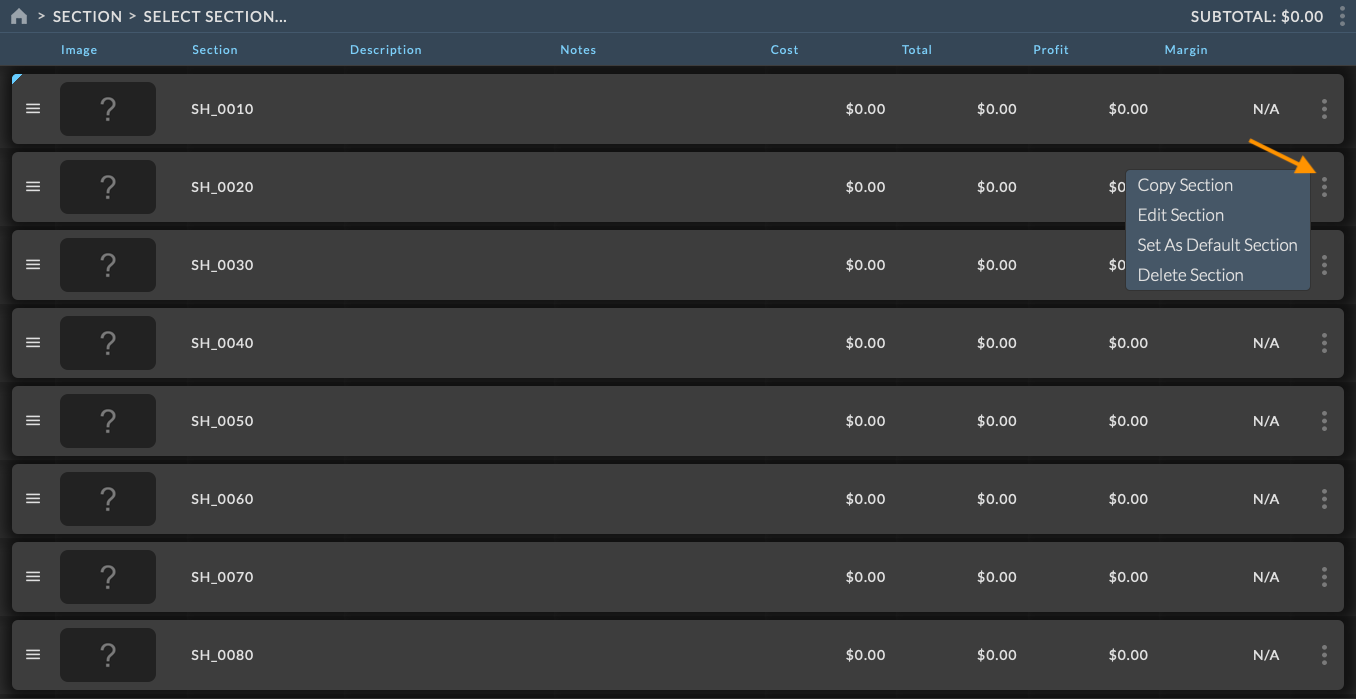
Available options within the Section Menu include:
Copy Section - Creates a copy of the selected section. Copying a section creates a new section with the same name and line items as the original section.
Edit Section - Opens a popup with the section details for editing.
Set As Default Section - Sets the section as the default section.
Delete Section - Deletes the section. Deleting a section will also delete all line items within the section.
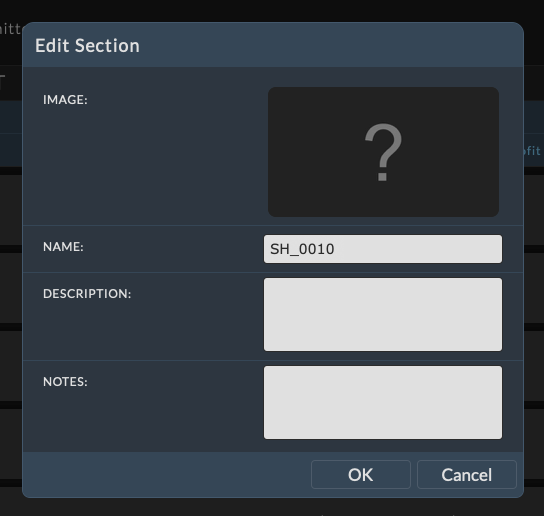
When editing a section from the Section Menu, the section details will open in a popup window for editing. The section details include:
Image - The image is used to visually identify the section in the Estimate Grid and can optionally be included in the exported bid PDF.
Name - The name of the section used to identify the section in the Estimate Grid and the exported bid PDF.
Description - The description of the section and can optionally be included in the exported bid PDF.
Notes - The notes of the section and can optionally be included in the exported bid PDF.
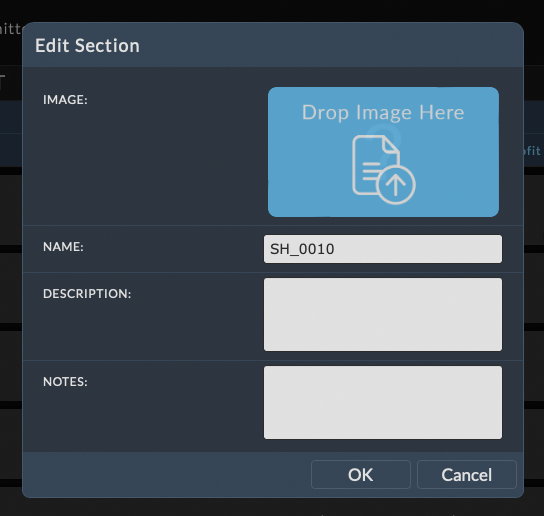
To upload a section image, drag and drop an image file onto the image area labeled “Drop Image Here”. The image area will automatically change to show the “Drop Image Here” when dragging a file over the browser window to indicate the dropzone.
Drop the file onto the highlighted dropzone to upload the file. During the upload process a spinner will indicate the progress of the upload.
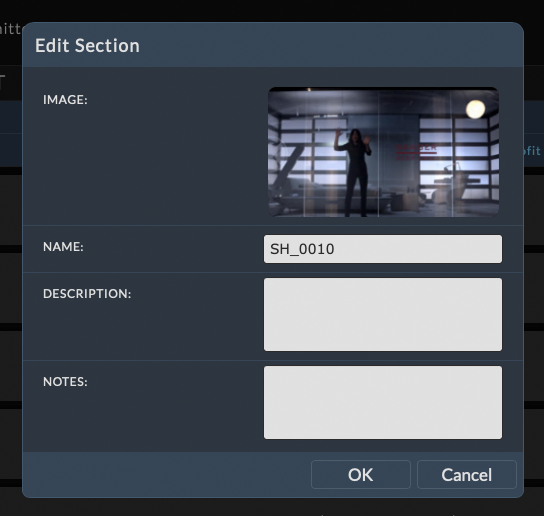
Once the image has been uploaded, the image will be displayed in the image area. This section image will now be available in the Estimate Grid, the section details, and the exported bid PDF.
To replace an existing image, repeat the process of dragging and dropping an image file onto the image area. The new image will replace the existing image. This action is not reversible.
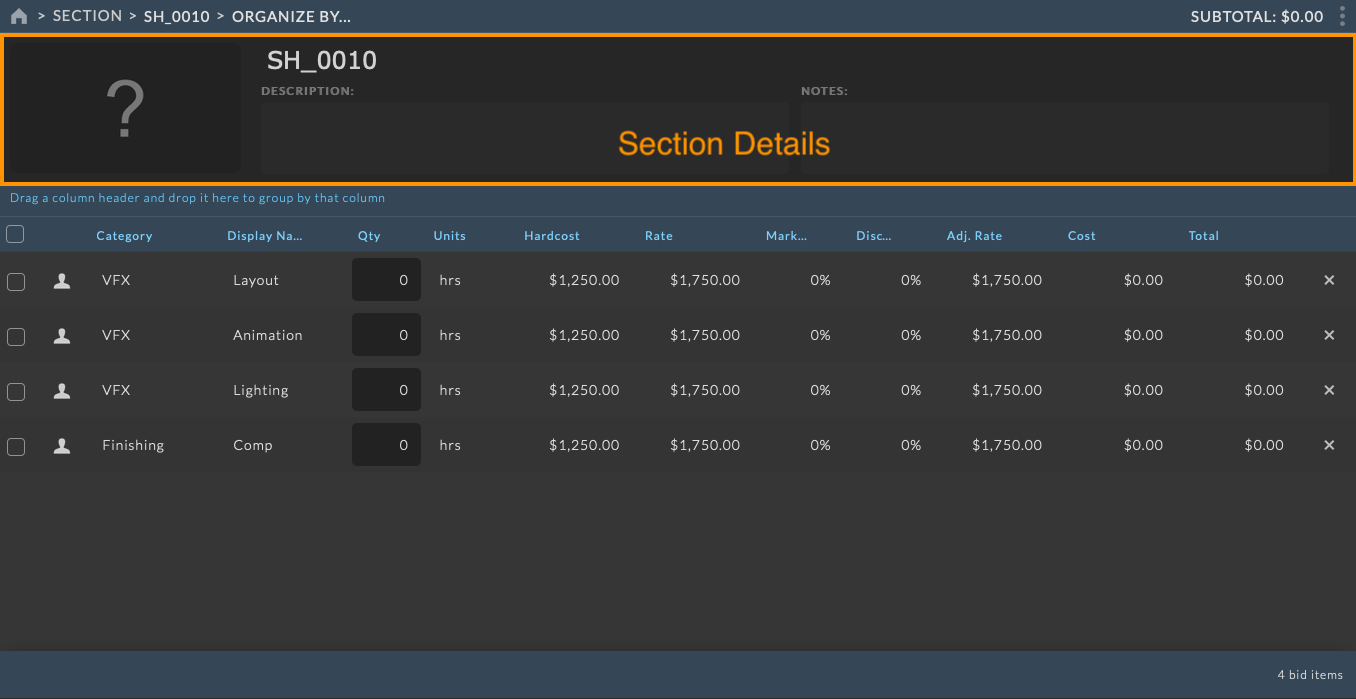
Section Details Panel
The section details can also be accessed via the Section Details Panel by clicking on the section name in the Organization Menu or by clicking on the section in the Estimate Grid.
Uploading a section image is the same process as the using the section details popup window.
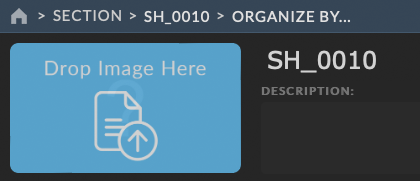
To upload a section image, drag and drop an image file onto the image area labeled “Drop Image Here”. The image area will automatically change to show the “Drop Image Here” when dragging a file over the browser window to indicate the dropzone.
Drop the file onto the highlighted dropzone to upload the file. During the upload process a spinner will indicate the progress of the upload.
Once the image has been uploaded, the image will be displayed in the image area. This section image will now be available in the Estimate Grid, the section details, and the exported bid PDF.
To replace an existing image, repeat the process of dragging and dropping an image file onto the image area. The new image will replace the existing image. This action is not reversible.
Hovering over items in the section details will display a blue border around editable items.
To rename the section, click on the section name and enter the new name. Clicking outside of the section name input, or pressing TAB will set the new section name.
To edit the section description, click on the area below the Description title and enter the section description. Clicking outside of the section description input, or pressing TAB will set the section description.
To edit the section notes, click on the area below the Notes title and enter the section note. Clicking outside of the section notes input, or pressing TAB will set the section note.
Note
Changes made to sections will not be committed until the bid is saved.
Hide Details Panel
The Section Details Panel can be hidden by clicking on the Toolbar Menu and selecting Hide Details from the popup menu.
Once the Section Details Panel has been hidden, it can be shown again by clicking on the Toolbar Menu and selecting Show Details from the popup menu.
Note
This option is only available when a section is loaded into the Estimate Grid.
Adding Line Items
Adding line items to a section is the same process as adding line items to the top level of the Organization Menu. Line items can be drag and dropped from the Items or Templates tabs of into the Estimate Grid while in a section. Items added to the estimate while within a section will be assigned to that section. Line items added to the estimate at the top level of the Organization Menu will be added to the default section.
In addition to adding line items to the Estimate Grid while in a section, line items can also be added to a section by dropping them onto a section when viewing the section list. To add a line item or template to a section in the section list, drag the line item or template over a section in the section list. The section to which the line item or template will be added will be highlighted. Drop the line item or template onto the highlighted section to add the line item or template to the section.
Deleting Sections
Sections can be deleted by clicking on the Section Menu and selecting Delete Section from the popup menu. Deleting a section will also delete all line items within that section. A confirmation dialog will be displayed to confirm the deletion of the section.
Note
If a section is accidentally deleted, the section can be restored by clicking on Revert Changes button on the bid toolbar. This will revert all changes made to the bid since the last save.
Sorting Sections
Sections within the Estimate Grid can be sorted by clicking on a column header in the section list. Clicking on a column header will sort the sections in ascending order. Clicking on the column header again will sort the sections in descending order. Clicking on the column header a third time will remove the sort and return the sections to their default order.
Sections can also be sorted manually by selecting the drag handle on the section row and dragging and dropping the section to the desired location. The manual order defined will become the default sort order when no column sorting is applied.
The sort order set within the UI can be used for the section order in the PDF export. The section order can also be set manually for the PDF export independent of the UI order. See the Export Settings section for more details.