User Timecards
Users timecards track the time spent for a task and are used to determine job actuals and burn rates. Timecard entry is available to all users with several methods to create and modify timecards.
Timecard UI
For all users, the  button in the NIM toolbar opens the user daily timecard panel for quick entry of timecards.
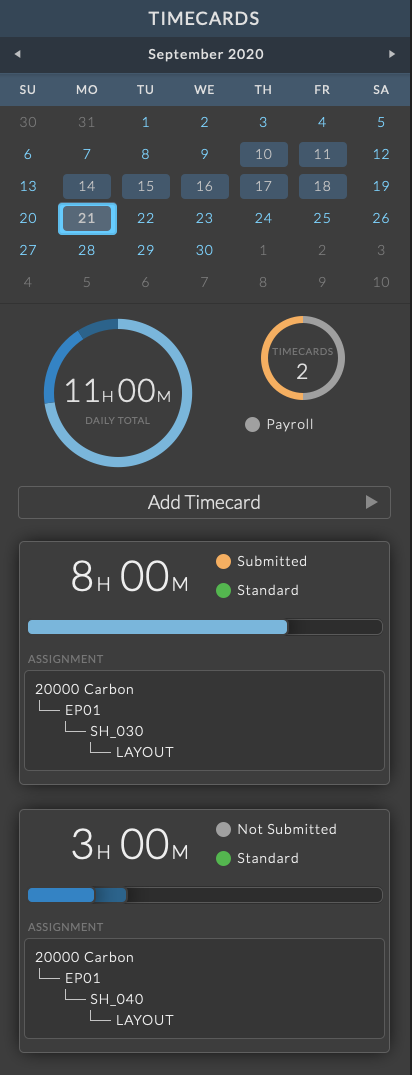
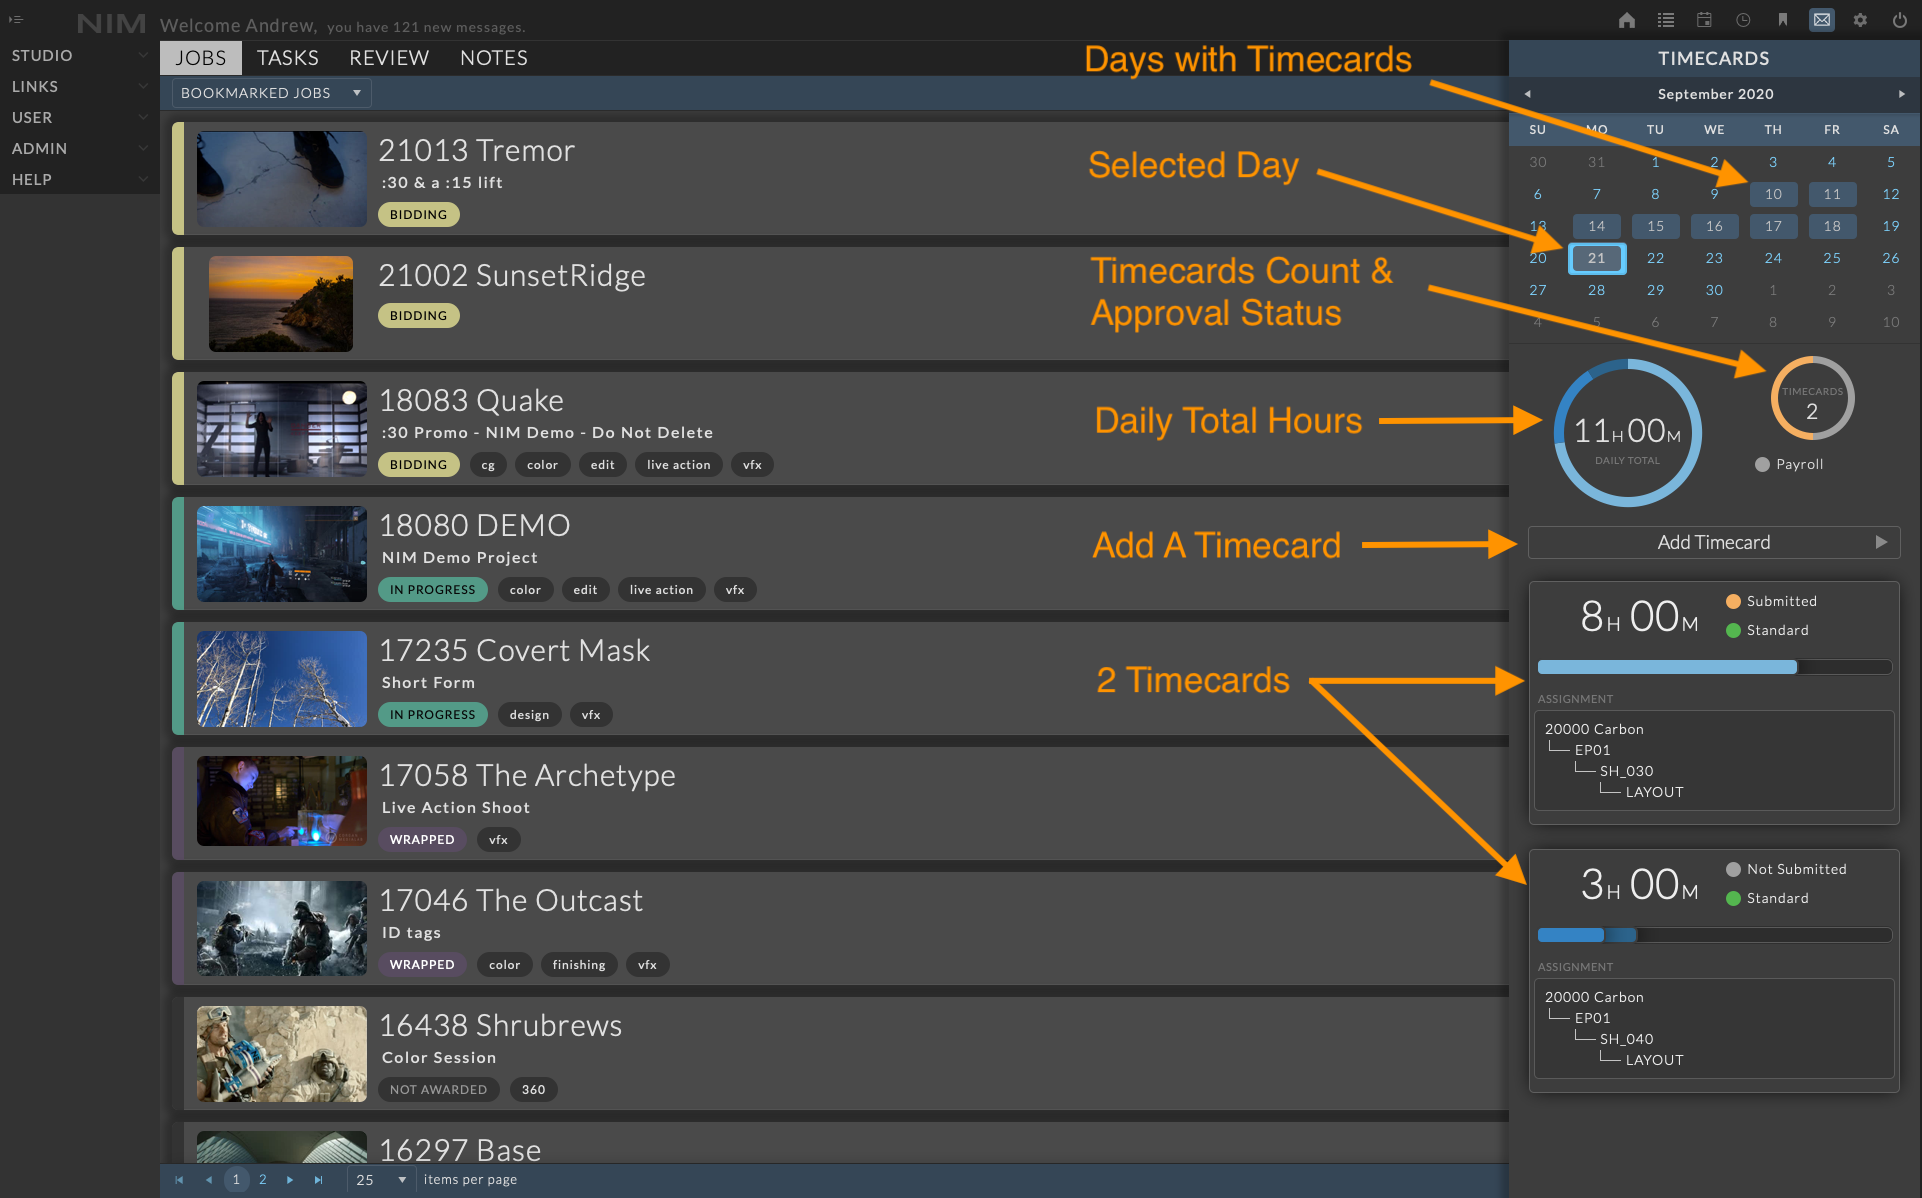
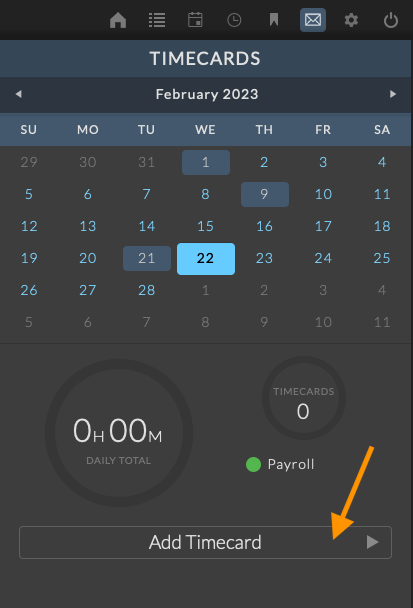
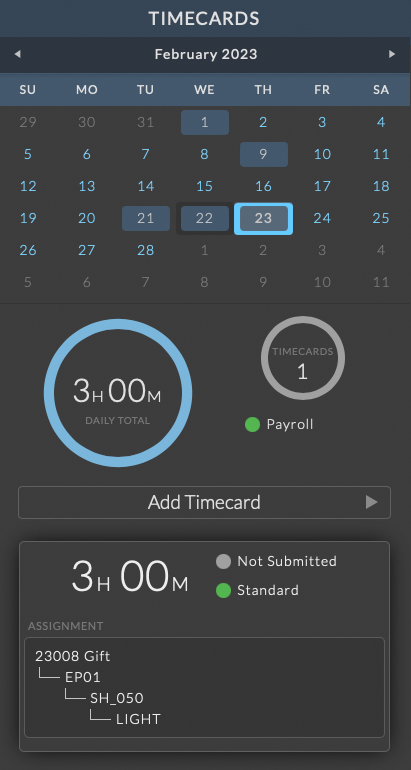
The selected date is highlighted in blue. Dates that contain existing timecards are marked in light grey.
Below the date selection calendar are two charts displaying the daily total time as well as the total number of timecards on the day. An additional indicator shows if the timecard is on or off Payroll. Grey denotes off and green denotes on Payroll.
The colors in the daily total chart start as light blue for regular time and progress towards darker shades of blue for overtime rate 1 and overtime rate 2 hours. Non-billable hours are displayed as grey.
The timecards chart colors depict the submission status of all timecards on the day. Hovering over the charts will display a tooltip with more detailed information.
The Add Timecard button allows users to add a new timecard on the selected day. Clicking the Add Timecard button will slide over the timecard info panel.
Any existing timecards on the day will be shown with their total time, submission status, time type, rate breakdown (if not on Payroll) and task assignment. Multiple timecards can be entered on a single day spanning multiple tasks on the same job or across different jobs. Information about a timecard is available by clicking on the timecard details.
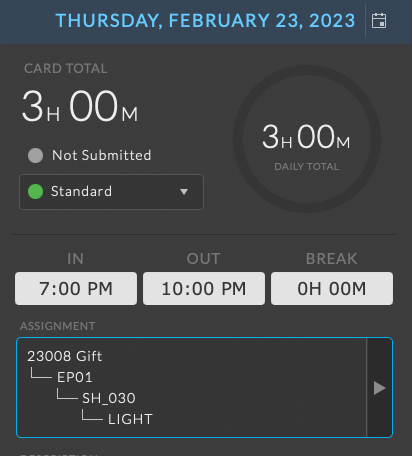
Below is a UI breakdown of the daily timecard panel.
Timecard Info Panel
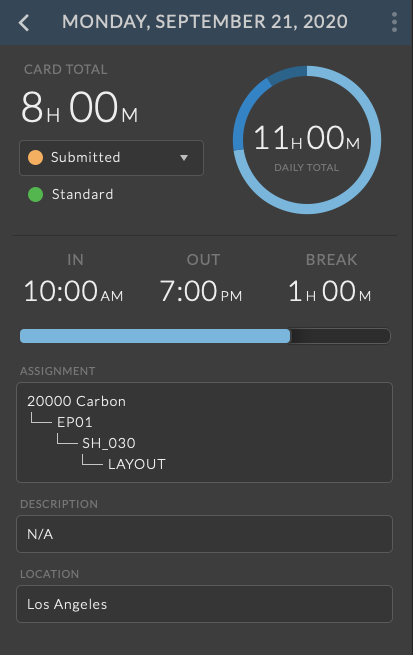
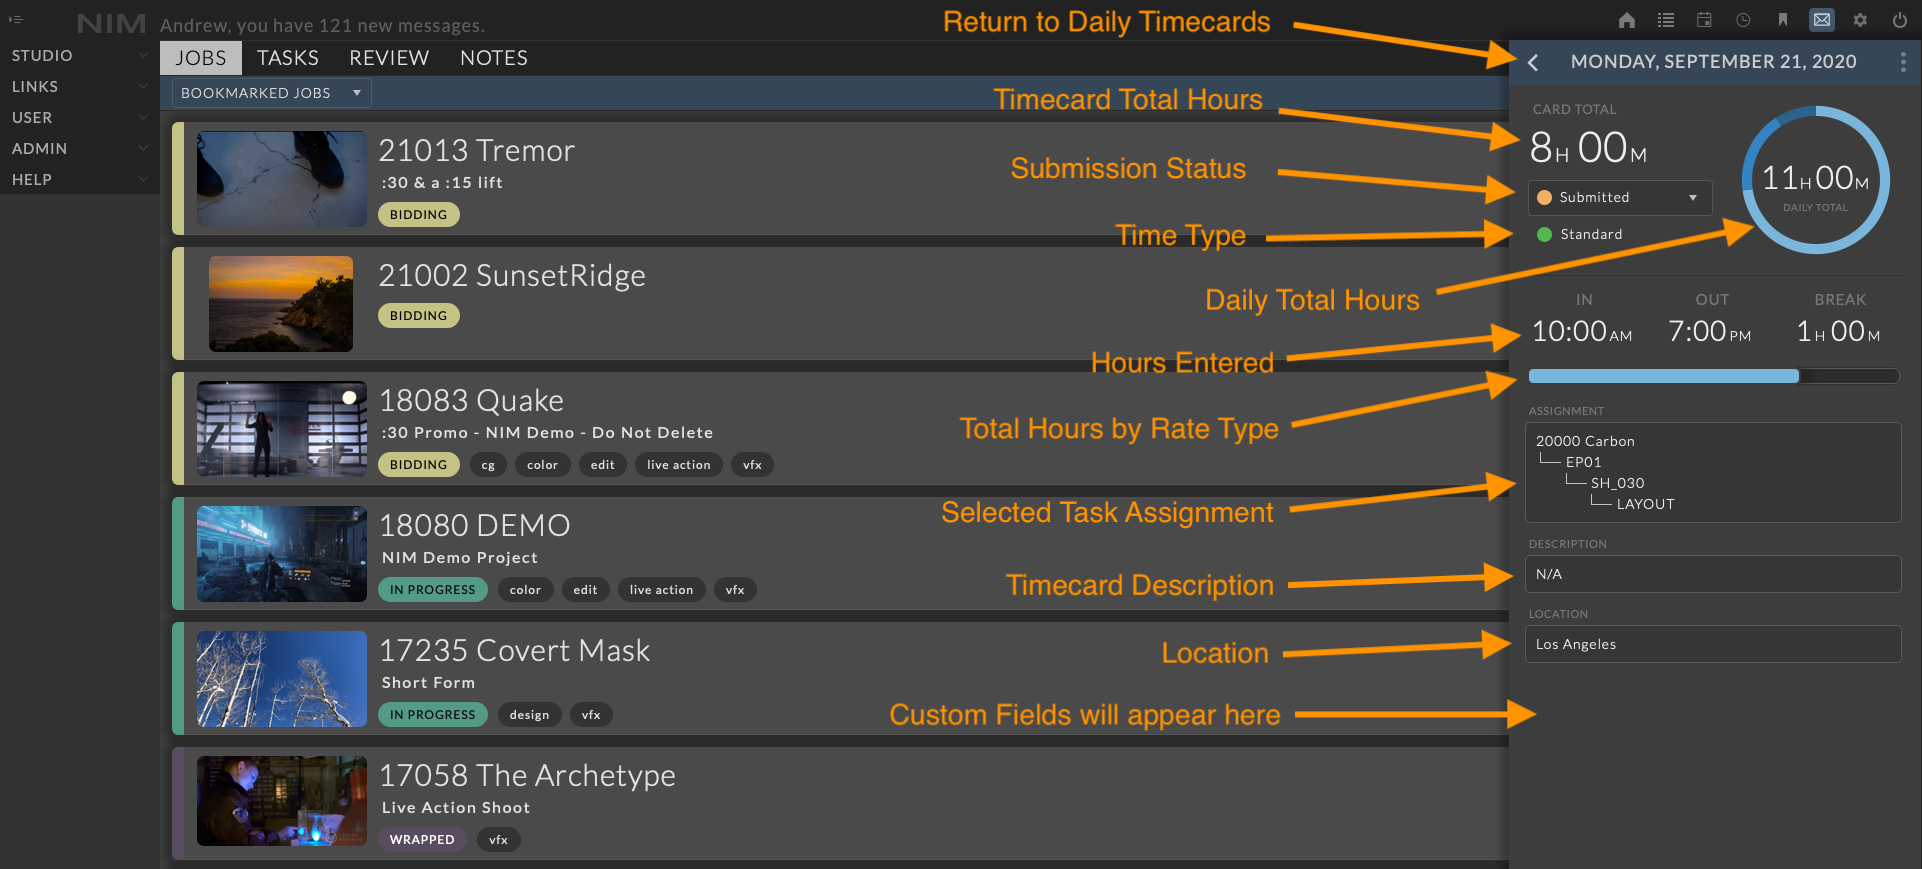
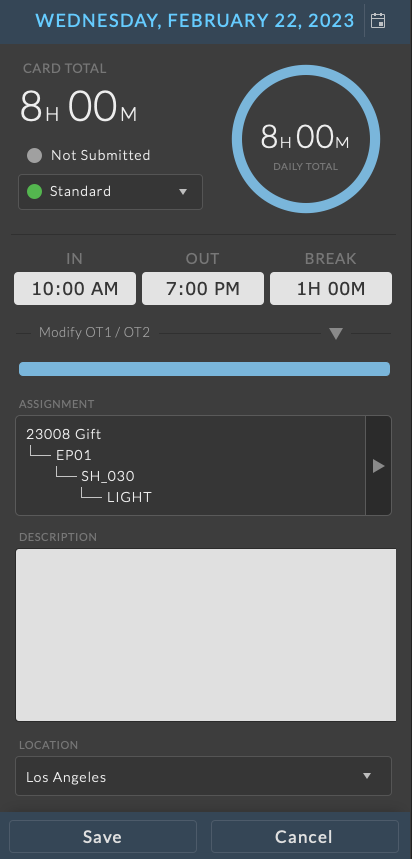
Clicking a timecard on a day will slide over the timecard info panel which contains all of the information related to the timecard. To return to the daily timecard panel, click the < at the top right of the info panel.
At the top left is the card total. This is the total number of hours for the timecard.
Below the card total are two indicators for the timecard submission status and time type.
At the top right is a chart showing the daily total of all timecard cards using the same rate type color coding as in the daily panel.
The next row of fields denote either the total time for a timecard or the in, out, and break time depending on the global timecard mode. To change the global timecard mode, please refer to the Timecards section of documentation.
The bar chart below the hour fields indicates the total amount of time this card is contributing for the day, broken down into rate types by color.
The remaining section provides inputs to set the associated task, description, and location, as well as any custom fields globally defined.
Below is a UI breakdown of the timecard info panel.
Creating a Timecard
To create a new timecard, first select the day by clicking on the date in the calendar in the daily timecard panel. By default the current day is selected.
If a day has existing timecards they will be displayed below the Add Timecard button.
Click on the Add Timecard button to add a new timecard to the day.
A new timecard info panel will slide over in edit mode.
The values from the last timecard entered will be used as the default values for any new timecard.
All new timecards will be created with the “Not Submitted” status. The timecard status can be updated once the timecard is saved. To submit, approve, or dispute a timecard, click the submission status and choose the appropriate action.
To change the time type, click on the time type dropdown. Billable time is denoted with green, and non-billable time types are denoted with grey.
If Time In / Time Out is configured for the global timecard settings, In, Out, and Break fields will be available. Click on a field to select the corresponding time.
If the global timecard settings do not have Time In / Time Out enabled, users will be able to enter a fixed amount of hours for the timecard independent of start and end times.
If a user’s rate is not on Payroll for the selected day, the option to explicitly declare overtime rate 1 and overtime rate 2 hours will be available.
To edit the overtime rate hours, click the arrow to the right of Modify OT1/OT2. This will expand the overtime hours options.
Entering Overtime
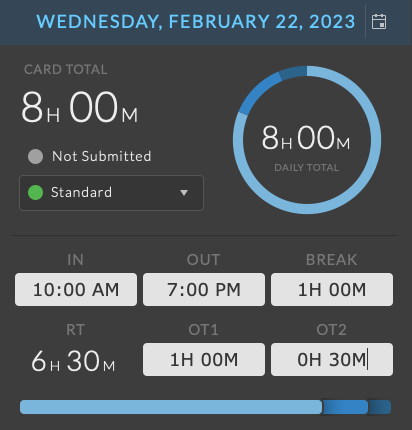
When inputting values for overtime, an equivalent amount of hours will be subtracted from RT (regular time) in order to keep the Total Hours consistent. If RT is 0, add more Total Hours before increasing OT1 or OT2.
In the example image, the overtime fields have been expanded and 1 hour has been allocated to overtime rate 1 and 30 minutes have been allocated to overtime rate 2.
The bar chart below the fields will dynamically change to visually reflect the total percentage of time this timecard uses for the day, as well as the breakdown of rate types. Light blue is used for regular time. Overtime rates use progressively darker shades of blue, while non-billable time is denoted in grey.
Note
When a user’s rate for the selected day is set to Payroll, the overtime rates are determined by the Payroll Group rules assigned to the user.
Payroll Rates
When a user’s rate for the selected day is set to Payroll, the option to manually set overtime hours is not available.
In this scenario, overtime is strictly determined by the Payroll Group rules assigned to the user’s rate and the UI will be restricted to either the fixed hour entry, or In, Out, and Break fields.
Additionally, when editing a timecard that is on payroll, the chart surrounding the daily total will be dark grey. The chart will be updated once the timecard is saved.
Task Assignment
Timecards can be linked to task types, jobs, and tasks assigned to the user. Attaching a timecard to a job enables that time to be used in the jobs actualization. Timecards that are not associated with a job will be actualized at the studio level for the total user cost.
While in edit mode, hovering over the Assignment section will highlight the border in blue indicating that it is a clickable item.
To select a task for the timecard, click the Assignment section. The Assignment Selection panel will slide over the current view.
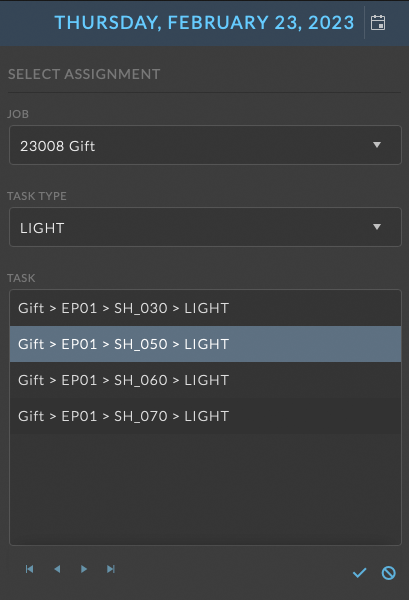
The Select Assignment panel contains the options to select a job, task type, and assigned task.
The jobs list contains all jobs that the user is assigned to as a member of the crew.
Task types are a list of all available task types. Available task types are determined by the Display in Timecards setting in Admin > Timecards - Task Types. For more information on available task types please refer to the Task Types section of the documentation.
The task list contains all tasks assigned to the user. Selecting a job or task type will filter the list of available tasks. For example, selecting a job will filter the list of tasks to those tasks the user is assigned to for the selected job. If multiple pages of tasks exist, use the navigation buttons at the lower left to change pages.
To save your task selection, click the checkmark at the lower right, or click the cancel button to return to the timecard info panel without saving your task changes.
Additional Fields
Timecards by default include the following additional fields:
Description - A brief description of the work done.
Location - The location the work was done.
If custom timecard fields have been defined, they will appear at the bottom of the timecard.
Saving A Timecard
To save your changes, click the “Save” button at the bottom of the info panel. Click “Cancel” to return to without saving changes.
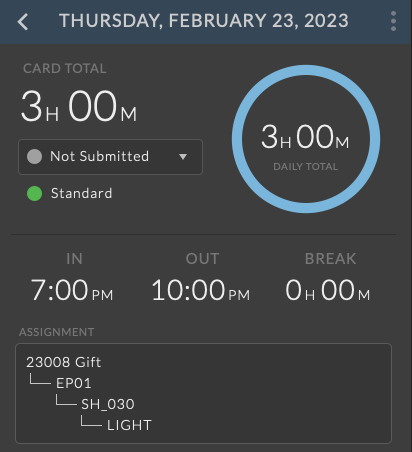
To return to the daily timecard panel, click the < at the top left of the timecard info panel. The new timecard’s basic details will now be displayed at the bottom of the daily timecard panel.
To edit an existing timecard, click the timecard details from the daily timecard panel to open the timecard info panel. Click on the ellipsis menu in the timecard info panel and choose “Edit”. Make the necessary changes and click the “Save” button at the bottom of the info panel to save your changes. Click the cancel button to return to the view mode without saving changes.
Delete a timecard by selecting the timecard from the daily timecard panel, clicking the ellipsis menu in the timecard info panel, and selecting “Delete”. You will be prompted to confirm deletion of the timecard. Once deleted, you will be returned to the daily timecard panel.
User Views
Users can view all of their timecards by going to the Main Menu > Users > Timecards panel. Timecards a viewable through two types of views:
Calendar View
List View
Calendar View
The Calendar View displays the user’s timecards in a standard calendar.
Navigation
Navigation in the calendar view is done through the tools at the top left of the calendar.

Click the Today button to immediately jump to today’s date.
The left and right arrows move forward and back in time for the given view.
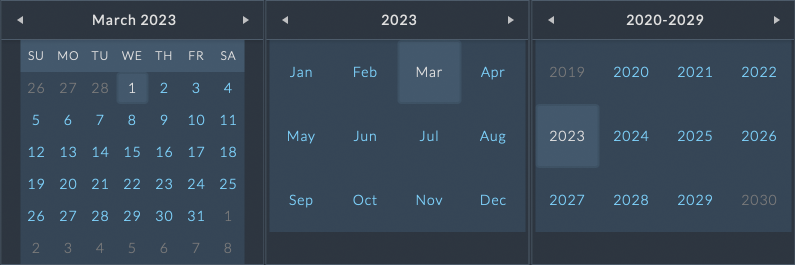
Clicking the Date at the right of the toolbar opens a mini calendar to quickly navigate to any day.

Inside the mini calendar, click the title bar to adjust the zoom level of the date range to select.
For example:
Clicking on March 2023 will zoom out the mini calendar to show a list of months.
Clicking on 2023 when viewing months will zoom out to show a list of years.
The calendar can be viewed by Day, Week, or Month depending on the selected view type.
To change the calendar view click on the corresponding view type at the top right of the calendar.
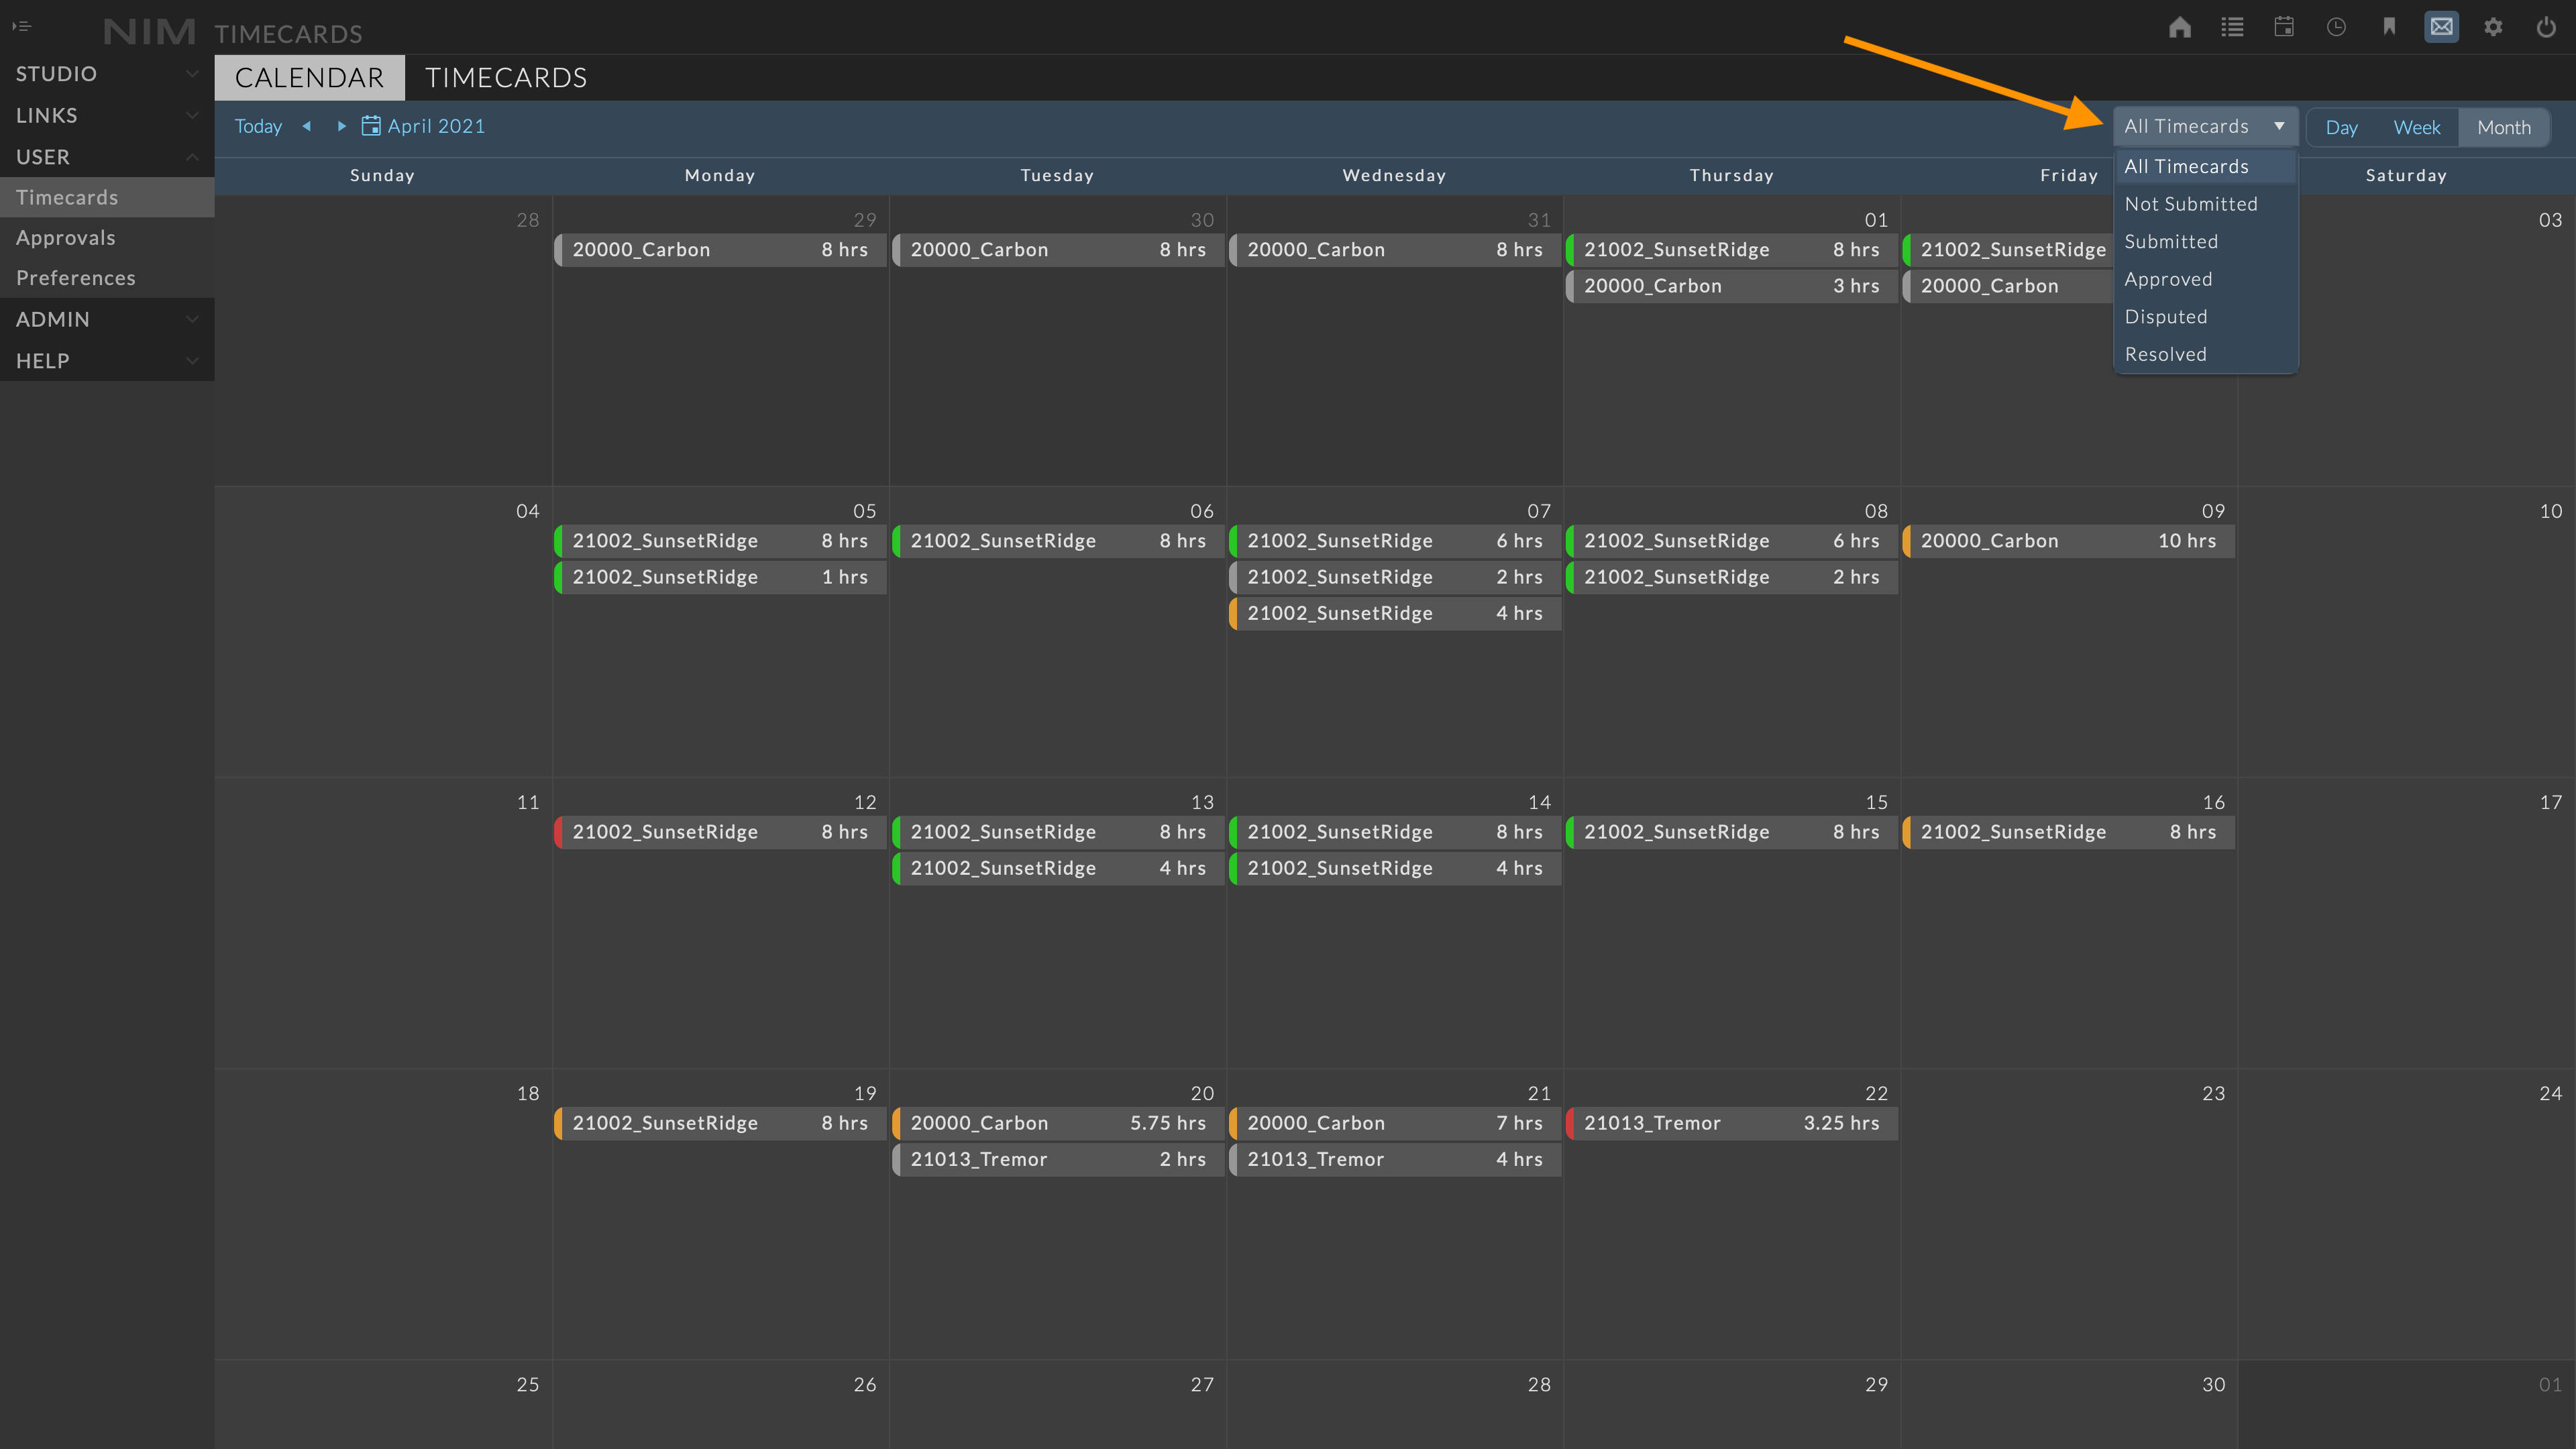
Status Filter
In any of the calendar views, timecards can be filtered by the submission status dropdown located at the top right of the panel.
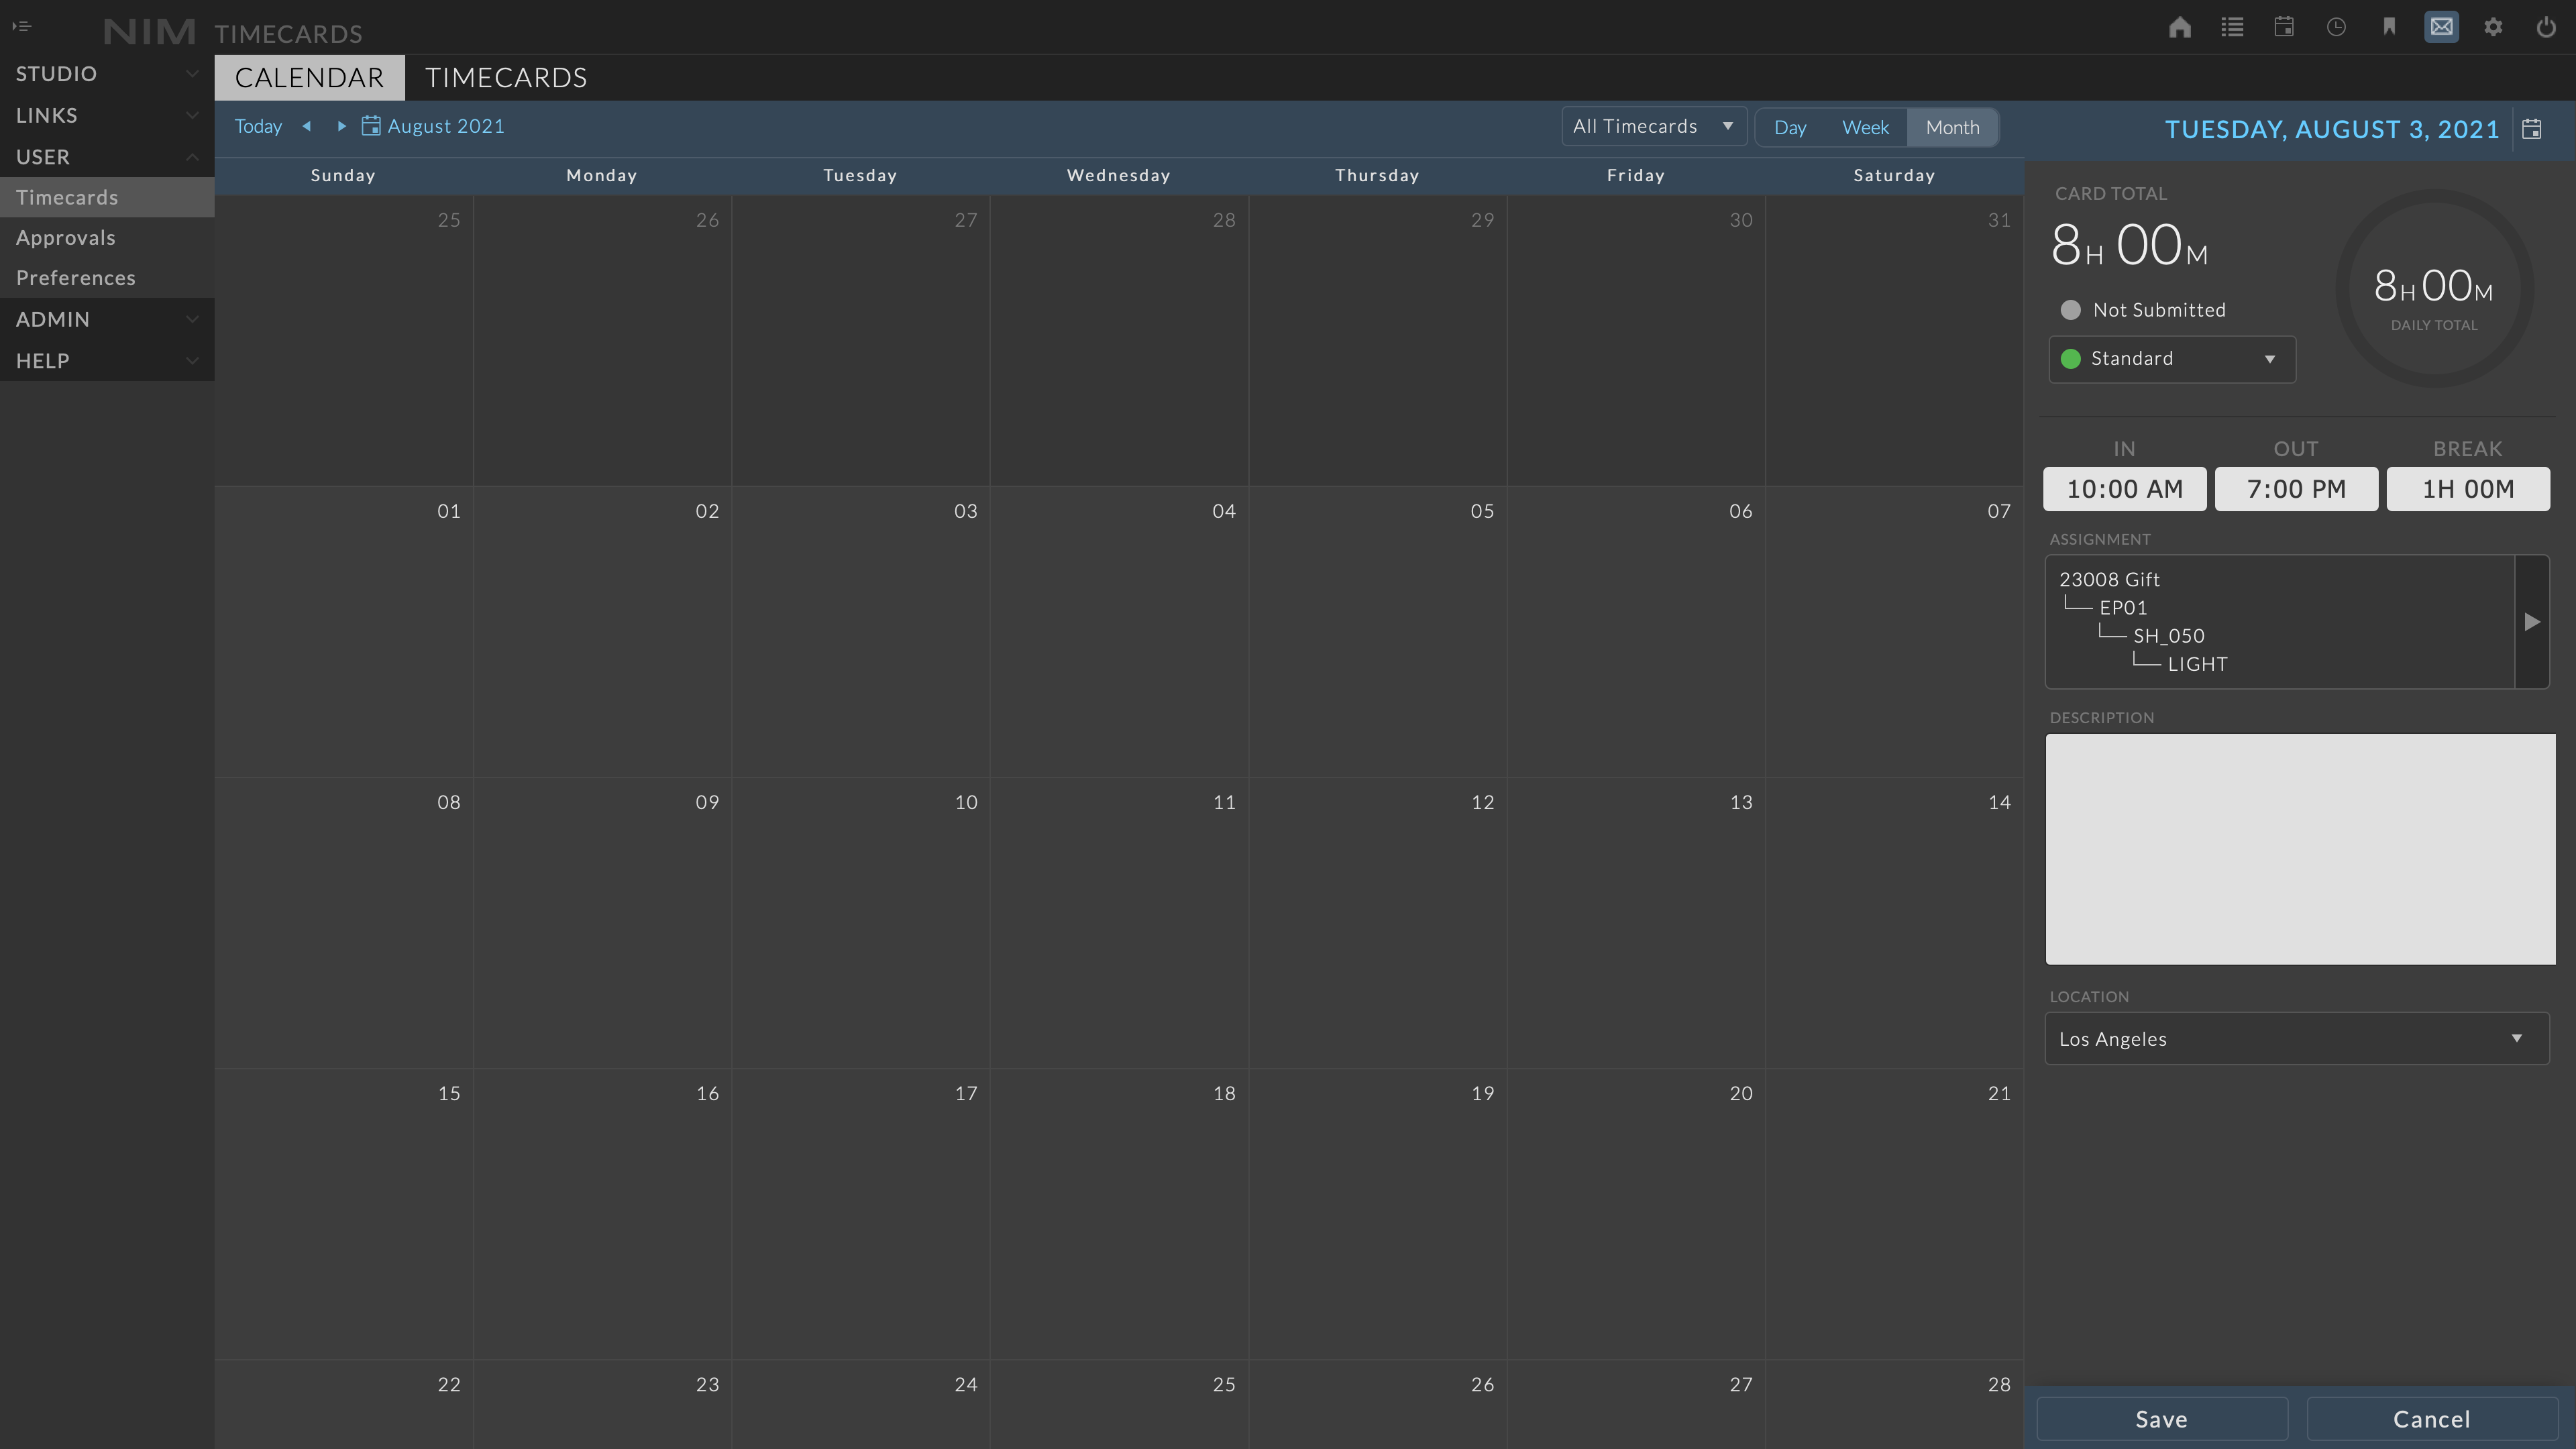
Adding a Timecard
New timecards can be added from the Calendar View by double clicking on the date for the desired timecard.
The timecard info panel will open in edit mode to enter the details for the new timecard.
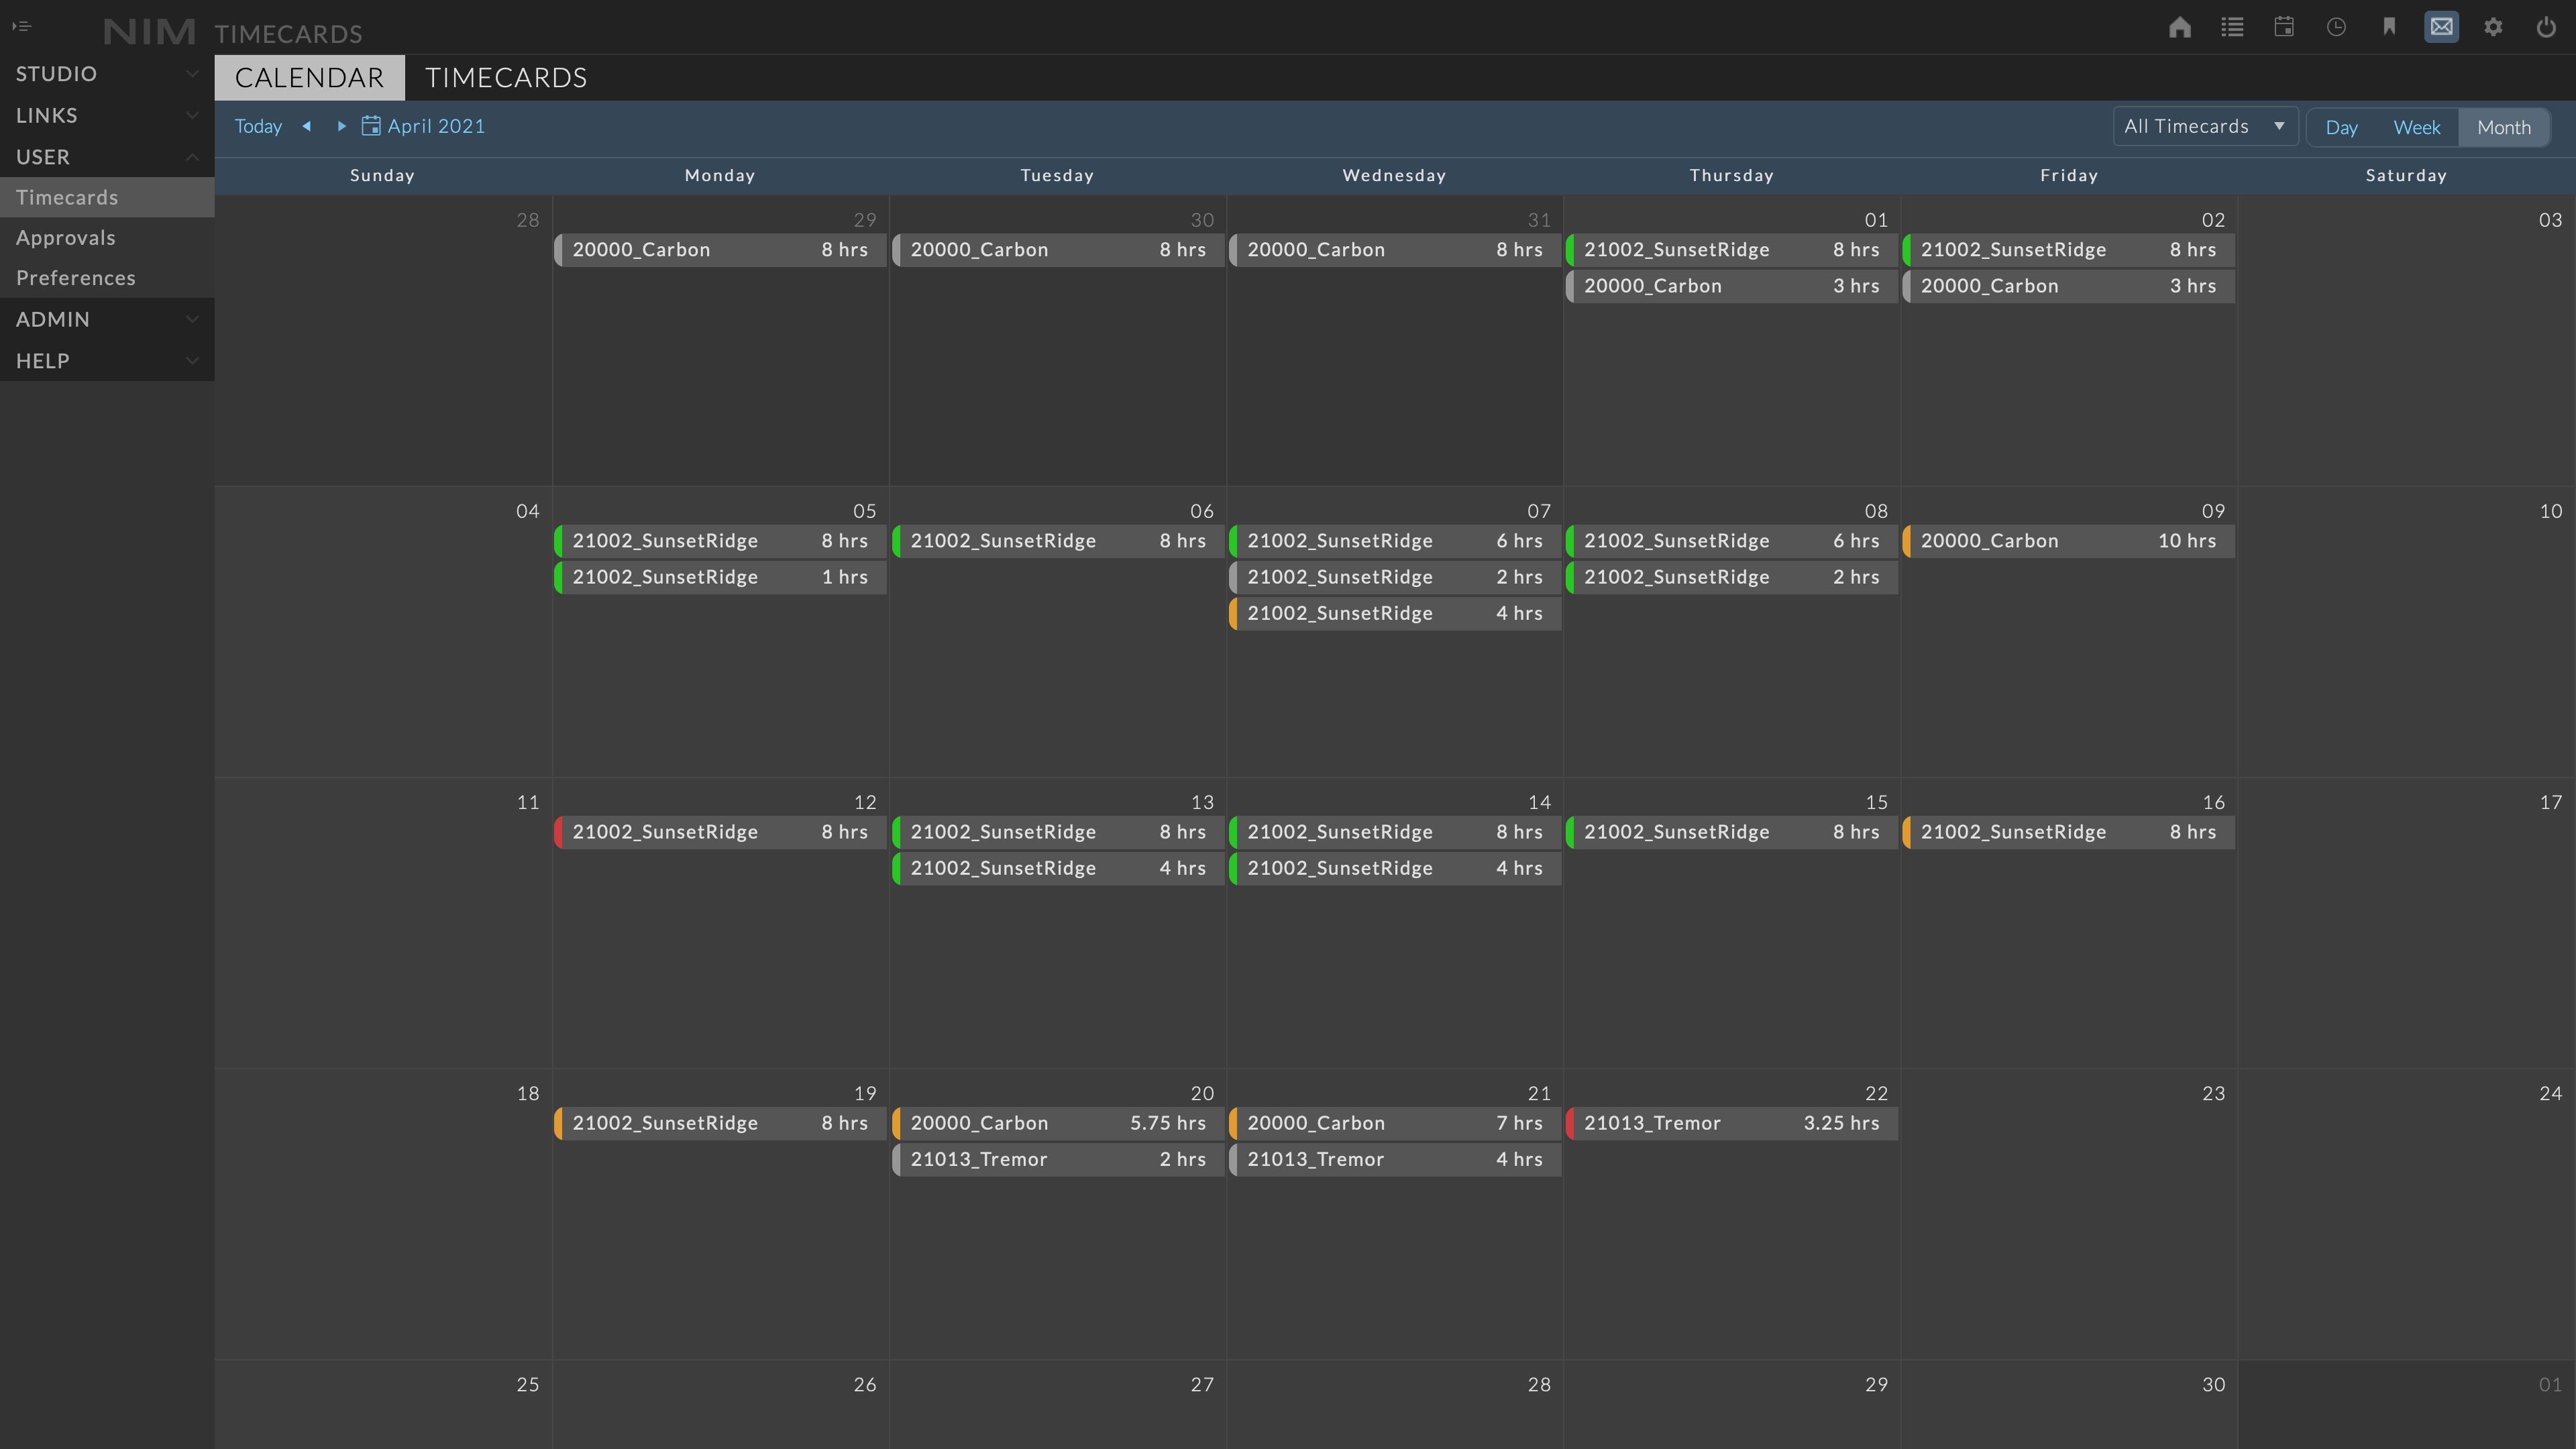
Month View
The month view displays user timecards one month at a time with per day timecards.
The color at the left of each timecard indicates the submission status.
Additional information includes the job or task if no job is selected and the total hours for the timecard.
Clicking on a timecard will open the timecard info panel to the right of the calendar. The selected timecard will be highlighted.
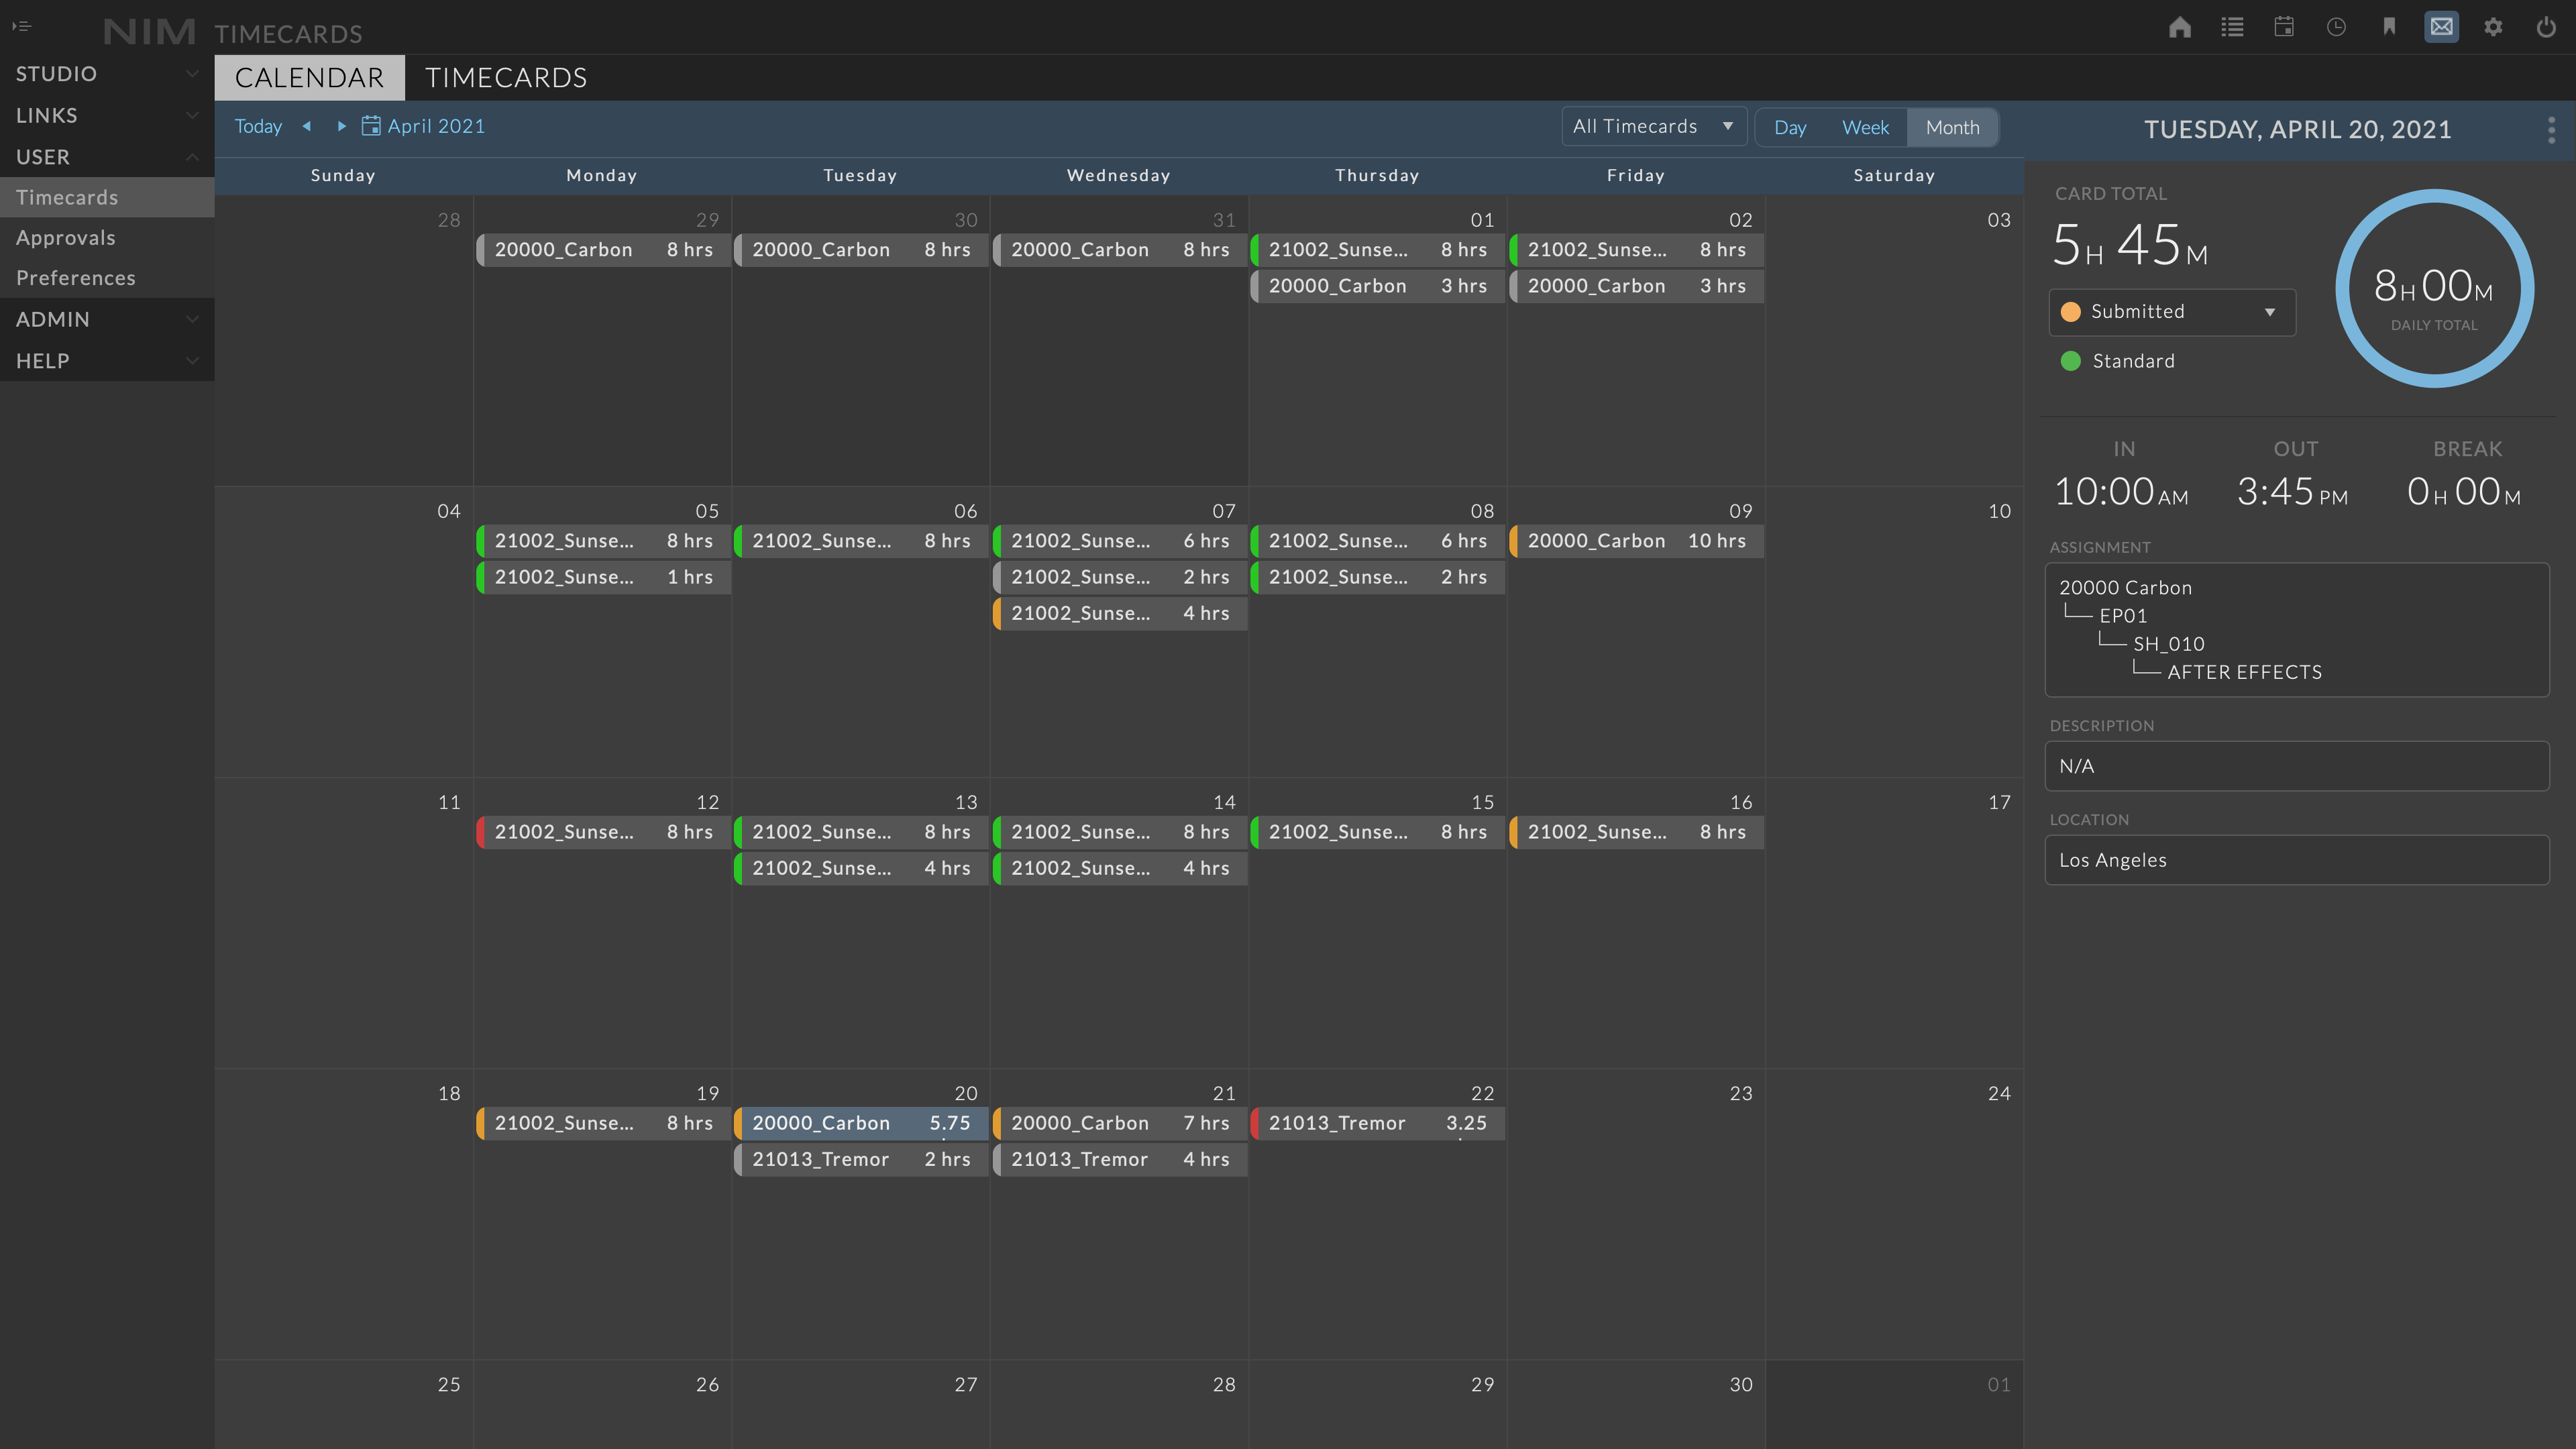
For more information on editing timecards please refer to the Timecard Info Panel section of the documentation.
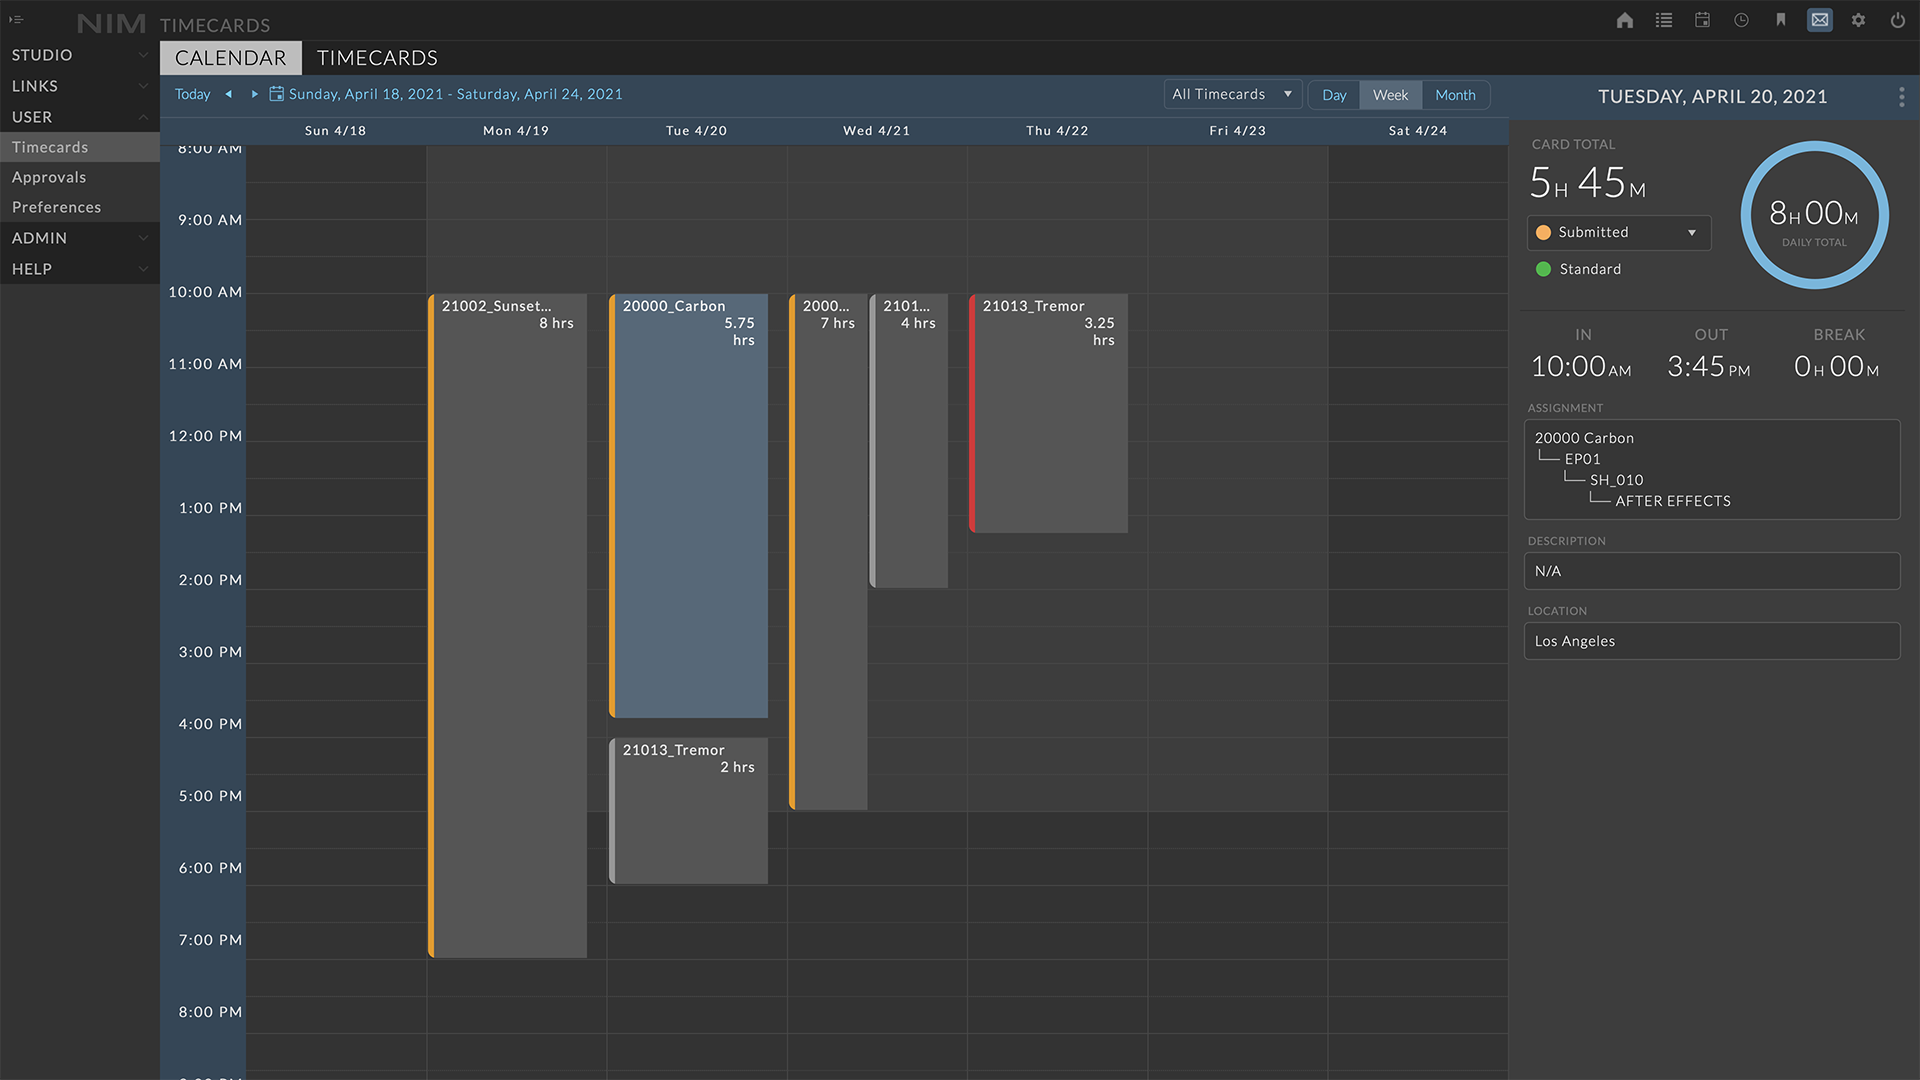
Week View
The week view displays all timecards for the selected week vertically over time. Timecards on the same day with overlapping time will be positioned side by side on the day.
The color at the left of each timecard indicates the submission status.
Additional information includes the job or task if no job is selected and the total hours for the timecard.
Clicking on a timecard will open the timecard info panel to the right of the calendar.
The selected timecard will be highlighted.
For more information on editing timecards please refer to the Timecard Info Panel section of the documentation.
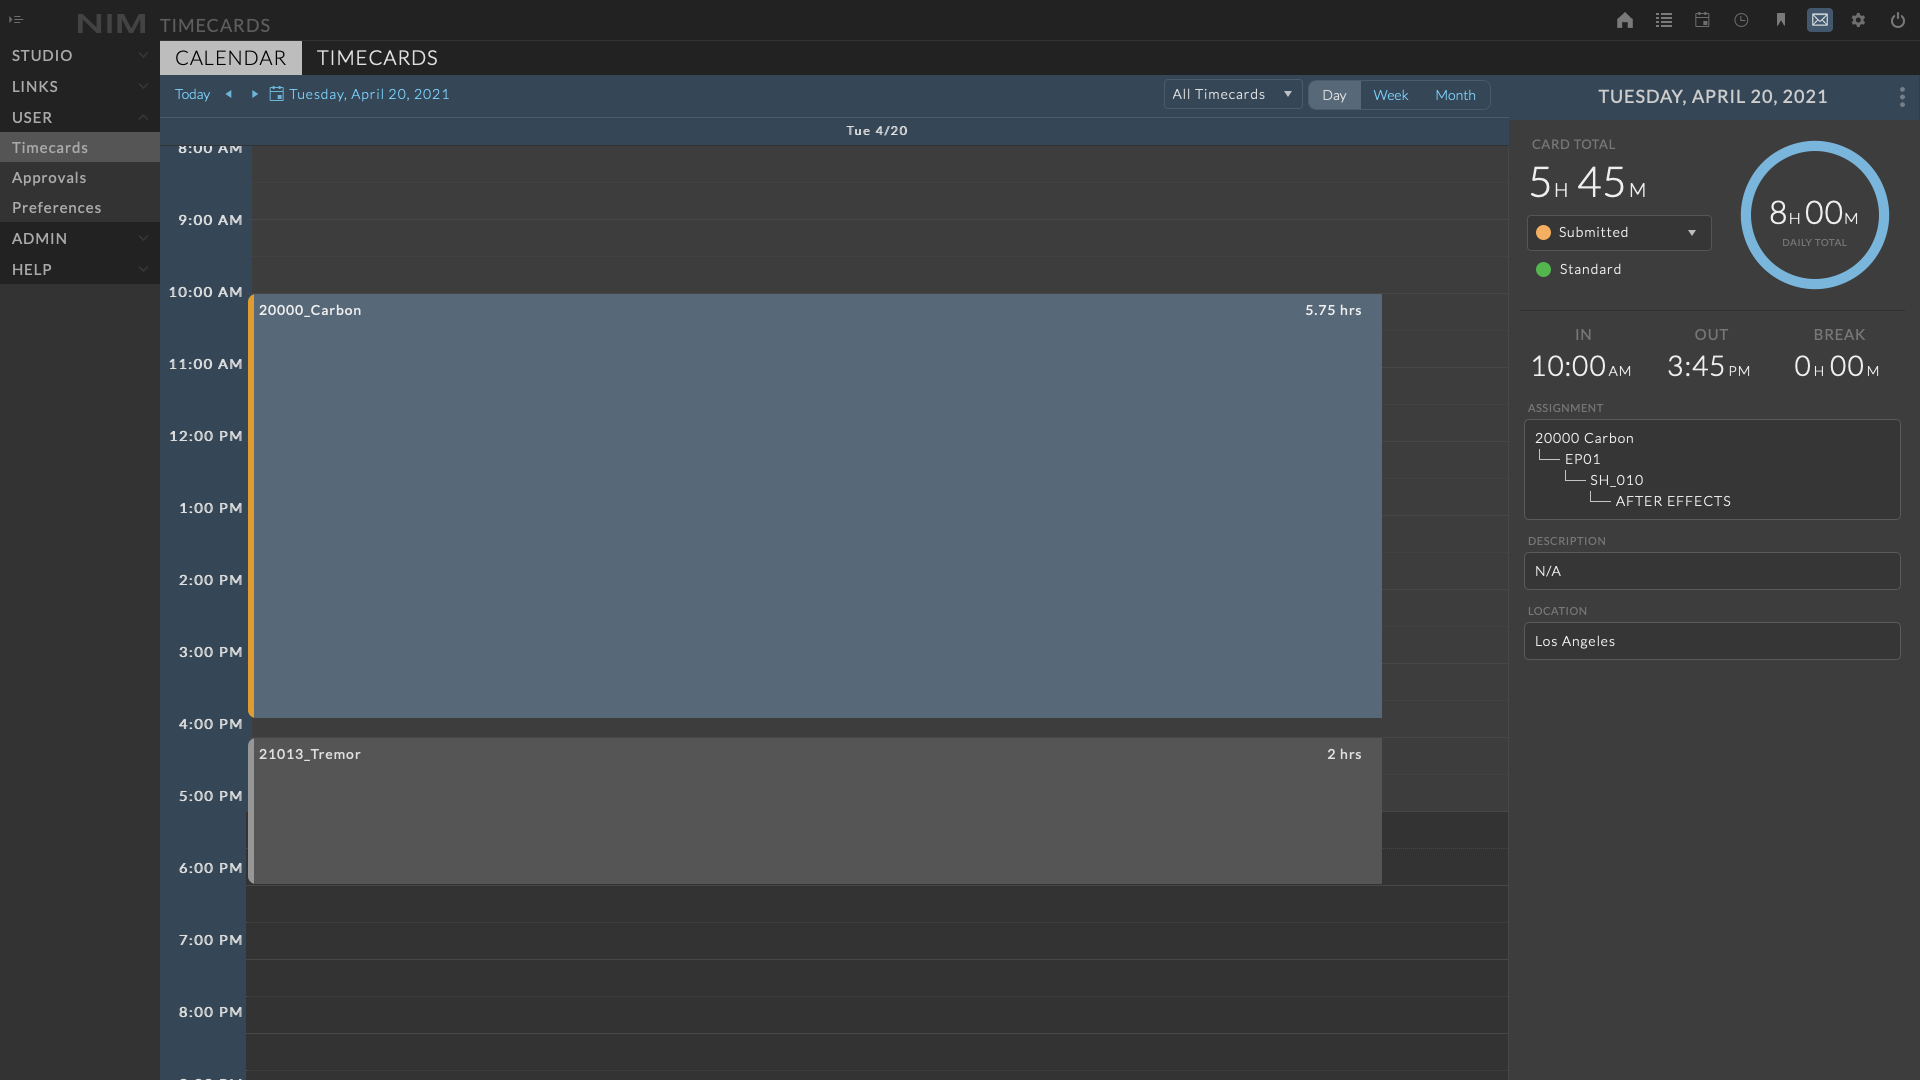
Day View
The day view displays all timecards for the selected day vertically over time. Timecards on the same day with overlapping time will be positioned side by side on the day.
The color at the left of each timecard indicates the submission status.
Additional information includes the job or task if no job is selected and the total hours for the timecard.
Clicking on a timecard will open the timecard info panel to the right of the calendar.
The selected timecard will be highlighted.
For more information on editing timecards please refer to the Timecard Info Panel section of the documentation.
List View
The list view displays all of the user’s timecards in a paginated list with advanced functionality to add and edit a range of timecards simultaneously.
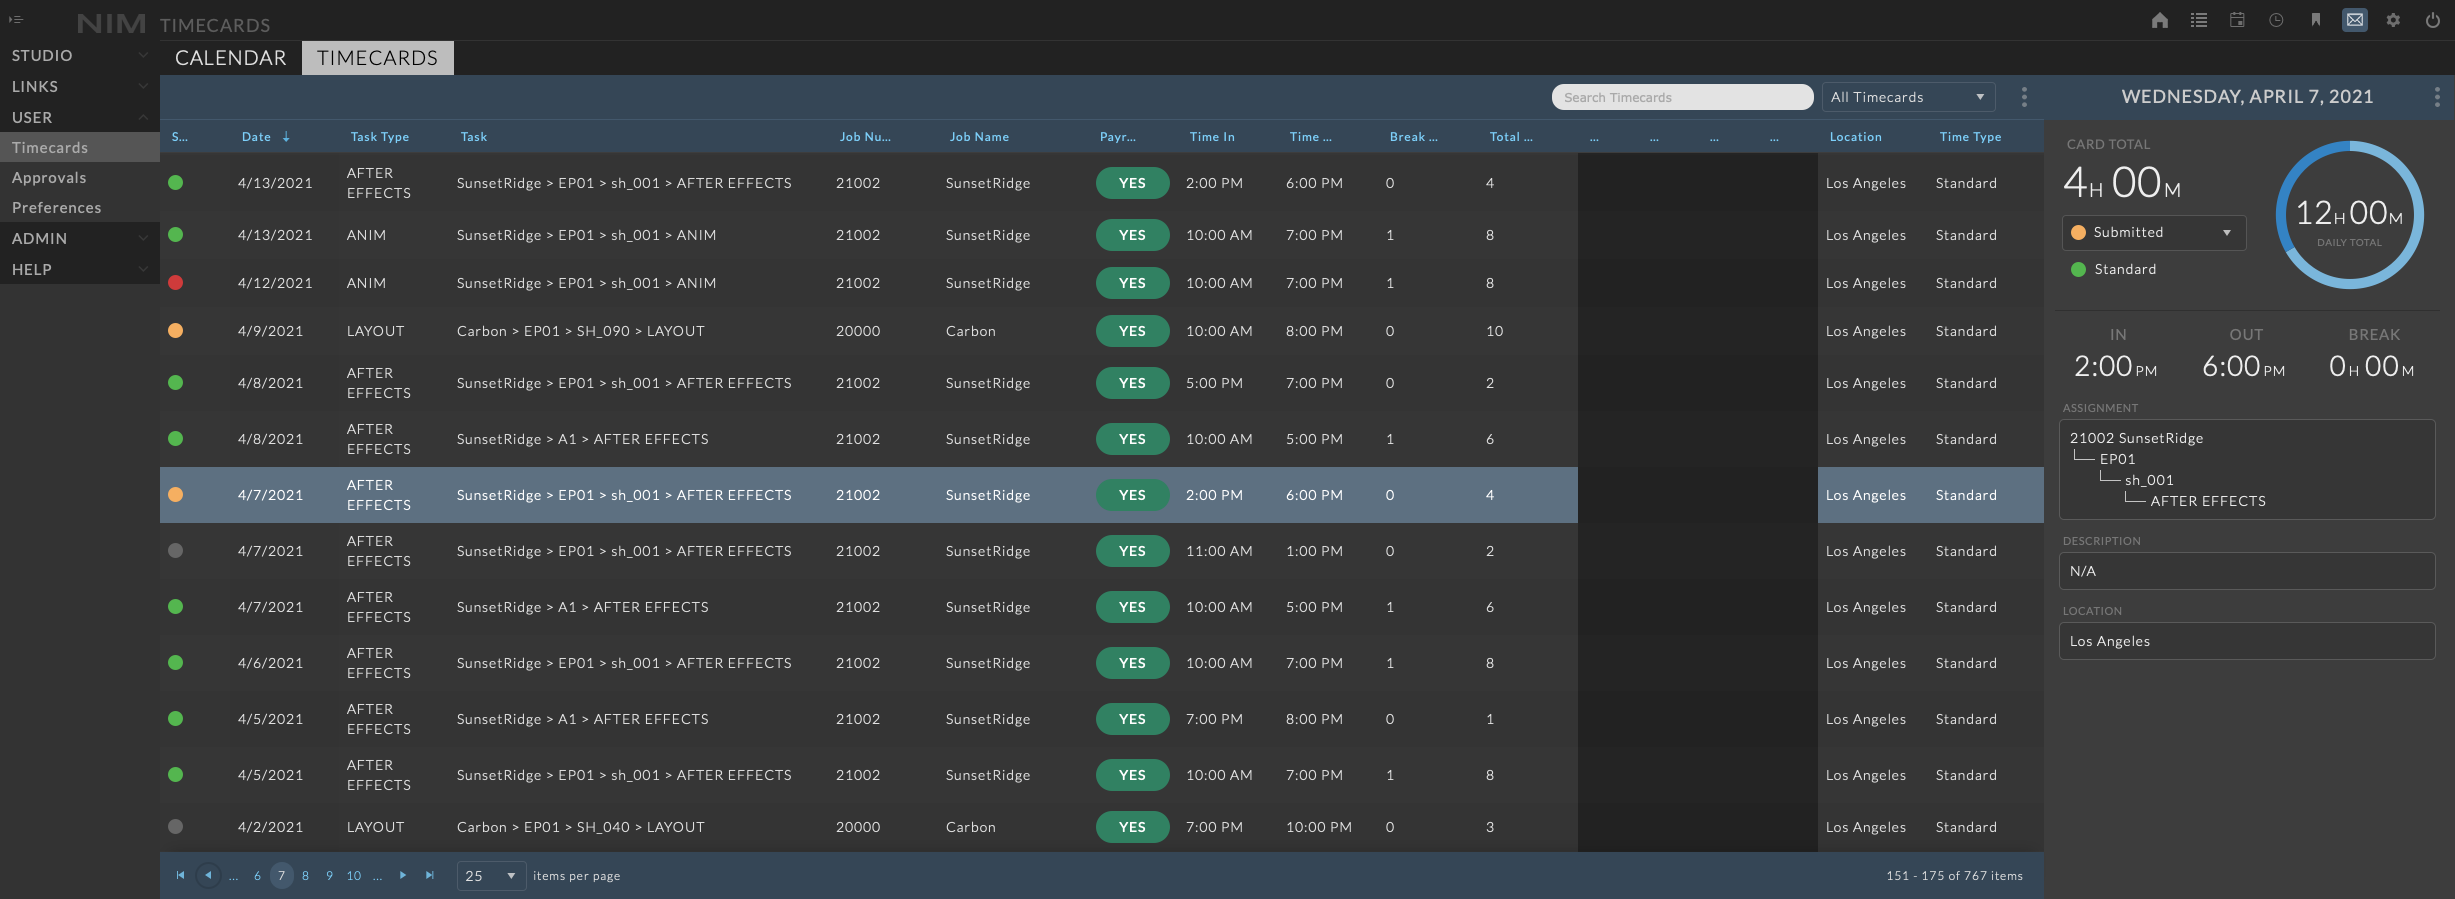
The list view displays all timecard data as well as any associated job name, number and custom fields.
Note
If a timecard is using Payroll rules, the RT, OT1, OT2, and Non-billable columns will be greyed out and only the total hours will be displayed.
Clicking on a row will select the timecard and open the timecard info panel for further editing. For more information on editing timecards please refer to the Timecard Info Panel section of the documentation.
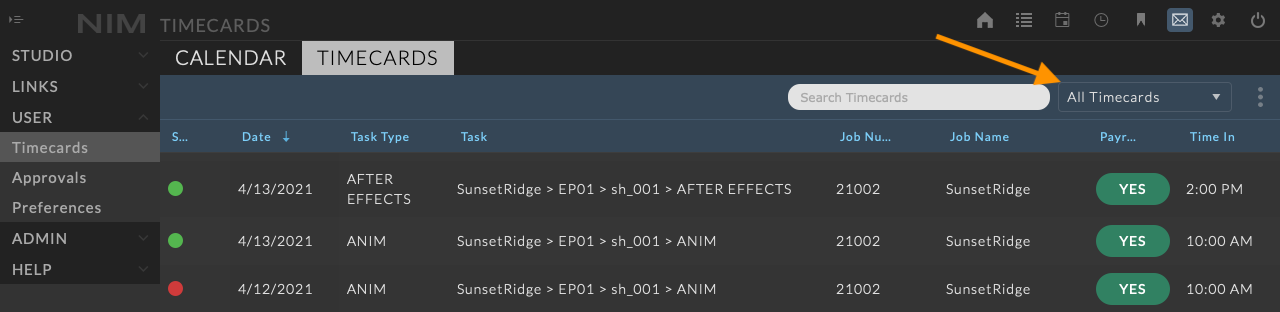
Status Filter
In the timecard list view, timecards can be filtered by the submission status dropdown located at the top right of the panel.
Multi-Card Edit
To edit multiple timecards simultaneously, click on the first timecard to be edited. Then Shift-click a second shot to select all timecards in-between, or Ctrl-click / Command-click to add non-consecutive timecards.
The Timecards Details panel will appear from the right.
Click on the ellipsis menu in the timecard info panel and choose “Edit” to update the timecard information.
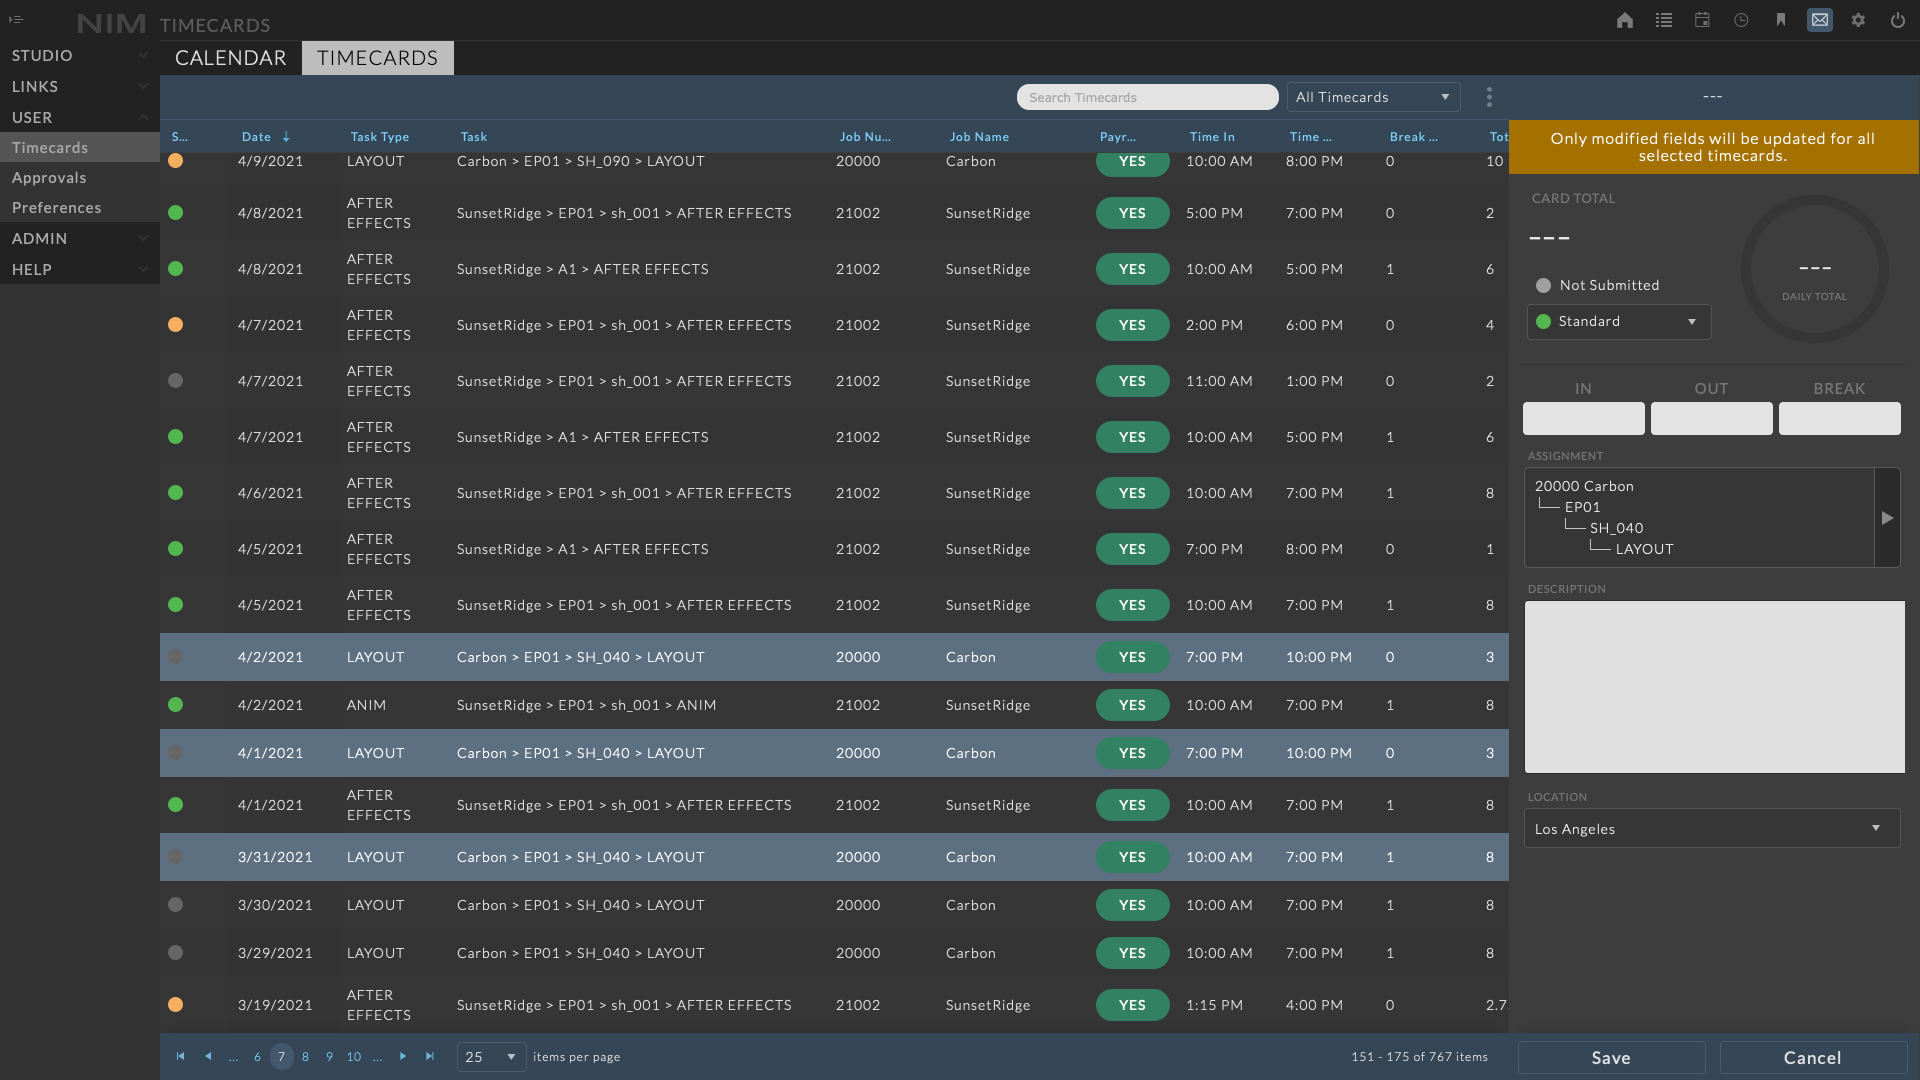
- At the top of the panel a reminder is included stating:
Only modified fields will be updated for all selected timecards.
Fields with matching values will be displayed as normal.
Fields with dissimilar values will be denoted as
---
Any value may be changed in the timecards, however there are some things to keep in mind while editing multiple timecards.
Changing the value of dissimilar fields will over-write all of the timecards with the new value.
Modifying the date will change all timecards to exist on the same day.
Note
When multi-selecting timecards, if timecards with different submission statuses are selected, the option to edit the timecards may be restricted. For example, if a “Not Submitted” and a “Submitted” timecard are selected, by default editing will not be available as “Submitted” timecards can not be modified without elevated permissions.
Adding a Timecard
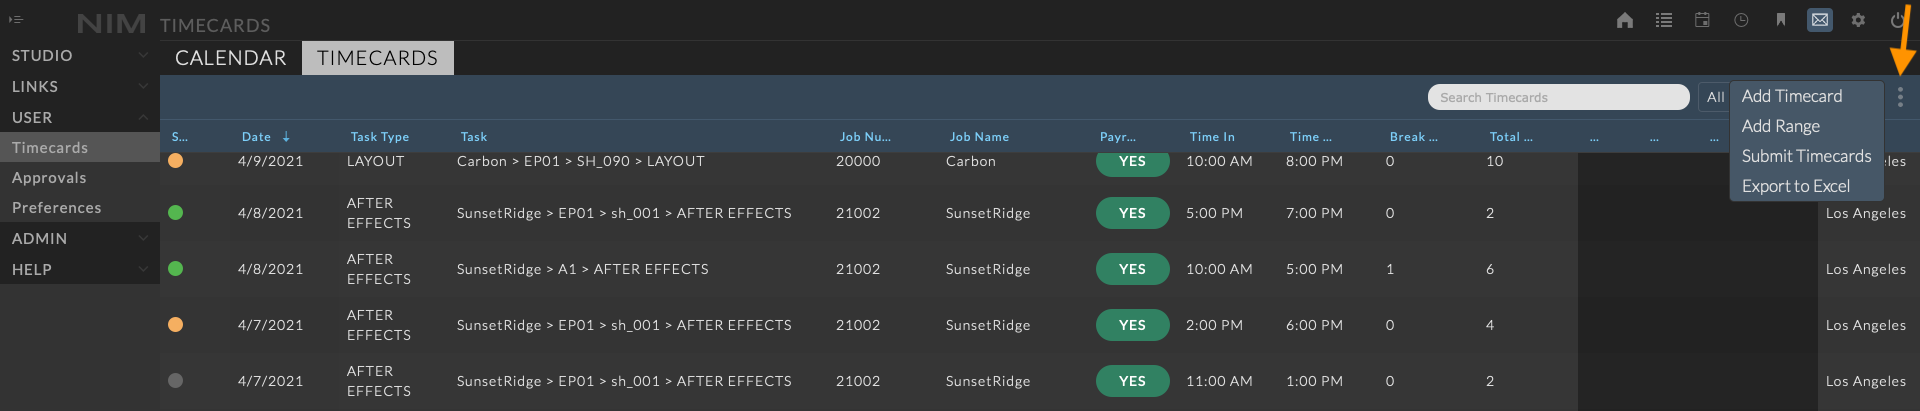
New timecards can be added from the List View by clicking the ellipsis menu at the top right of the header and select “Add Timecard”.
The timecard info panel will open in edit mode to enter the details for the new timecard. For more information on editing timecards please refer to the Timecard Info Panel section of the documentation.
Multi-Card Entry
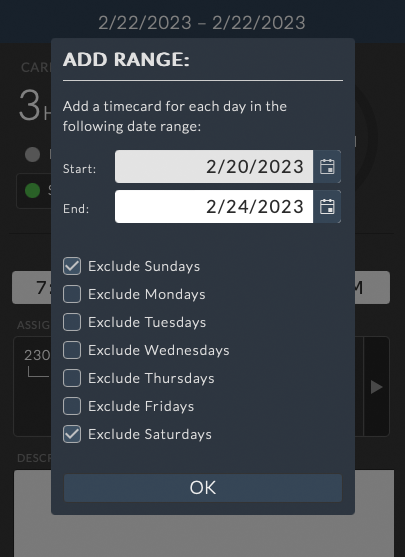
The List View includes an advanced timecard entry that allows for a range of timecards to be generated at once.
To add multiple timecards over a range of dates, click the ellipsis menu and select Add Range.
The timecard info panel will open and a popup will appear allowing you to selected the start and end date range. Options to exclude days from the range are available by checking the corresponding boxes.
After the range is set, click the OK button to edit the timecard details.
Saving the timecard will create identical timecards for every date in the range, not including any days marked to be excluded.
Note
By default “Exclude Saturdays” and “Exclude Sundays” is selected
Submit For Approval
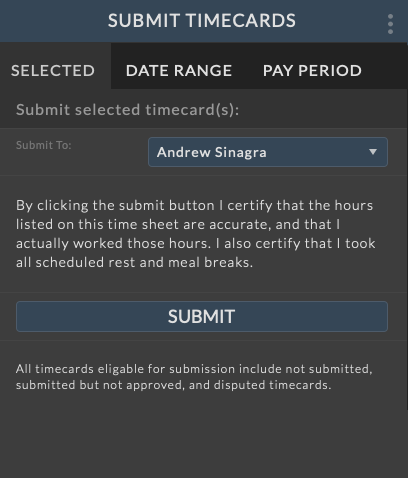
Timecards can be submitted to a user for approval by selecting Submit Timecards from the ellipsis menu. The submit timecards panel will open to the right of the list view with 3 options to choose for submission:
Selected
Date Range
Pay Period
|

|
|
Note
Multi-select a range of timecard prior to choosing Submit Timecards, to use the “Selected” option. Alternatively, choose a date range by selecting a given week, or if a pay period start date has been established for your studio, then choose by Pay Period.
Submit Selection

Click on the timecard to submit for approval from the timecard grid. To select multiple timecards, click on the first timecard desired, then Shift-click a second timecard to select all timecards in-between, or Ctrl-click / Command-click to add non-consecutive timecards.
Once the timecards have been selected click on the ellipsis menu and choose Submit Timecards to load the submission panel.
Select a user to submit the timecards to for approval from the “Submit To” dropdown and click the submit button.
When the timecards are successfully submitted you will receive the following notification: Timecards successfully submitted for review.
Submit Date Range
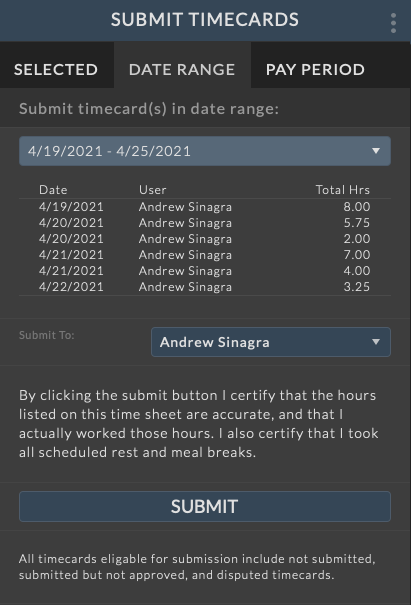
A range of timecards can be submitted for approval. Click on the “Date Range” dropdown and choose a time period to submit timecards. Each range constitutes one week and can be defined as Monday-Sunday or Sunday-Saturday as defined in the Admin > Timecards - Options settings.
After a range is selected, the timecards within the range will be displayed below the dropdown.
Select a user to submit the timecards to for approval from the “Submit To” dropdown.
If the selected timecards are correct, click the submit button.
When the timecards are successfully submitted you will receive the following notification: Timecards successfully submitted for review.
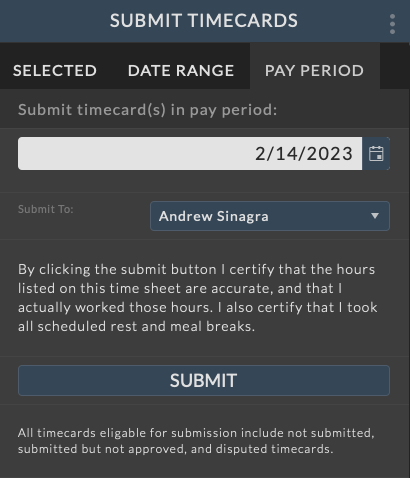
Submit Pay Period

All timecards that fall within a given pay period can be submitted for approval. Click on the “Pay Period” date selector and choose a date from the calendar. The pay period the selected date falls within will be used as the range to submit timecards.
After a pay period is selected, the timecards within the range will be displayed below the date selection.
Select a user to submit the timecards to for approval from the “Submit To” dropdown.
If the selected timecards are correct, click the submit button.
When the timecards are successfully submitted you will receive the following notification: Timecards successfully submitted for review.
Export to Excel
The timecard grid can be exported to Excel using the Export to Excel ellipsis menu option. Any filters that have been applied to the grid will be respected in the export.