Nuke
The NIM Nuke Connector allows users to manage file directly through the integrated file browser. Browsing by Jobs & Assets or Shows, Shots, and Tasks allows users to circumvent navigating the servers folder structure and use the flow of production to open and save files.
When using NIM’s project structure management, the connectors manage all file naming conventions using task-centric organization of basenames, tags, and versions.
For an in depth look at the NIM Nuke Connector functionality and the NIM intergration with Thinkbox Software® Deadline®, check out the video here:
NIM - Nuke Connector, NIM Write Nodes & Deadline Integration from NIM Labs on Vimeo.
Additional NIM videos can be found here: https://nim-labs.com/videos
Installation
The following procedures describes how to install the integrated Nuke NIM browser. The connector creates a NIM menu within the main Nuke menu for file management. The script and the following installation procedures have been tested with Nuke 9.0v7 and later.
The NIM Connector folder structure is as follows:
nim             <-- NIM_CONNECTOR_ROOT
    css
    img
    nim-core
    plugins
In the following examples [NIM_CONNECTOR_ROOT] is the path to the top level NIM folder.
Replace all instances of [NIM_CONNECTOR_ROOT] with the actual path to the folder.
init.py
Nuke’s init.py file can be found in the .nuke folder in the following locations:
Windows: |
drive:/Users/[USERNAME]/.nuke |
OSX: |
~/.nuke |
Linux: |
~/.nuke |
If you do not have an init.py at this location, copy the file [NIM_CONNECTOR_ROOT]/plugins/Nuke/install/init.py to your .nuke folder location.
Edit the init.py file and update the [NIM_CONNECTOR_ROOT] with the proper path to your studios NIM connector folder.
NOTE: Be sure to use forward slashes “/” for all directory separators in the path
If you have an existing init.py file, copy the contents of the [NIM_CONNECTOR_ROOT]/plugins/Nuke/install/init.py to the end of your init.py file to invoke the NIM menu at startup.
If you have an init.py file already at either location, copy the contents of the corresponding init.py file to the end of the existing file, updating the paths as instructed.
NOTE: If you do not see the .nuke folder, either you have not run Nuke for the first time or you may need to enable viewing of hidden files.
The next time Nuke is started, a NIM menu should appear in the Nuke main menu. If you don’t see the NIM menu, it’s likely that the init.py file is in the wrong location or the path to the NIM_CONNECTOR_ROOT is incorrect.
Setting Preferences
If you have already installed and launched other NIM Connectors your connection preferences will already be saved in the nim.prefs file.
The NIM preferences are in the following locations:
Windows: |
drive:/Users/[USERNAME]/.nim |
OSX: |
/Users/[USERNAME]/.nim |
Linux: |
/home/[USERNAME]/.nim |
If this is the first time accessing a NIM Connector, after launching Nuke a dialog box will appear to enter the path of the NIM API.
Enter the path as follows:
http://[hostname]/nimAPI.php
where [hostname] is the address you have assigned to the NIM server.
API Keys
NIM API keys are an optional security feature that restricts API access with time limited per user keys. Requiring API keys restricts all API access to only those users with an API key.
If Require API Keys is enabled in ADMIN/Security - Options, users will be presented with a dialog box the first time they attempt to use a NIM Connector. API keys are unique to each user. Enter the NIM API key provided to you by your NIM administrator. For more information on enabling NIM API Keys please refer to the API Keys section of the documentation. For information on creating user API keys please refer to the Users Grid section of the Administration documentation.
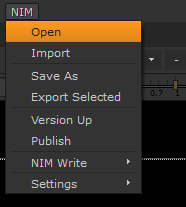
NIM File Menu
The NIM File menu contains file operations to load, save, version and publish files to NIM.
Open / Import
Use OPENor IMPORTto load an existing NIM version or publish.
- NIM will automatically handle path translations for files saved using different operating systems.
Path translation settings are defined in the Server Administration section of NIM
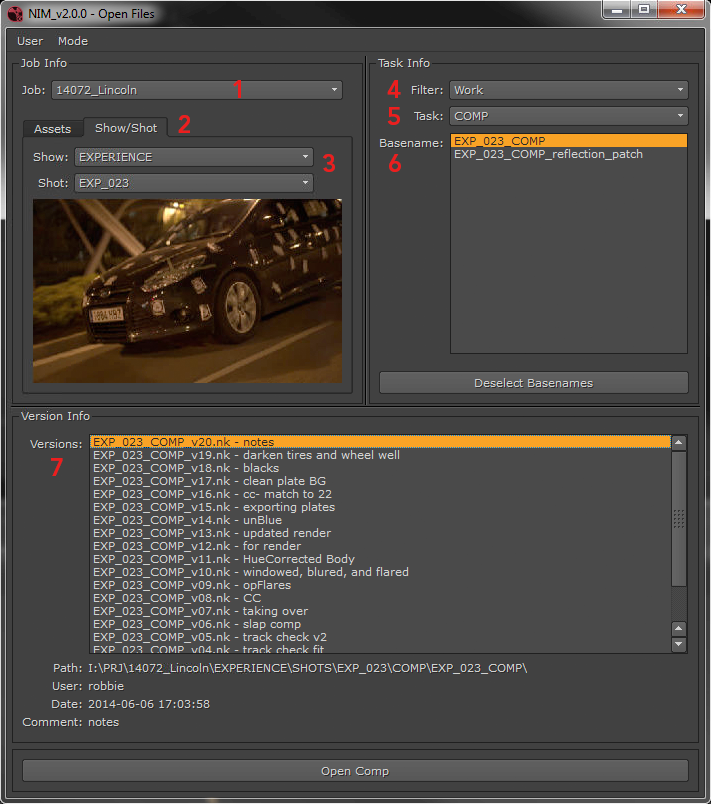
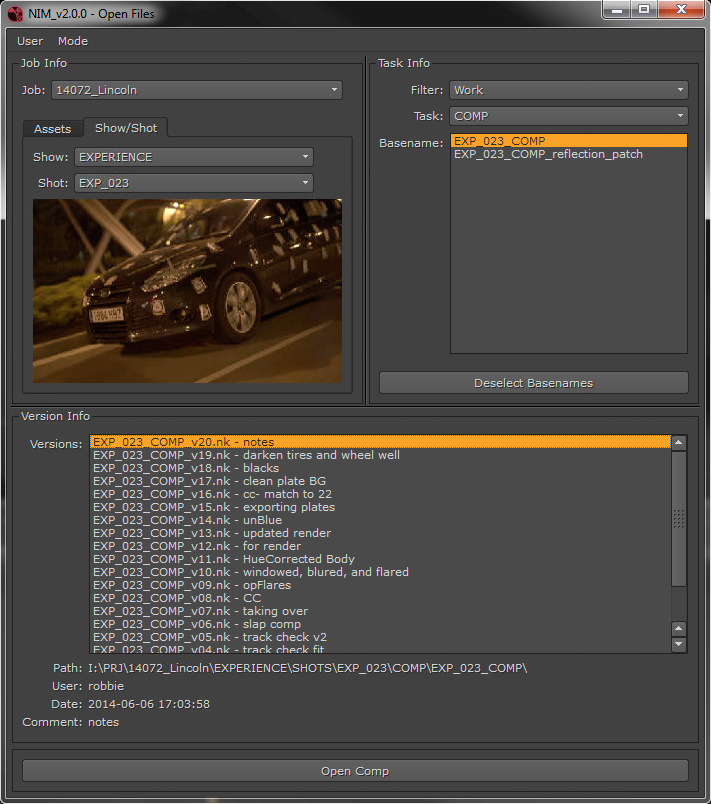
The following steps outline the workflow to open a file:
- Job:
Files are loaded by first selecting the job from a list of jobs the user is assigned to.
- Assets / Show Tab:
Assets or Shows/Shots are accessed by selecting the appropriate type from the tabs.
- Asset & Shots:
- In Assets, a list of assets on the selected job are available.
Select the asset from the Asset dropdown
- In Shows/Shots, two dropdowns are available.
Select the show on the job from the Show dropdown.
After selecting a show, the available shots will be loaded into the Shot dropdown.
Select the desired shot from the Shot dropdown.
- Filter:
Once the Asset or Shot is selected, the files may be filtered by:
- Asset Master - Selects the Asset Master if one is set
Available when an asset is selected
Only available for Import & Reference
Published - Displays only published files
Work - Displays all working versions
If Asset Master is selected click the IMPORT or REFERENCE button to load the Asset Master.
- Task:
- Tasks show all tasks that have been made available to the current application.
This is defined in the Task Types Administrative section of NIM
If Published or Work is selected, select the Task Type to load the corresponding basenames.
- Basenames:
The available basenames for the selected task appear in the basename list.
Select the desired basename from the list
If loading an IMPORT and the Published filter is selected click the IMPORT button to load the published basename.
If using the OPEN dialog and the Published filter is selected, selected a basename will display the list of published versions.
- Versions:
If the Work filter is selected, choosing a basename will load all working versions in the versions list.
The version list displays the version file name as well as the version comment.
Select the working version from the Version list.
- The version details will be displayed below including:
Path - the full path to the file
User - the user who saved the version
Date - the date the version was logged
Comment - the version comment
Click the OPENor IMPORTbutton to load the working version.
Save As / Save Selected
- Use SAVE AS or SAVE SELECTED to:
Start a new basename
Save a file into an existing basename
Export part of a scene to a new or existing basename
If saving into an existing basename you will be prompted to either:
Save the file into the existing basename as the latest version.
Start a new basename by adding a tag.
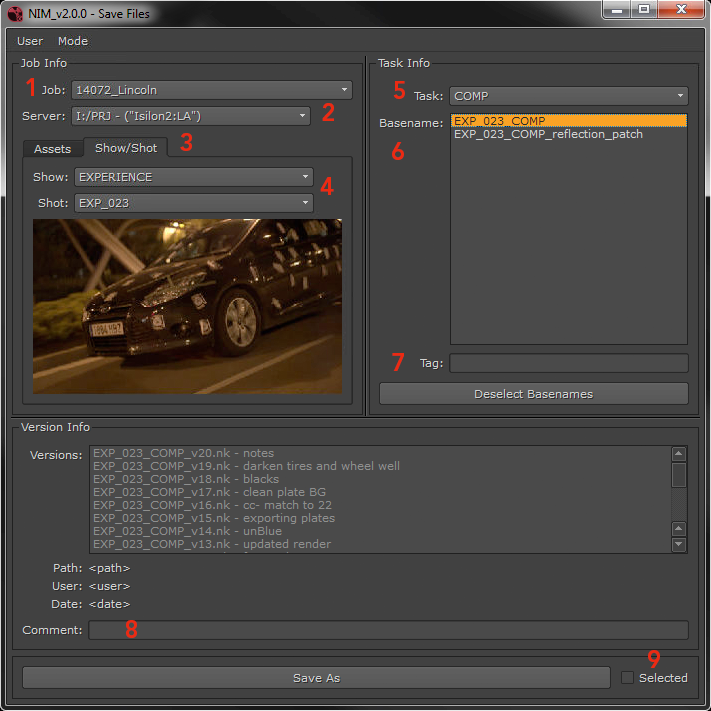
Follow these steps to save a file:
- Job:
Files are loaded by first selecting the job from a list of jobs the user is assigned to.
- Server:
- Select the project server to save the file to.
The project servers are defined in the NIM job under Production / Config
- Assets / Show Tab:
Assets or Shows/Shots are accessed by selecting the appropriate type from the tabs.
- Asset & Shots:
- In Assets, a list of assets on the selected job are available.
Select the asset from the Asset dropdown
- In Shows/Shots, two dropdowns are available.
Select the show on the job from the Show dropdown.
After selecting a show, the available shots will be loaded into the Shot dropdown.
Select the desired shot from the Shot dropdown.
- Task:
Tasks show all tasks that have been made available to the current application. This is defined in the Task Types Administrative section of NIM
Select the Task type from the Task dropdown.
- Basenames:
A list of available basenames are displayed.
- To save into an existing basename:
Select the basename from the basename list
Enter a comment in the Note field ( 8 )
Choose the Selected checkbox ( 9 ) if you wish to save only selected items in the scene if presented
- Click SAVE AS
The filename will be named automatically and versioned up in the current basename.
- The version information will be logged into NIM on the corresponding Asset or Shot including:
Filename
File Path
Owner
Date
Version
Note
- To create a new basename:
Enter a Tag ( 7 ) to append to the basename ( OPTIONAL )
Enter a comment in the Note field ( 8 )
Choose the Selected checkbox ( 9 ) if you wish to save only selected items in the scene if presented
- Click SAVE AS
- A new folder with the Task Folder name will be created under the NIM ASSET_ROOT or SHOT_ROOT as appropriate
Task Folder names are defined in the Task Types Administrative section of NIM
A new folder will be created for the basename under the Task Folder with the basename as the name
All versions of this basename will be saved to the basename folder
- The file will be named according to the following convention
- File naming is defined as:
Asset: assetname_taskShortName_version
Shot: shotname_taskShortName_version
- Adding a tag to a basename will append the tag in the following convention:
Asset: assetname_taskShortName_tag_version
Shot: shotname_taskShortName_tag_version
- The version information will be logged into NIM on the corresponding Asset or Shot including:
Filename
File Path
Owner
Date
Version
Note
Version Up
To version up a file that is already part of a NIM version stream, choose VERSION UP from the NIM menu.
A dialog box will appear with an entry to add a note.
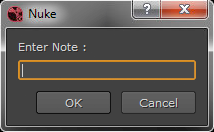
Enter the note and click OK.
The file will be saved to the appropriate location.
The filename will be automatically versioned up.
- The version information will be logged into NIM on the corresponding Asset or Shot including:
Filename
File Path
Owner
Date
Version
Note
A confirmation dialog box will appear:
Click OK to close the dialog box and continue working
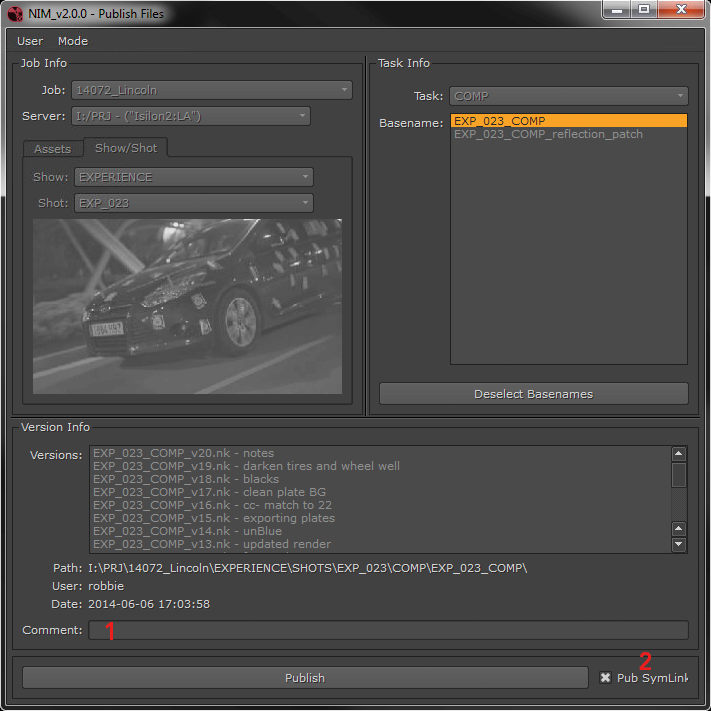
Publish
Publishing a version saves the working file, creates a published file, and generates a versionless version of the basename version stream:
Follow these steps to publish a file:
Note
To publish a file you must be in an existing version stream
All non-editable fields will be greyed out
- Comment:
Enter the comment that will be saved with the version and published files
- Publish SymLink:
This enables NIM to create the symlink for the versionless version
De-selecting this checkbox will create a copy of the file instead of a symlink
- Click Publish:
First this will save the current working version as a new version
- A new file with a _PUB tag appended to the name will be saved and flagged as the current published file.
These _PUB “published” files are not considered a “working” file and filtered out of the version stream when loading working files
Creating a separate publish file aids in the prevention of modifying a publish by accident
- A “versionless” version of the basename will be linked at the root level of the Task folder.
eg. CAR_COMP_v01.nk will be linked as CAR_COMP.nk
When a published file is saved the _PUB file is the currently loaded file. NIM will ask you if you wish to revert the scene to the current working version.
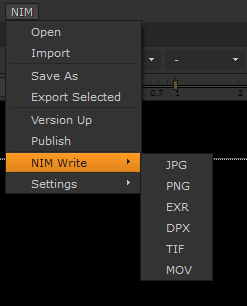
NIM Write Gizmos
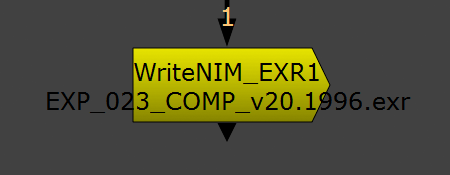
NIM Write Gizmos automatically handle output destinations and file naming conventions based on the NIM project structure settings.
- NIM Write Gizmos are available for the following output file formats:
JPG
PNG
EXR
DPX
TIF
MOV
Output Path
The ASSET_COMP folder or SHOT_COMP folder as defined in the selected NIM project structure will determine the output path of the rendered comp.
Output Settings
The NIM Write Gizmos contain all the output settings found on a nuke write node for the given output file type.
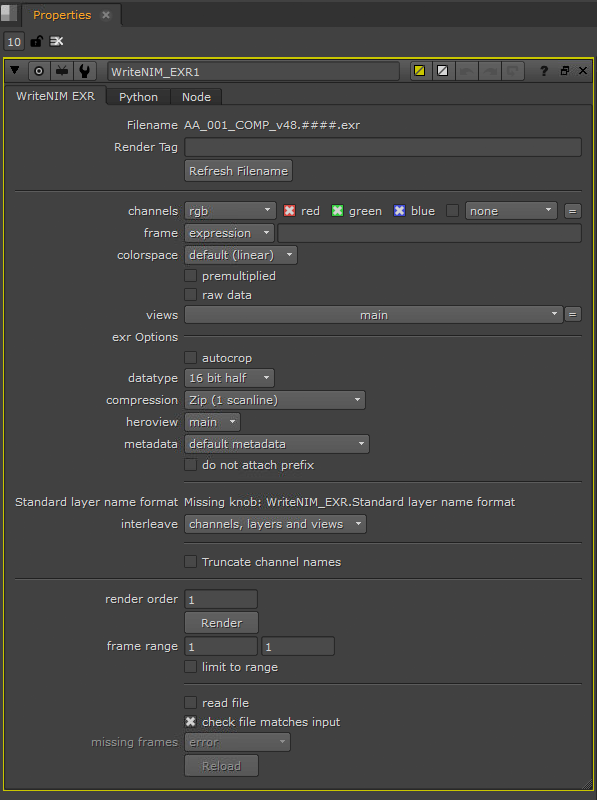
Naming
Comp file names will be constructed with the version name of the comp plus an optional Render Tag that will be appended to the name.
When using multiple NIM write gizmos in the same comp, each NIM write gizmo will need a unique Render Tag.

Note
NIM write gizmos do not automatically update within the UI, however they will be correct at render time. To ensure the filename will be written as expected, click the Refresh Filename button.