Calendars
NIM calendars are designed to share company wide and per job events with users. Calendars are best used for marking meeting dates, event planning, and significant job dates such as client postings and creative reviews. Multiple calendars can be created at the studio and per job level for organizational purposes. All calendars have the option to be exported to iCal or PDF as needed for sharing with collaborators outside of NIM.

- Two types of calendars are available:
Studio Calendars - Global calendars accessed from the Main Menu
Job Calendars - Calendars associated with individual jobs accessed from the Job Menu
- The calendar panel contains two main sections:
Calendar List - The list of all calendars for the given section
Calendar View - Displays the selected calendar with all corresponding events
Calendar Views

The calendar can be viewed by Day, Week, Month, or an Agenda style view.
To change the calendar view click on the corresponding view type at the top right of the calendar.
Month View
The month view displays events one month at a time with events spanning a full day. Double clicking on an event will open a dialog to edit the event details. For more information on adding, editing, and deleting events please refer to the Calendar Events section of the documentation.

Week View
The week view displays all events for the selected week vertically over time. Events on the same day with overlapping time will be positioned side by side on the day. “All Day” events will span the full width of the week in the “All Day” row at the top of the view.

Double clicking on an event will open a dialog to edit the event details. For more information on adding, editing, and deleting events please refer to the Calendar Events section of the documentation.
Day View
The day view displays all events for the selected day vertically over time. Events on the same day with overlapping time will be positioned side by side on the day. “All Day” events will span the full width of the day in the “All Day” row at the top of the view.

Double clicking on an event will open a dialog to edit the event details. For more information on adding, editing, and deleting events please refer to the Calendar Events section of the documentation.
Agenda View
The agenda view displays all events in a grid view, starting on the selected day and extending a week. The duration of each event including start and end times are displayed in the Time column, with the event information displayed in the Event column.

Note
The agenda view does not allow for editing of events.
Hours Displayed
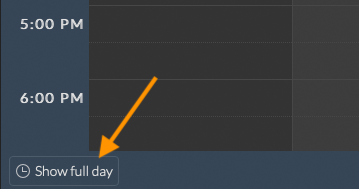
The week and day views offer the option to display the day’s hours either as “Full Day” or “Business Hours.” The “Business Hours” range is determined by the “Work Day Start” and “Work Day End” settings in Admin > Schedule - Options.
To expand the daily hours to show the full day, click the Show Full Day button at the lower left of the schedule.
To revert to displaying only business hours, click the Show Business Hours button at the same location.
Hourly Interval

The division of time for the week and day view is determined by the “Day View Interval” value in Admin > Schedule - Options.
This value affects the number of subdivisions available in the view and the time selector, but does not limit the value at which the start or end time for an event can be manually set.
Calendar Navigation

Navigation within the views is managed using the tools located at the top left of the calendar.
Today Button: Clicking the Today button instantly takes you to the current date, allowing you to quickly return to today’s date regardless of where you are in the calendar.
Navigation Arrows: The left and right arrows enable you to move backward and forward in time based on the selected view. For instance, in the Day view, the arrows move you one day at a time; in the Week view, one week at a time; and in the Month view, they move you forward or backward by one month at a time. This allows for easy navigation through past and future events without changing your current view type.
Date Selection: Clicking on the displayed date will bring up a mini-calendar, allowing you to quickly select a different start date for the calendar. This feature is especially useful for jumping directly to a specific date without having to scroll through the time manually.
These tools provide a simple and efficient way to browse the calendar, helping you stay on top of both current and upcoming events.
Mini Calendar

Clicking the date at the right of the date navigation opens a mini-calendar, allowing you to quickly navigate to any specific day.
The selected date will be highlighted in the mini-calendar and used as the start date for the current calendar view.
Within the mini-calendar, you can use the title bar navigation to easily adjust the zoom level and change the date range for selection.
Title Bar Navigation: Click on the title bar of the mini-calendar to zoom out and broaden your view. This zoom feature makes it simple to select not only specific days but also months or years, providing flexibility in navigating through your calendar.
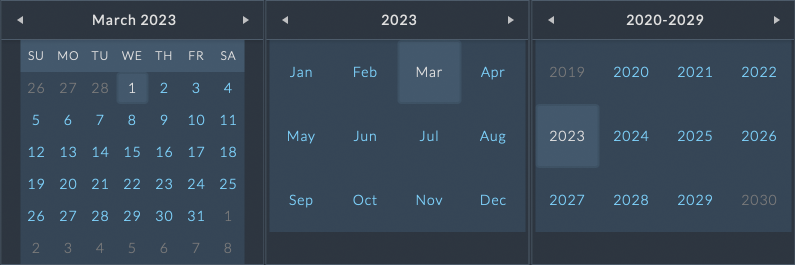
For example:
Clicking on “March 2023” will zoom out to display a list of months within the year 2023.
If you click on “2023” when viewing the list of months, it will zoom out further to show a list of years, allowing you to navigate across different years with ease.
Event Colors

The Event Color Dropdown located in the calendar toolbar allows you to customize how events are color-coded within the views.
This feature provides flexibility in visualizing your calendar based on different criteria.
You can choose from the following color-coding options:
Calendar Colors: Events will be color-coded according to the calendar they are associated with.
Event Colors: Events will be color-coded according to the color that is assigned to the event.
Resource Colors: Events will be color-coded according to the resource they are associated with, providing a clear visual distinction between different resources on the schedule.
Task Colors: Events will be color-coded according to the task they are associated with, providing a clear visual distinction between different tasks on the schedule.
Location Colors: Events will be color-coded based on their assigned location, making it easy to see where each event is taking place at a glance.
Selecting a new option from the dropdown will instantly apply the corresponding color scheme to all events in the schedule, ensuring that the visual representation of your events aligns with your preferred organizational method.
Filter Panel

The calendar filter panel allows users to efficiently filter events based on specific criteria.
The panel provides a point-and-click interface for creating complex filter rules, making it easier to manage, navigate, and focus in on events that are most relevant to your workflow.
Filter Panel Overview
The calendar filter panel contains one main section to create and manage filters.
Calendar Filter

The filter options available in the calendar filter panel are unique to events.
Users can apply specific filters tailored to the type of data they are working with, ensuring more accurate and efficient filtering.
Creating and Editing Filters

Filters are created using a point-and-click tool that allows users to add and customize filter rules one by one.
Users can combine multiple conditions using “And” or “Or” logic, providing the flexibility to build complex filter expressions.
Filter Options
When creating filter rules, you can choose from several options to specify how the filter should be applied. The filter criteria will vary depending on the data type of the column.
Filter Condition |
Text |
Date |
Number |
|---|---|---|---|
Is equal to |
x |
x |
x |
Is not equal to |
x |
x |
x |
Starts with |
x |
||
Contains |
x |
||
Does not contain |
x |
||
Ends with |
x |
||
Is before or equal to |
x |
||
Is after or equal to |
x |
||
Is before |
x |
||
Is after |
x |
||
Is less than or equal to |
x |
||
Is greater than or equal to |
x |
||
Is less than |
x |
||
Is greater than |
x |
||
Is null |
x |
x |
Note
Is equal to: If the filter is being applied to a list of items, this option will provide a dropdown list to choose from.
Is not equal to: If the filter is being applied to a list of items, this option will also provide a dropdown list to choose from.
Filter Expression Preview:

As users create or edit filters, the filter panel displays a preview of the resulting filter expression at the bottom. This preview helps users understand the structure and logic of the filter, ensuring that the correct conditions are applied.
Using the Filter Panel
Accessing the Filter Panel

Open the filter panel by clicking on the “Filters” button in the calendar toolbar. The panel will slide out, revealing the available filter options.
Configuring Calendar Filters

Customize the filter conditions to narrow down the list of items displayed, utilizing the various filter options to refine your search.
Applying Filters

After configuring your filters, click the “Filter” button to apply the filter settings to the current view. The calendar will update to display only the items that match the filter criteria.
As this is an unsaved filter, the filter dropdown will display “Custom” to indicate that the current filter is a custom filter that has not been saved.
Clearing Filters

To clear the filter in the filter panel and return to the default view, click the “Clear” button. This action will remove all filter conditions and display all available events in the calendar.
To clear any filters applied from the filter dropdown, choose “All Items” from the filter dropdown. If an unsaved filter has been applied and the filter dropdown says “Custom”, open the filter panel and, click the “Clear” button.
Saving Filters

After configuring your filters, click the “Save” button to store the filter settings for future use.
A dialog will appear where you can enter a name for the filter and save it. The saved filter will be added to the filter dropdown menu for easy access.
Sharing Filters

To share the filter, navigate to the “Share” tab, select the users or user groups you want to share the filter with, and click “Save.”
The shared filter will be accessible in calendar views for the selected users or user groups from the filter dropdown menu.
To change the sharing settings for a filter, select the filter from the dropdown menu, click the “Share” tab, make the desired changes, and click “Save” to update the sharing settings.
Loading Saved Filters

To load a saved filter, click on the filter dropdown menu at the top right of the calendar and select the desired filter from the list. The calendar will update to display only the items that match the saved filter criteria. The filter panel will also update to show the saved filter’s conditions.
Managing Saved Filters

To edit or delete a saved filter, select the filter from the dropdown, make the desired changes in the filter panel, and click “Save” to update the filter or “Delete” to remove it.
When you update an existing filter, you have the option to rename it at save to create a new filter with the updated settings. Alternatively, you can choose to overwrite the existing filter with the new settings by saving it with the same name.
The filter tool enables users to efficiently manage their schedules, ensuring they can quickly access the most relevant information without getting overwhelmed with large numbers of items. By creating, saving, and sharing filters, users can streamline their workflow and quickly access the information that matters most.
Filter Examples
The following examples demonstrate how to build complex filters using the filter panel. These examples are designed to help you understand how to create filters that meet your specific needs and provide a more focused view of your information. The examples cover a range of scenarios and may not be reflective of the filter items available in you specific filter context.
Example 1: Filtering Users by Group and Employment Status
Scenario:
You want to filter the schedule to display only the users who are full-time staff, belong to the “Animators” group, and have the keyword “Remote” in their profile.
Filter Setup:

Filter Expression:
(
  Employment is equal to 'Staff'
  AND
  Keyword is equal to 'Remote'
  AND
  User Group is equal to 'Animators'
)
Explanation:
This filter will show users who are part of the Animators group and are full-time staff with the keyword “Remote” associated with them. This is useful when you want to see which staff animators are available and can work remotely.
Example 2: Filtering Users by Multiple Job Roles
Scenario:
You need to display all users who are either animators or compositors, and who are also available for overtime work.
Filter Setup:

Filter Expression:
(
  (
    User Group is equal to 'Animators'
    OR
    User Group is equal to 'Comp'
  )
  AND Keyword contains 'Overtime'
)
Explanation:
This filter shows all animators and compositors who are also available for overtime. The OR group ensures that both roles are included, while the AND condition further narrows down the list to those available for overtime work.
Example 3: Filtering Users by Employment Status and Excluding Specific User Groups
Scenario:
You want to view all freelance users except those in the “Comp” or “Animators” group.
Filter Setup:

Filter Expression:
(
  Employment is equal to 'Freelance'
  AND
  (
    User Group is not equal to 'Comp'
    AND
    User Group is not equal to 'Animators'
  )
)
Explanation:
This filter displays all freelance users, excluding those who belong to the Comp or Animators group. The AND logic ensures that both conditions are applied, effectively filtering out any Comp and Animator freelancers.
Example 4: Filtering for Multi-Role Freelancers with Specific Skills
Scenario: You need to find all freelance users who work in either the “Animators” or “Comp” departments and have the keyword “Senior” or “Lead.”
Filter Setup:

Filter Expression:
(
  (
    User Group is equal to 'Animators'
    OR User Group is equal to 'Comp'
  )
  AND Employment is equal to 'Freelance'
  AND
  (
    Keyword contains 'Senior'
    OR Keyword contains 'Lead'
  )
)
Explanation:
This filter narrows down freelance users who are either in the Animators or Comp groups and hold senior or lead positions, making it easier to identify experienced freelancers in these roles.
Example 5: Combining Complex Conditions for a Specific Team
Scenario:
You need to filter the schedule to show users who are either “Senior Animators” or “Lead Compositors,” excluding those who are currently assigned to the “R&D” department.
Filter Setup:

Filter Expression:
(
  (
    (
      User Group is equal to 'Animators'
      AND Keyword contains ‘Senior'
    )
    OR
    (
      User Group is equal to ‘Compositors'
      AND Keyword contains ‘Lead'
    )
  )
  AND User Group is not equal to 'R&D'
)
Explanation:
This filter is used to find senior animators and lead compositors while excluding any users currently in the R&D department. It ensures that only qualified users from the specific roles are displayed in the schedule, excluding those in R&D.
Calendars
Multiple calendars can be created in the calendar list to provide clear organization for your events. Calendars can be viewed individually or in combination to provide a comprehensive view of all events. Calendar color coding can be used to differentiate between calendars in the view when multiple calendars are displayed.
Working with Calendars
Creating a New Calendar

To create a new calendar click the  button at the top right of the Calendar List. A calendar named “New Calendar” will appear in the calendar list.
Note
The new calendar will be marked as visible and selected by default.
Editing Calendars

Click the  to the right of the new calendar to edit the calendar name and color.
The calendar color will be used to color code events in the calendar view when calendar based event color coding is enabled.
To select a new color for the calendar, click on the color swatch to open the color picker dialog.
Use the color picker options to select a new color for the calendar and click “Apply” to save the new color, or “Cancel” to discard the changes.
For more information on calendar color coding, please refer to the Calendar Event Colors section of the NIM documentation.
To save your changes, click the  button to the right of the calendar name, or click the cancel button to discard your changes.
Showing and Hiding Calendars
Multiple calendars can be displayed at once in the calendar view, allowing you to view events across different calendars simultaneously.

NIM will remember the visibility of each calendar when you navigate away from the calendar view, ensuring that your preferred calendar settings are maintained when you return.

To show or hide a calendar, click the checkbox to the left of the calendar name in the Calendar List.
When a calendar is hidden, the checkbox will be unchecked and the calendar will not be displayed in the calendar view.
If a calendar is hidden and selected, the creation of any new events will automatically show the selected calendar.
Tip
Use calendar based event color coding to differentiate between multiple calendars when viewing them together in the calendar view.
Selecting Calendars

When multiple calendars are displayed, the selected calendar will be highlighted in the Calendar List. To select a calendar, click on the calendar name in the Calendar List.
Any new events created will be added to the selected calendar.
If a calendar is hidden and selected, the creation of any new events will automatically show the calendar.
Deleting Calendars
To delete the calendar, click the  to the right of the calendar name. A confirmation dialog will appear to confirm the deletion of the calendar. Click “Delete” to confirm the deletion, or “Cancel” to keep the calendar.
When a calendar is deleted, all events associated with the calendar will also be deleted.
Copying a Calendar

Calendars can be copied to a new calendar in the calendar list by clicking the Copy Calendar button.
This will copy all existing events from the currently selected calendar to a new calendar within the current context.
Exporting Calendars
Calendars can be exported to multiple formats for use outside of NIM. When exporting a calendar, all visible calendar events will be included in the export allowing you to select multiple calendars or use filter options to control the events included in the export.
Export to iCal

Calendars can be exported to an iCal file by clicking the Export iCal button in the calendar toolbar. All events in the current calendar view will be exported to an iCal file and automatically downloaded by the browser. Once downloaded, this file can be directly imported into any calendar application that supports the iCal format.
Export to PDF

Calendars can be exported to PDF by clicking the Export PDF button in the calendar toolbar.
All events in the current calendar view will be exported to a PDF file that will be automatically downloaded by the browser.
The PDF header image used for the PDF will be the header associated with the user’s location in the User Profile. If no header image is set, the default PDF header image will be used.
Calendar Events
Calendar events include unique title, and description, along with links to resources, tasks, locations, and users. Events can be scheduled to start and end at specific times in varying timezones or marked as “All Day” events that span across start and end dates. Additionally, the repeat event option allows users to create events that recur over a defined period of time.
Event Information
Each event contains 2 tabs: Details, and Duration, allowing you to manage the event’s specific information, and duration values effectively.
Details

The Details tab provides specific information about the event, including the title, description, resource, task, location, users, event color and parent calendar.
Events can be linked to a specific calendar to help organize and categorize events effectively.
Detail Fields include:
Title |
|
Description |
|
Resource |
|
Task |
|
Location |
|
Assignment |
|
Color |
|
Calendar |
|
Duration

The Duration tab allows you to set the start and end times for the event, as well as the option to mark it as an all-day or repeating event.
All-day events span across start and end dates without specific times and operate independent of timezones.
Events with a specific start and end time can be set to different timezones, allowing you to manage events across different regions effectively.
Events can be set to repeat daily, weekly, monthly, or yearly, with additional settings to define the event repeat rules. For more information on repeating events, please refer to the Repeating Events section of the NIM documentation.
Duration Fields include:
Start |
|
End |
|
Timezone |
|
All Day Event |
|
Repeat |
|
Repeating Events
Repeating events are events that occur multiple times over a defined period.
When creating a repeating event, you can define the frequency and end date of the recurrence, as well as additional rules to determine how the event is propagated to future recurrences.
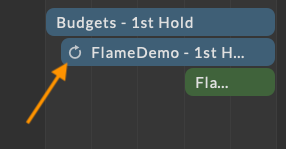
If the event is part of a repeating series of events, there will be a repeat icon at the left of the event indicating that this is a repeating event.
Repeat Rules
When a Repeat option is selected, additional fields are available to define the repeat rules. Depending on the selection, increasingly complex rules can be defined as the Repeat value gets larger. All options include a Repeat Every and an End value to determine the frequency and end of the recurrence, while Weekly, Monthly, and Yearly options additionally include a Repeat On value to further refine how the event is propagated to future recurrences.
Daily Repeat Example
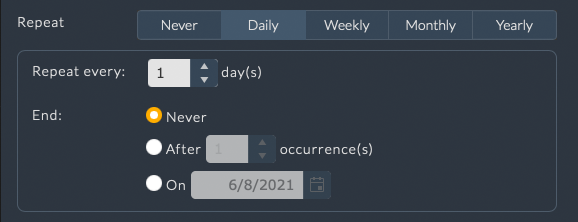
The example at the right displays the options available for a Daily repeat cycle.
Weekly Repeat Example
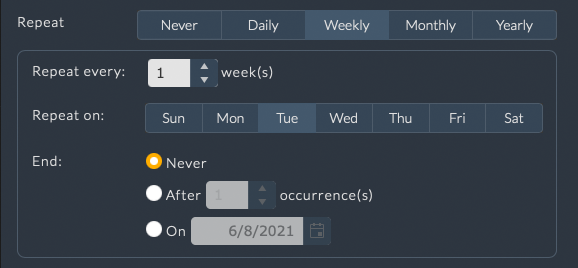
The example at the right displays the options available for a Weekly repeat cycle.
Monthly Repeat Example

The example at the right displays the options available for a Monthly repeat cycle.
Yearly Repeat Example
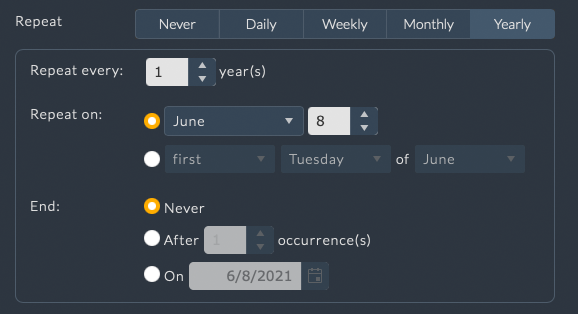
The example at the right displays the options available for a Yearly repeat cycle.
Timezone Options

The Timezone options are available when the All Day Event checkbox is unselected. When the All Day Event checkbox is selected, the Timezone options are disabled.
Clicking the Timezone button opens the Timezones options dialog.
By default, Use separate start and end timezones is enabled.
De-selecting this option will remove the End Timezone dropdown and only the Start Timezone dropdown selection will be used.
Below the Start and End timezone dropdowns is an additional field to select a city within the selected timezone.
Adding Events
Adding an event to a calendar is a straightforward process that can be done from the day, week, or month views:
Create a New Event
Double-click on a cell:

To quickly add an event, simply double-click on an empty cell within the Day, Week, or Range view.
This action will automatically open the event creation dialog box for that specific date and time and include the selected job, user, or resource.
Important
If no calendar currently exists, a new calendar will be created and the event will be added to that calendar when the event is saved.
If the currently selected calendar is not visible, it will be automatically shown when a new event is saved.
Event Creation Dialog
When you initiate the creation of a new event, whether by double-clicking on a cell or using the add button, a dialog box will appear where you can enter all necessary event details.
This dialog is central to defining the event’s characteristics and linking it to the appropriate resources, users, or jobs.
Please refer to the Event Information section of the NIM documentation for more information on the event details and how to manage them effectively.
Editing Events
Editing an event in the calendar is straightforward and can be done in multiple ways.
Open the Event for Editing
Double-click on the event:

In the Range, Week, or Day view, simply double-click on the event you wish to edit.
This will open the event’s dialog box, where you can modify the event details.
Right-click on the event:

Alternatively, you can right-click on the event and choose Edit from the context menu. This option provides quick access to editing, especially useful when working with multiple events on the calendar.
When you open the event for editing, a dialog box will appear, allowing you to update any of the event’s details.
Committing Changes

Save:
After making the necessary changes, click the Save button to commit your updates.
Cancel:
If you decide not to make any changes, click the Cancel button to close the dialog box and return to the calendar view without saving your edits.
Editing Repeating Events
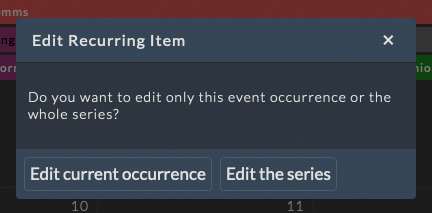
Repeating events have the option to be edited as a series or as individual occurrences.
When editing a repeating event, a popup will appear asking if you wish to edit the current occurrence or the entire series of events.
Choosing to edit the series will edit all events in the series of repeating events.
Selecting the current occurrence will edit only the selected occurrence and make it unique from other recurring instances.
Unique Occurrences
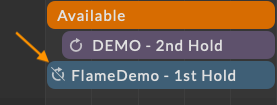
If the event was previously part of a repeating series, but modified independently, a canceled repeat icon at the left of the event indicates that this is a unique occurrence in a repeating series.
Resetting Event Series
If you have a series of repeating events that has at least one occurrence that has been modified independently, you can reset the series to the original repeating event settings.

To do this, double click on the event or right click and choose Edit from the context menu.
A popup will appear asking if you wish to edit the current occurrence or edit the series.
Selecting the series will show an additional option to “Reset Series.”
Clicking this button will reset all events in the series to the original repeating event settings.
Moving Events
Events on the calendar can be easily moved or resized by clicking on specific areas of the event and dragging them to a new position.
Moving the Event
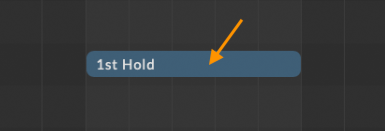
To move an entire event, click and hold on the center of the event. You can then drag it to other cells on the calendar to change the date.
Extending or Shortening the Event
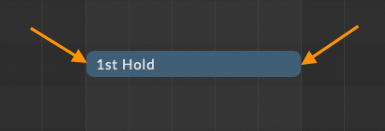
To adjust the duration of an event, click and hold on either the left or right edge of the event. Dragging the edge will extend or shorten the event’s start or end time.
Extending Non-“All Day” Events

In the week or day view, click and hold on the top or bottom of the event to extend the start or end times of non-“All Day” events.
Deleting Events
Deleting a calendar event is simple and can be done in multiple ways.
Deleting an Event
Right-click on the event:
In the day, week, or month views, you can right-click on the event you wish to remove.
From the context menu, select Delete to immediately delete the event from the calendar.
Delete from the Event Editing Dialog Box:
Alternatively, if you have already opened the event’s dialog box to edit it, you can delete the event by clicking the Delete button in the dialog box. This method is useful if you’re reviewing or modifying the event before deciding to delete it.
Deleting Repeating Events

Repeating events have the option to be deleted as a series or as individual occurrences.
When deleting a repeating event, a popup will appear asking if you wish to delete the current occurrence or the entire series of events.
Choosing to delete the series will delete all events in the series of repeating events.
Selecting the current occurrence will delete only the selected occurrence from the series.
Important
When deleting an event, you will be asked to confirm the deletion. Once confirmed, the event or series of events will be permanently removed from the calendar. This action cannot be undone, so please ensure you want to delete the event before confirming the deletion.
Quick View

Clicking on an event will display the quick view tooltip, allowing you to quickly access key information about the event without needing to open the event editor.
Only the fields that have been set will be shown in the quick view.
The tooltip will list up to 5 users and 5 resources assigned to the event. If more than 5 users or resources are assigned, a “+ X more” line will appear, where X indicates the number of additional users or resources. To view all users and resources assigned to the event, open the event editor.
Context Menu
The context menu provides quick access to various actions and options for managing events in calendars.
Right-clicking on an event will open the context menu, allowing you to perform specific actions related to the event.
Edit
Selecting Edit opens the event in the editing dialog, allowing you to modify any of its details such as title, time, or associated users and resources.
Copy
Choosing Copy will create a duplicate of the event with the same details on the same day. You can then modify the copied event as needed.
Delete
Clicking Delete removes the event from the calendar. A confirmation dialog will appear to ensure you want to proceed with the deletion.