Studio Financials
Studio Financials provide an overview of site wide billing, invoices, and access to reconcile user timecards on Payroll. To open the Financials panel, select Studio > Financials from the Main Menu.
The Finance panel is divided into two sections:
Finance Dashboard
Finance Tabs
Overview - A timeline chart displaying invoice totals stacked by status
Billing - Per job billing status and invoice totals
Invoices - Invoices across all jobs
Expenses - Expenses entered across all jobs
Payroll - A workspace to resolve timecards for users that are using Payroll Group rates
Note
The overview and billing tabs are non-editable and for analysis purposes only. Information here can be filtered to limit items to a specific job or specified time frame.
Finance Dashboard
The Finance Dashboard displays summarized information for site wide invoice totals and filtering tools to filter by job or by date range.

Summarized Totals
At the left of the dashboard are summarized totals for:
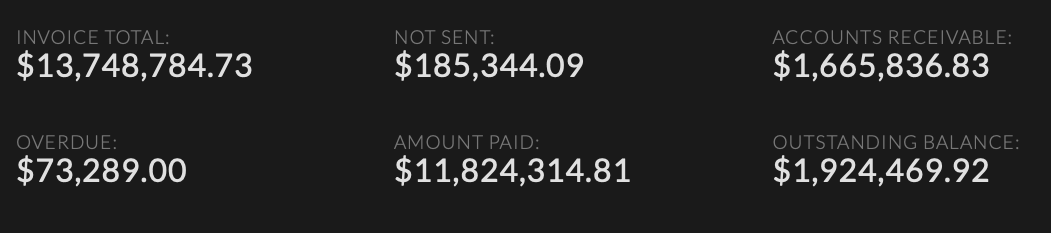
Invoice Total |
The total of all job invoices “Sent” or “Paid” within the filtered date range and all earlier unpaid invoices |
Not Sent |
The total of all invoices created but not “Sent” or “Paid” during or before the filtered date range |
Accounts Receivable |
The total of all invoices “Sent” but not “Paid” during or before the filtered date range. This total does NOT include Overdue invoices. |
Overdue |
The total of all invoices “Due” but not “Paid” by the “Due” date during or before the filtered date range |
Amount Paid |
The total of all invoices “Paid” within the filtered date range |
Outstanding Balance |
Invoice Total minus Amount Paid |
Filters
At the right of the panel are filtering options to filter by:
Job
Start Date
End Date
To open the filter options, click the filter button at the top right of the dashboard. When a filter is active, the filter button will be highlighted.

Note
The default time period filter is automatically applied using a 3 month window ending on the current day.
Job Filter
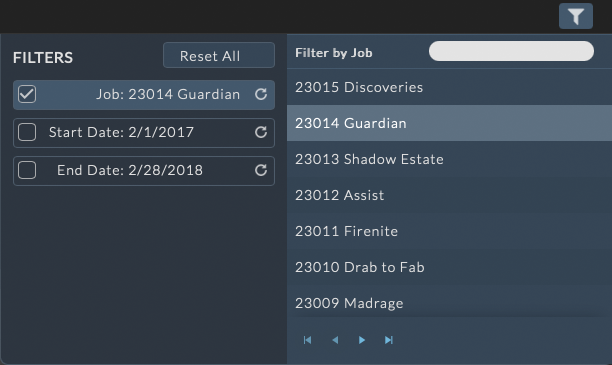
Invoices may be filtered by a single job.
Click on the Filters / Job button from the filter list.
The Filter panel will expand from the right allowing the user to select a job.
Clicking on a job in the list will immediately apply the filter.
Note
When filtering by job, the start and end date filters are disabled so all invoices on the job will be displayed. The time filters can be applied by clicking on the checkbox next to Start Date and End Date to re-enable the filter.
Time Filter
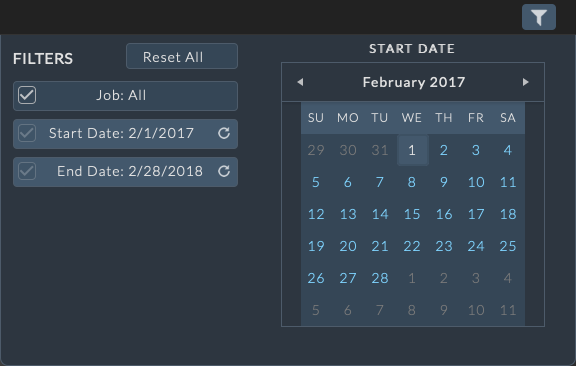
Invoices may be filtered by time.
Click on the Filters / Start Date or End Date button from the filter list.
The Filter panel will expand from the right allowing the user to select a date.
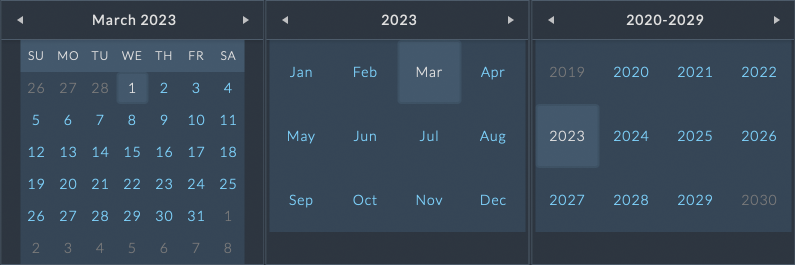
Clicking on a date in the mini calendar will immediately apply the filter.
Inside the mini calendar, click the title bar to adjust the zoom level of the date range to select.
Clicking on March 2023 will zoom out the mini calendar to show a list of months.
Clicking on 2023 when viewing months will zoom out to show a list of years.
Clearing Filters
Filters may be individually enabled and disabled by clicking the checkmark box to the left of each filter.
 - enables the filter
 - disables the filter
To reset all filters click the Reset All button at the right of the Filter panel
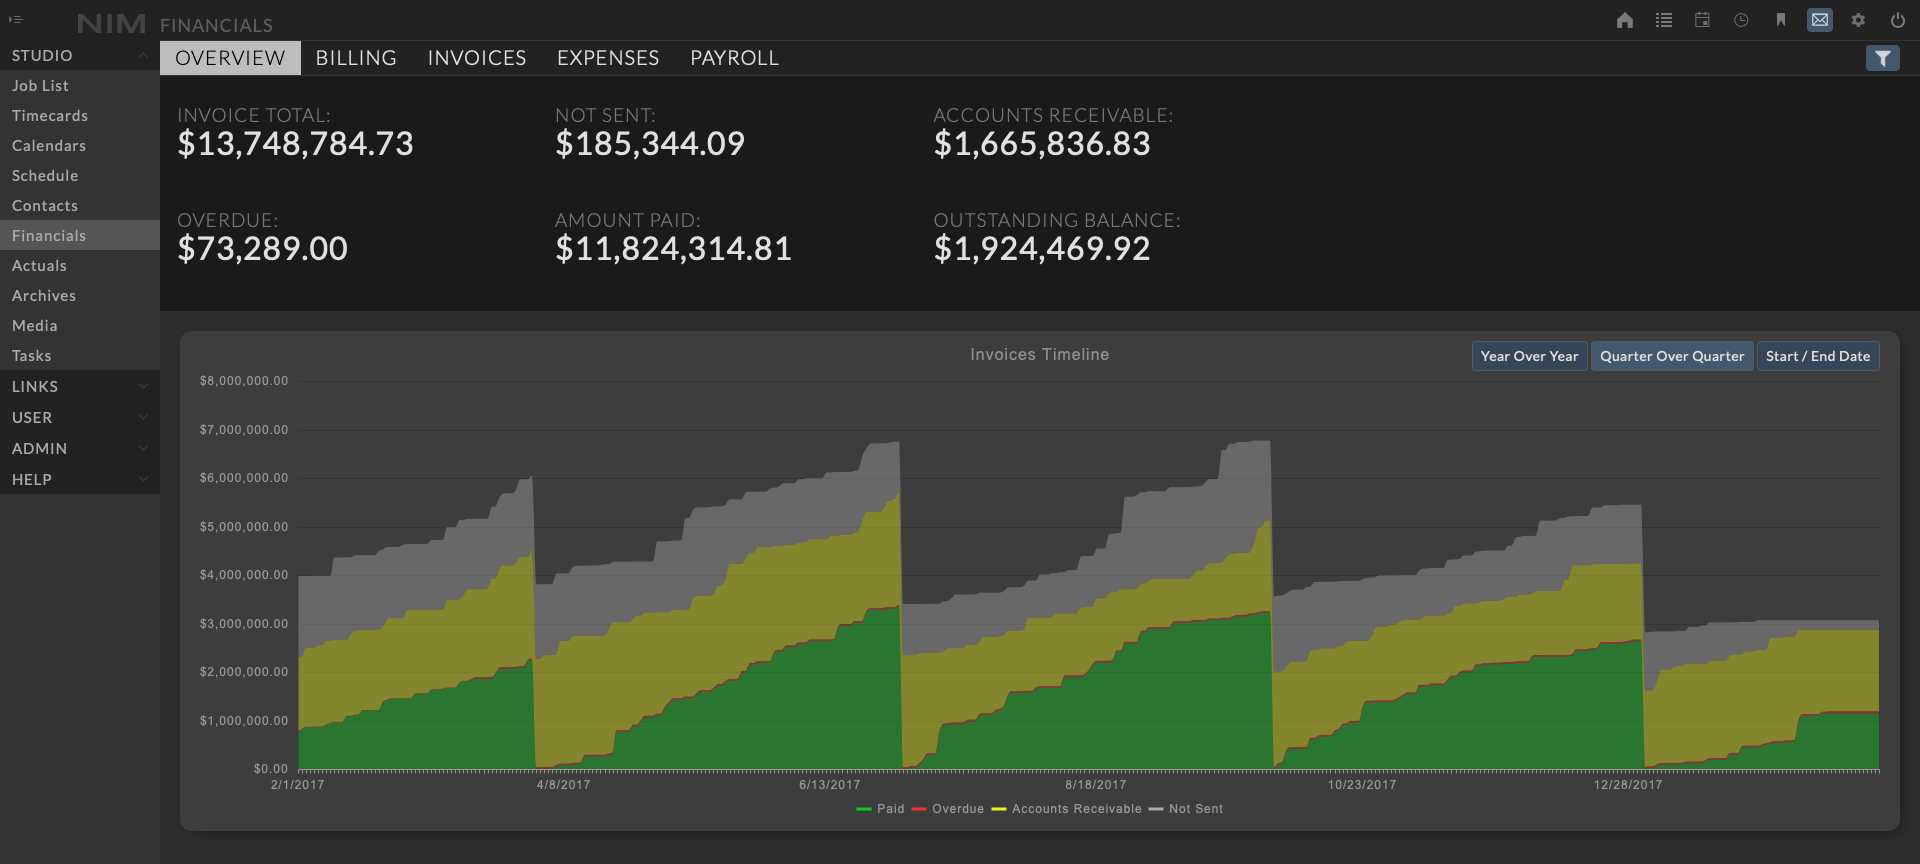
Overview
The Overview tab is selected by default containing a timeline chart graphing the site wide invoice statuses over time.
Hovering the cursor over a region will display the exact value for each area on the chart.
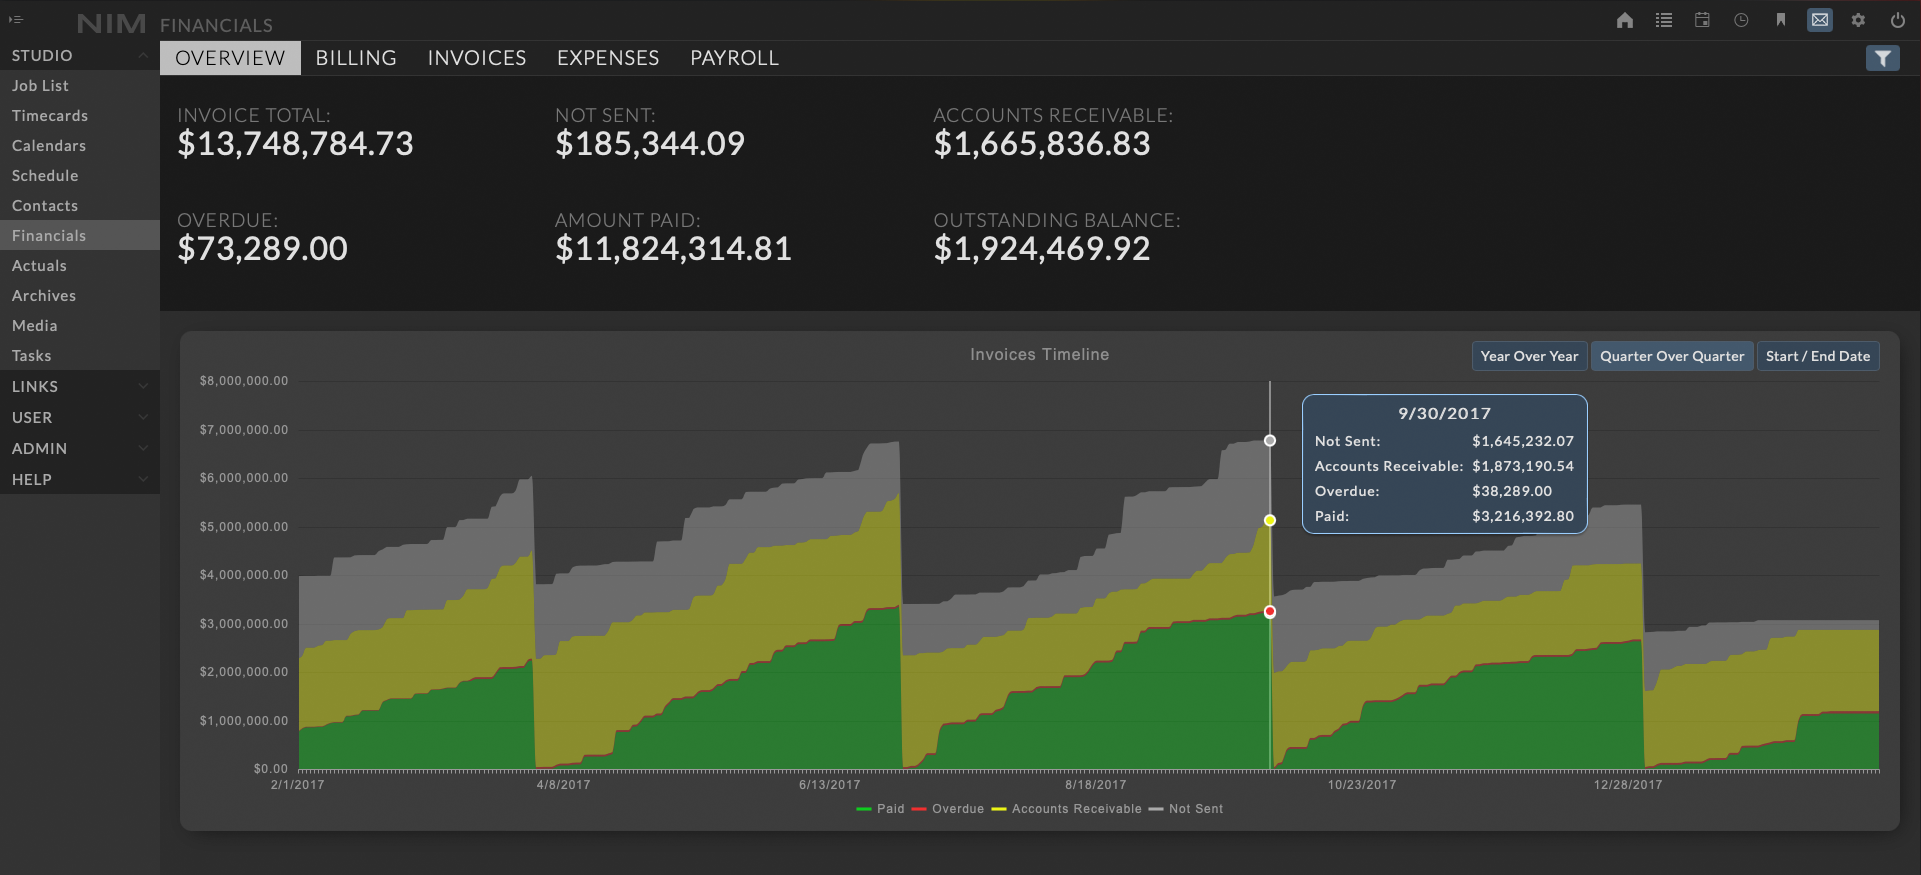
The invoice timeline has 3 views to analyze and compare invoices over time:
Year over Year - Resets the amount paid per year with carry over for prior invoices not sent, in accounts receivable, or overdue.
Quarter over Quarter - Resets the amount paid per quarter with carry over for prior invoices not sent, in accounts receivable, or overdue.
Start/End Date - Resets the amount paid per the start date with carry over for prior invoices not sent, in accounts receivable, or overdue.
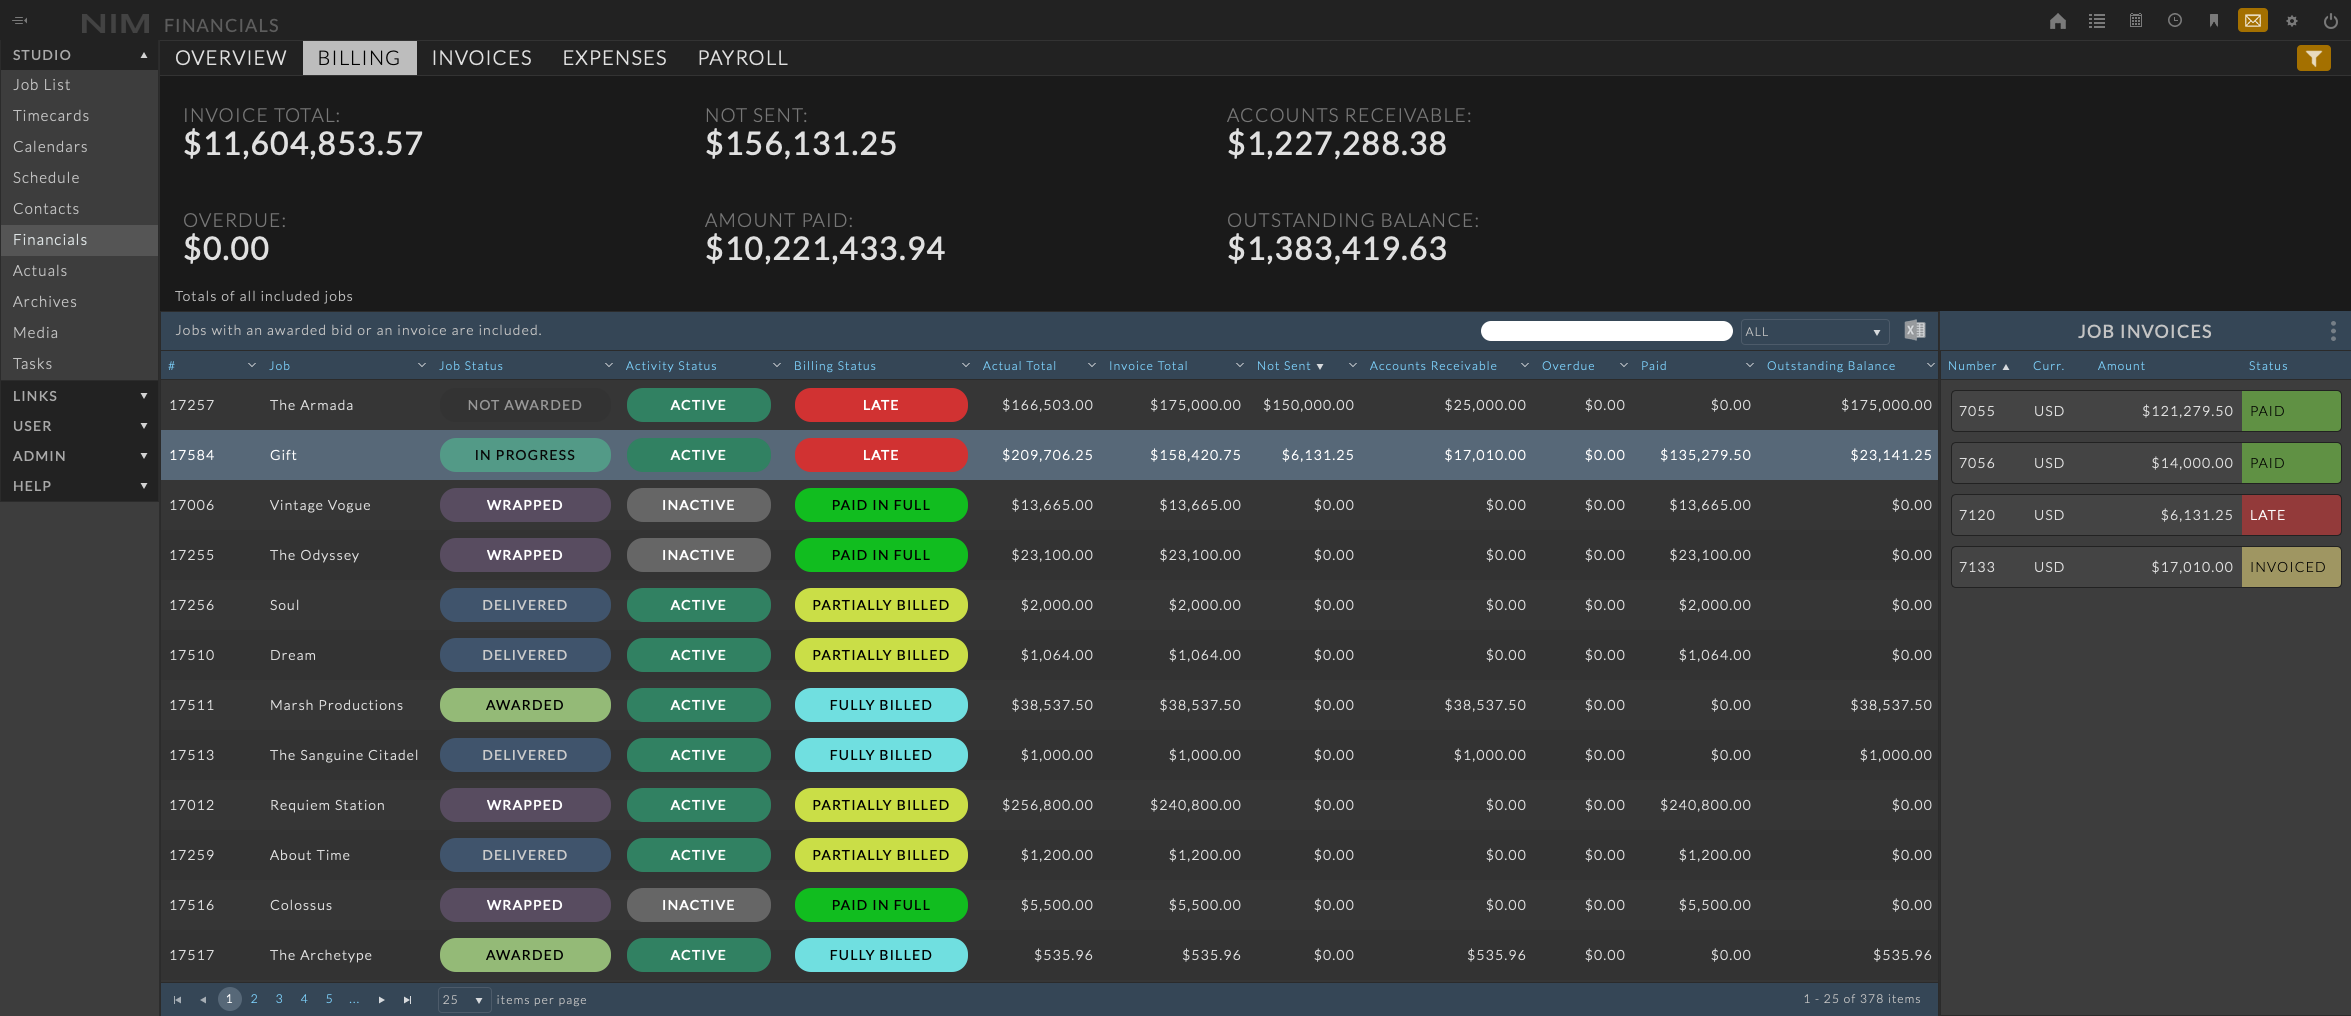
Billing
The Billing tab displays summarized invoice information related to jobs determined by the job/date filter. Selecting the Billing tab will update the dashboard totals to only include the jobs within the search results.
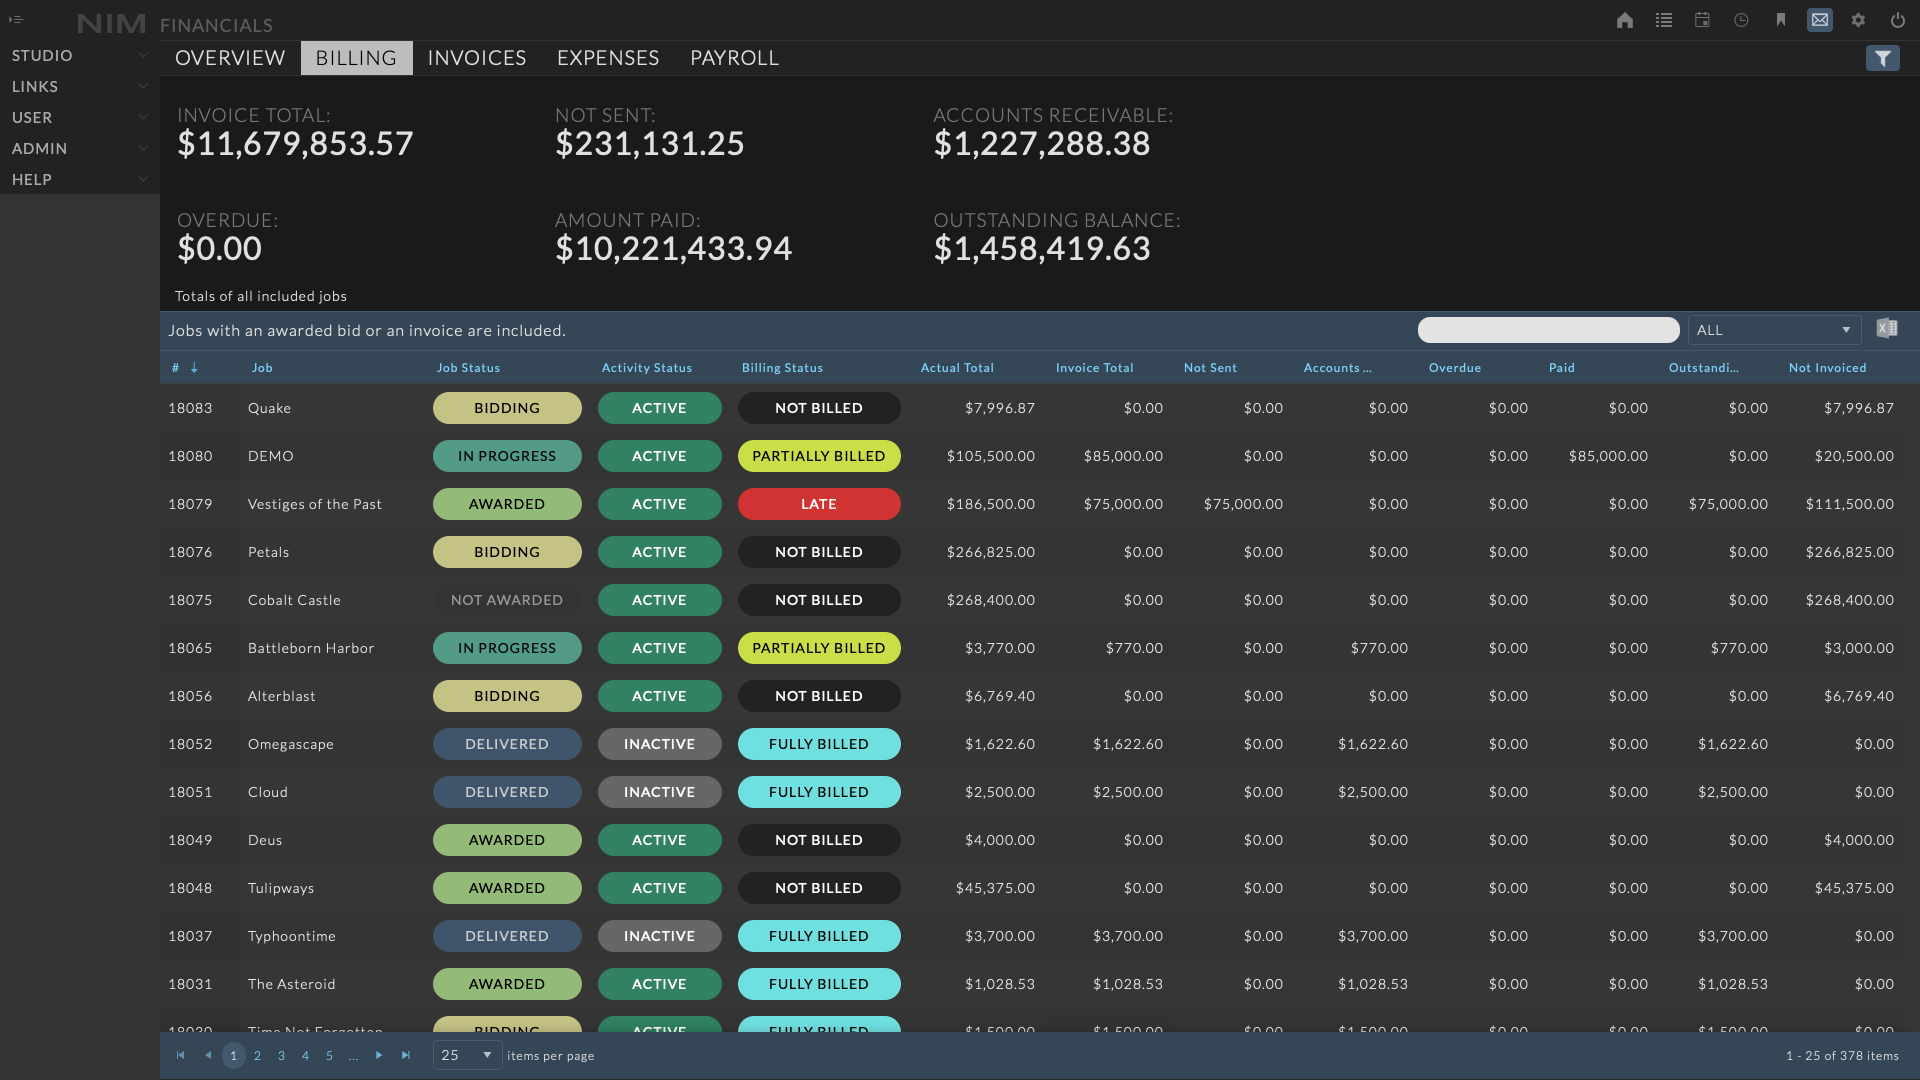
The grid includes the following information:
Job Number |
The job number |
Job Name |
The job name |
Job Status |
The job status |
All Job Fields |
All job fields from the job overview ( hidden by default ) |
Billing Status |
The billing status determined as the total of invoice statuses |
Actual Total |
The job Actual Total derived from the Job Actualization |
Invoice Total |
The total of job invoices entered |
Not Sent |
The total of job invoices scheduled but not sent |
Accounts Receivable |
The total of invoices sent but not paid |
Overdue |
The total of invoices overdue |
Paid |
The total of invoices paid |
Outstanding Balance |
The Actual Total derived from the Job Actualization minus Paid |
Not Invoiced |
The Actual Total derived from the Job Actualization minus the Invoice Total |
Note
Only jobs with an awarded bid or invoice are included in the Billing grid
Billing Status
The billing status of each job is determined by the combined statuses of the jobs invoices. Invoice statuses are determined by comparing the current date to the date logged for each action item on the invoice. To find out more about invoice statuses please refer to the Invoice Status section of the documentation.
Billing status options include:
Not Billed |
An amount is due to be billed but no invoice has been marked as sent with a “Sent” date in the past |
Partially Billed |
At least one invoice on the job has been marked as sent with a “Sent” date in the past |
Fully Billed |
All invoices on the job have been marked as sent with a “Sent” date in the past |
Late |
A least one invoice on the job is past the “Due” date without a “Paid” date |
Paid in Full |
All invoices on the job have a “Paid” date |
Filters
The Billing grid supports job number and name filtering, column menu filtering as well as job status filtering by the job status dropdown.
Search
To filter the grid by a job number or name, type the search criteria into the search bubble at the right of the grid header.

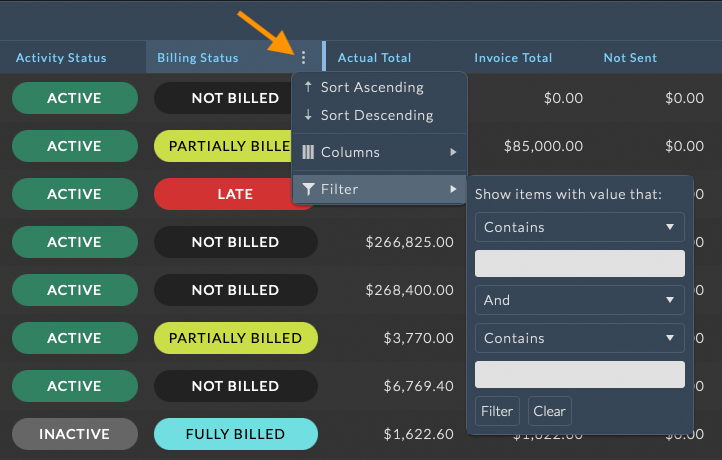
Column
To filter the grid by a column menu, hover over the column and click on the ellipsis menu at the right of the column header and select your filter options from the Filter menu.
Job Status
Additionally, jobs can be filtered by the job status dropdown at the right of the grid toolbar.

Export to Excel
The Billing grid can be exported to excel using the  button. Exported grids will respect any filtering previously applied.
Invoice List
Selecting a row in the Billing grid will open a panel displaying a list of all invoices for the selected job. Each invoice entry contains the following information:
Number - The invoice number
Currency - The currency selected for the invoice
Amount - The total amount of the invoice
Status - The current status of the invoice
Selecting an invoice in the list will slide over an invoice edit panel. From here invoice details can be updated, and unwanted invoice entries can be deleted. Use the ellipsis menu at the top right of the panel to edit or delete the invoice.
In addition to modifying the invoice, you can go directly to the parent job’s invoice section by choosing Open Job Invoices.
For more information on editing invoices, please refer to the Edit an Invoice section of the documentation.
Invoices
The Invoices tab provides a complete list of all invoices site wide, with individual information for all invoices within the filtered job or date range. Selecting the Invoices tab will update the dashboard totals to only include the invoices within the search results.
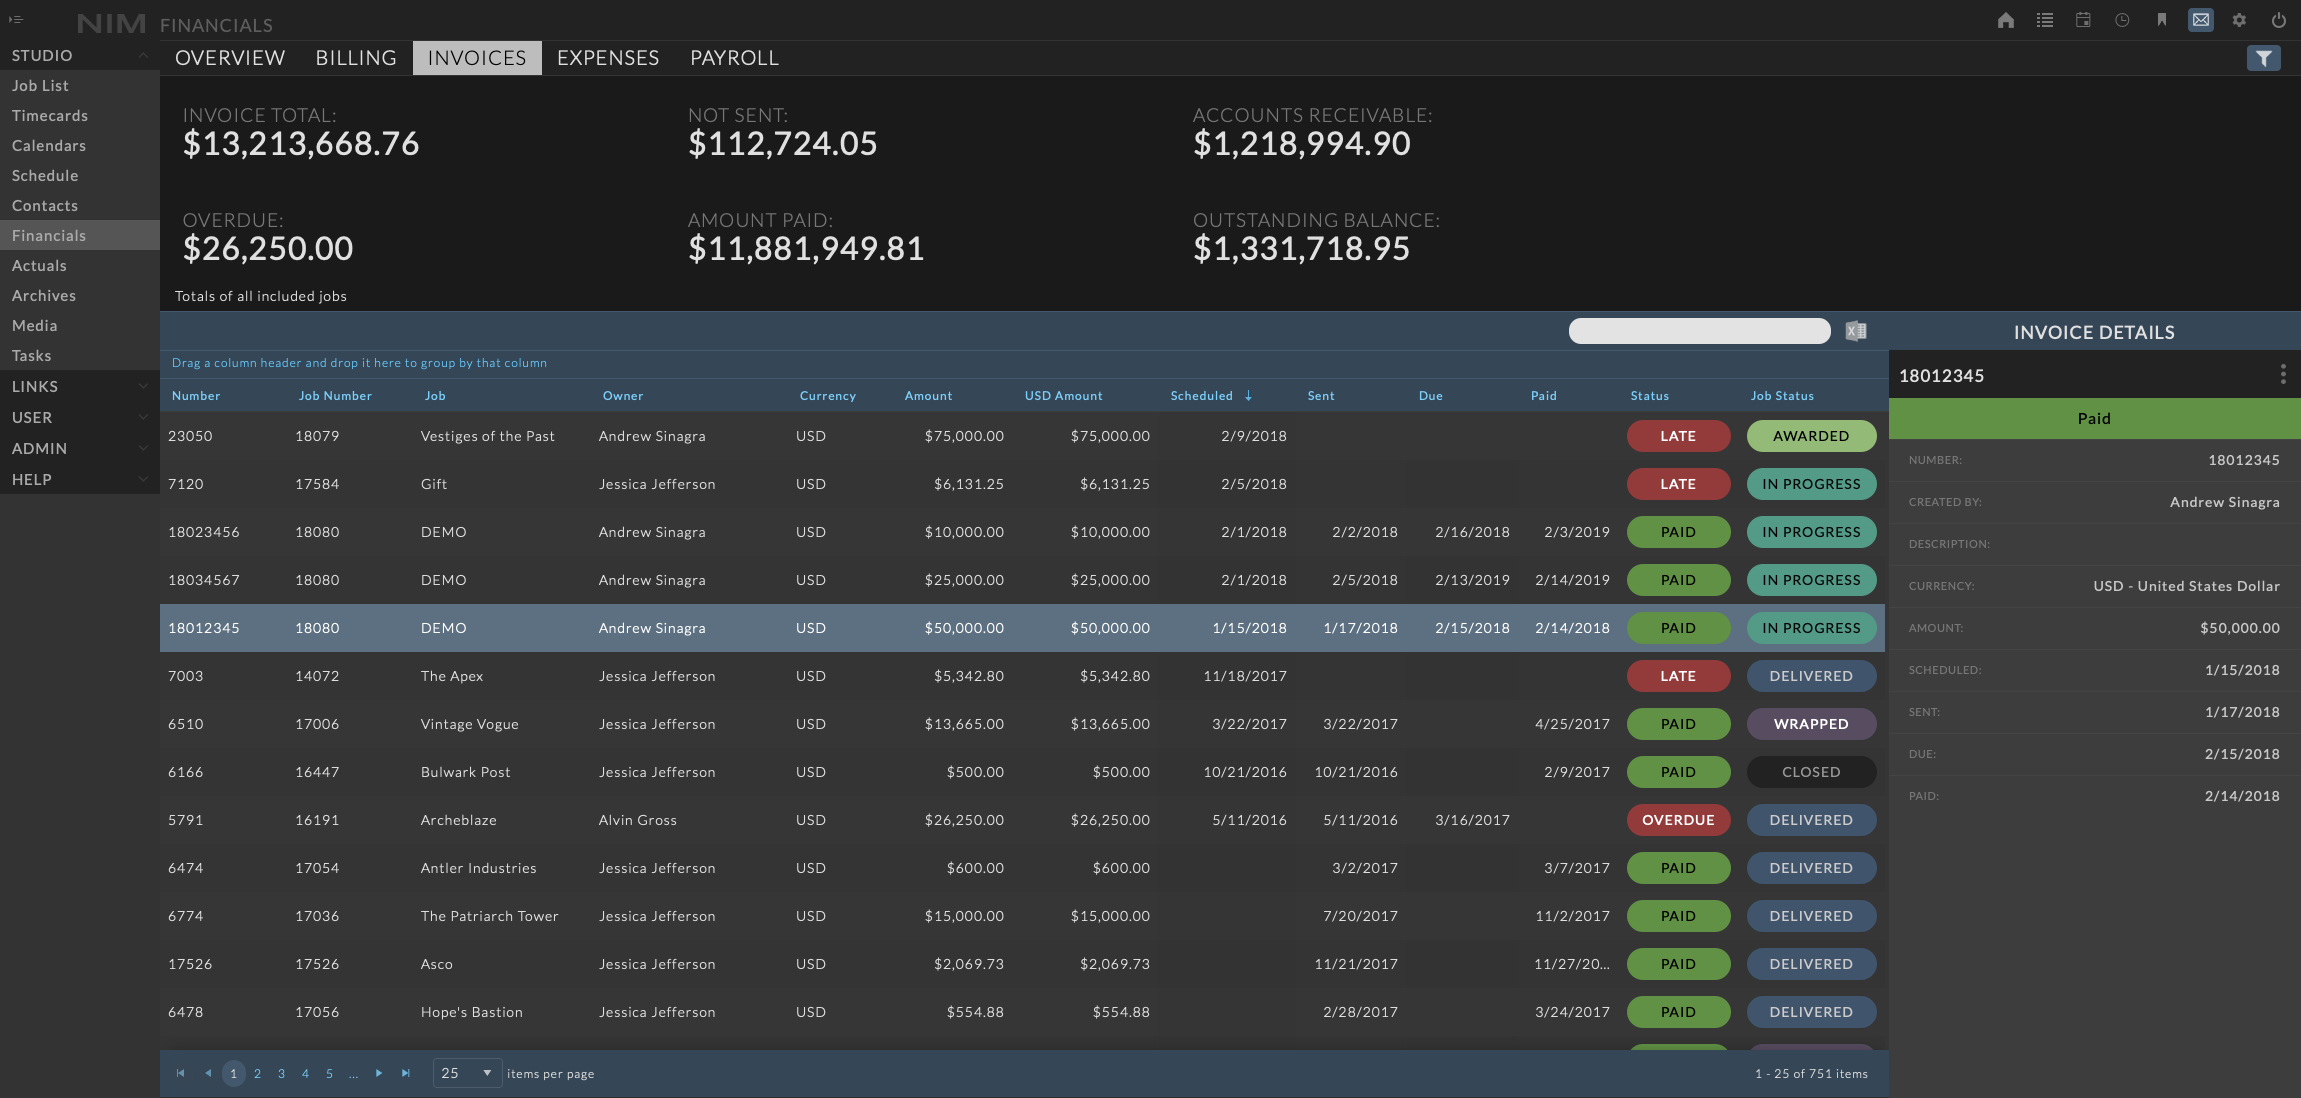
The Invoices grid includes the following information:
Number |
The invoice number |
Job |
The job the invoice is created for |
All Job Fields |
All job fields from the job overview ( hidden by default ) |
Owner |
The user who created the invoice |
Currency |
The currency of the invoice amount |
Amount |
The invoice amount |
Studio Currency Amount |
The invoice amount represented in the studio currency. This column will be named according to the selected studio currency. For example, a studio currency of USD will display the column label as USD Amount |
Scheduled |
The scheduled date to send the invoice out |
Sent |
The date the invoice was sent out |
Due |
The due date of the invoice |
Paid |
The date the invoice was paid |
Status |
The overall status of the invoice based upon the scheduled/sent/due/paid dates |
Invoice Status
The invoice status is determined by comparing the current date to the date logged for each action item on the invoice.
- Action items include:
Scheduled
Sent
Due
Paid
Based on the state of the action items, one of the following statuses will be automatically applied:
Not Invoiced |
No action item has been set with a date or the “Scheduled” date is in the future |
Late |
The “Scheduled” date is in the past and no other action items have been set |
Invoiced |
The “Sent” date has been set and the “Due” date is either not set or set in the future. |
Overdue |
The “Due” date is in the past and a “Paid” date has not be set |
Paid |
The “Paid” date has been set |
Note
If at anytime the “Paid” date is set, the invoice will be marked as paid regardless of the other action items state.
Filters
The Invoice grid supports job number, name, owner, and status quick filtering, as well as column menu filtering.
Search
To filter the grid by a job number, name, owner, or status type the search criteria into the search bubble at the right of the grid header.
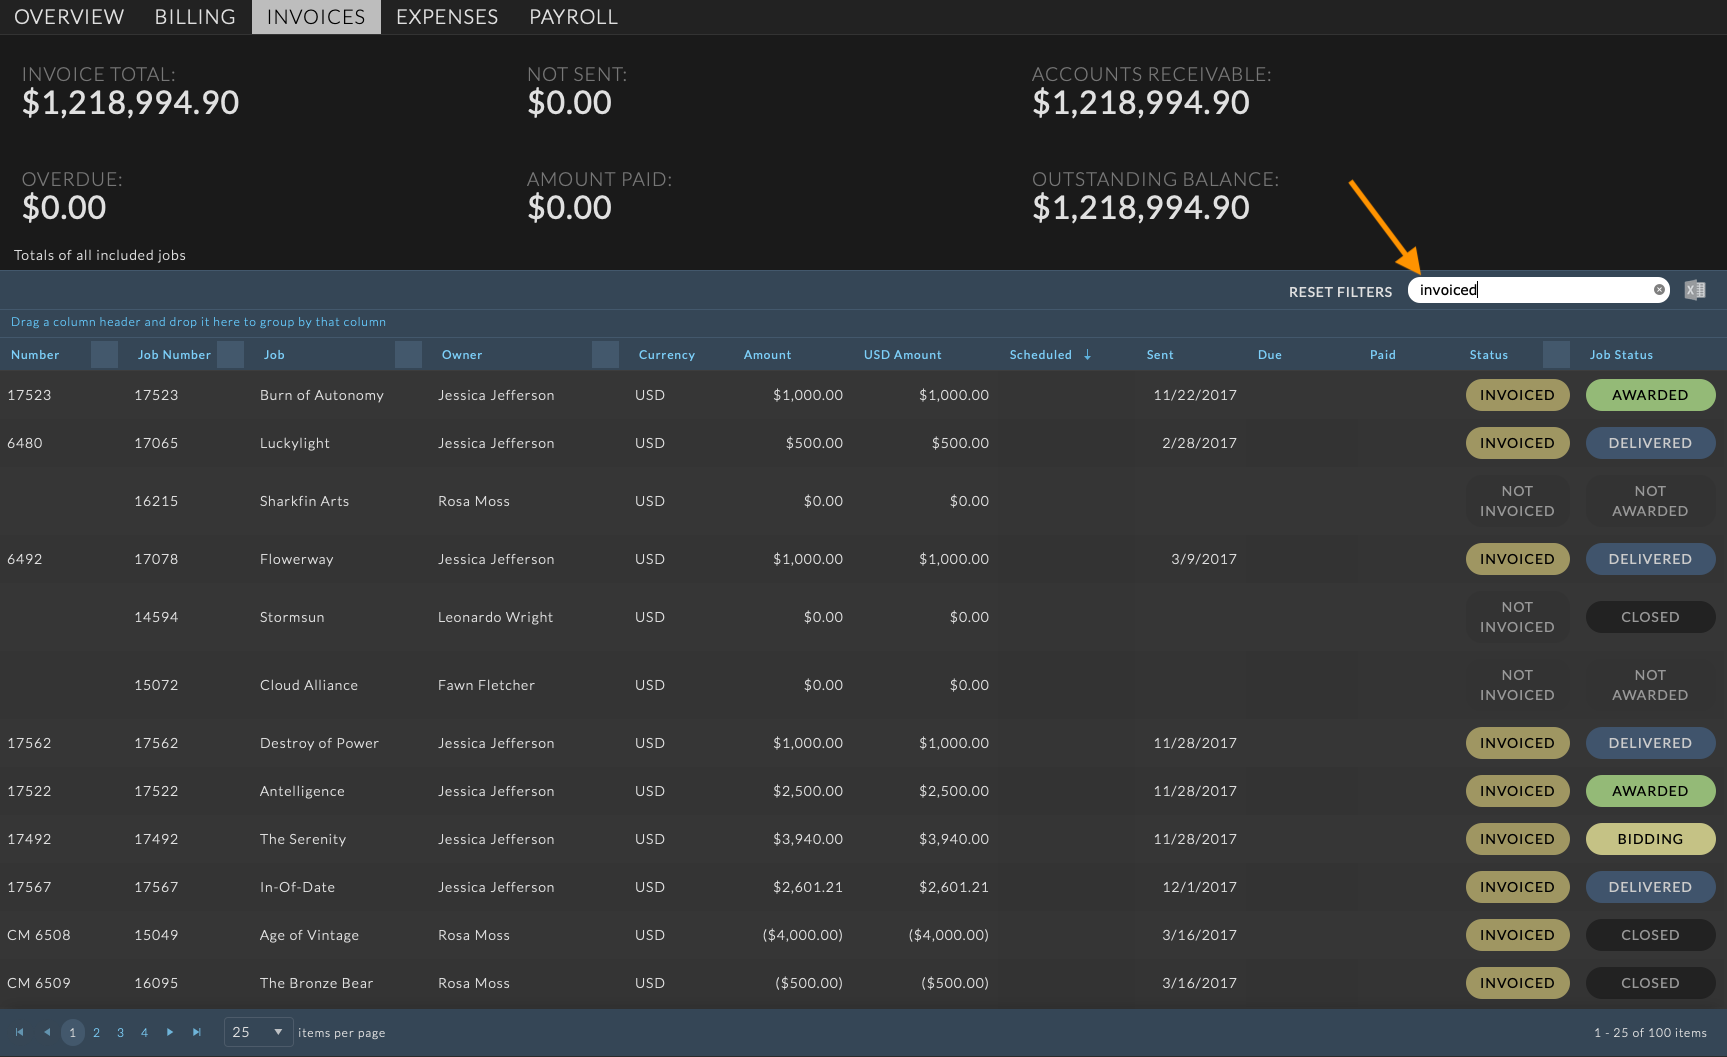
Note
When filtered, the dashboard totals will be updated to only include the invoices within the search results.
Column Filters
To filter the grid by a column menu, hover over the column and click on the ellipsis menu at the right of the column header and select your filter options from the Filter menu.
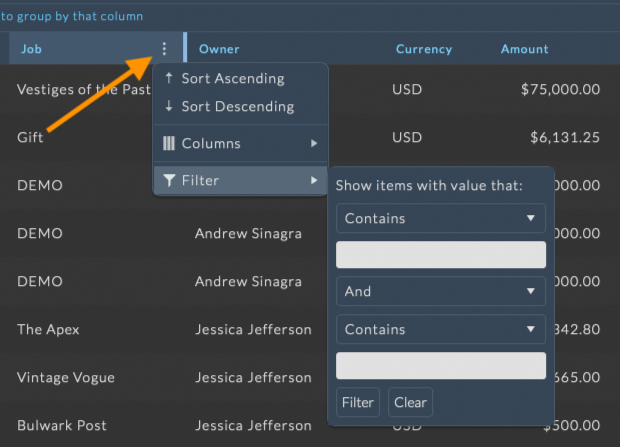
Column Grouping
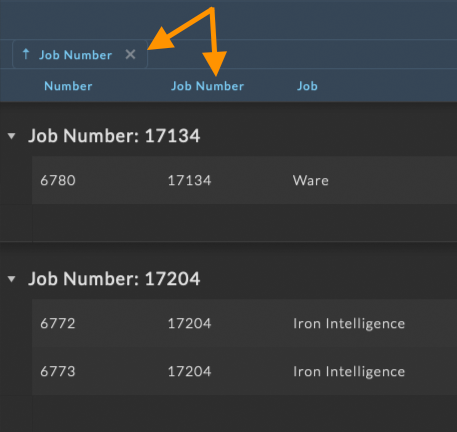
The invoice grid contains functionality to group items by information in any column.
To group by column, drag and drop a column header to the bar labeled Drag a column header and drop it here to group by that column.
Grouping invoices will sum the Studio Currency Amount for each group and display the total in the group footer.
Note
When grouping by one or more columns, only items within your current page will be grouped. The current sorting, filtering, and pagination rules still determine the total set of items you’ll see at one time.
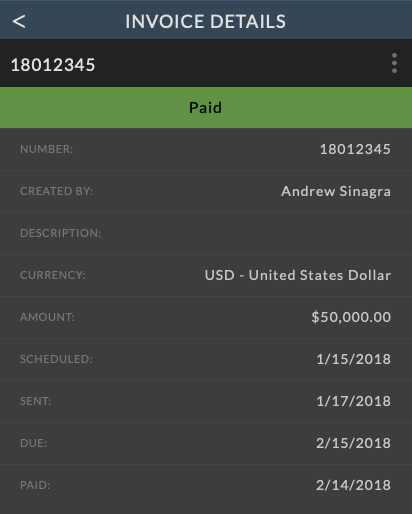
Edit an Invoice
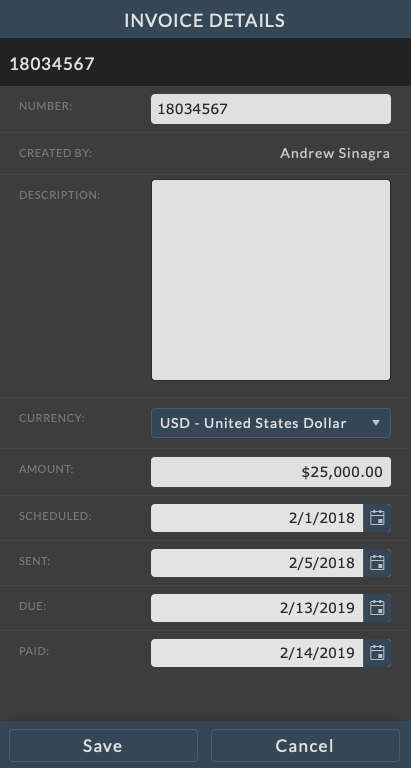
To edit the status of an invoice, click on the invoice line item in the grid. The Invoice Details will slide out to the right of the grid.
Click on the ellipsis menu in the invoice info panel and choose “Edit”. Make the necessary changes and click the Save button at the bottom of the info panel to save your changes. Click the Cancel button to return to the view mode without saving changes.
Delete an invoice entry by selecting the invoice from the grid, clicking the ellipsis menu in the invoice panel, and selecting Delete. You will be prompted to confirm deletion of the invoice.
In addition to modifying the invoice, you can go directly to the parent job’s invoice section by choosing Open Job Invoices.
Invoice details include:
Number |
The invoice number |
Created By |
The user who created the invoice |
Description |
The description of the invoice |
Currency |
The currency of the invoice |
Amount |
The invoice amount |
Scheduled |
The scheduled date to send the invoice |
Sent |
The date the invoice was sent |
Due |
The due date of the invoice |
Paid |
The date the invoice was paid |
Note
Dates can be entered by typing a date directly into the input field or by clicking the calendar icon at the right of the date field to select a date using the mini calendar input.
Expenses
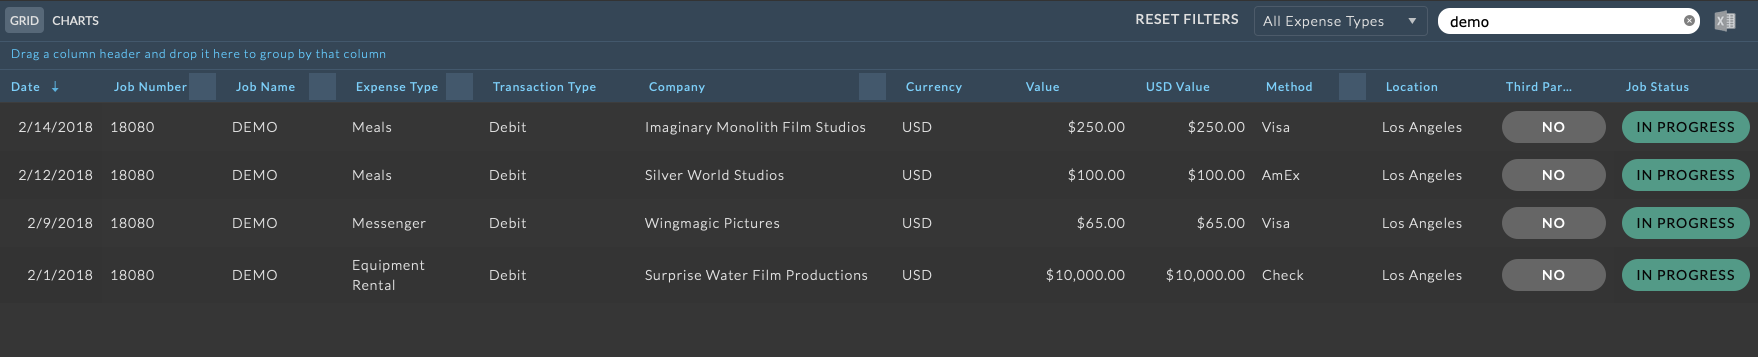
The Expenses tab displays information related to the expenses logged into NIM for the filtered date range. There are two views available for expenses, the Grid view and the Charts view.
Expense Grid View
The grid view shows a list of individual expenses across all jobs that fit the filter criteria. You can filter this grid further by individual columns or by using the Expense Type filter dropdown or the text input in the top bar.
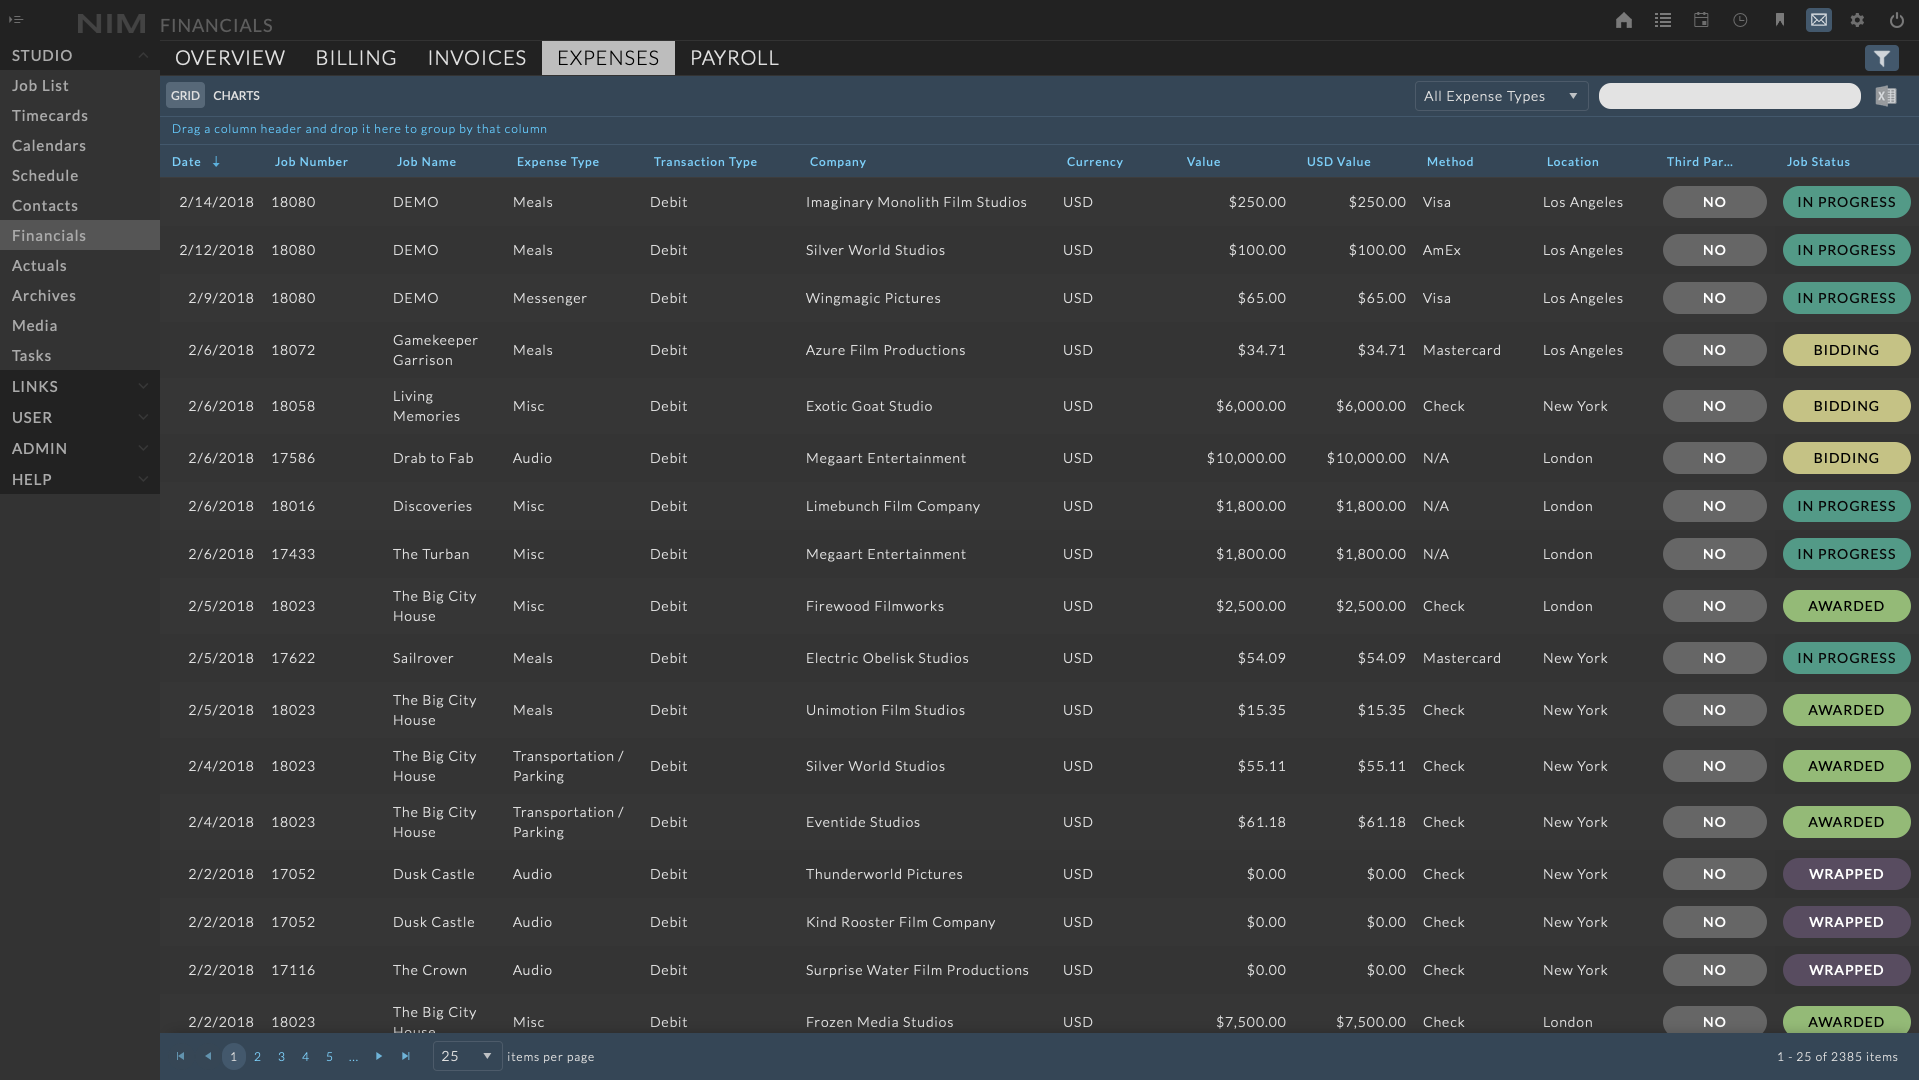
The Expenses grid includes the following information:
Date |
The date of the expense |
Job Number |
The job number the expense is attached to |
Job Name |
The job name the expense is attached to |
All Job Fields |
All job fields from the job overview ( hidden by default ) |
Expense Type |
The name of the expense type associated with the expense item |
Transaction Type |
Options are Debit or Credit. A debit is charged against the total cost. A credit is reimbursed against the total cost. |
Company |
The company name associated with the expense |
Description |
The brief description of the expenses |
Currency |
The currency type of the expense |
Value |
The total value of the expense in it’s native currency |
Studio Currency Value |
The expense value represented in the studio currency. This column will be named according to the selected studio currency. For example, a studio currency of USD will display the column label as USD Value |
Method |
The selected payment method for the expense |
Location |
The selected location for the expense |
Third Party Cost |
Indicates if the expense is flagged as a 3rd Party Cost |
Filters
The Expenses grid supports job number, job name, expense type, company, description, and payment method quick filtering, as well as column menu filtering.
Search
To filter the grid by a job number, job name, expense type, company, description, or payment method the search criteria into the search bubble at the right of the grid header.
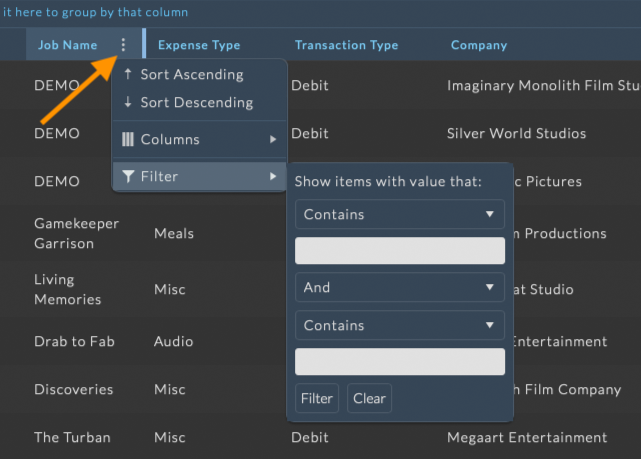
Column Filters
To filter the grid by a column, hover over the column and click the ellipsis menu at the right of the column header and select your filter options from the Filter menu.
Column Grouping
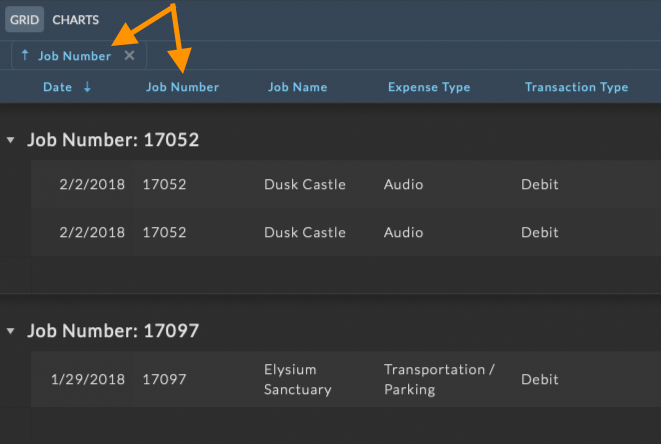
The expenses grid contains functionality to group items by information in any column.
To group by column, drag and drop a column header to the bar labeled Drag a column header and drop it here to group by that column.
Grouping expenses will sum the Studio Currency Amount for each group and display the total in the group footer.
Note
When grouping by one or more columns, only items within your current page will be grouped. The current sorting, filtering, and pagination rules still determine the total set of items you’ll see at one time.
Edit Expenses
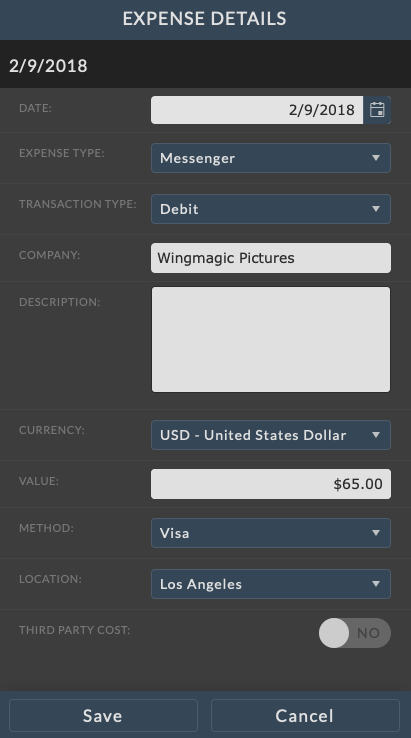
To edit an expense, click on the expense line item in the grid. The Expense Details will slide out to the right of the grid.
Click on the ellipsis menu in the expense info panel and choose “Edit”. Make the necessary changes and click the Save button at the bottom of the info panel to save your changes. Click the Cancel button to return to the view mode without saving changes.
Delete an expense entry by selecting the expense from the grid, clicking the ellipsis menu in the expense panel, and selecting Delete. You will be prompted to confirm deletion of the expense.
In addition to modifying the expense, you can go directly to the parent job’s expense section by choosing Open Job Expenses.
Expense details include:
Date |
The date to associate with the expense. |
Expense Type |
This is the expense type that should be associated with the expense. |
Transaction Type |
Options are Debit or Credit. A debit transaction is money paid and a credit transaction is incoming money. An example of a credit transaction may be the return of an item. |
Company |
The entity the expense was paid to or where the credit was received from. |
Description |
A brief description of the expense. |
Currency |
The currency of the expense value. (Defaults to the Job Currency.) |
Value |
The value of the expense. |
Method |
The payment method used. |
Location |
The location of the expense. |
Third Party Cost |
Flags this expense as a third party cost. Expenses can be bid for as third party costs when creating a bid in NIM, and third party costs will be grouped separately in Actuals. |
Note
Expenses cannot be added from this view. Expenses must be added on the job they are attributed to.
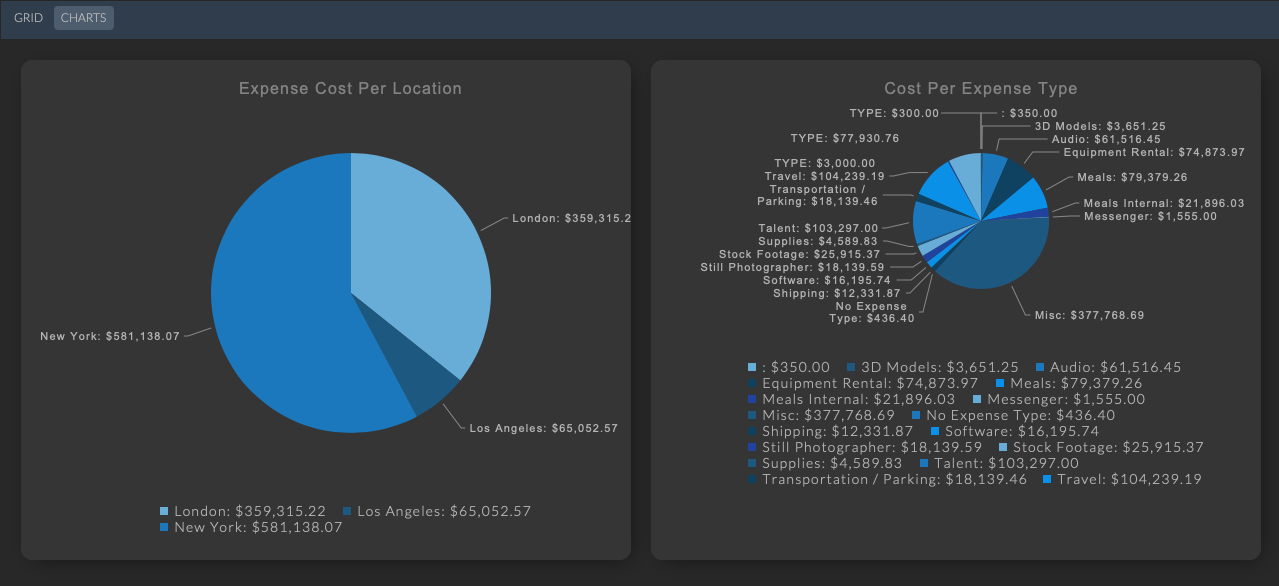
Expense Charts View
- Expense charts are summarized as:
Expense Cost Per Location
Cost Per Expense Type
Clicking on an item in the legend will hide and unhide that value in the chart.
Payroll
Payroll is a timecard actualization system which calculates user cost per pay period based on a set of defined rules. You have the option to include users on “Payroll” which will utilize the payroll rules, or off payroll (the default) which will use the fixed rate system. Payroll can be reconciled per pay period as a final check and balance to calculate total user time and user costs. Once a day is reconciled for a user, the status of all user timecards for the day is updated to “Resolved” and the timecard is locked. Pay periods can be reconciled via the Studio > Financials - Payroll view.
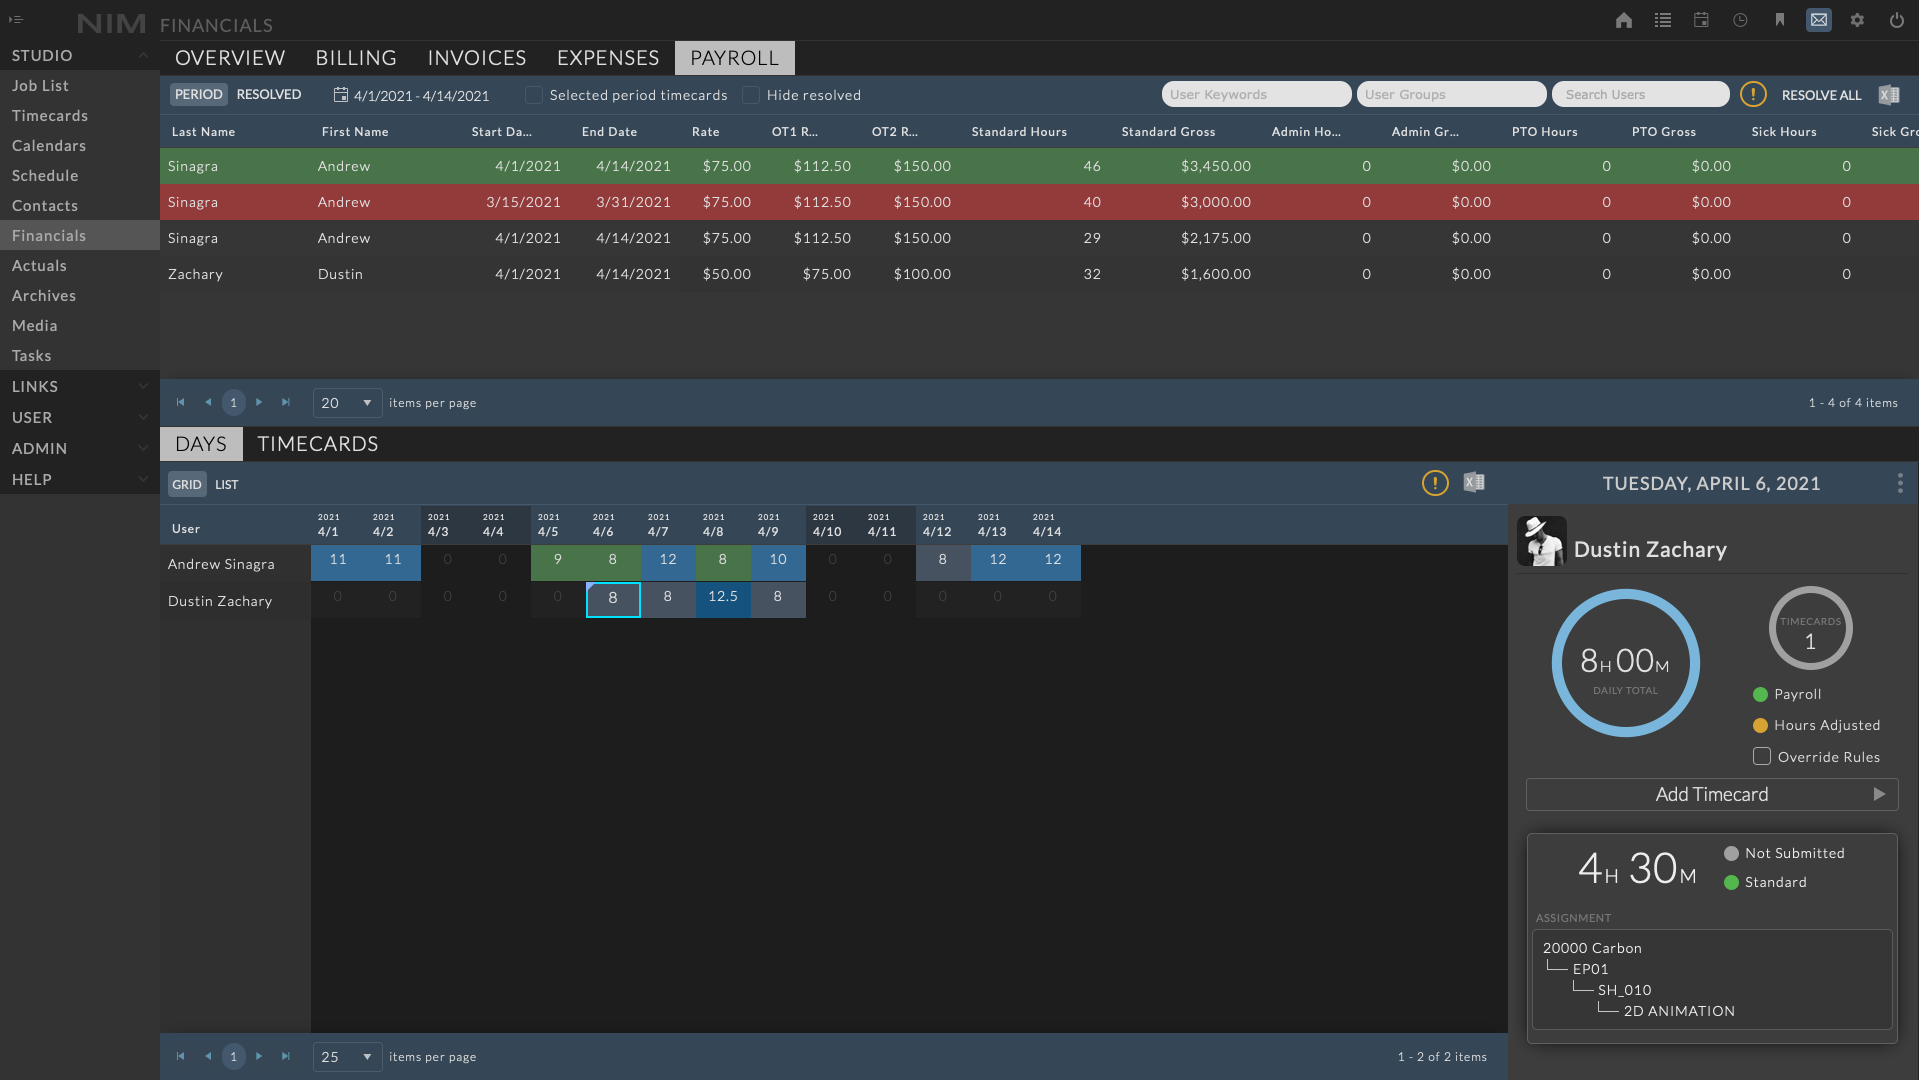
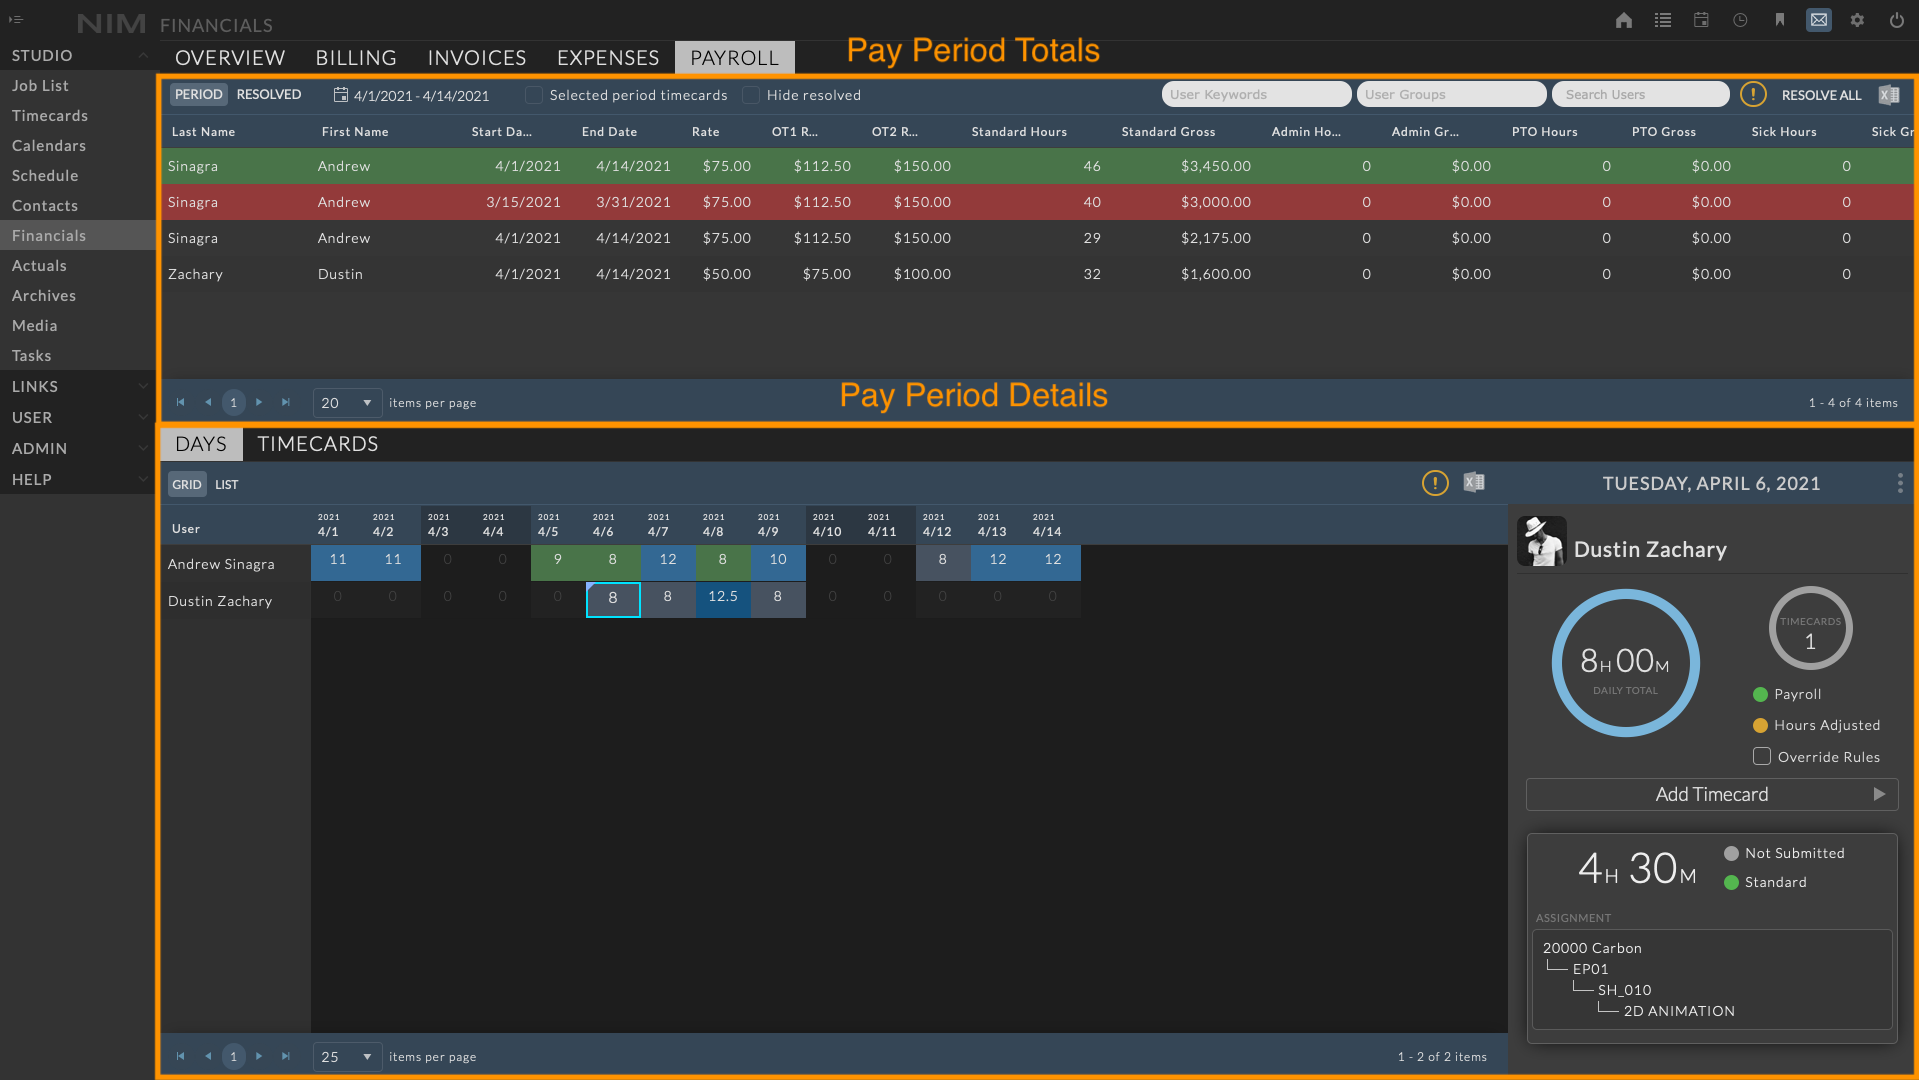
Payroll Views
The Payroll view is divided into two main sections.
Pay Period Totals |
Displays cumulative totals for each users pay period. Options to toggle between all active items for the selected pay period, or all resolved items for previous pay periods. |
Pay Period Details |
Displays all days for the currently selected pay period. Available to be viewed as a per Day view or Timecard grid. |
Pay Period Totals
The Pay Period Totals section displays the cumulative hours and cost for each user during the pay period. The calculated totals are determined by the payroll group the user is associated with during the selected pay period. This includes a breakdown of each time type as well as totals for overtime 1 and overtime 2 rates.

There are three types of rows that can be displayed in the grid:

|
Current Timecards |
Standard rows indicate unresolved days for the selected pay period. |

|
Resolved Days |
Green rows indicate days that have been resolved during the selected pay period. |

|
Unresolved Days |
Red rows indicate unresolved days for a previous pay period. |
Each row displays the following information for the row’s pay period:
User’s Name |
The user’s first and last name |
Period Dates |
The start and end date for the pay period containing the days of the row |
Rate |
The user’s rate |
OT1 Rate |
The user’s overtime 1 rate |
OT2 Rate |
The user’s overtime 2 rate |
Standard Hours |
The total standard hours |
Standard Gross |
The gross total cost of standard hours |
Overtime 1 Hours |
The total overtime 1 hours |
Overtime 1 Gross |
The gross total cost of overtime 1 hours |
Overtime 2 Hours |
The total overtime 2 hours |
Overtime 2 Gross |
The gross total cost of overtime 2 hours |
Time Type Hours |
Individual columns for total hours of defined time types |
Time Type Gross |
Individual columns for the gross total cost of defined time types |
Total Hours |
The total hours across all time types |
Total Gross |
The total gross cost for the row based on the payroll group rules |
Resolved On |
The date and time the row was resolved |
Resolved By |
The name of the user who resolved the row |
Navigation
Navigation in the Payroll view is done through the toolbar at the top of the Pay Period Totals section.

Current Period vs Resolved
The Pay Period Totals can be set to view all items for the current pay period or previously resolved items using the buttons at the top left of the Payroll toolbar.
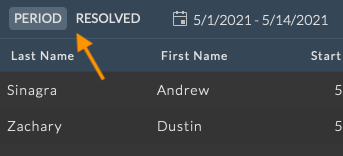
Selecting the Period button displays all items for the currently selected pay period.
Selecting the Resolved button displays all items that have been previously resolved.
Select Pay Period

Clicking on the date range button in the toolbar in drop down a mini-calendar to select the pay period. Use the standard mini-calendar navigation to select a day.
Selecting a day in the calendar will automatically select the pay period the date falls within.
- Inside the mini calendar, click the title bar to adjust the zoom level of the date range to select.
Clicking on March 2023 will zoom out the mini calendar to show a list of months.
Clicking on 2023 when viewing months will zoom out to show a list of years.
Filters
Pay Period Totals includes several filters to narrow the scope of viewed items.
Selected Period Timecards
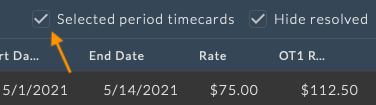
Marking this checkbox will limit the rows to only include items that are from the currently selected pay period. This removes all previously unresolved items (red rows).
Hide Resolved
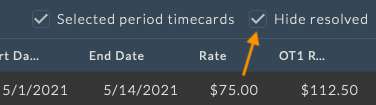
Marking this checkbox will remove all resolved rows from the current view (green rows).
User Filters
User filters are available to limit the list of users. Available filter options include:
User’s tagged with the corresponding user keyword
User’s are a member of the selected user groups
User’s name meets the search criteria.

Column Filters
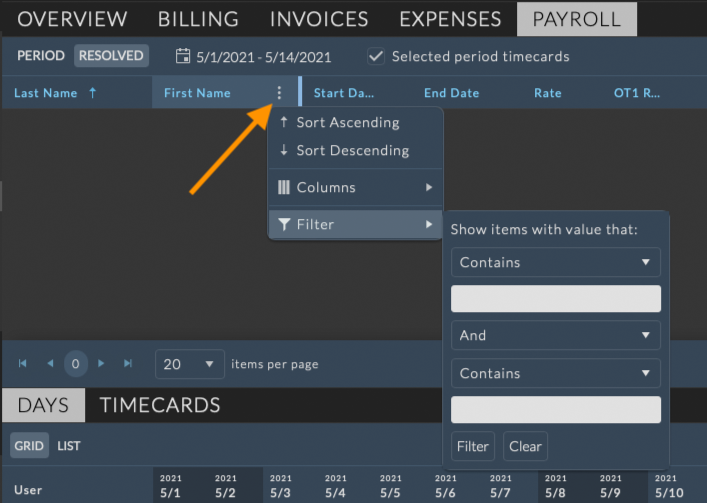
Column filtering is available in when viewing Resolved items. Filtering by grid column menus provides access to more complex filtering options per column. Column filters can be used in conjunction with the other filters to create more refined filter rules.
To filter the grid by a column menu, hover of the column and click the ellipsis menu at the right of the column header and select your filter options from the Filter menu.
Export to Excel
The Pay Period Totals grid can be exported to Excel using the Export to Excel button at the far right of the toolbar. Any filters that have been applied to the grid will be respected in the export.
Pay Period Details
The Pay Period Details section allows users to select an individual day or timecard to update and approve as needed. Initially, the view will display all users with timecards in the pay period. Selecting a user in the Pay Period Totals grid or using any of the filter options available will refine the days to display the corresponding user(s). Pay Period Details are viewable in both a per day view and a per timecard view. Click the corresponding tab to load the view.
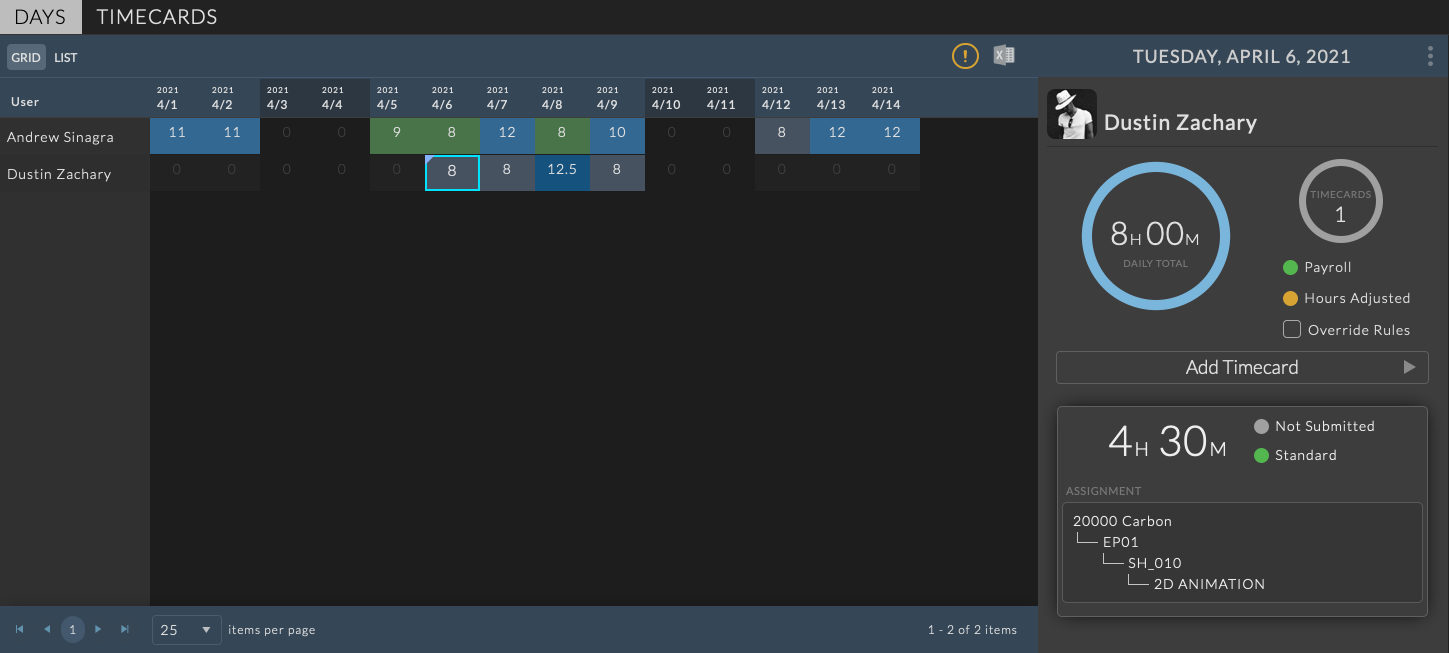
Days
The Day tab displays all days within the selected pay period and the corresponding total hours per day. This section works similar to the Day view in Timecards. For more information on navigating the Day view and timecards please refer to the Timecard Days section of the documentation.
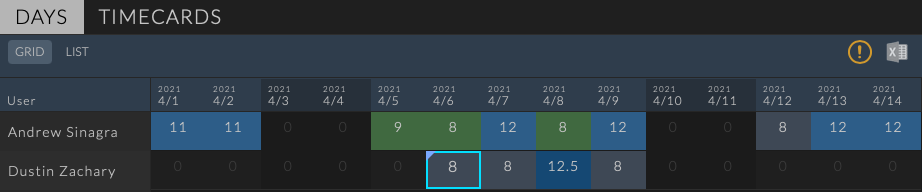
Cells in the Days tab can be represented with different colors and marks to indicate various states:

|
A light blue border indicates the currently selected day. |

|
Days with regular time rate hours. |

|
Days with overtime rate 1 hours. |

|
Days with overtime rate 2 hours. |

|
Days with green backgrounds have been resolved. |

|
Days with red backgrounds are non-payroll days. |

|
Days with light blue marks have had the total hours adjusted based on timecard rules. |

|
Days with dark blue marks have been set to override timecard rules that would change the total hours. |
Selecting a day will load the timecard daily info panel to the right of the view. Timecards that have not been resolved can be edited, have their approval state updated, or override timecard rules that may adjust the total hours on the day.
Override Rules
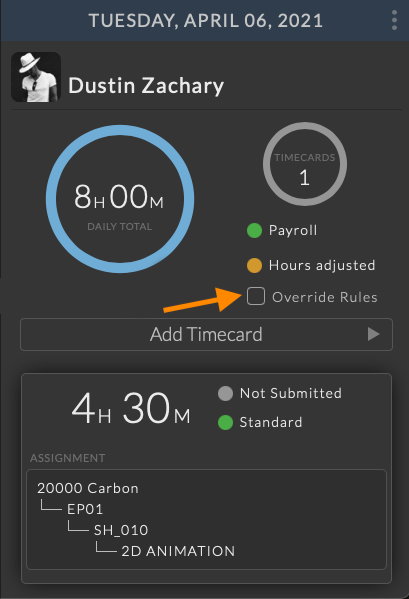
If a payroll rule includes the ability to adjust the total hours for the day, an option to override the rules which adjusted hours is available on the timecard day info panel.
For example, if a payroll rule states that a user is guaranteed a minimum of 8 hours and all timecards for the day total less than 8 hours, the day will be adjusted to the guaranteed value automatically.
By checking the Override Rules checkbox, this adjustment will be disabled for the day and the total hours will be equal to the exact hours entered on the timecards.
For more information on working with timecards and the timecard info panel please refer to the User Timecards section of the documentation.
Timecards
The Timecards tab displays all timecards for users within the selected pay period. Selecting a row will load the timecard info panel to the right of the view. Timecards that have not been resolved can be edited and have their approval state updated.
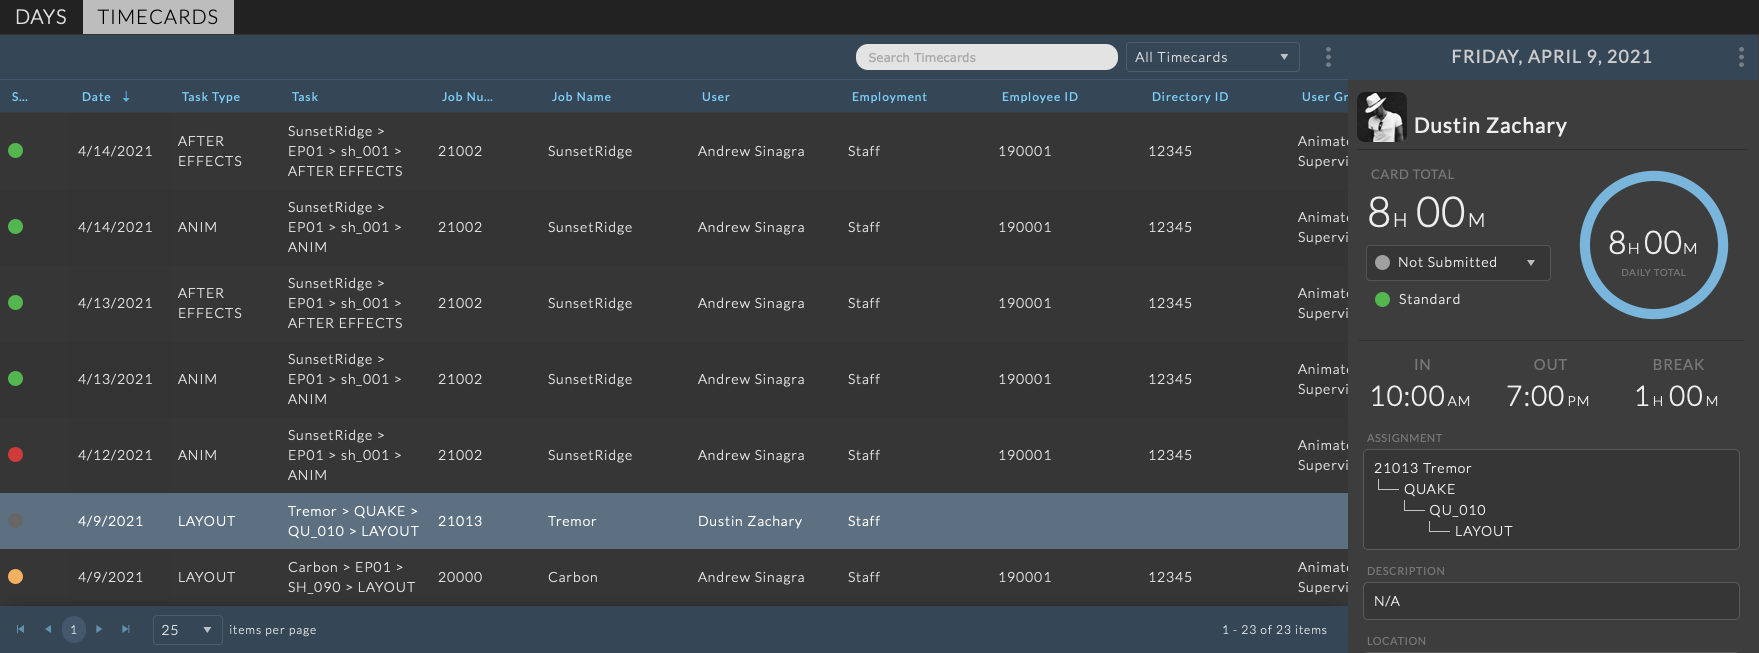
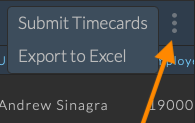
Timecards can be submitted for approval or exported to Excel using the ellipsis menu on the right of the Timecards toolbar.
For more information on timecard approvals, please refer to the Timecard Approvals section of the documentation.
Resolve Timecards
Rows in the Pay Period Totals grid can be resolved by clicking the Resolve (All/Selected) button. Resolving a row locks those timecards included in the pay period from any further changes.

Resolved rows will be displayed for the currently selected pay period. All previously resolved rows can viewed from the Resolved section of the Pay Period Totals.
Note
When resolving rows that are unresolved from previous pay periods (red rows), the row will be removed from the current pay period view upon resolution.
Previously resolved rows can be unresolved from the Resolved tab. When a resolved row is selected, an Unresolve Selected button will appear on the toolbar. Unresolving a row will remove that row from the Resolved view and the items will be available in the Period view.

Note
If new timecards were created for the previously resolved period, the totals will now be combined to a single unresolved row.