Shot Views
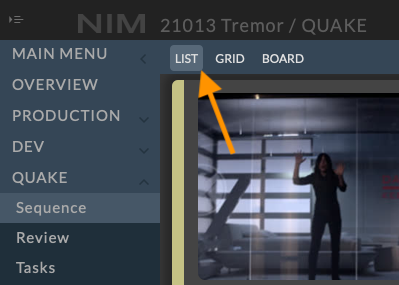
Selecting Sequence from a show menu will load the shot views. Shots have 3 viewing modes, List, Grid, and Board, accessible from the top left of the shots toolbar. Select a view mode to load the corresponding panel.
Shot Toolbar
The shot toolbar is shared across all views and provides several tools for working with shots. These options will change dependent upon the active view.

Search Shots
Shots can be filtered using the search field in the toolbar in addition to standard grid column search functionality (when available in the view). Enter a portion of a shot name or description into the search field. The shot list will automatically be filtered by the given search criteria. To clear the search, delete the entry from the search field and press enter. The shot list will refesh with the full shot list.
Filter by Ownership
The ownership filter will limit which shots are visible based on if the user is assigned a task on the shot. The options are:
All Shots |
Displays all shots |
My Shots |
Only displays shots ( and all shot tasks ) that contains tasks the user is assigned to. |
My Tasks |
Only displays the shots and tasks that are assigned to the user. |
Update Shot Icons
If the job has been brought online, NIM can use the SHOT PLATES folder to search for images to use as shot icons.
To automatically add/update icons for all shots in the show, click on the ![]() button in the shots toolbar. This will load the sequence Icons panel.
button in the shots toolbar. This will load the sequence Icons panel.
From the “Server” dropdown, choose the job server containing the project structure to scan. NIM will use the SHOT PLATES folder defined in the job’s project structure to look for images to create shot icons. The first image found in the folder will be used for the icon.
The “Update” dropdown lets you choose how to update shot icons:
MISSING |
Only update shots with no icon |
ALL |
Rebuilds all shot icons from found plates. |
Click the GENERATE ICONS button to start the scan. The progress will be displayed in the output area below.
For more information, please refer to the Icon section of the documentation.
For more information on project structure special folders, such as SHOT PLATES, please refer to the Special Folders section of the documentation.
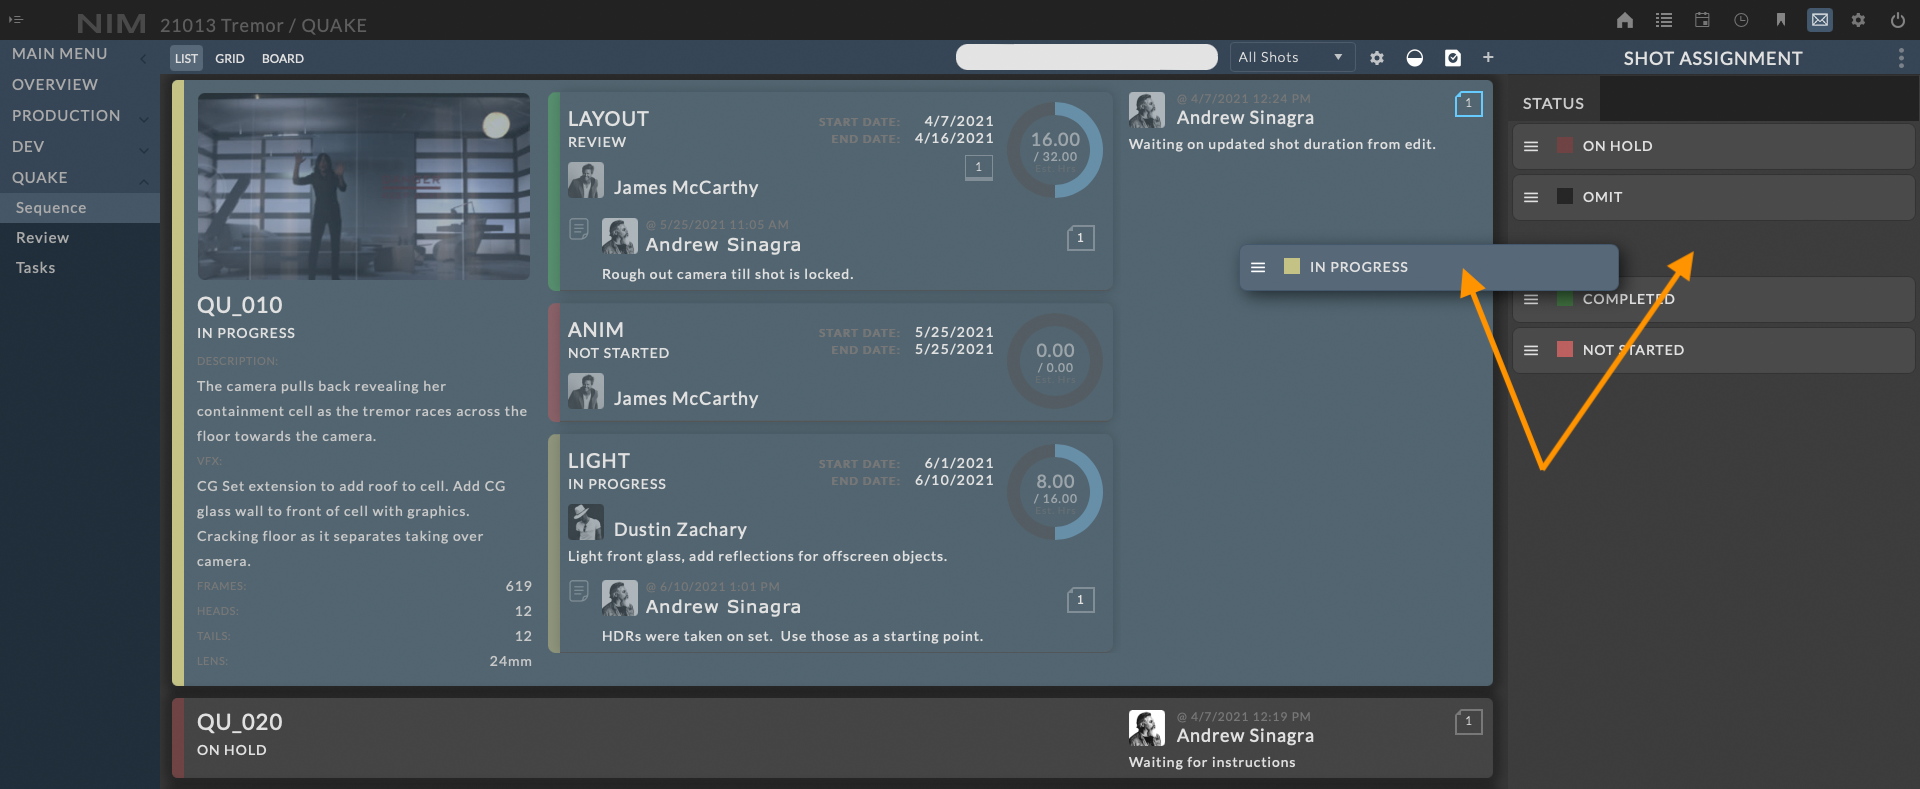
Shot Status
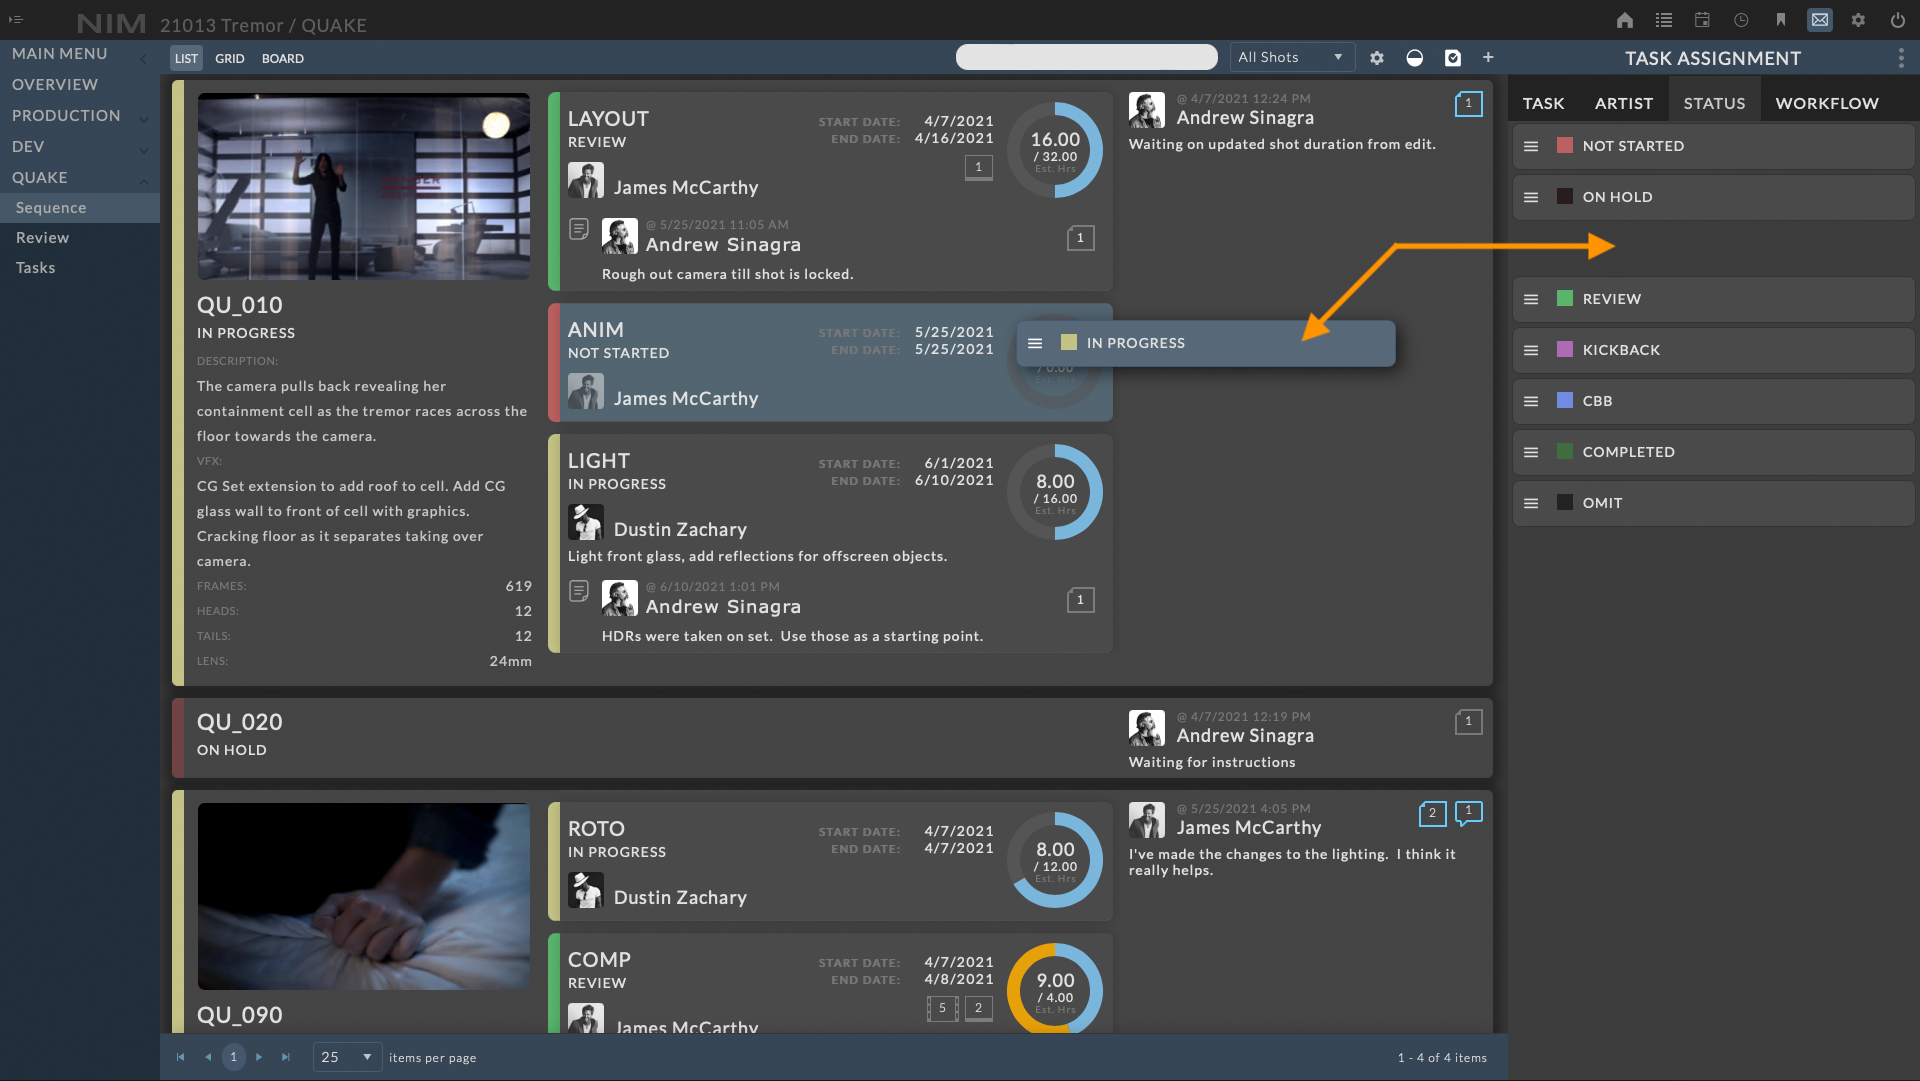
In addition to modifying the shot details directly, a status can be assigned to shots by clicking on the  button. This will load the Shot Status panel.
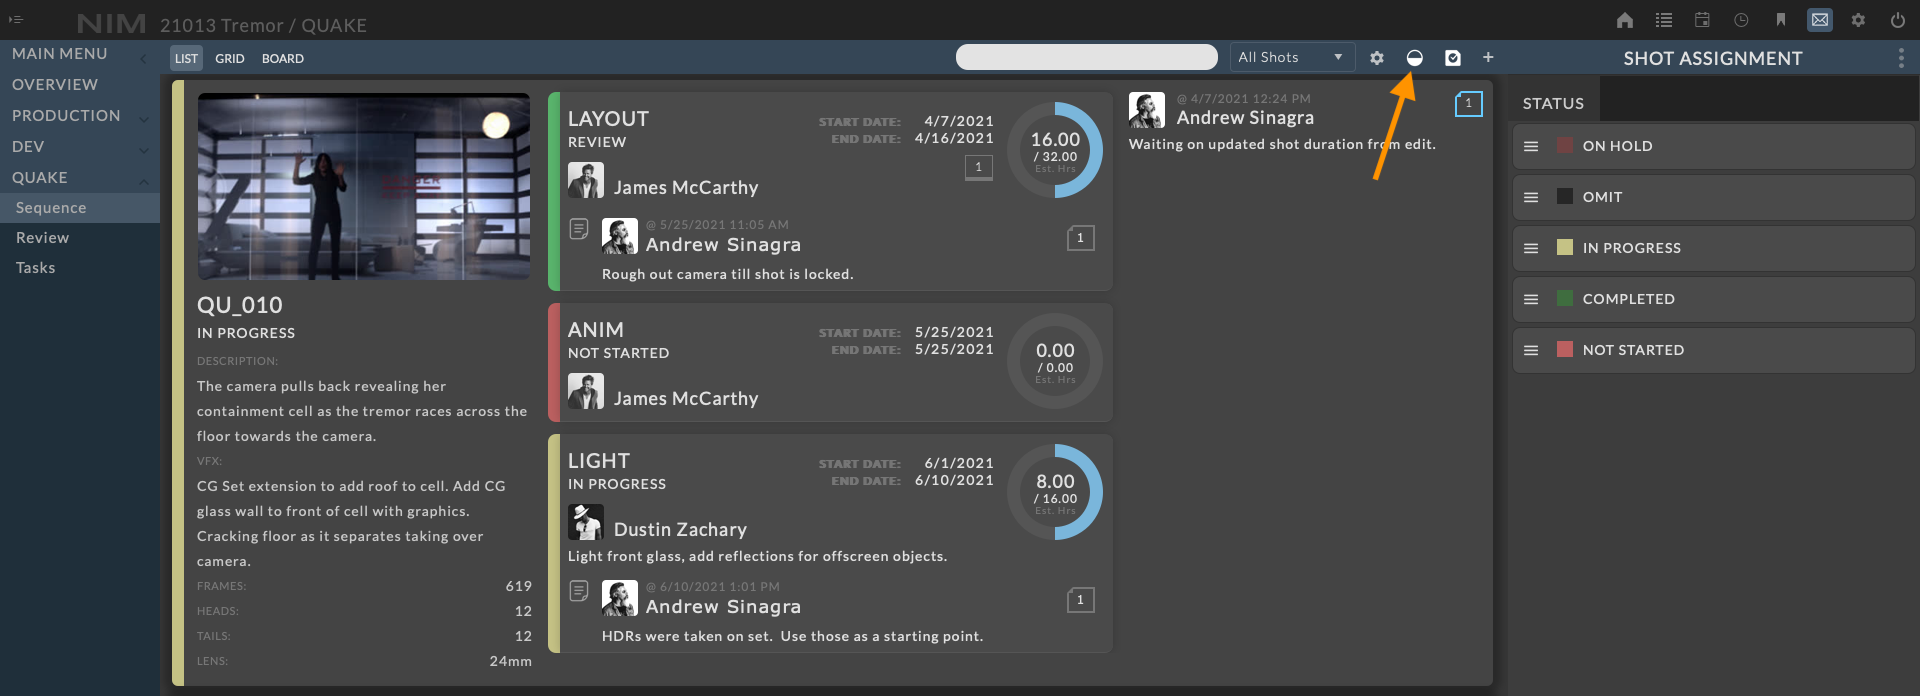
To assign a status to a shot click and hold on the status drag handle and drag and drop on the desired shot. Shot status drag and drop is available in the shot list, shot grid, and shot board views.
Note
In the grid and board view, you can multi-select shots by holding the shift key and clicking the shots to select a range or use the Command or Ctrl key depending upon your OS to select non-sequential shots. Then drag and drop the status to assign to all selected shots simultaneously.
Associated Task Status
If the shot status has an associated task status, all task statuses on the shot will be changed to the associated task status when the shot status is applied. If the status has no associated task status, the shot tasks will not be modified.
For more information on defining shot statuses see the Status section of the documentation.
Add Tasks
To open the task assignment panel click on the  button. Task assignment allows users to add tasks to a shot, assign users to the task, set task status, add task notes, and more.
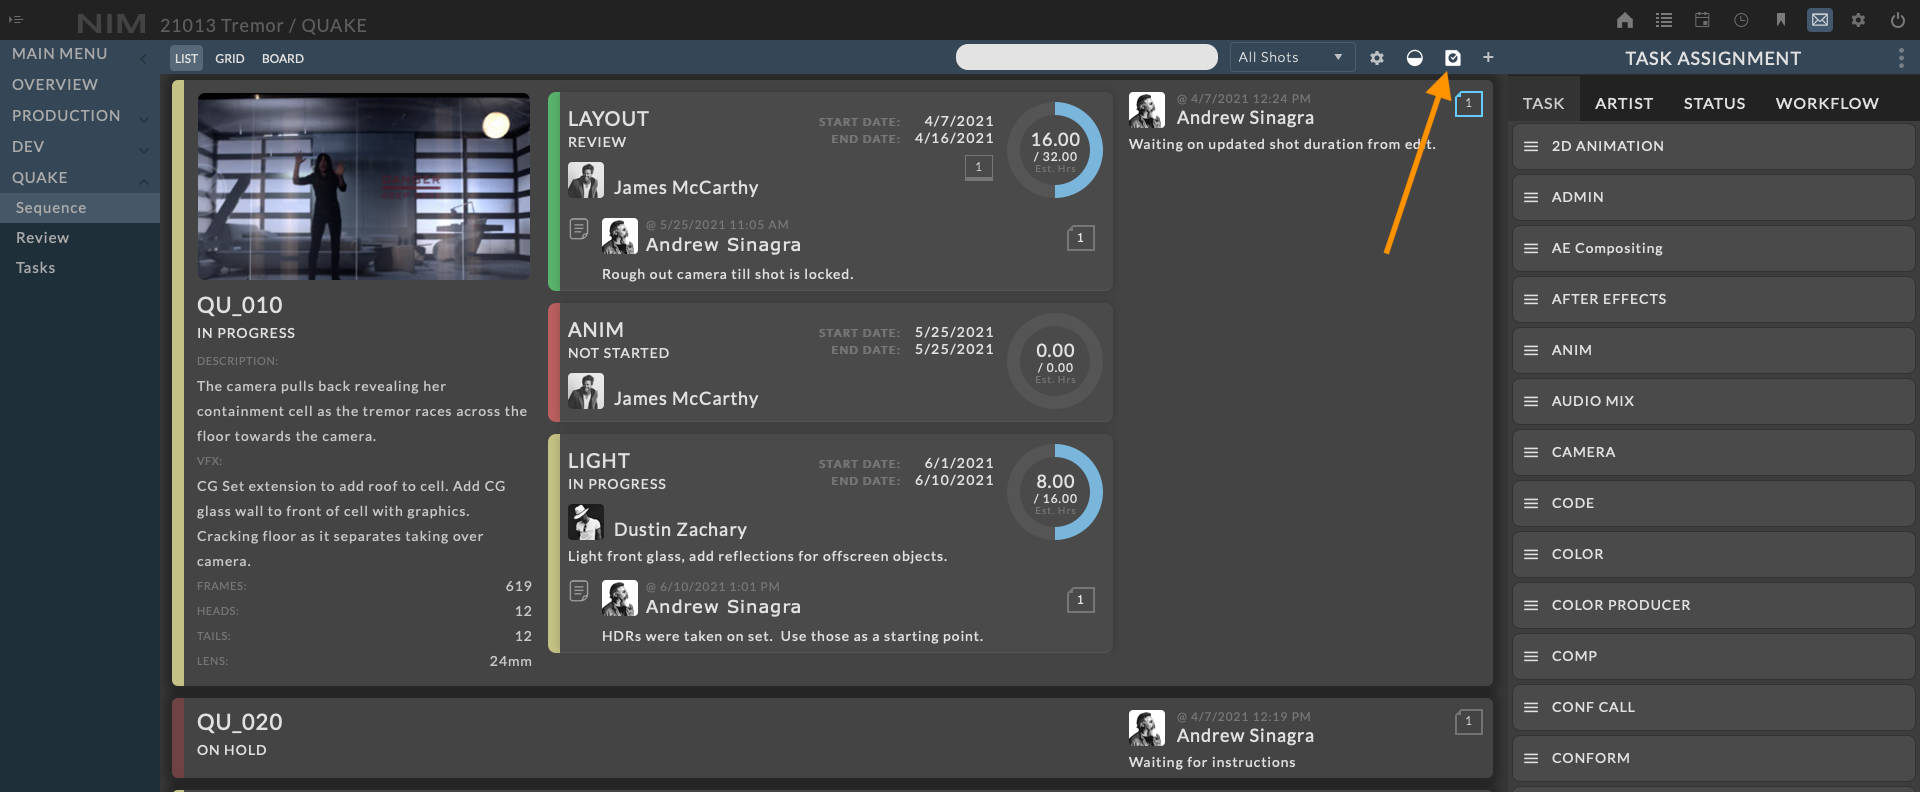
For more information on assigning tasks, see the Task Assignment section of the documentation.
Create Shot
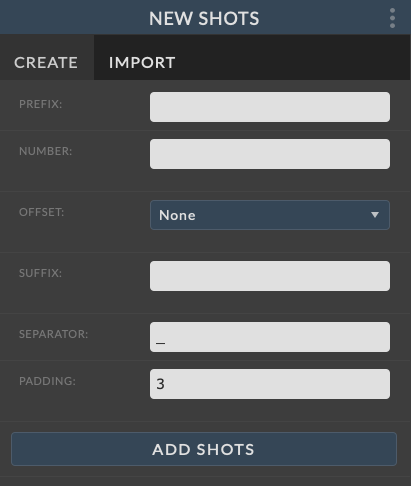
To create a new shot from the toolbar, click on the  button.
The New Shots panel will slide out from the right with two options for shot creation.
Create - Allows for manual entry of shot names for creation
Build Sequence - Sequential Shot Creation
Import - Uses CSV Import for Shot Creation
More information about creating shots can be found in the Shot Creation section of the documentation.
Export to Excel
The shot or task grid can be exported to Excel using the  button. Any filters that have been applied to the grid will be respected in the export.
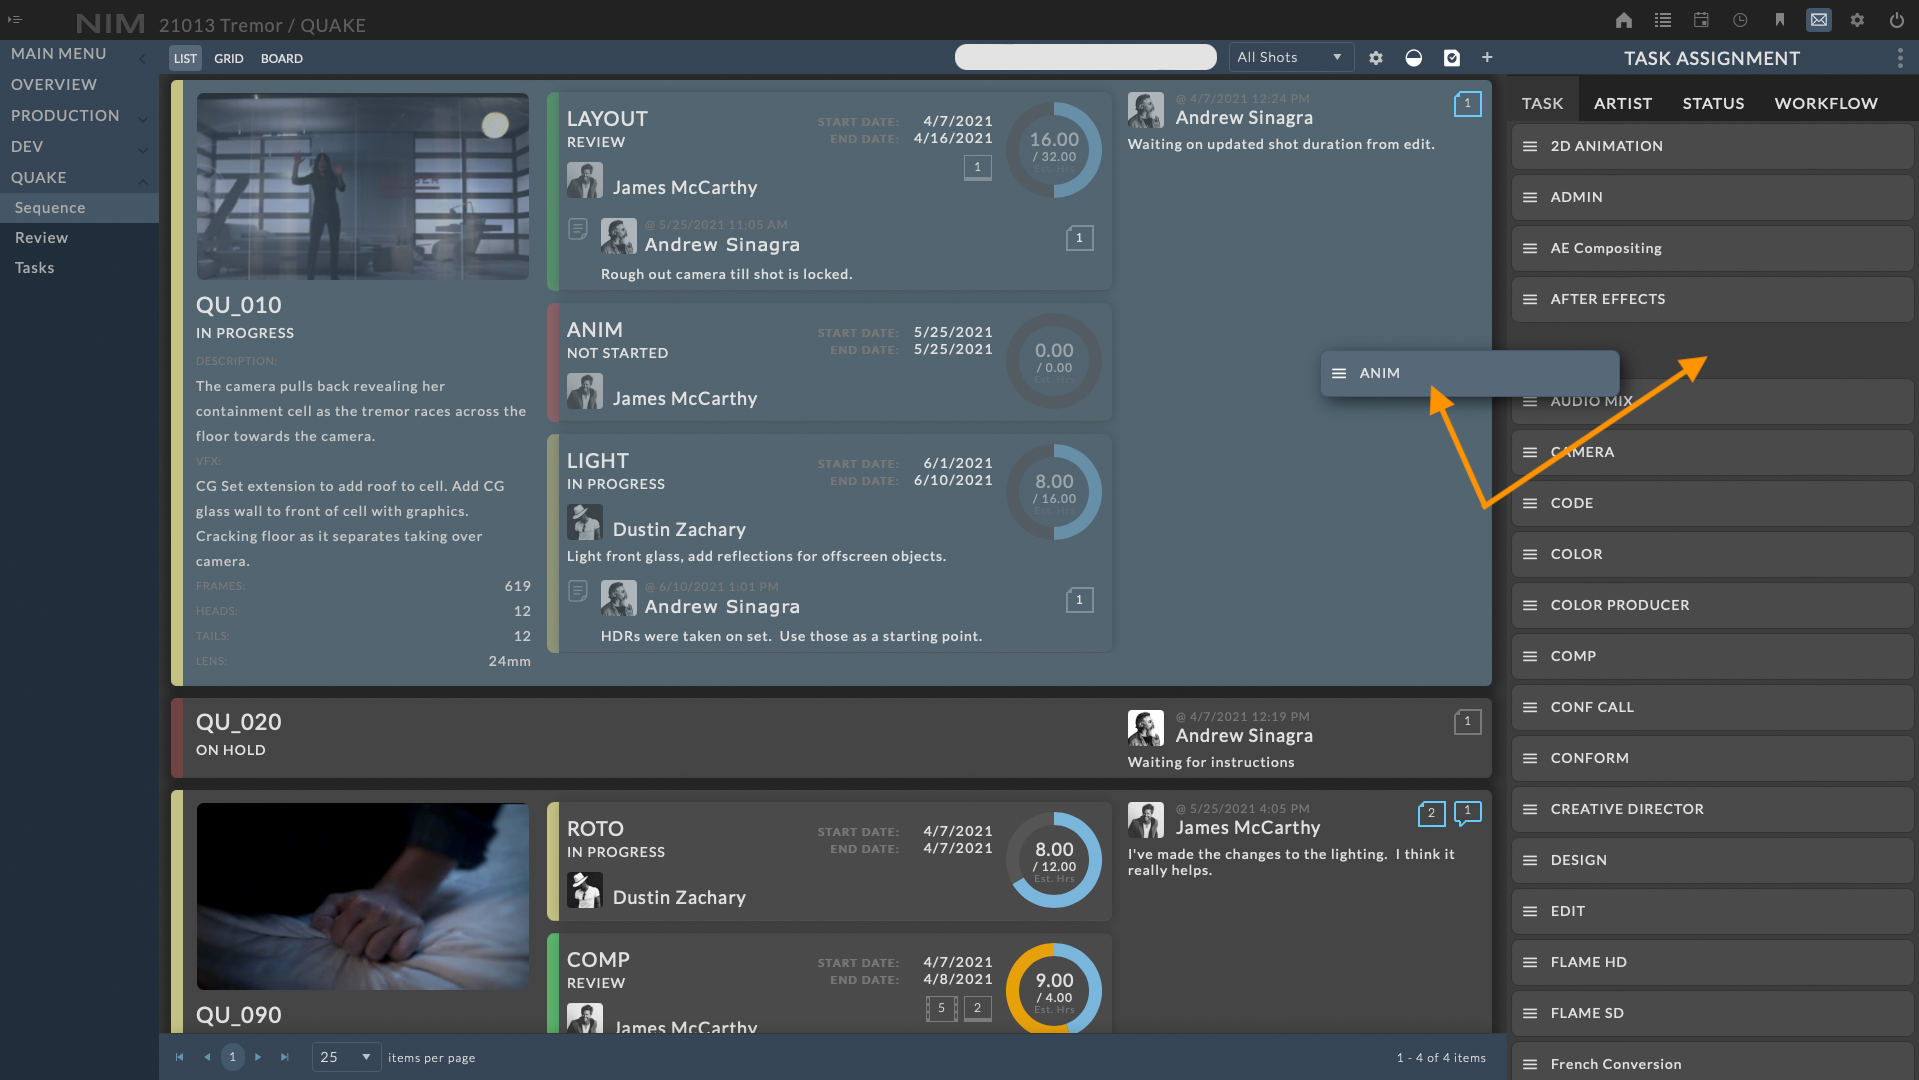
List View
The shot list view is a combined view displaying detailed information for shots, tasks, and notes simultaneously. The UI is designed to allow for the quick drag and drop assignment of tasks and updating of details. The shot list view can be accessed by clicking the List button on the left of the shot toolbar.
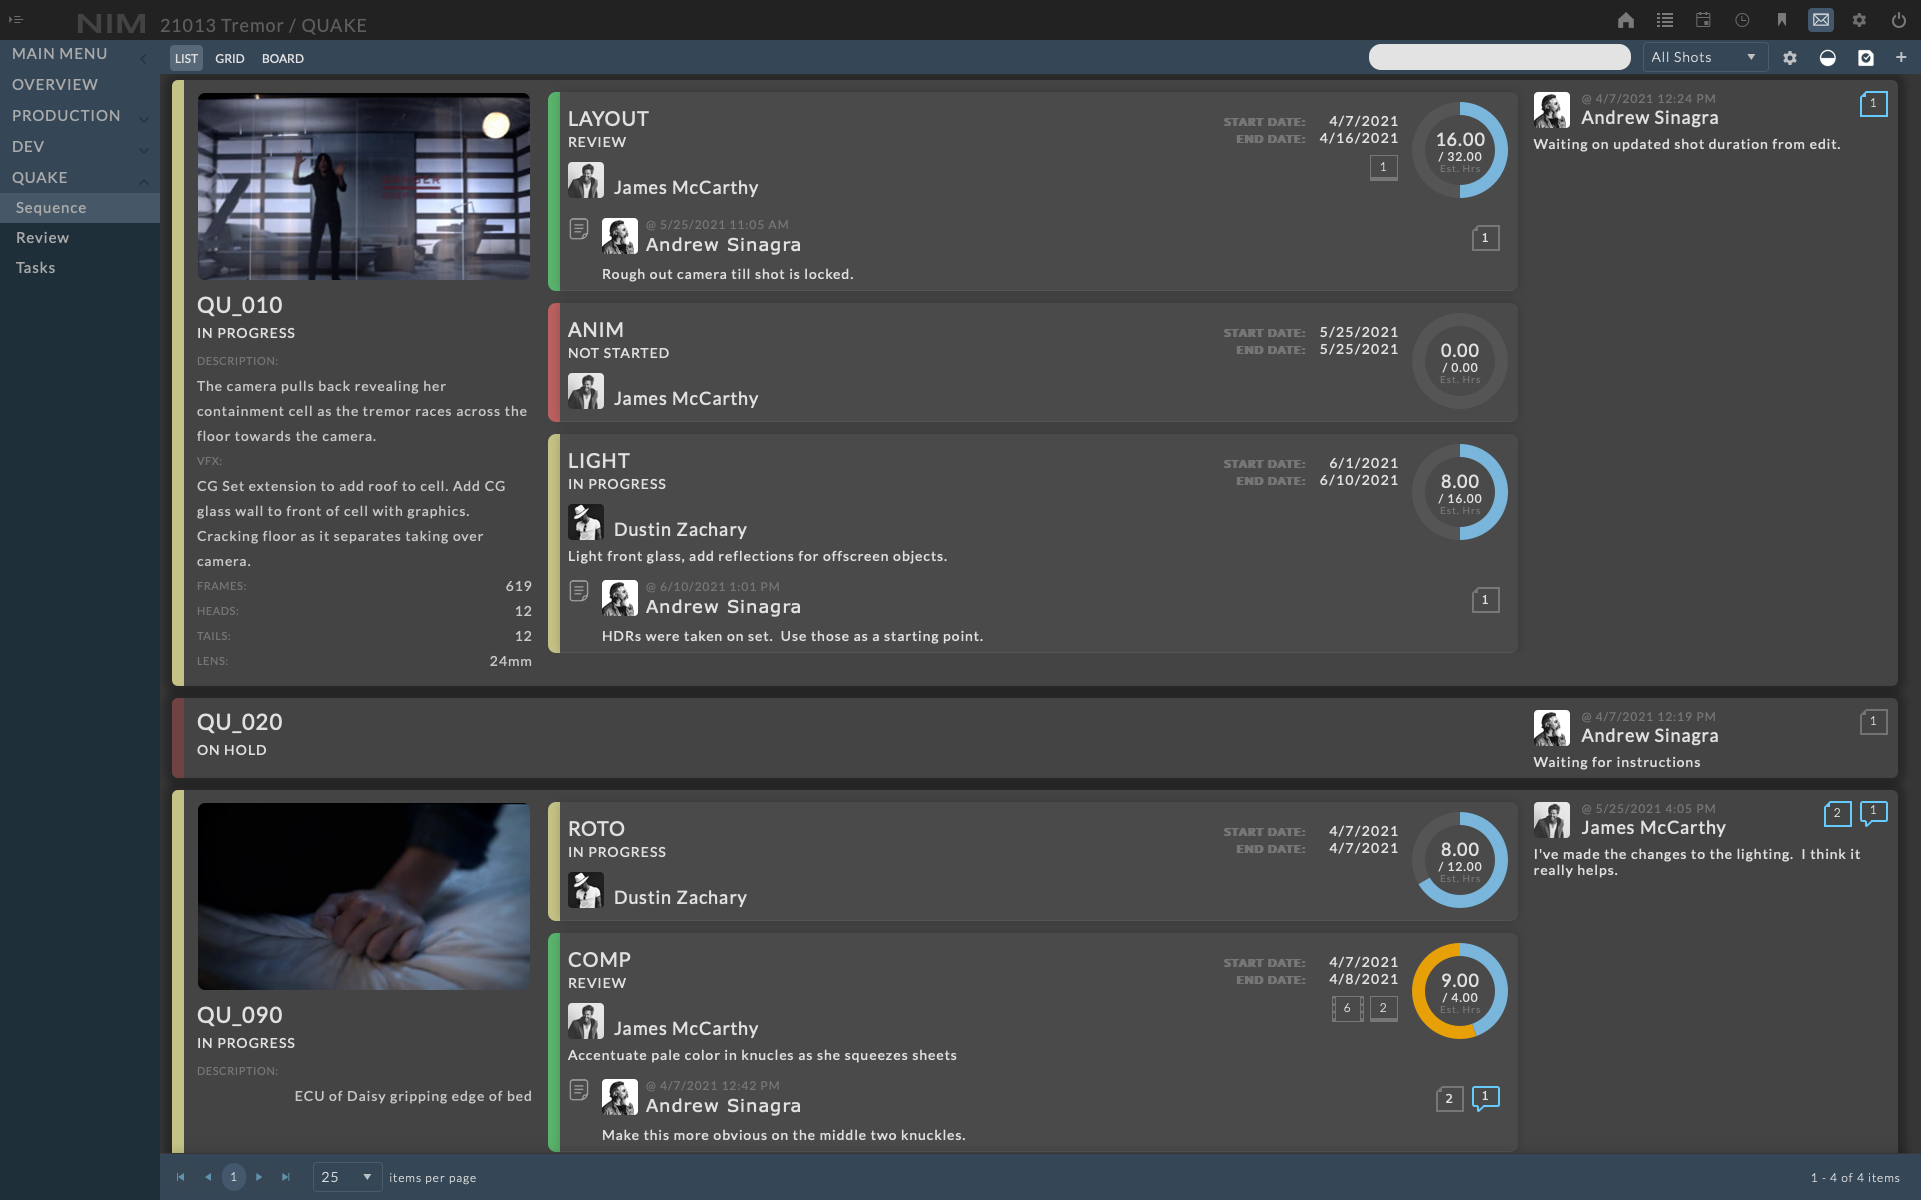
Each shot contains three columns of information.
Shot Info |
Contains the shot name, icon, status, description, vfx notes, frames, heads, tails, and lens information. |
Shot Tasks |
Lists all tasks that have been attached to the shot |
Shot Notes |
Displays the latest shot note |
Clicking in different areas of the shot row will open different info panels including the shot, task, and note info. Hovering your mouse over a section of the shot row will highlight the selectable elements.
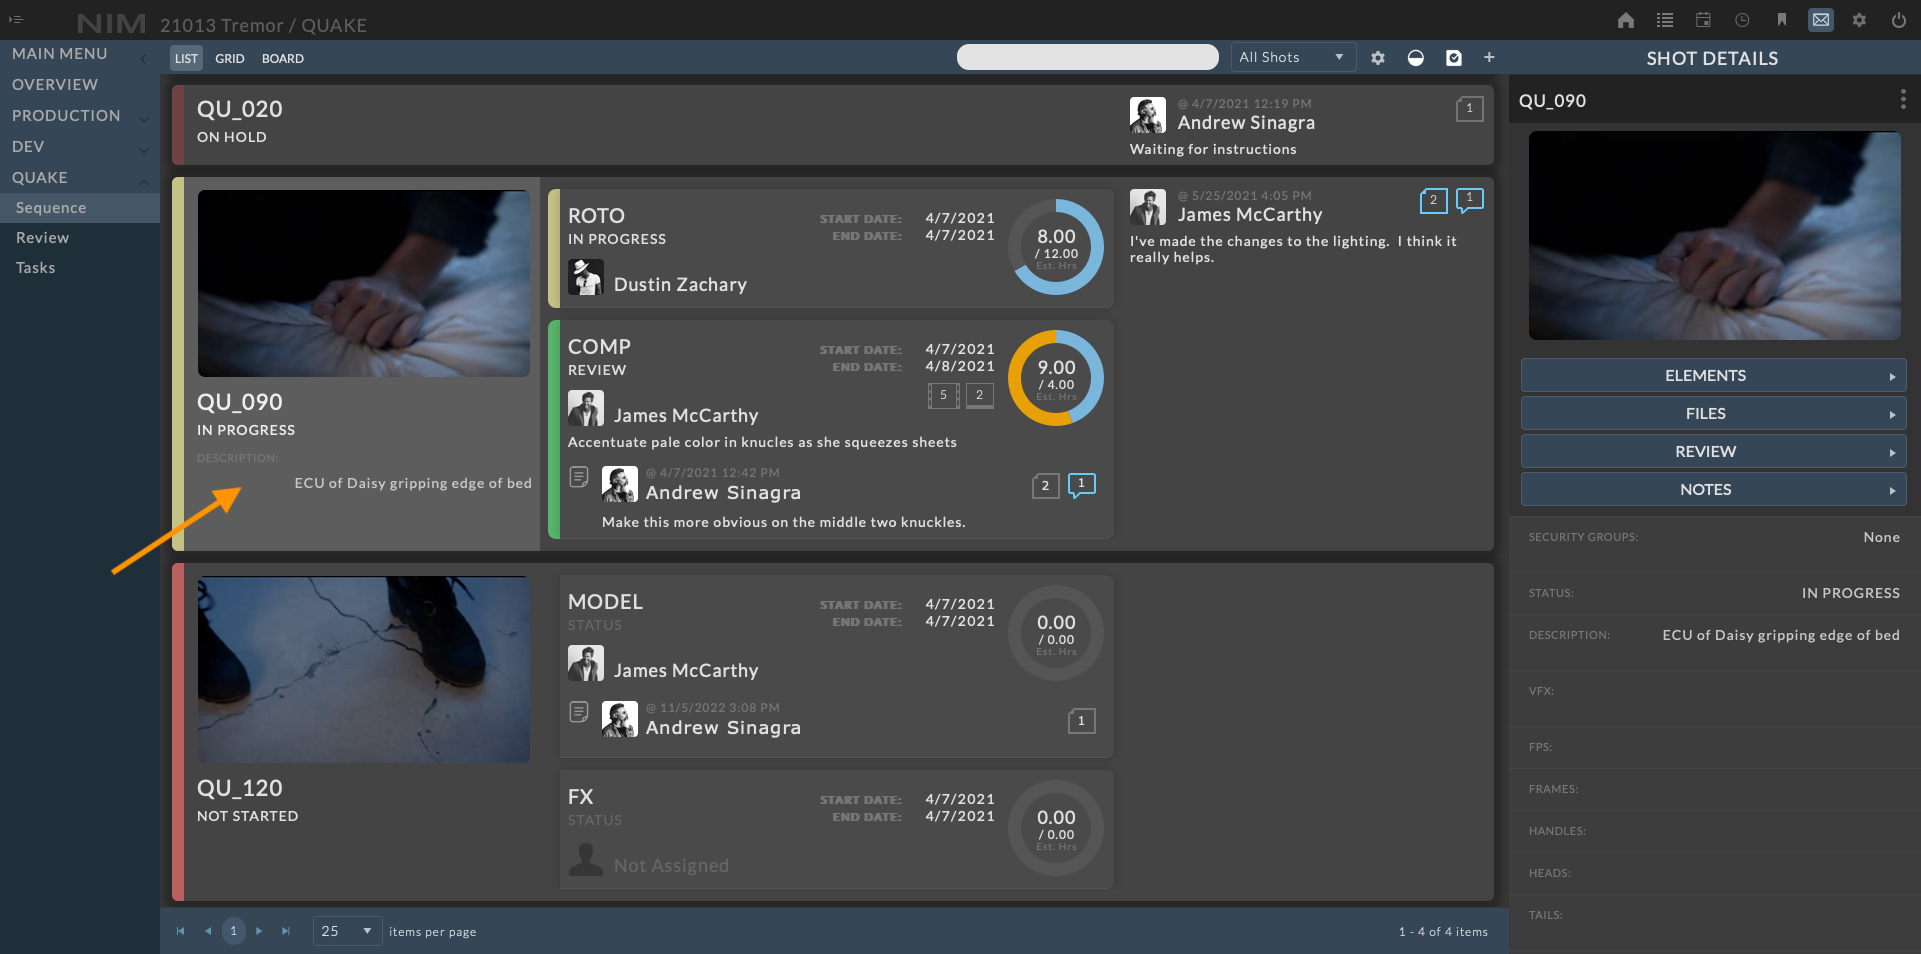
Shot Info
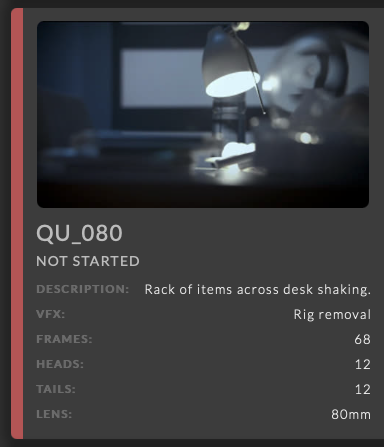
The first column displays the shot icon, the shot name, status and the description, vfx notes, frames, heads, tails, and lens information.
The information in this section will expand as more details are added to the shot.
By default, only the shot name will be displayed.
To open the shot info panel for the full shot details, click anywhere on the highlighted shot info area.
For more information on editing shot details, please refer to the Shot Details section of the documentation.
Shot Tasks
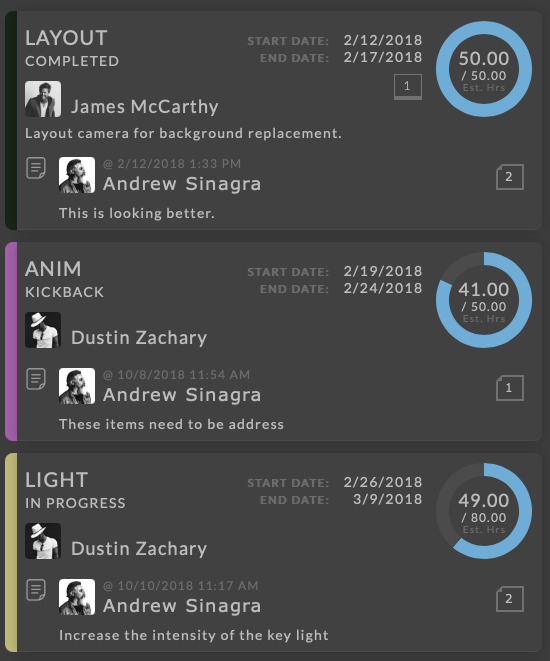
The second column displays the list of tasks attached to the shot with information including the task assignment, duration, estimated time and time used, status, and latest note.
The task also includes counters for total number of review items, renders, notes, and replies. If an unread note or reply exists, the counter will be highlighted.
Clicking on a task will open the task info panel. For more information on editing tasks, please refer to the Task Details section of the documentation.
Creating Tasks
To create a new task in the list view, click the button from the shot toolbar. The task assignment panel will appear to the right of the list view. Click and drag any of the tasks in the list over the target shot. While holding a task over the shot, the droppable area will be highlighted. Dropping the task on the shot will add the task to the shot.
Workflows, which are groups of preassigned tasks, can be dropped on shots from this panel as well. For more information on adding and assigning tasks as well as task Workflows, please refer to the Task Creation and Workflows section of the documentation.
Task Assignment
In addition to being directly assigned from the task info panel, users can be assigned to tasks via drag and drop using the task assignment panel. Click and drag any users available from the “Artist” tab to the task they should be assigned to. Dropping the user on the task will immediately assign them to the task.
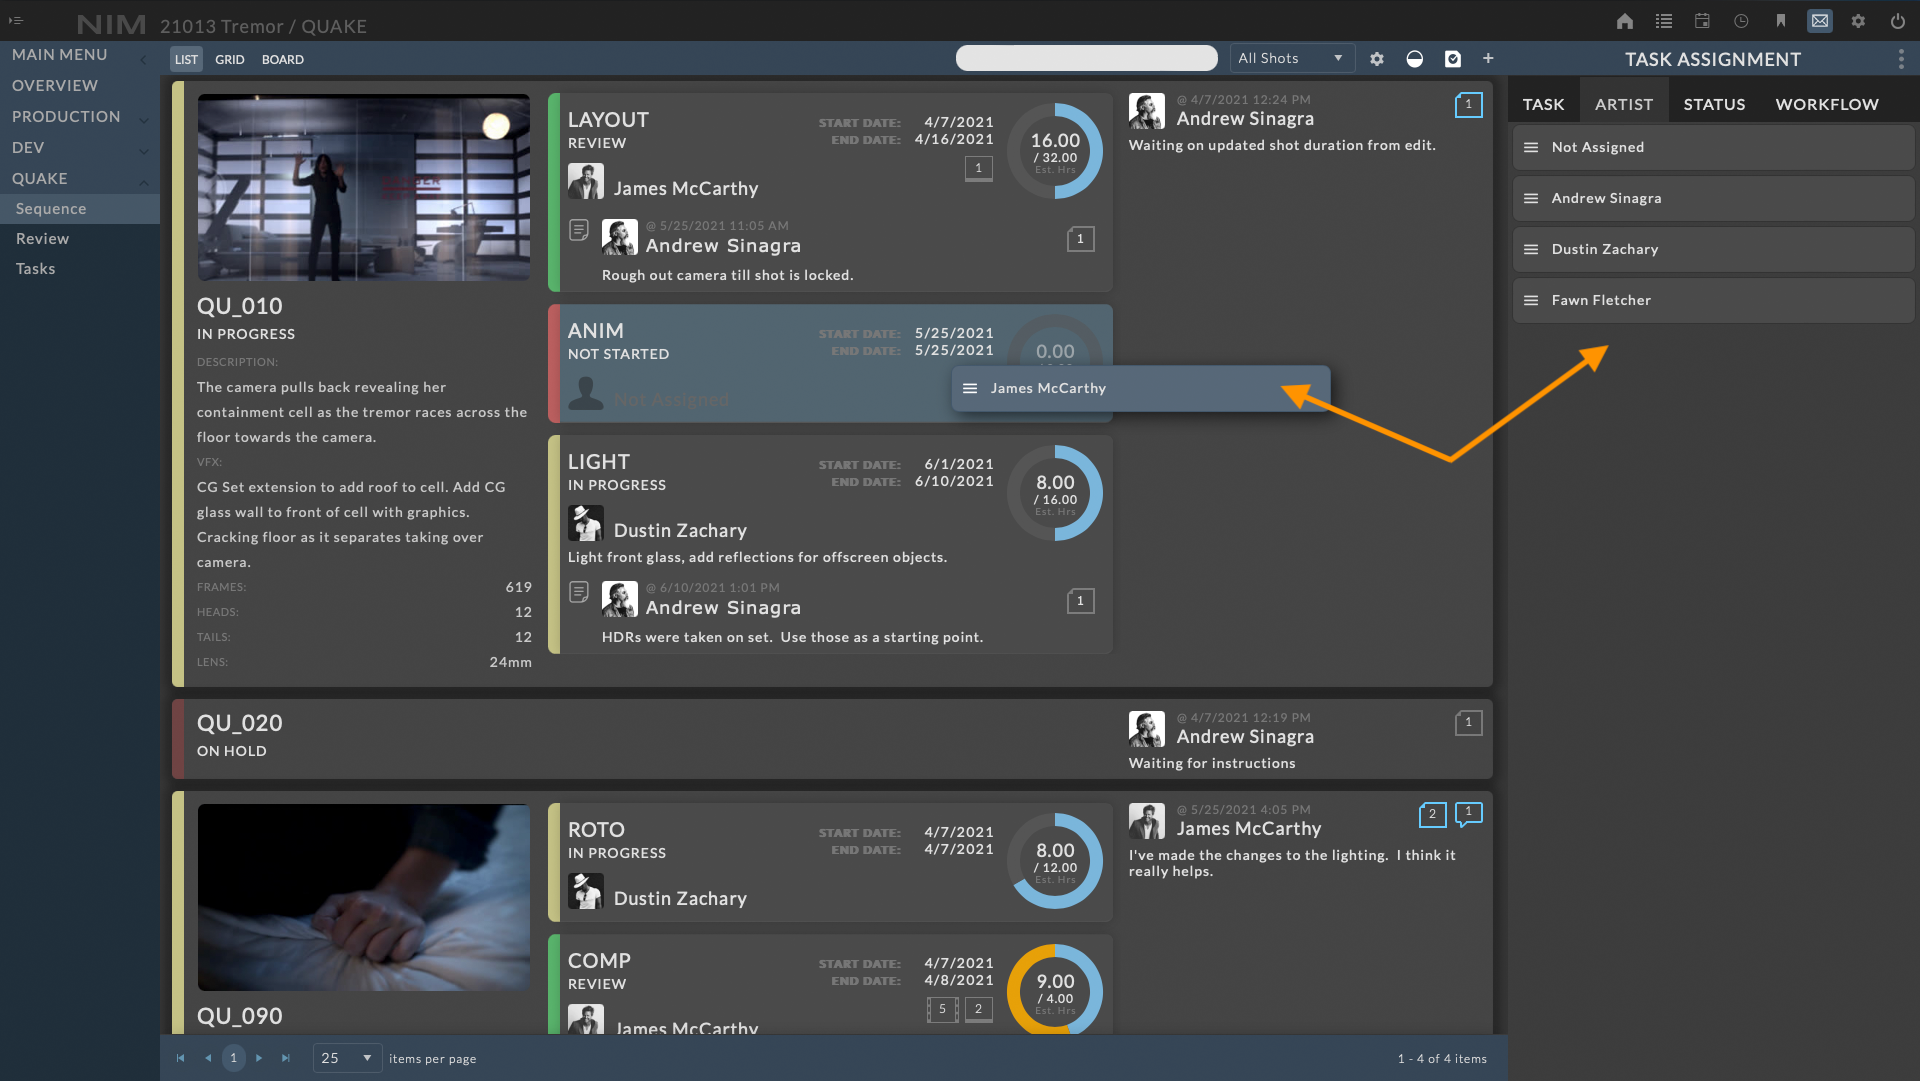
For more information on task assignment, please refer to the Task Assignment section of the documentation.
Task Status
In addition to being directly modified from the task info panel, the task status can be set via drag and drop using the task assignment panel. Click and drag any available status from the “Status” tab to the task to set the new status. Dropping the status on the task will immediately set the new task status.
Shot Notes
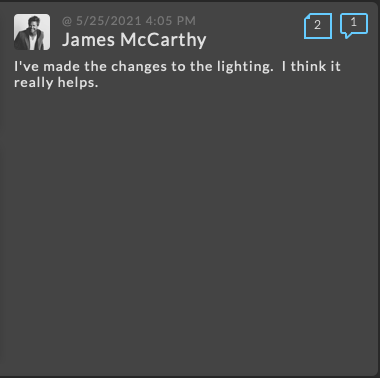
The final column is the shot notes. This panel displays the most current note assigned to the shot along with the author of the note and the date/time it was created.
The notes also includes counters for total number of notes, and replies. If an unread note or reply exists, the counter will be highlighted.
Click on the note section to open the shot notes in the info panel. For more information on creating and editing shot notes, please refer to the Notes section of the documentation.
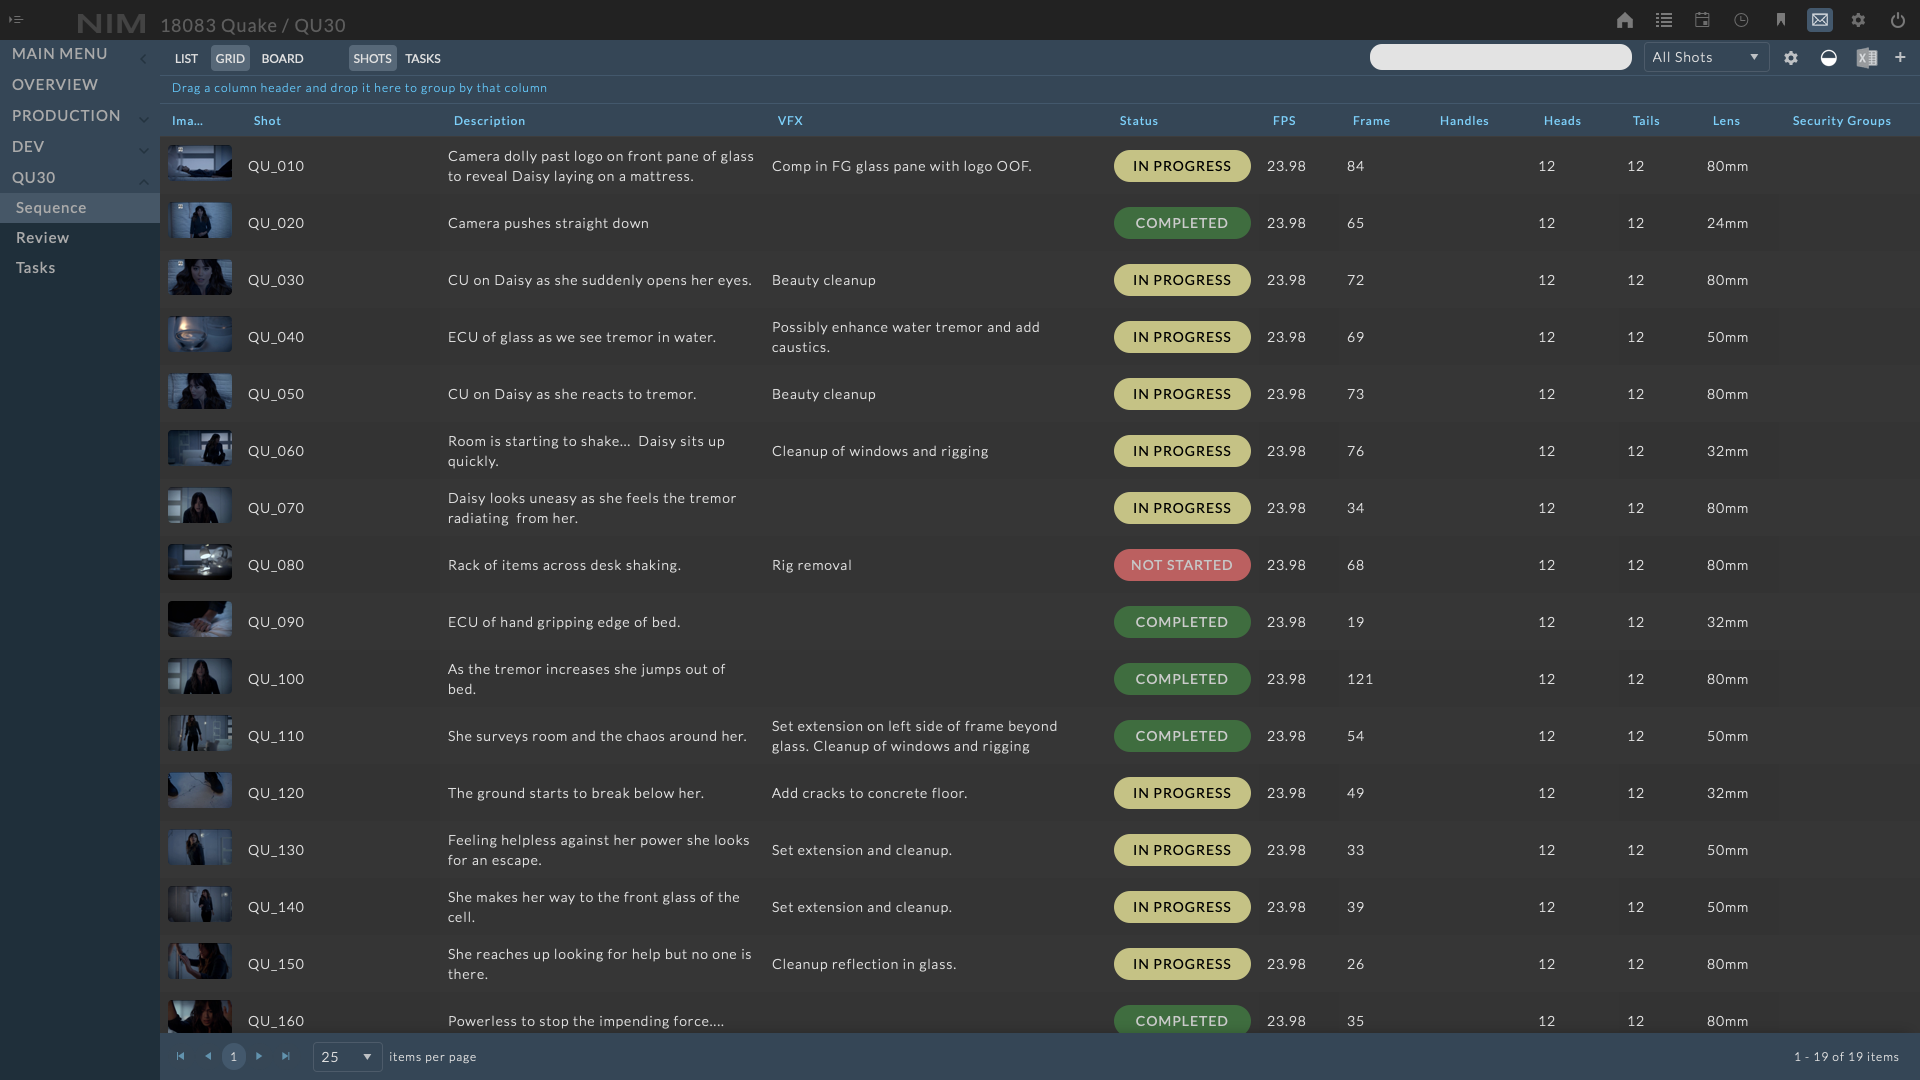
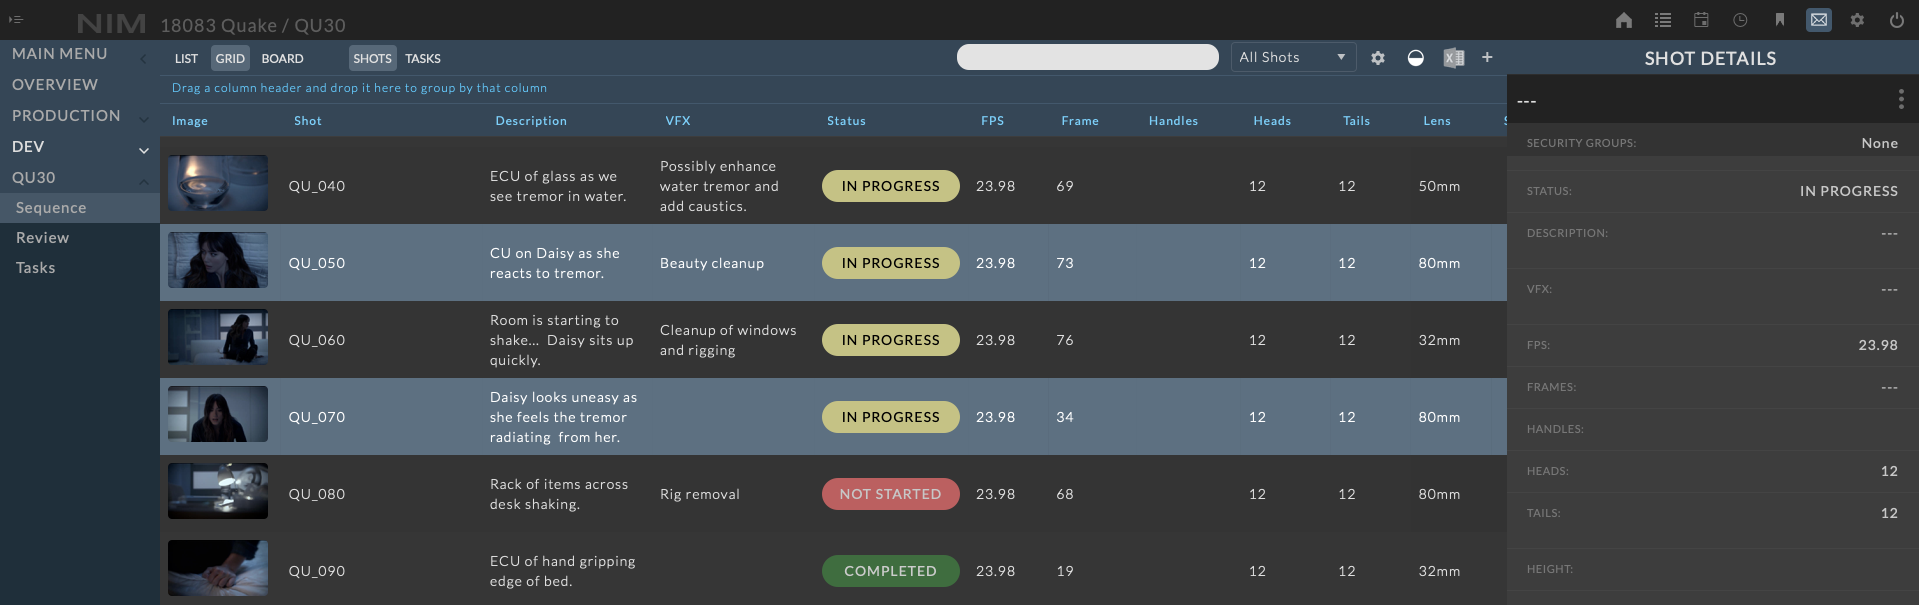
Grid View
The grid view displays shot and shot tasks in a paginated searchable grid. The grid view can be accessed by clicking the Grid button on the left of the shot toolbar.
Grid Features:
Users can choose to display/hide any shot field as a column.
The columns can be re-arranged and re-sized to fit the users preference.
Shots can be grouped by dragging any column name to the row above the column header.
The grid can be exported to excel.
Multi-select editing
The shot grid view and the task grid view are divided into their own grids. When the “Grid” option is selected from the toolbar, a second row of buttons will appear to select the “Shots” or “Tasks” grid.
Filter & Sorting
In addition to the search and filter options available from the toolbar, the grid provides additional functionality to refine the items displayed.
Column Filters
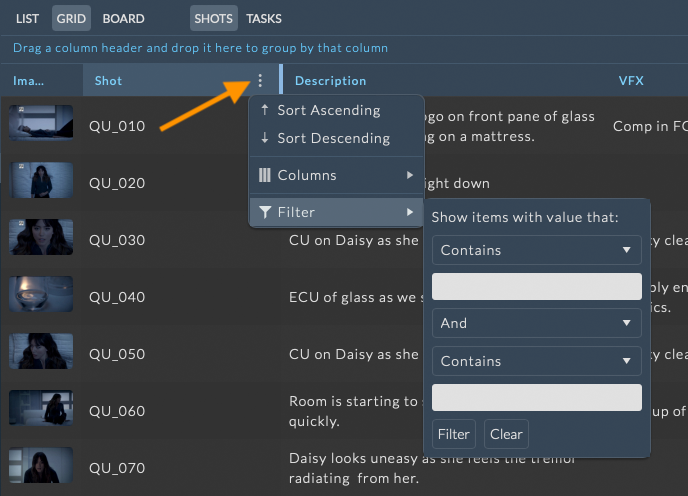
Filtering by grid column menus provides access to more complex filtering options per column. Column filters can be used in conjunction with the other filters to create more refined filter rules.
To filter the shot or task grid by a column menu, hover over the column and click on the ellipsis menu at the right of the column header and select your filter options from the Filter menu.
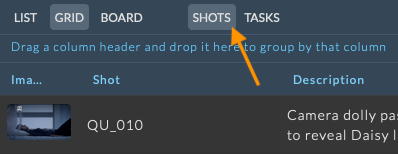
Column Grouping
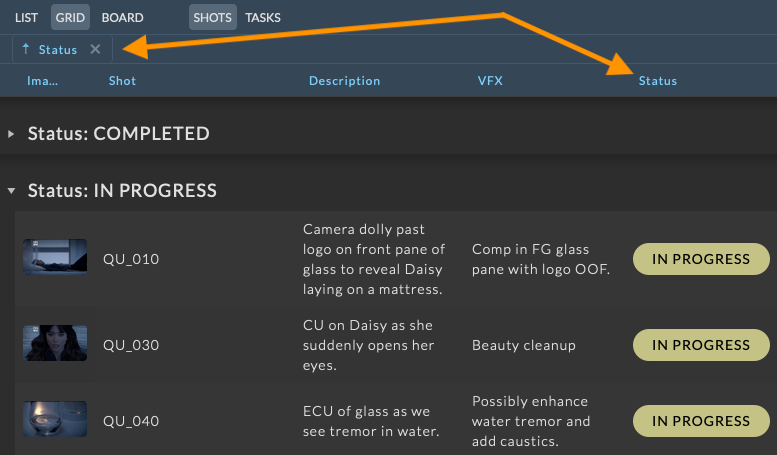
The grid view contains functionality to group shots and task items by information in any column. To group by column, drag and drop a column header to the bar labeled Drag a column header and drop it here to group by that column.
Note
When grouping by one or more columns, only items within your current page will be grouped. The current sorting, filtering, and pagination rules still determine the total set of items you’ll see at one time.
Multi-Select
The grid view allows for multi-selection editing and deletion. For more information on editing multiple shots or tasks simultaneously, please refer to the Multi-Shot Edit / Delete section of the documentation.
Shots Grid View
From the shot grid view, a shot-centric grid view is accessible via the Shot button in the toolbar. In this view, each row represents a shot. All shot details are available including all custom fields, and a color coded status column.
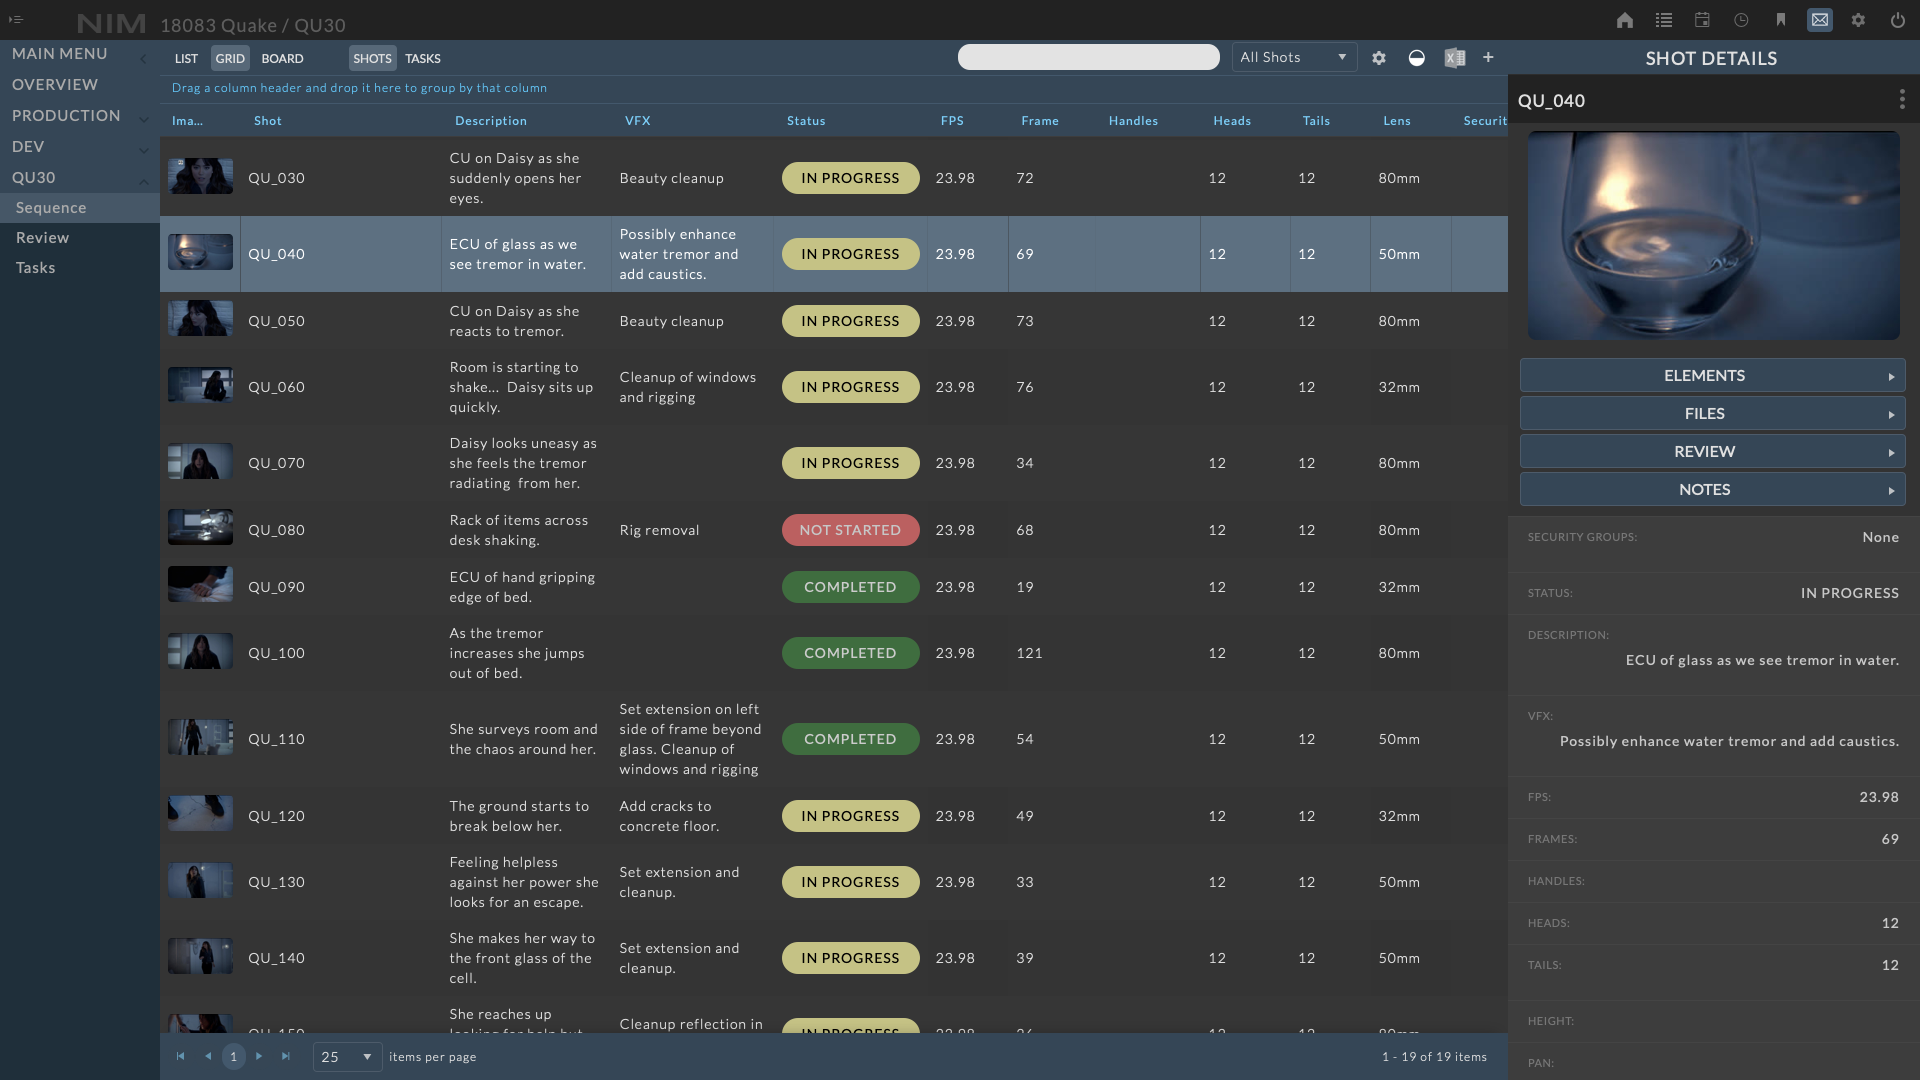
Clicking a shot row opens the shot info panel. More information on editing shots can be found in the Shot Details section of the documentation.
Note
New shots can be created from the Shots Grid using the button, however tasks can not be created or assigned when in this view.
Drag and drop shot status updates are available in the shot grid using the Shot Assignment panel accessed from the button in the toolbar.
Tasks Grid View
From the shot grid view, a task-centric grid view is accessible via the Tasks button in the toolbar. In this view, each row represents a task rather than a shot. All task details are available including all custom fields, a progress bar displaying estimated vs time used, a color coded status column, and the latest note.
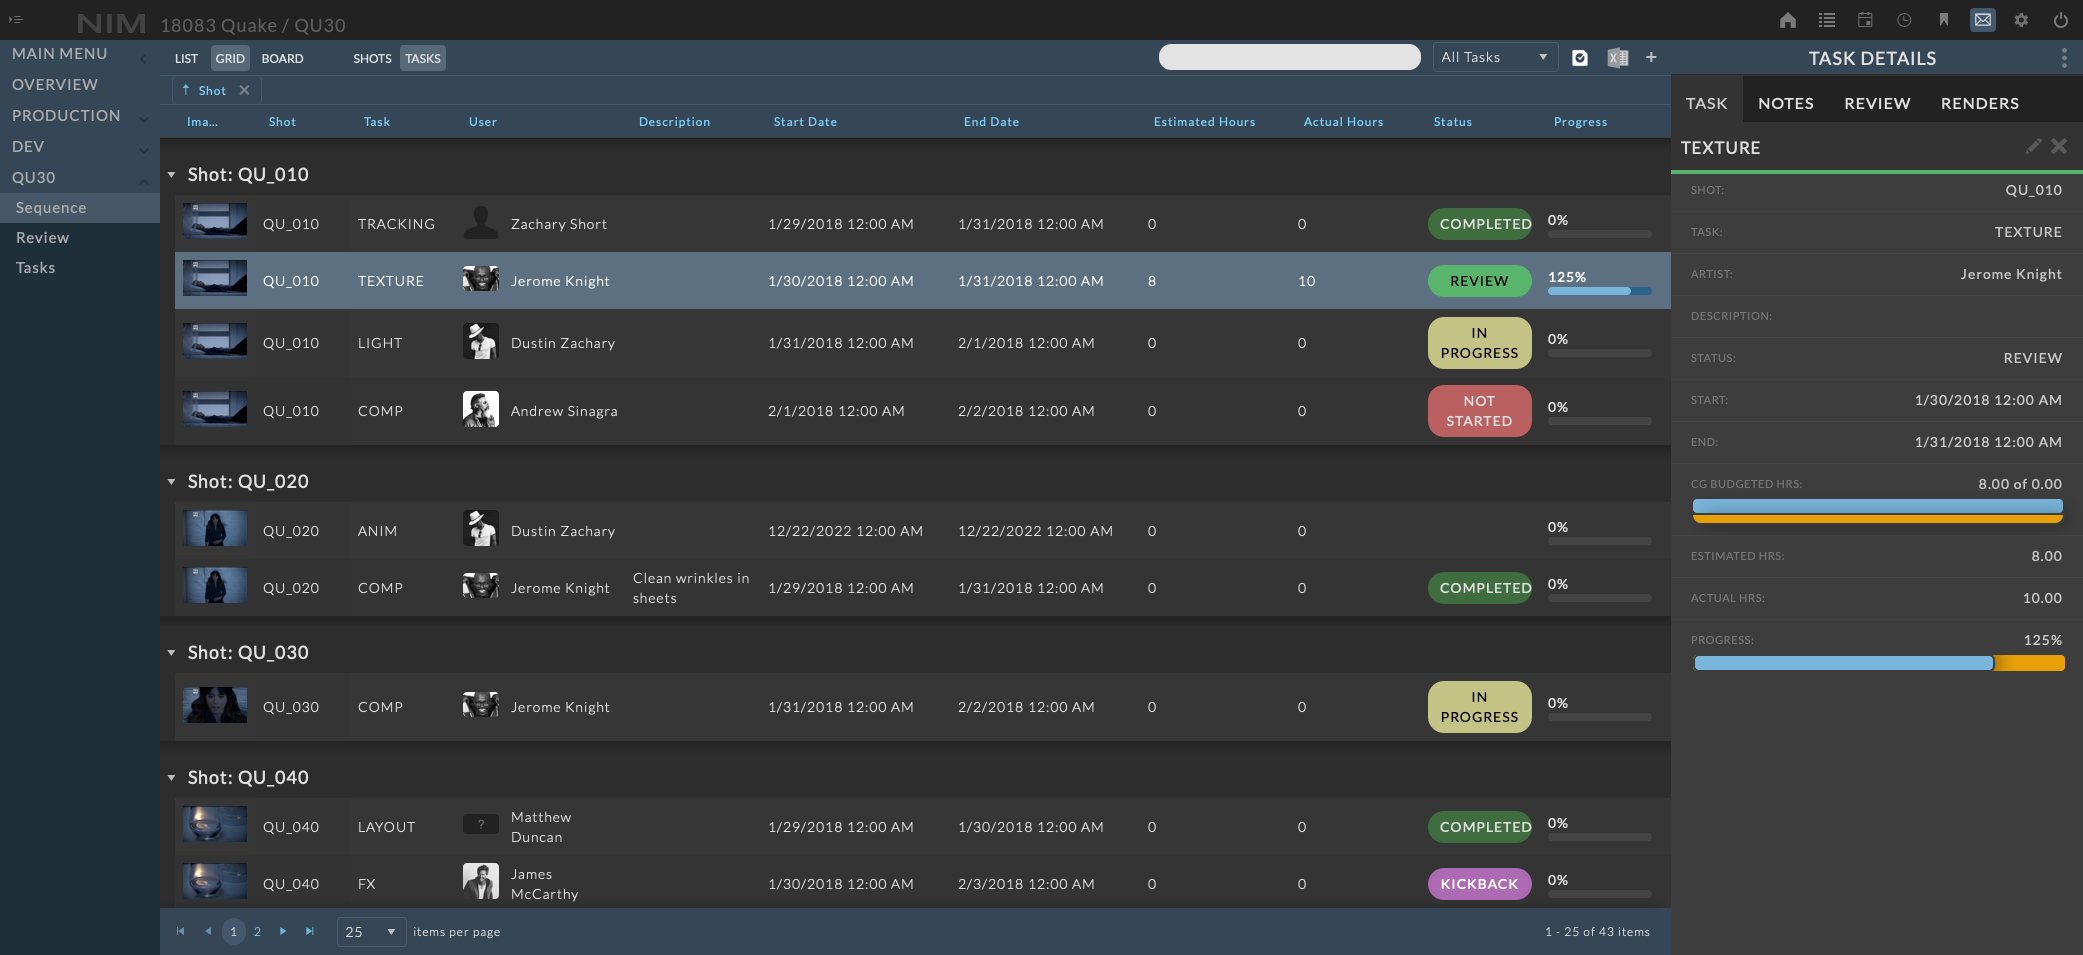
Clicking a task row opens the task info panel. More information on editing tasks can be found in the Task Details section of the documentation.
Note
New tasks can be created from the Tasks Grid using the button, however shots can not be created when in this view. When creating a new task from the Tasks Grid, an additional field will appear to select the parent shot for the new task.
Drag and drop task assignment and task status updates are available in the task grid using the Task Assignment panel accessed from the button in the toolbar.
Board View
The shot board view displays all shots in a storyboard view including information for the shot name, description, and status.
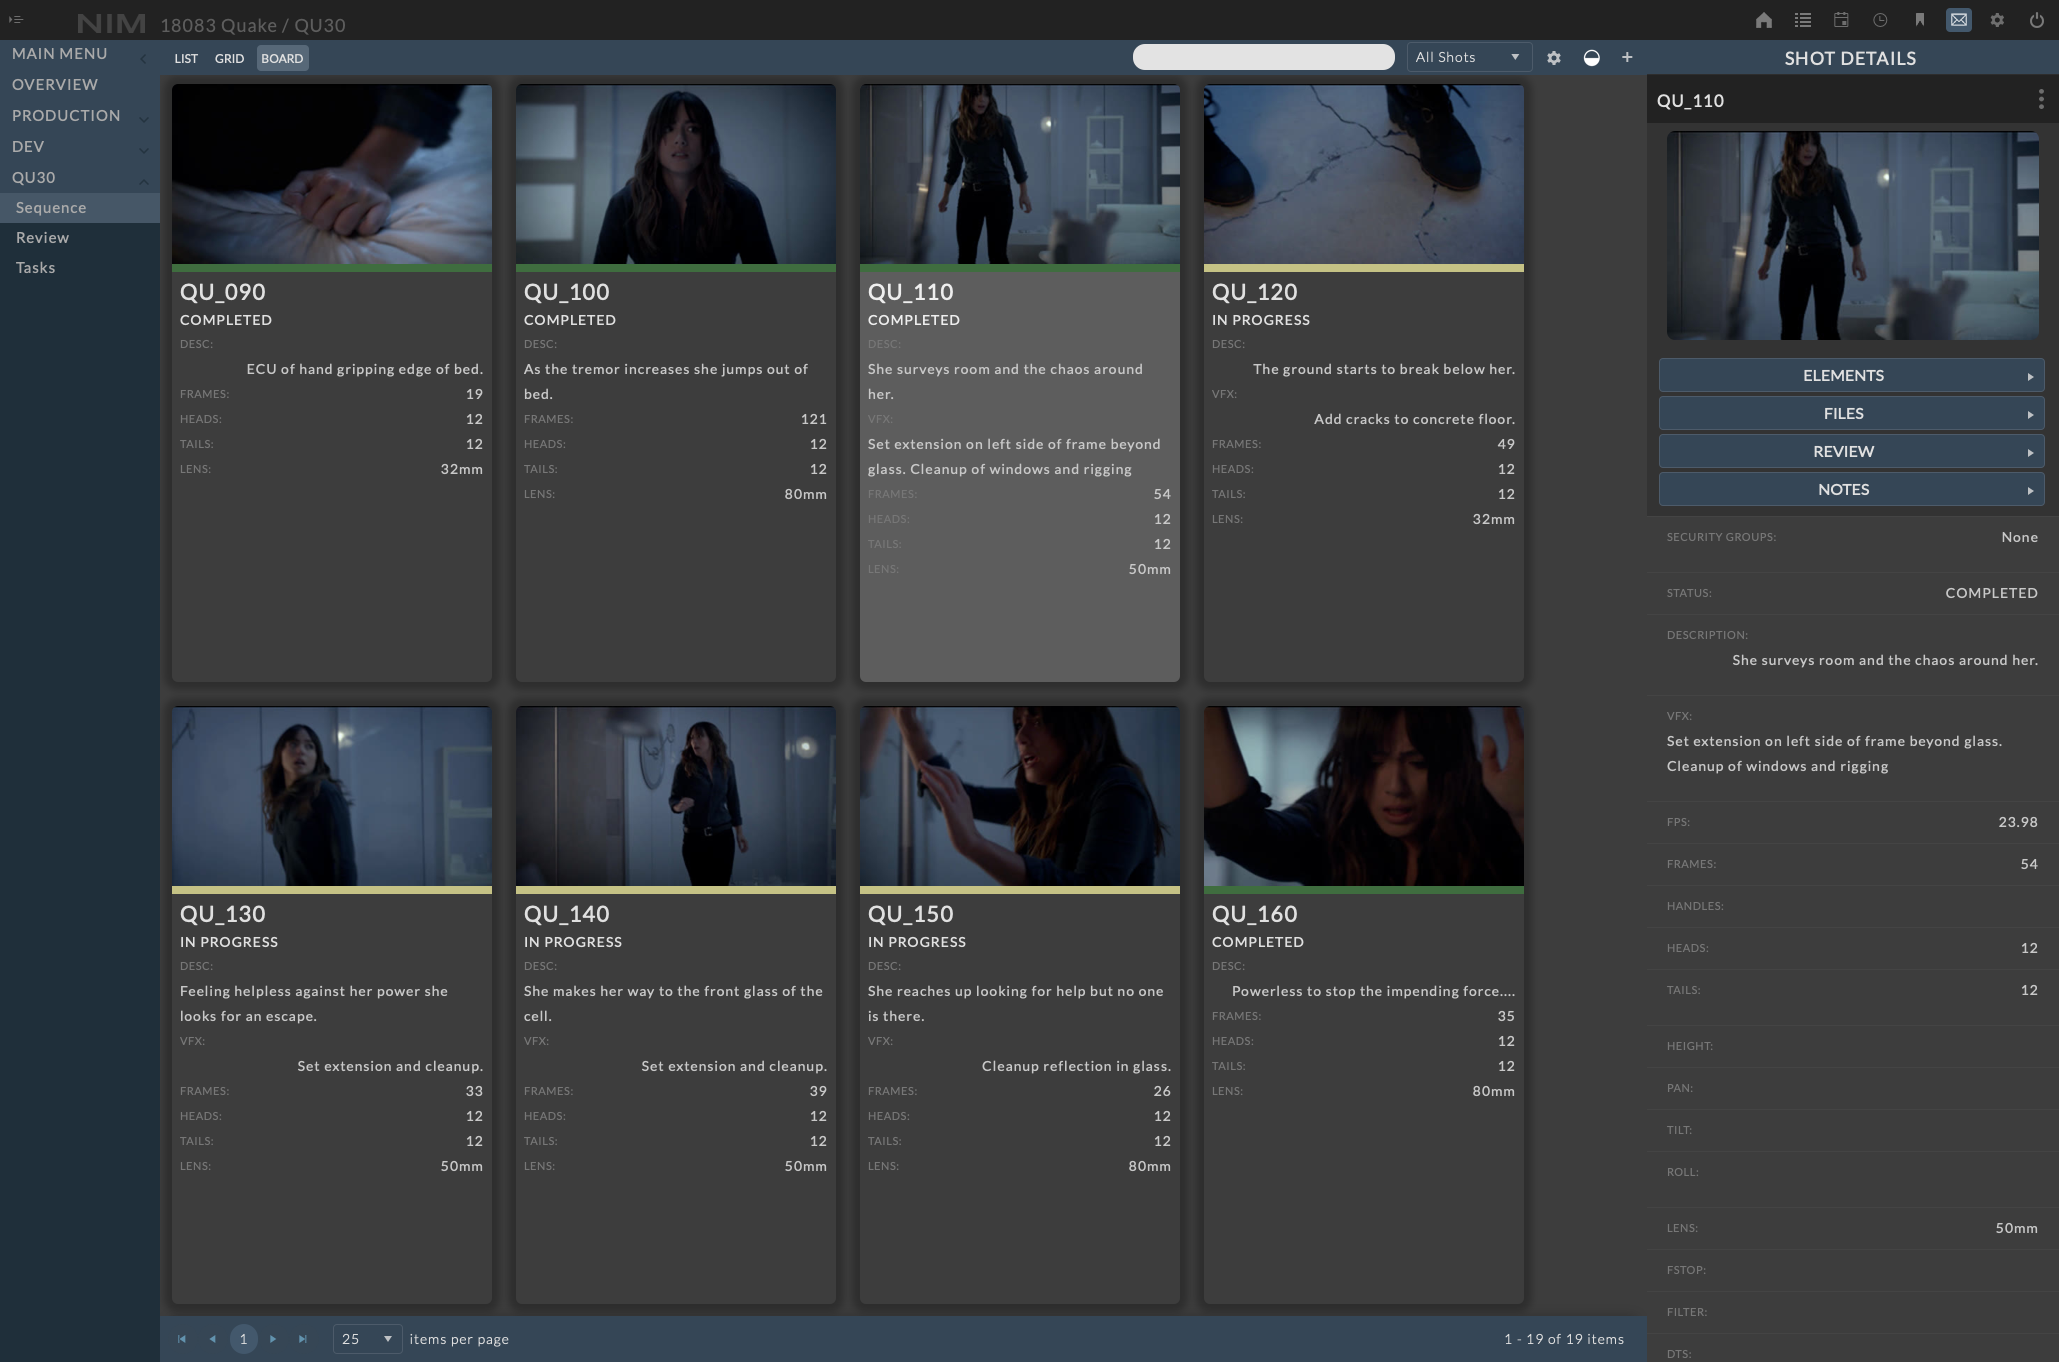
Clicking a shot board opens the shot info panel. More information on editing shots can be found in the Shot Details section of the documentation.
Note
New shots can be created from the Shots Board view using the button, however tasks can not be created or assigned when in this view.
Drag and drop shot status updates are available in the shot grid using the Shot Assignment panel accessed from the button in the toolbar.
Multi-Select
The board view allows for multi-selection editing and deletion. For more information on editing multiple shots simultaneously, please refer to the Multi-Shot Edit / Delete section of the documentation.
Multi-Shot Edit / Delete
Shots can be edited or deleted in groups from the Grid View or the Board View.
To edit or delete multiple shots simultaneously, click on the first shot to be edited. Then Shift-click a second shot to select all shots in between, or Ctrl-click / Command-click to add non-consecutive shots.
The Shot info panel will appear from the right.
Click the ellipsis menu and choose Edit in the Shot info panel to edit the shot information.
Fields with matching values will be displayed as normal.
Fields with dissimilar values will be denoted as
---
Note
Only modified values will be saved, and all modified values will be saved for all selected shots.