Admin & Configuration Settings
The admin menu is where all customizable aspects of NIM can be configured.

Jobs
The Jobs Administrative window has 6 tabs including:
Status: Create and manage job statuses
Keywords: Create and manage job keywords
Numbering: Create and manage job numbering templates
Options: Set default job fields and options
Custom: Create and manage custom job fields
Deleted: Manage deleted jobs
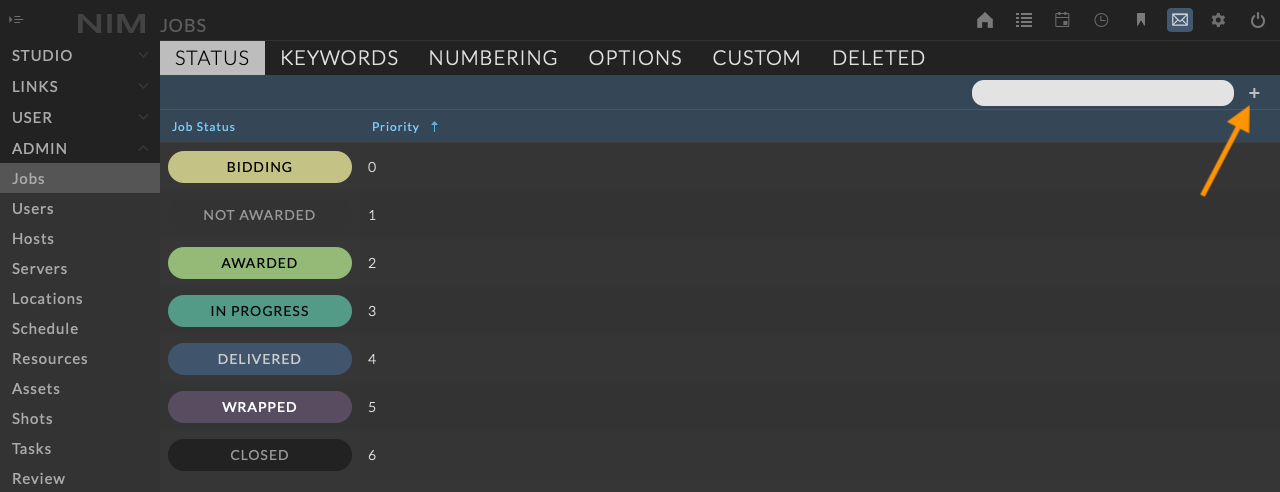
Job Status
Status is a color coded list of job statuses with an associated priority order for organization. NIM includes 6 status items by default, but you can add or edit these to include whatever items fits your studio’s needs.
To add a new status click the  button at the top right of the Status section.
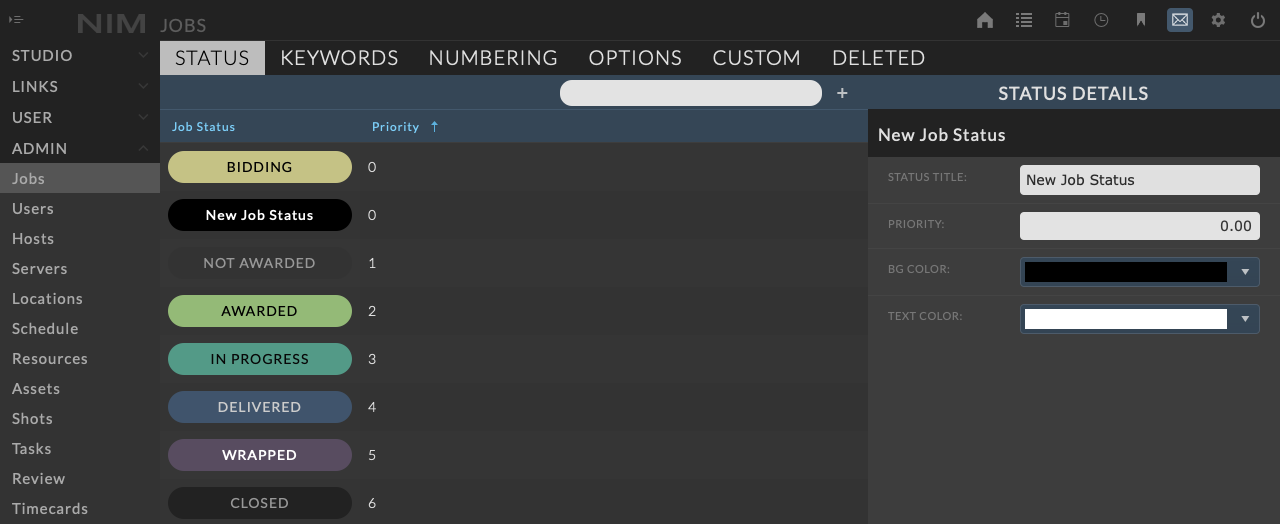
This will open up an information pane to the right allowing you to enter the following:
Status Title : The name of the status
Priority : The order in which the status will be displayed in lists. Lower numbers will be displayed first.
BG Color : The background color of the status box
Text Color : The color of the text in the status box
Associated Activity Status : This dropdown allows you to associate a job status with an activity status. Options include Active, Inactive, or None.
Setting this value to None will not change the job’s activity status when the job status is set to this job status.
Selecting Active or Inactive will automatically update the job’s activity status to this value when the job status is changed. This is useful for keeping activity statuses in sync with the job statuses. When the job activity status is set to inactive, the job will be removed as an available option in various areas of the NIM UI and Connectors. Additionally, the job list can be filtered to show only active jobs. This is useful for keeping the job list clean and organized.
Similarly you can edit existing job statuses by clicking on a status from the grid, clicking on the ellipsis menu in the info panel and selecting “Edit”.

After making your changes, click the “Save” button at the bottom of the info panel to commit your changes, or “Cancel” to quit editing without saving.
To delete a job status click the ellipsis menu in the info panel and choose “Delete”. You will be prompted to confirm deletion of the job status. Deleting a job status will remove that status from any previously assigned jobs.
Job Keywords
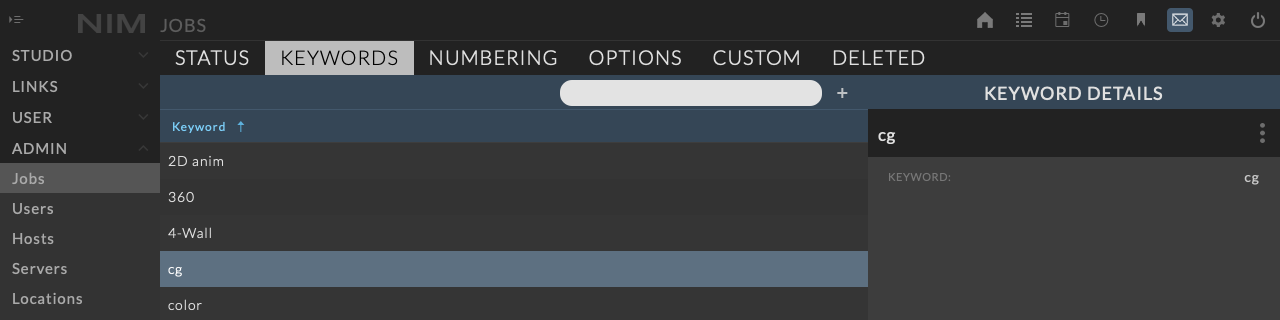
Job keywords allow a studio to tag jobs with an unlimited number of keywords for refinement in searches and organization. In this example we have the keywords Color, Live Action, and VFX to denote different aspects of production that a job may include.
To add new keywords, click the button at the top right of the keywords window. The keyword details will appear and you can enter a custom name. When done click the “Save” button at the bottom of the info panel to save your changes.
To edit a keyword, click on a keyword from the grid to load the keyword details. Click the ellipsis menu in the keyword info panel and select “Edit”. Make the necessary changes and click the “Save” button to save your changes.
Delete a keyword entry by selecting the keyword from the grid, clicking the ellipsis menu in the keyword info panel, and selecting “Delete”. You will be prompted to confirm deletion of the keyword. Deleting a keyword will remove that keyword from any previously assigned jobs.
Job Numbering
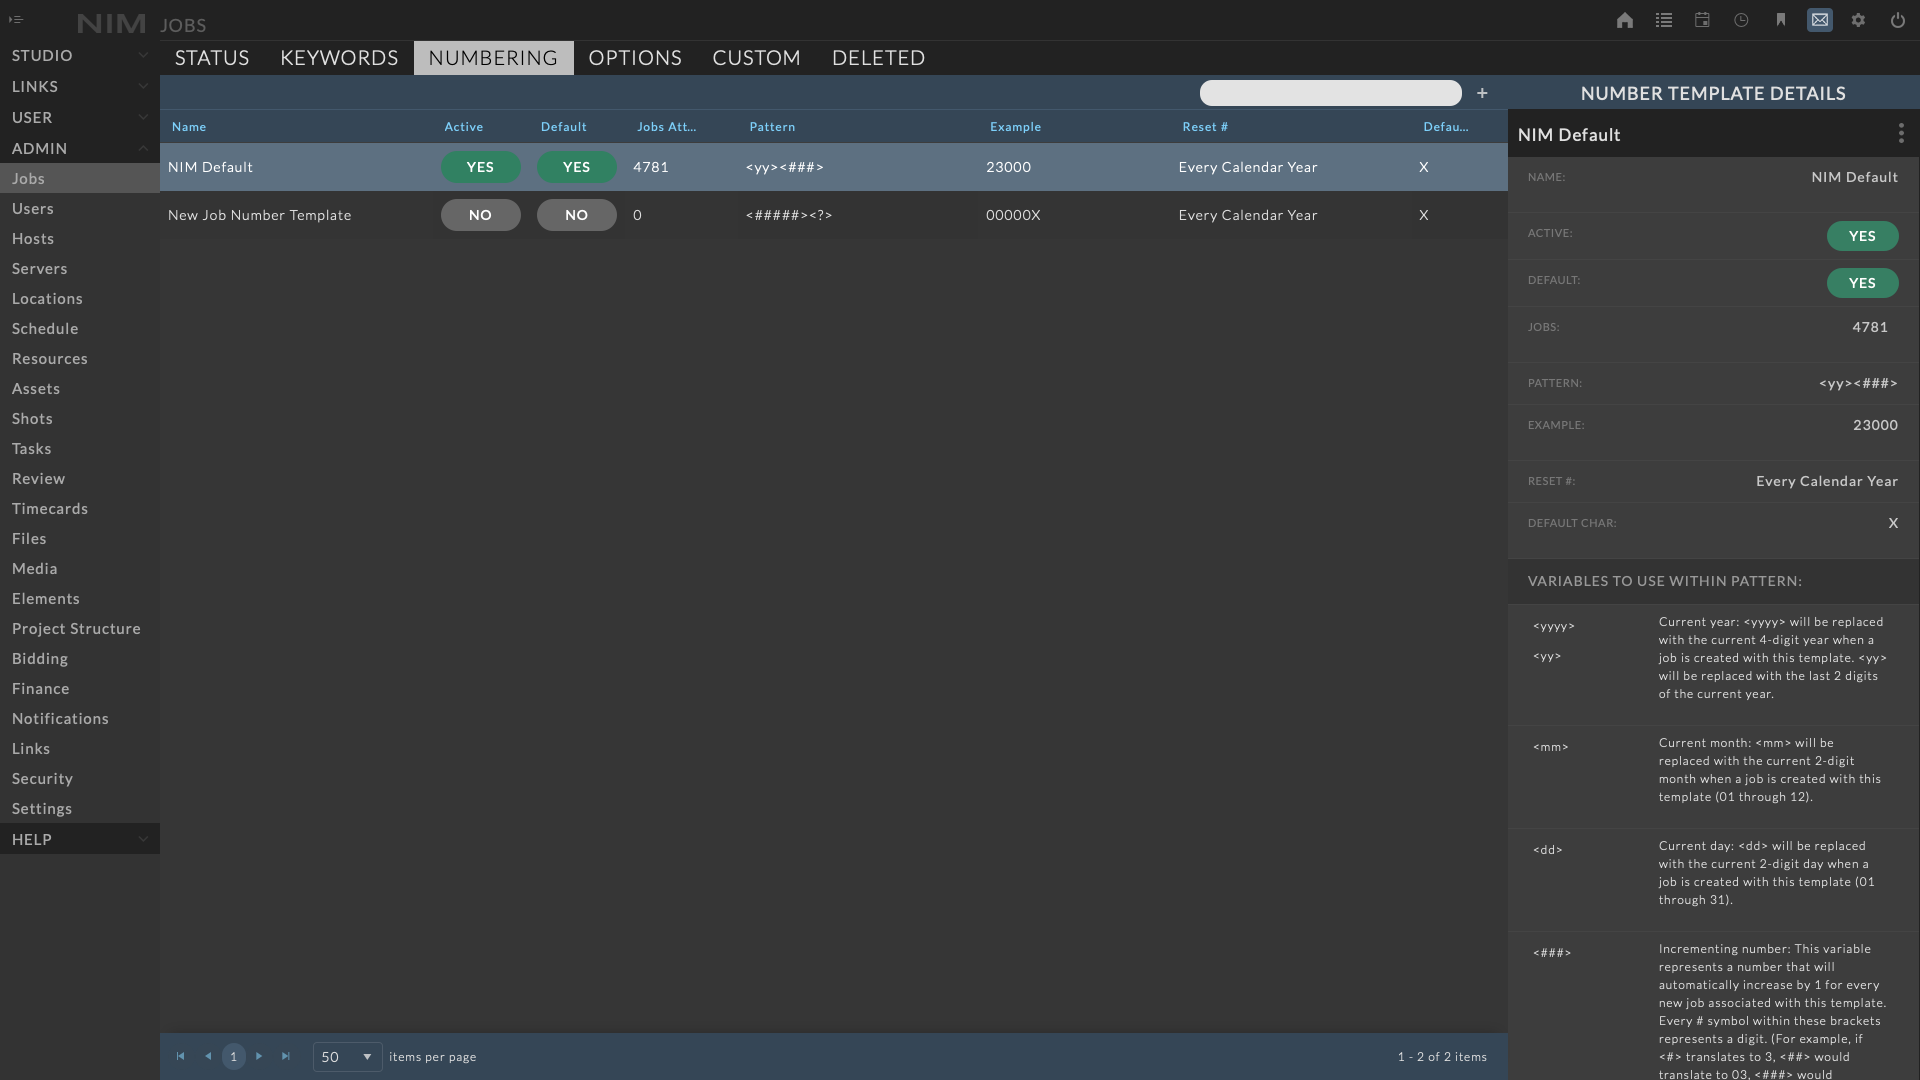
Job numbering allows studios to define custom number templates for projects. Multiple number templates can be defined. When a job is created, the user can select which number template to use. Multiple number templates allows studios to assign unique numbering schemes to projects of different types.
To add a new job numbering template, click the button at the top right of the numbering window. The number template details will appear to enter a name and define the properties for the templates. When done click the “Save” button at the bottom of the info panel to save your changes.
To edit a number template, click on a number template from the grid to load the number template details. Click on the ellipsis menu in the number template info panel and choose “Edit”. Make the necessary changes and click the “Save” button at the bottom of the info panel to save your changes.
Delete a number template entry by selecting the number template from the grid, clicking the ellipsis menu in the number template info panel, and selecting “Delete”. You will be prompted to confirm deletion of the number template. Deleting a number template will remove that number template from any previously assigned jobs.
Note
If a job is using a template, the template can not be deleted. To remove the template as an option when making new jobs, uncheck the Active checkbox in the template details.
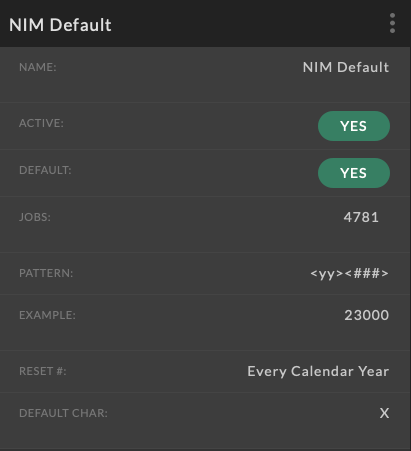
Number Template Options:
Name - The name that will displayed in the dropdown option when choosing a template.
Active - Defines if this template is active. If this value is unchecked, the template will not be an option when creating a new job.
Default - Defines if this template is the default option selected.
Jobs - The total number of jobs using this template. When there are 1 or more jobs attached to a template, the pattern cannot be changed and the template can not be deleted.
Pattern - The numbering pattern to use. This field can use a combination of numbers, letters, and variables to create the custom job number desired.
VARIABLES FOR NUMBER PATTERN:
<yyyy> or <yy> - Current year: <yyyy> will be replaced with the current 4-digit year when a job is created with this template. <yy> will be replaced with the last 2 digits of the current year.
<mm> - Current month: <mm> will be replaced with the current 2-digit month when a job is created with this template (01 through 12).
<dd> - Current day: <dd> will be replaced with the current 2-digit day when a job is created with this template (01 through 31).
<###> - Incrementing number: This variable represents a number that will automatically increase by 1 for every new job associated with this template. Every # symbol within these brackets represents a digit. Only one incrementing number is allowed per template.
<@> - Any character: Each @ symbol within these brackets represents a single character. This includes any letter, number or symbol.
<?> - Variable number of characters: This variable can be replaced with any number of characters, including none. Only one variable number of characters is allowed per template.
Example:
If <#> translates to 3, then <##> would translate to 03, and <###> would translate to 003, etc.
<yy><####> will create jobs in 2016 staring with 16000
FX_<yyyy>_<@@>_<####>_<?> will create jobs in 2016 with a default character of A starting with FX_2016_AA_0000_A where any number of characters or numbers can be appended to the end. The A characters can be replaced at job creation with new characters that fit the numbering needs.
Example - This is an active example of how your numbering template will appear.
Reset # - This value determines when an incrementing number variable resets back to zero.
Default Char - This will be the default value for <?> variables and each character in <@> variables.
Job Options
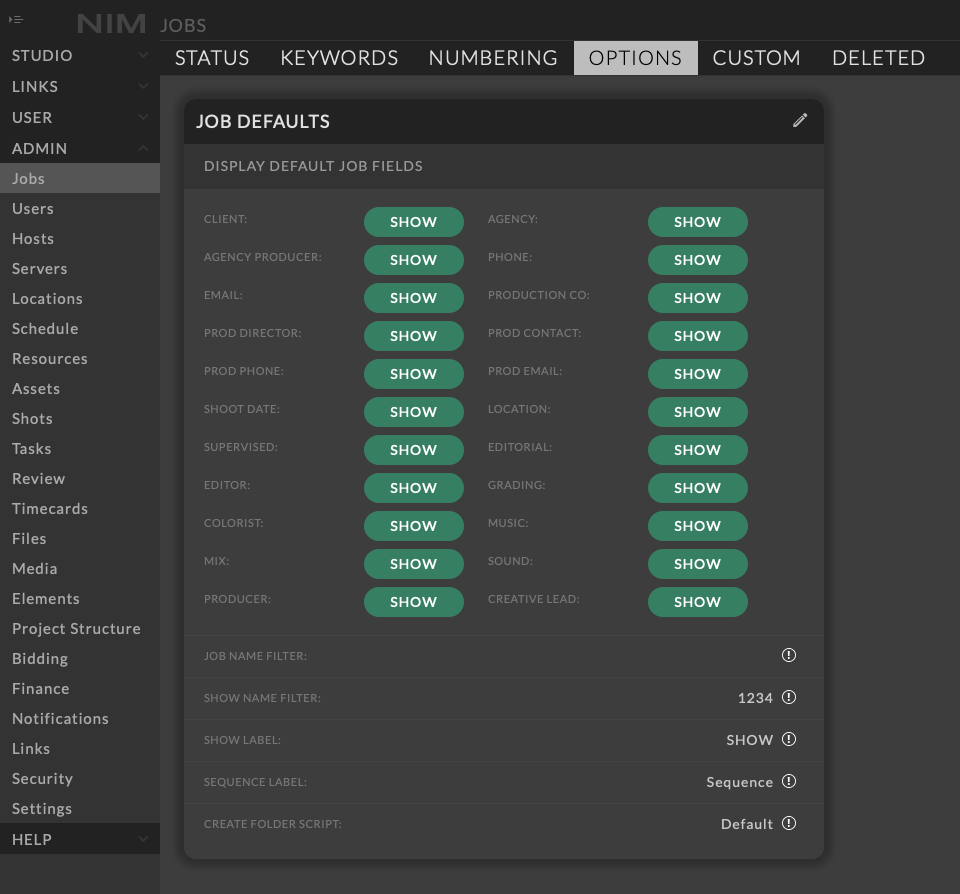
Default Fields
NIM comes with several default job fields. Studios can choose to hide any of these values by unchecking them from the Job Defaults list.
To edit the job defaults fields, click the edit button  and uncheck any items that should be hidden from the UI. Make the necessary changes and click the check mark in the Job Defaults header to save. At any time the checkbox can be rechecked to have the field reappear. Any existing data in fields that are hidden will be retained and be displayed when the field is unhidden.
Location Labels
The labels for the job Bidding Location and Assigned Location can be modified to fit the nomenclature of your studio. Click the edit button to enable editing and enter the desired labels. A blank field will use the default value. These labels will only appear in the NIM UI and do not carry over to the API.
Name Filters
The names for jobs and shows can have filters automatically applied to limit the characters used for naming. The filter fields use regular expressions (regex) to remove specific characters in a job or show name. This filter will only remove characters from the name on manually created items. This does not filter names created via the API.
Job Labels
The labels for Shows and Sequences can be modified to fit the nomenclature of your studio. Click the edit button to enabled editing and enter the desired label. A blank field will use the default value. These labels will only appear in the NIM UI and do not carry over to the connectors.
Create Folder Script
The Create Folder Script dropdown allows the studio to define it’s own custom PHP script for folder creation. Custom scripts must be placed on the NIM VM in the /var/www/html/_custom directory. An example script is provided with the name: createFolder.php. To override the default behavior, modify this script as needed and select createFolder.php from the dropdown.
Allow Spaces and Periods in Object Names
By default, NIM will not allow spaces or periods in object names including assets, shows, and shots. This is to prevent issues with file paths and naming conventions. If your studio does not have these restrictions, you can enable this option to allow spaces and periods in object names. This will allow for more flexibility in naming conventions.
Custom Job Fields
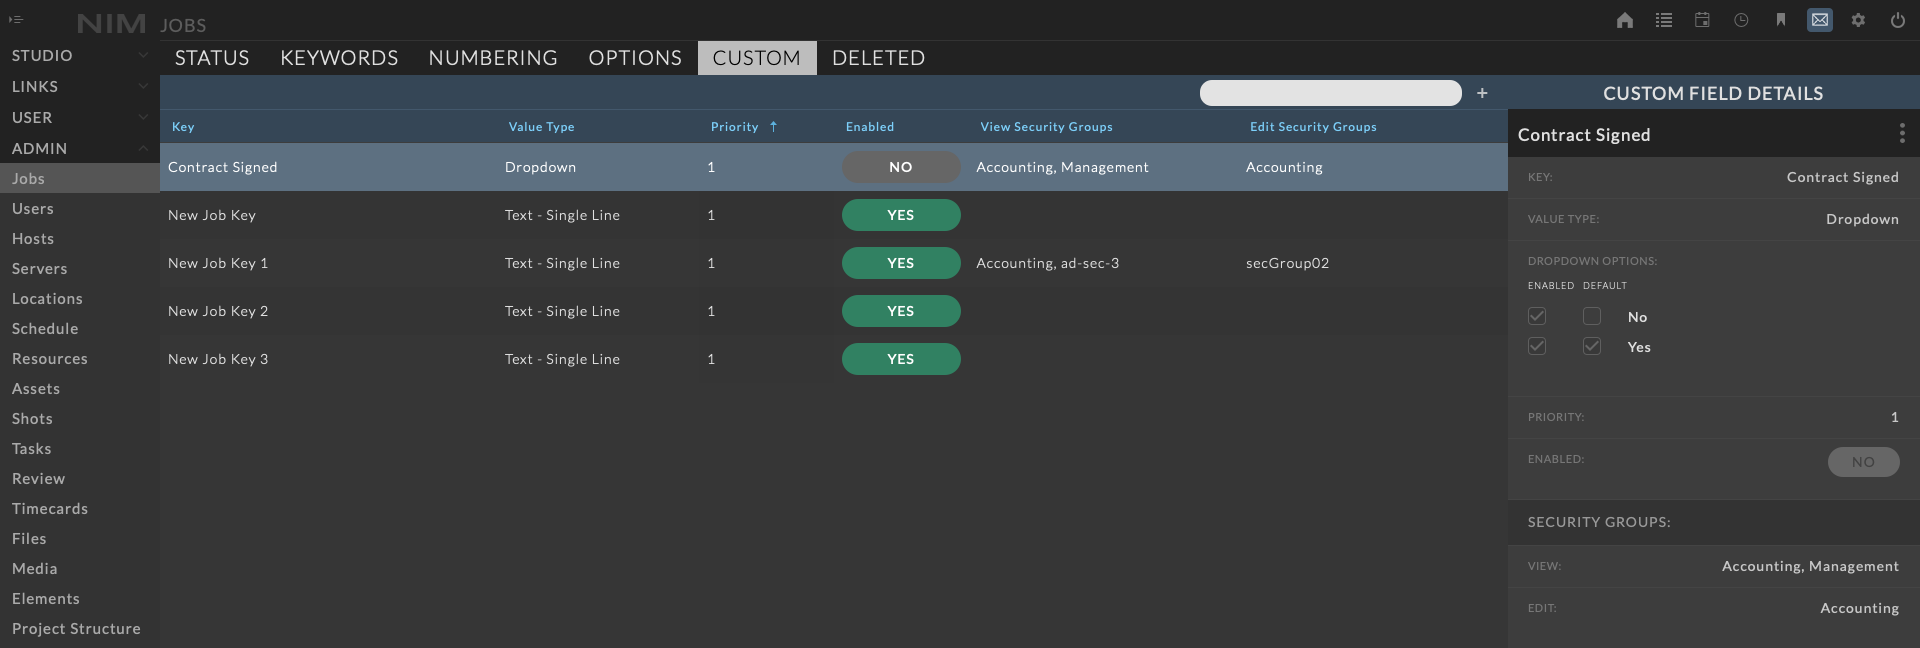
Custom job fields allows users to add data items specific to the studios needs.
To add new custom fields, click the button at the top right of the custom window. The custom field details will appear and you can enter a name for your field. When done click the “Save” button at the bottom of the info panel to save your changes.
To edit a custom field, click on a row from the grid to load the custom field details. Click on the ellipsis menu in the custom field info panel and choose “Edit”. Make the necessary changes and click the “Save” button at the bottom of the info panel to save your changes.
Delete a custom field entry by selecting the custom field from the grid, clicking the ellipsis menu in the custom field panel, and selecting “Delete”. You will be prompted to confirm deletion of the custom field. Deleting a custom field will remove that field from all jobs and remove any possible associated data.
There are five data types available:
Single Line Text
Multi Line Text
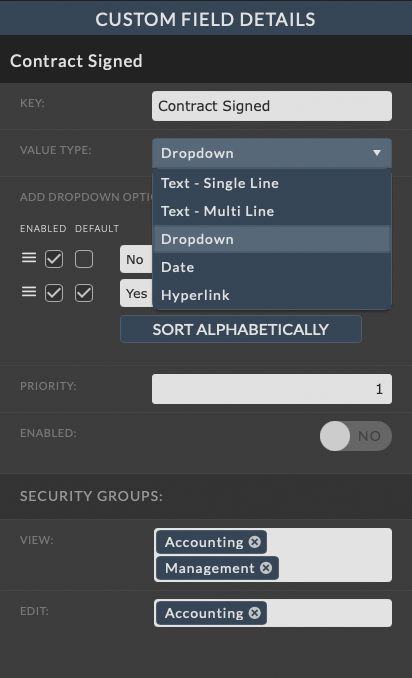
Dropdown
Date
Hyperlink
Note
If Single Line, Multi Line, or Data is selected the only option is to enter the Key which becomes the label for the new data field.
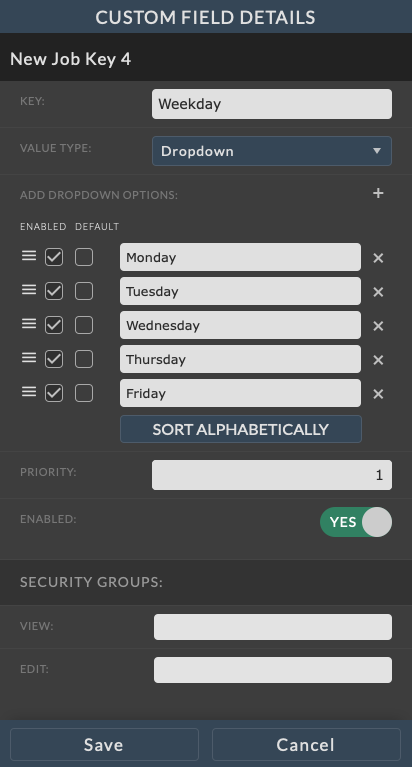
If Dropdown is selected a will appear next to the Options label. Click the button to add options to the dropdown box. In this example we are creating a dropdown named WeekDay and have added the days of the week as options. Click the checkbox next to an option in the default colum to select it as the default option when creating a new object with this field. The enable checkbox determines which selections are available for this dropdown field.
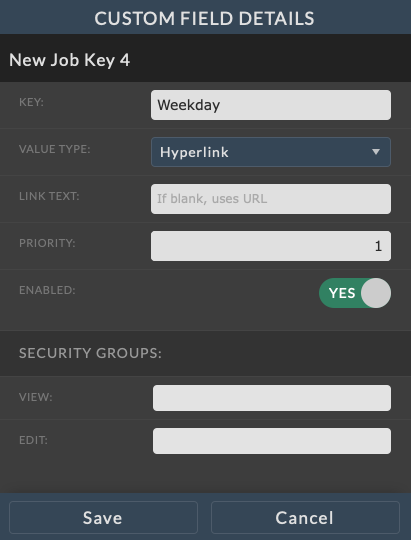
If Hyperlink is selected an additional option to enter the default Link Text is available. If entered this text will be displayed instead of the full link. If left blank the full link will be displayed.
The Priority field will determine the order of the fields when displayed on a job.
The Enabled checkbox determines if this field will be displayed on jobs.
There are two security group fields for all custom fields, View and Edit. Adding a security group to these fields will provide access only to users in the associated security group.
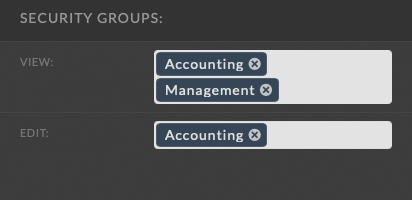
Clicking in the field will display a list of available security groups. Select a group to add it to the field. Click the X at the right of the group to remove it from the field. View will allow users in the security group to view the field. Edit will allow editing capability. Leaving these fields blank will provide full access to anyone with the appropriate permission. Multiple security groups can be added to either field.
Note
If an item with the custom field has a previously set value that is now disabled, it will retain it’s value untill the next time it is edited, at which point the original value will no longer be an option.
Deleted Jobs
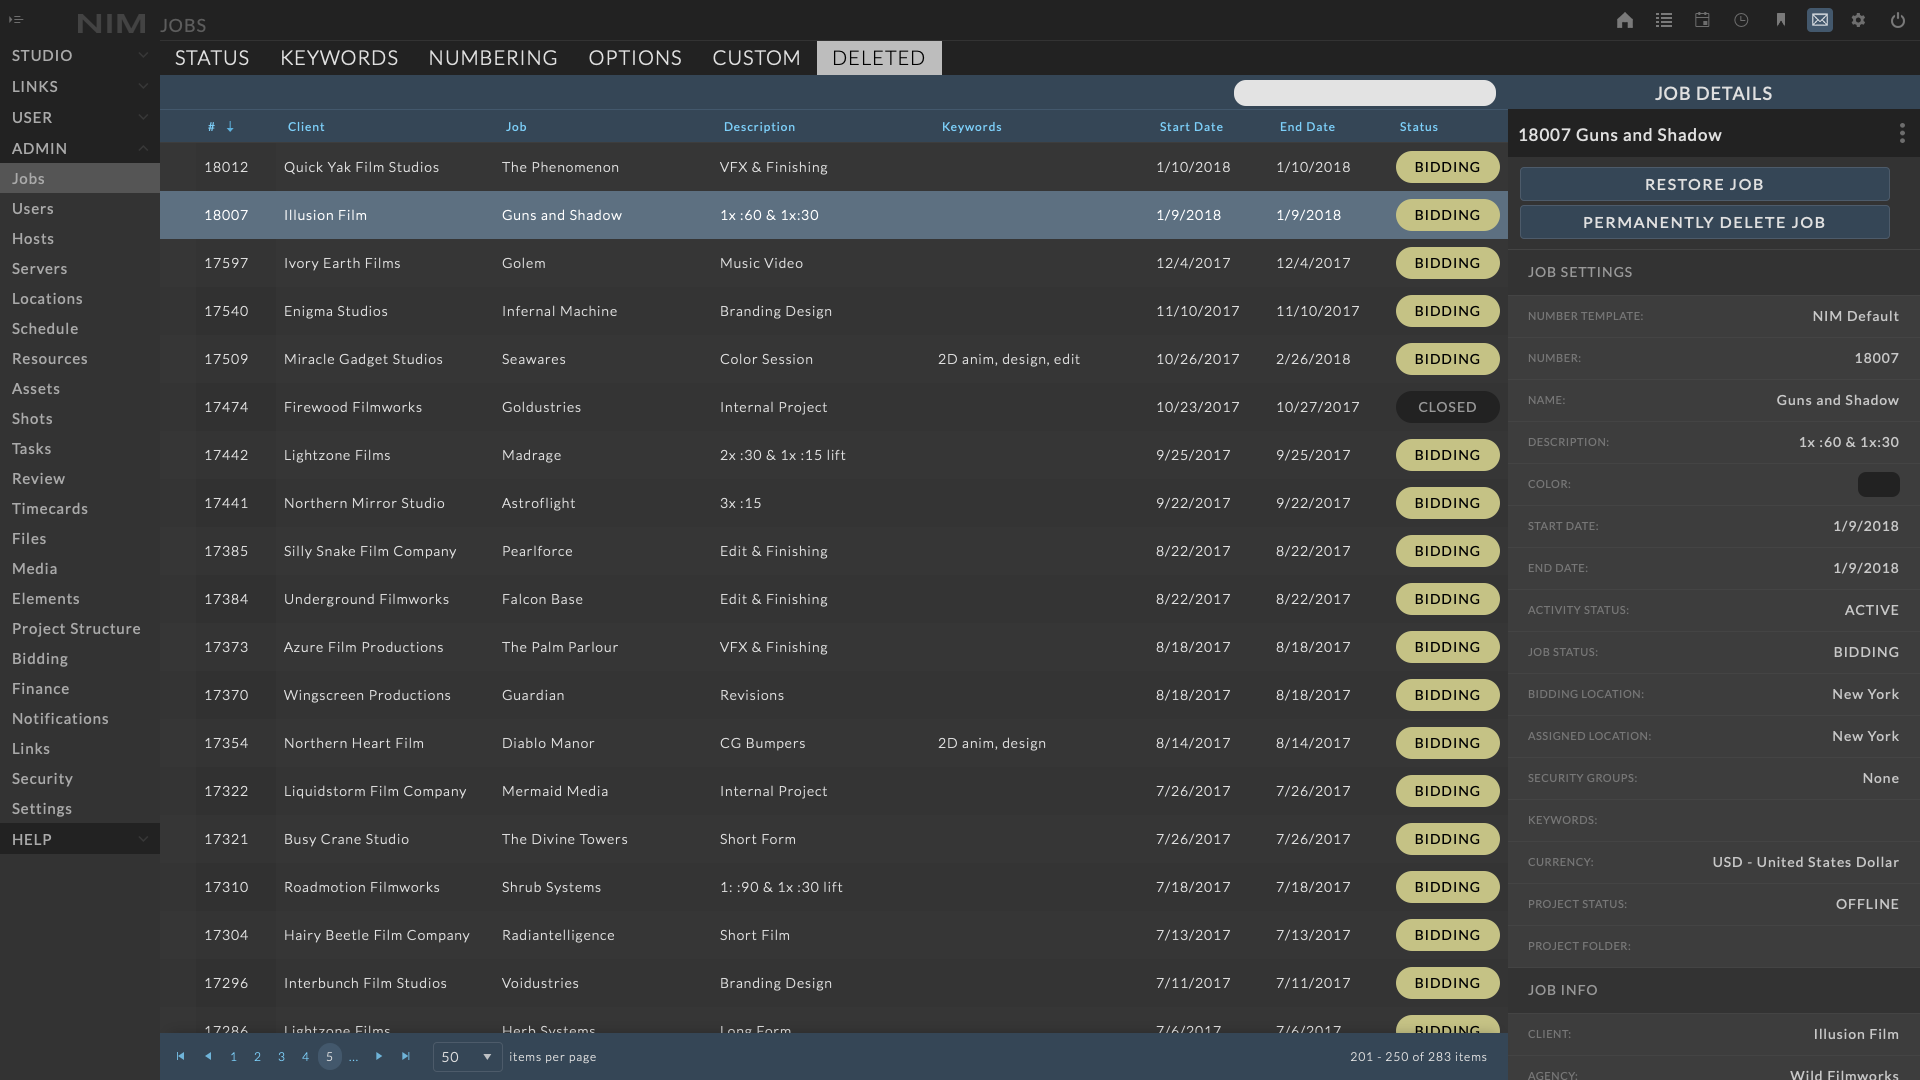
Jobs deleted from the main job list will be stored here in the deleted jobs list. This will retain all data related to the job in the event that it needs to be reinstated.
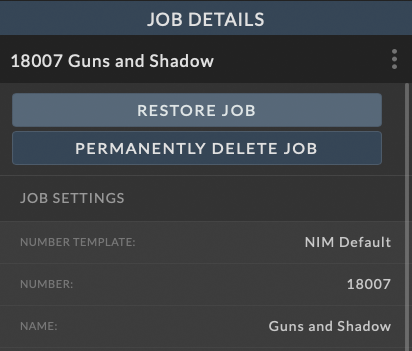
If you wish to reinstate a job, simply click the RESTORE JOB button and your job will be placed back in the main job list.
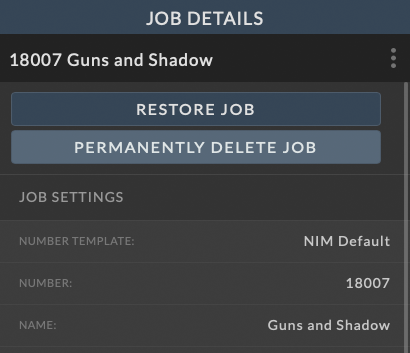
While there is no real need to permanently deleted a job, if you wish to destroy all data and associations with a particular job you can click the PERMANENTLY DELETE JOB button.
Users
User accounts track linked information related to the individual users throughout NIM including permissions, timecards, tasks, reviews, notes, file ownership, and more. You will need an account per user to properly track this information. For this reason it is preferable to enable and disable users as needed rather than deleting them from the system.
Create users for all of your artists, producers, coordinators… basically anyone needing access to NIM and/or the NIM connectors. User accounts can be categorized using User Type and User Keywords, as well as grouped via User Groups.
The Users Administrative window has 5 tabs including:
Users: Create and manage user accounts
Types: Create and manage user types
Keywords: Create and manage user keywords
Groups: Create and manage user groups
Options: Set default user fields and options
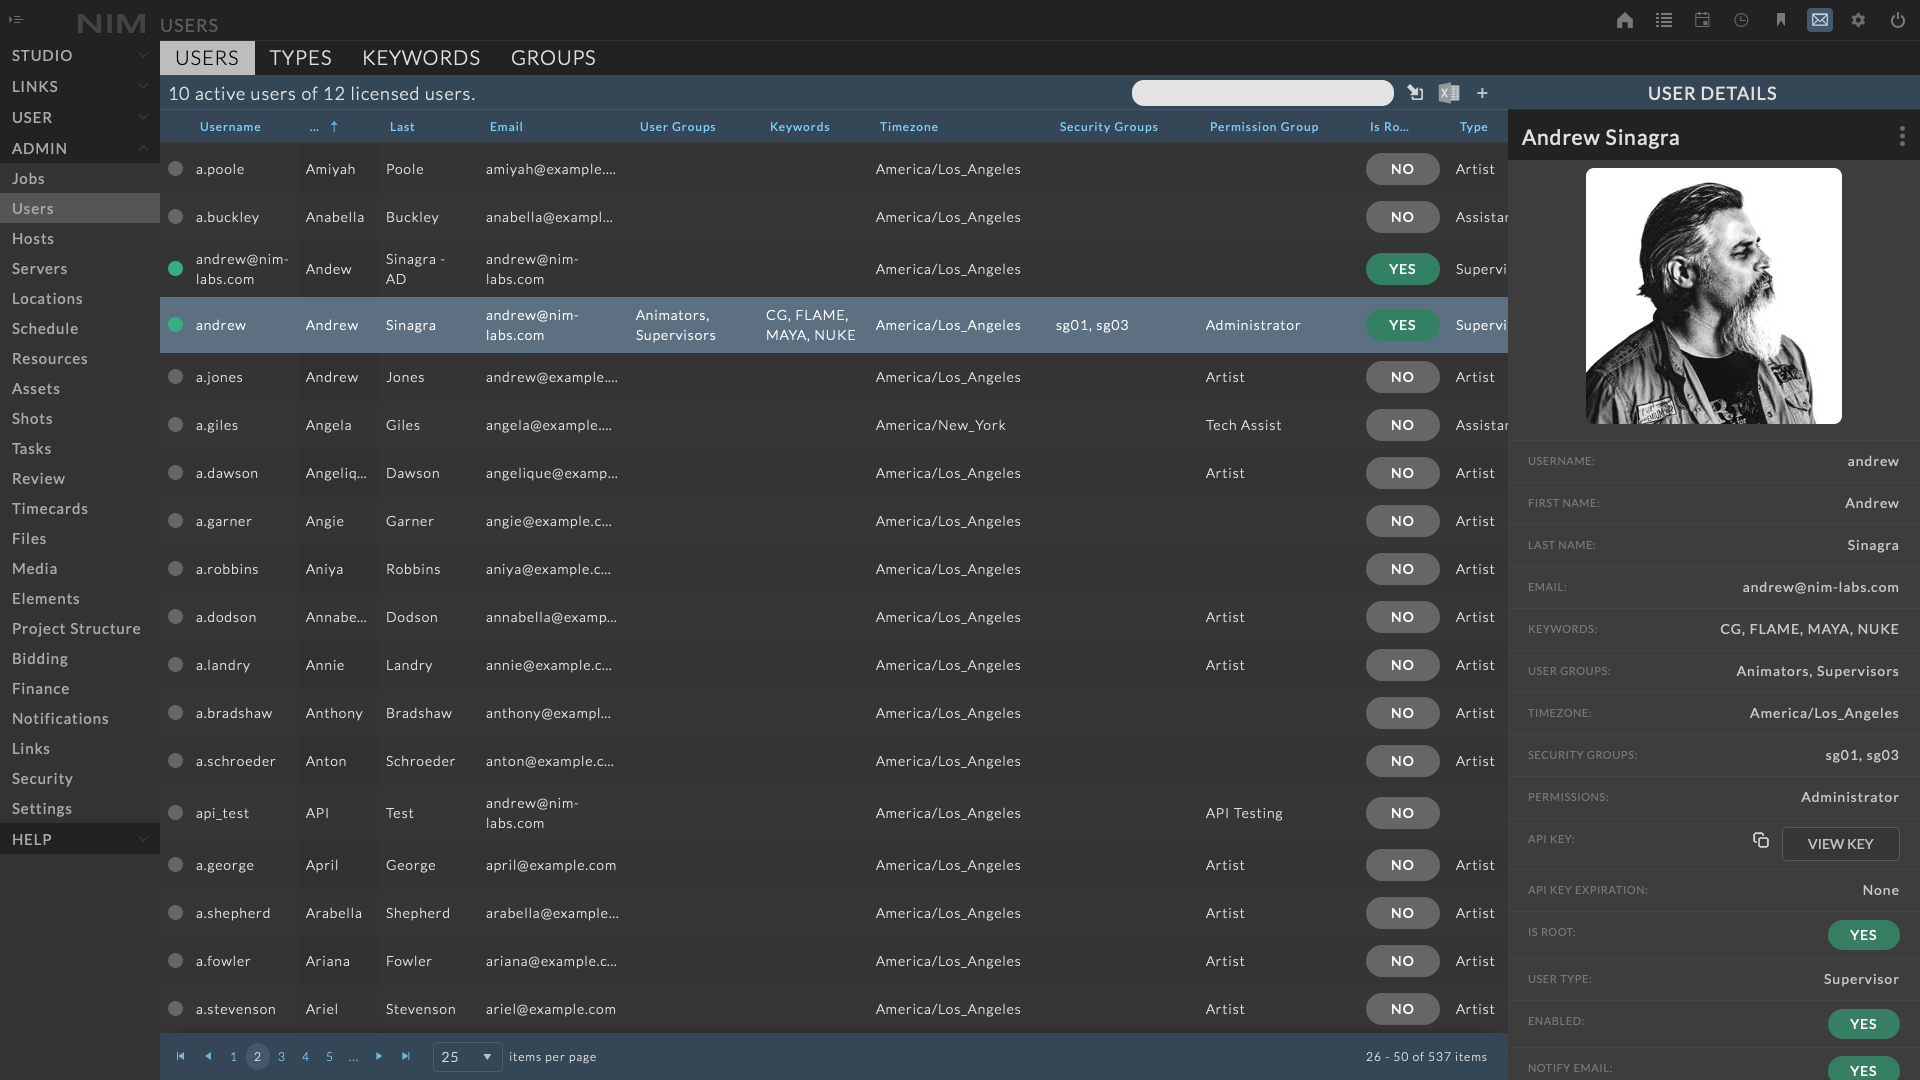
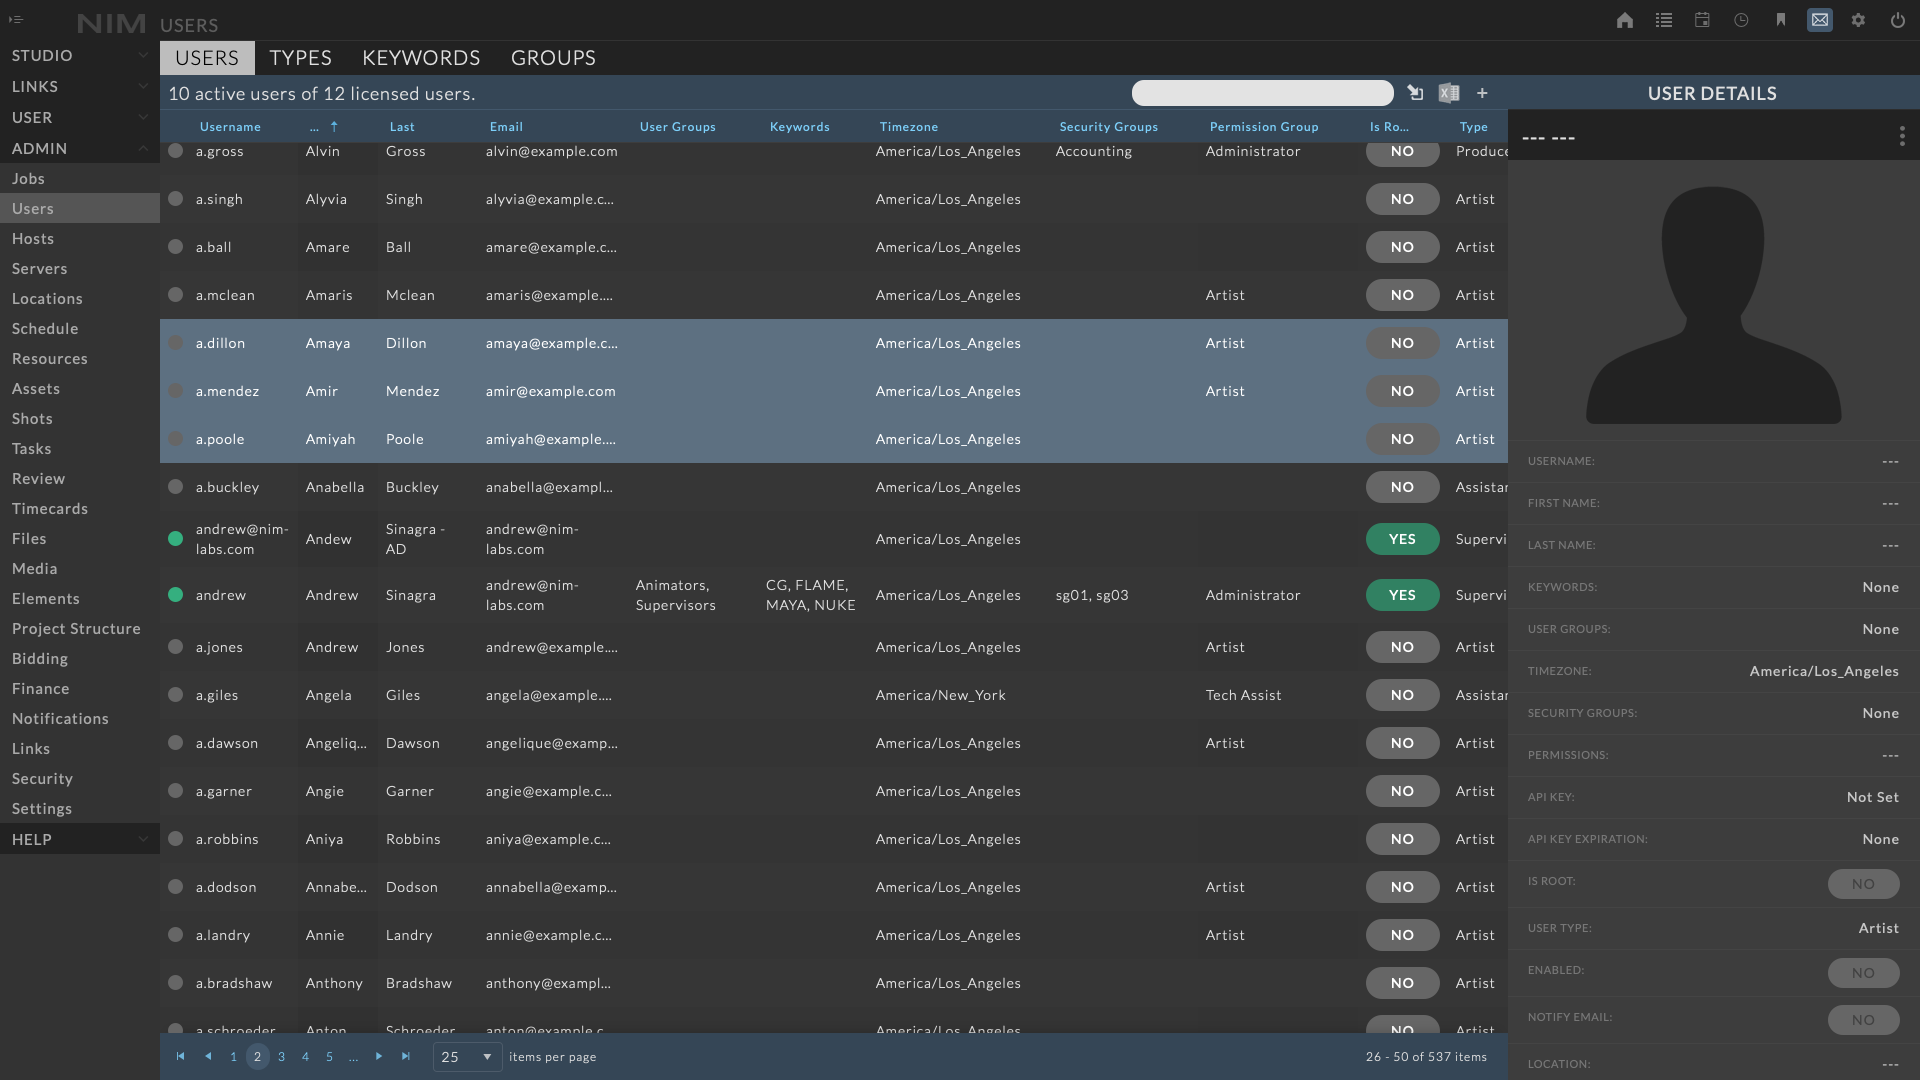
Users Grid
Administrators will manage and create all new user accounts from this window. This is also the location to enable or disable users for licensing and login access.
Working with Grids
Grids are a powerful tool for managing and working with large amounts of data. The grid UI offers various features to help you manage your data more effectively. For more details on working with grids, please refer to the Working with Grids section of the documentation..
Filters
The user list supports search and filter panel filtering.
Search

Using the search input, you can quickly search by username, first name, last name, and email.
To search for a user, type the search criteria into the search bubble at the right of the user list toolbar.
Filter Panel

The filter panel allows you to filter the job list by various criteria, enabling the ability to create complex filter structures and save and share them for future use.
To open the filter panel, click the Filter button at the right of the job list toolbar.
For more information on working with the filter panel, please refer to the Filter Panel section of the documentation.
Export to Excel
All user records can be exported to an Excel file using the  button.
Clicking the button will begin generation of the Excel file which will be automatically download to your browser.
All filtering will be maintained when exporting to Excel.
Creating a User
Clicking on the at the top right of the pane will create a new user. Enter all of the users pertinent information and click the “Save” button at the bottom of the info panel to save your changes.
- There are several fields that are required to create a new user including:
Username
First Name
Last Name
Email
To assign the user a new password click the RESET PASSWORD button. If the user has an email address entered as well as NOTIFY EMAIL set to yes, they will receive an email with a temporary password. If no email address is present, or NOTIFY EMAIL is set to no, a pop-up window will appear with the new temporary password.
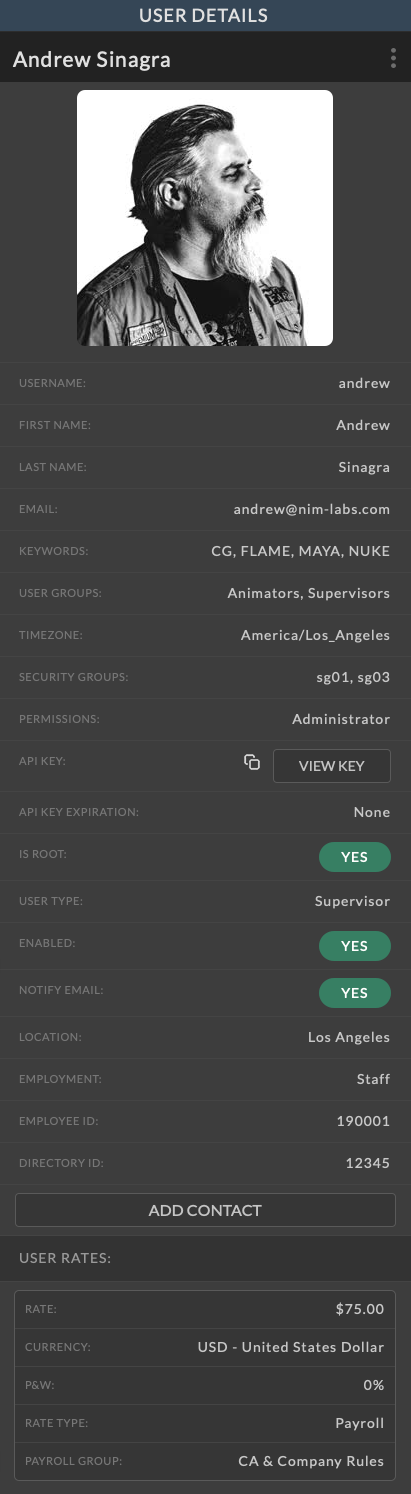
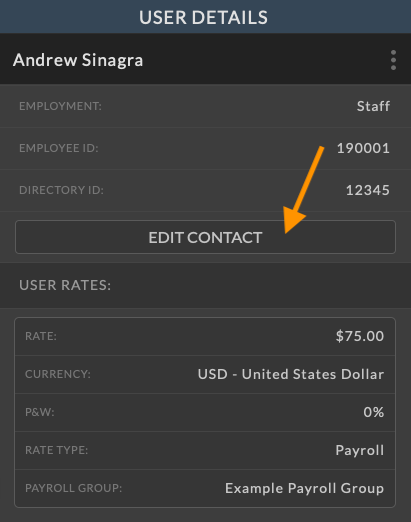
The image to the right shows a breakdown of the User Details panel. Here you can edit the user’s details, set their account type and permission group, as well as define default rates and assign payroll groups actualization.
Available Options:
Upload Image - Users can upload a user icon by clicking on this button and selecting an image. You can also drag and drop images directly from the desktop to this area. When dragging, the area that you can drop the image on is illuminated. The image file will be automatically converted to the proper size and format. Supported image types include .jpg, .png, .gif.
Username - This is the username that will be used for login information and recognized throughout NIM where the actual users name is not shown.
Password - If you are the owner of the account being edited you have the ability to type in your own password. Otherwise a new password will be generated automatically when the
RESET PASSWORDbutton is pressed. If the user has an email address entered as well asNOTIFY EMAILset to yes, they will receive an email with a temporary password. If no email address is present, orNOTIFY EMAILis set to no, a pop-up window will appear with the new temporary password.First & Last Name - These are required fields for all users
Email - The email address that is used for all NIM notifications
Keywords - These are studio defined keywords that can be used to tag a user. Any number of keywords can be assigned to a user. The master list of keywords is created in the Main Menu / Admin / Users / Keywords section.
User Groups - This is a list of the user groups this user is a member of. Click in the field to select a user group to add membership. Click the X at the right of the group name to remove membership. A user can be a member of multiple groups.
Timezone - This is the timezone for the user. By default this will be the studio defined timezone set in Admin/Settings.
Security Groups - Adding a security group to a user will provide access to all objects within NIM that are contained in the same group. Clicking in this field will display a list of available security groups. Select a group to add it to the field. Click the
Xat the right of the group to remove it from the field. Users can be a member of multiple groups.Permissions - This is a dropdown of available permission groups that can be assigned to the user. Permission groups are defined in the Main Menu / Admin / Permissions section.
API Key - If
Require API Keysis enabled in the Admin/Security Options, users attempting to use the NIM Connectors will be asked to enter an API key. These keys are generated on a per user basis and are used to authenticate the connector user with the NIM API. Anyone connecting with API Keys will be have their access limited to their respective security groups. Not using API keys will provide access to all information accessible through the API. It is highly recommended to restrict all access to HTTPS connections and disable HTTP. This can be done through the NIM VM scriptnim-ssl. For more information on how to use thenim-sslscript please refer to the Virtual Machine Shell Scripts section.API Key Expiration - This value sets the expiration date of the users API Key. If left blank there will be no expiration.
Is Root - This defines whether or not the user is a root user. Root users have permission to access all information and functionality within NIM. This setting overrides any Permission settings.
Note
Only root users can assign other root users. There must always be at least 1 root users.
User Type - This dropdown defines the account type of the user. This field is currently only used for grouping items and has no impact on permissions.
Note
This field will be removed in a future version of NIM in favor of User Groups.
Enabled - This determines the account status for the given user. An enabled account will have access to login and will be counted against the current licensed total. A disabled account will retain all information throughout NIM but will not be allowed to login and will not be counted against the current licensed total.
- Notify Email - Turning this on will enable email notification for the user. An email with pertinent information will be sent to the user’s email address when associated NIM notification events occur. Examples of these include:
a new note is added or modified on an asset or shot in which the user is assigned a task
a new note is added or modified on a task the user is assigned
a new note is added or modified on a review item owned by the user
Location - This is the default location assigned to the user. The list of location options is defined in Main Menu / Admin / Locations
Employment - Options here include Freelance or Staff. This information is related to how Job Actuals are filtered.
Employee ID - The user’s employee ID as determined by the studio. This can be used to reference the user’s payroll ID as it will appear on timecard reports.
Directory ID - The user’s Directory Services ID. This can be used to link users to Active Directory accounts.
User Notes
User notes can be used to leave general notes on a user. User notes are divided into groups via Topic and Conversations. Topics are a way to group notes within a conversation. Multiple topics can be created to group the conversations as needed.

To access user notes, click the NOTES button in the user info panel. This will slide over the user notes panel. The user notes panel will display all topics and conversations for the user. Clicking on a topic will display the conversations for that topic.
Add Note

To add a note, you first need to create a Topic for the note.
Click the in the Topics column on the left to create a new topic.
Enter a name for the new topic and click the checkmark to save it.
When a topic is selected, a appears on the right of the page, in the Conversation area. Clicking this button will create a new note in this topic. Text can be added and formatted in each note. Click the checkbox on the right to save the note. Click the Cancel button to return to the view mode without saving the note.

Edit Note
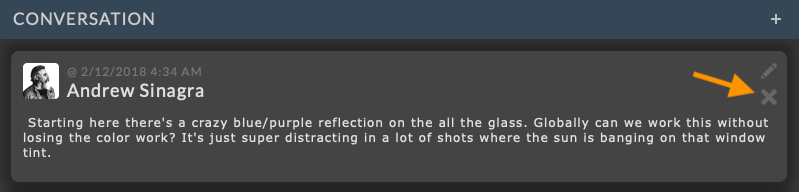
To edit a note, click the button at the top right of the note. Make the necessary changes and click the check mark to save. Click the Cancel button to return without saving changes.

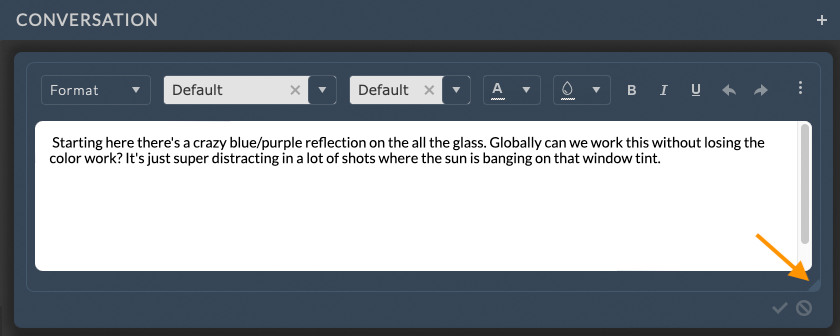
While editing a note, the text area can be expanded to fit the content you are entering.
To resize the text area, click and drag the resize handle at the lower right. Letting go of the resize handle will keep the text area at the new size.
Delete Note
Delete a conversation entry by clicking the  button next to the edit button at the top right of the note. You will be prompted to confirm deletion of the note.
User Jobs
The user’s job panel is a list of all jobs that the user is assigned to as a crew member.

To access user jobs, click the JOBS button in the user info panel. This will slide over the user jobs panel.
The jobs panel has the same functionality as the jobs list. You can add, edit, and delete jobs from this panel as well as export the list to Excel. Any saved job list filters will also be available in the user’s job list.
For more information on working with the job list, please refer to the Job List section of the documentation.
User Contacts
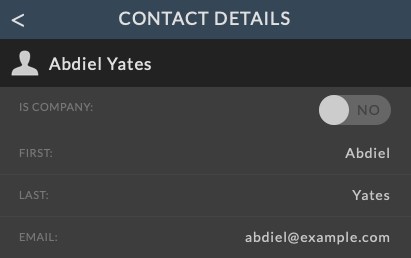
Contacts are independent of NIM users. A contact can be linked to a NIM user, but the contact is not a NIM user.
When a NIM user is linked to a contact entry, the first name, last name, and email address of the NIM user are fixed on the contact entry.
If the NIM user is updated, the contact entry will also be updated.
Add User Contact
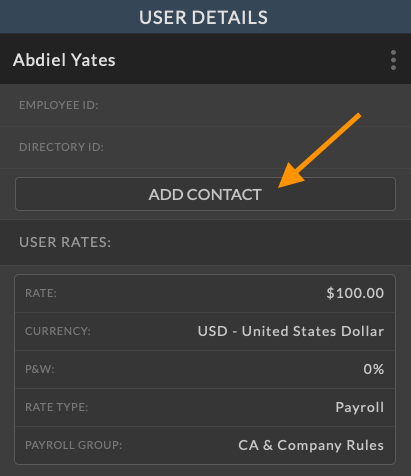
To create a new contact from an existing user, click the ADD CONTACT button from the user info panel.
This will slide over a new contact panel where you can enter the rest of the pertinent contact information.
The new contact details will be saved as a new contact entry and the contact will be linked to the user.
Edit User Contact
For users with existing linked contacts, the EDIT CONTACT button will appear.
Click the EDIT CONTACT button from the user info panel to slide over the contact panel for editing.
The contact information can then be edited and saved, updating the contact information.
The contact will remain linked to the user.
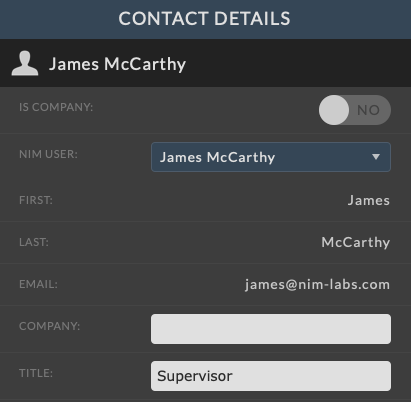
Link User Contact
To link a NIM user to an existing contact, select the NIM user from the NIM User dropdown in the contact info panel in Studio > Contacts. The first name, last name, and email address will be automatically populated. The contact will now be linked to the NIM user.
To unlink a NIM user from a contact, remove the NIM user from the contact. The contact will remain, but the NIM user will no longer be linked to the contact.
For more information on contacts, please refer to the Contacts Overview section.
User Rates
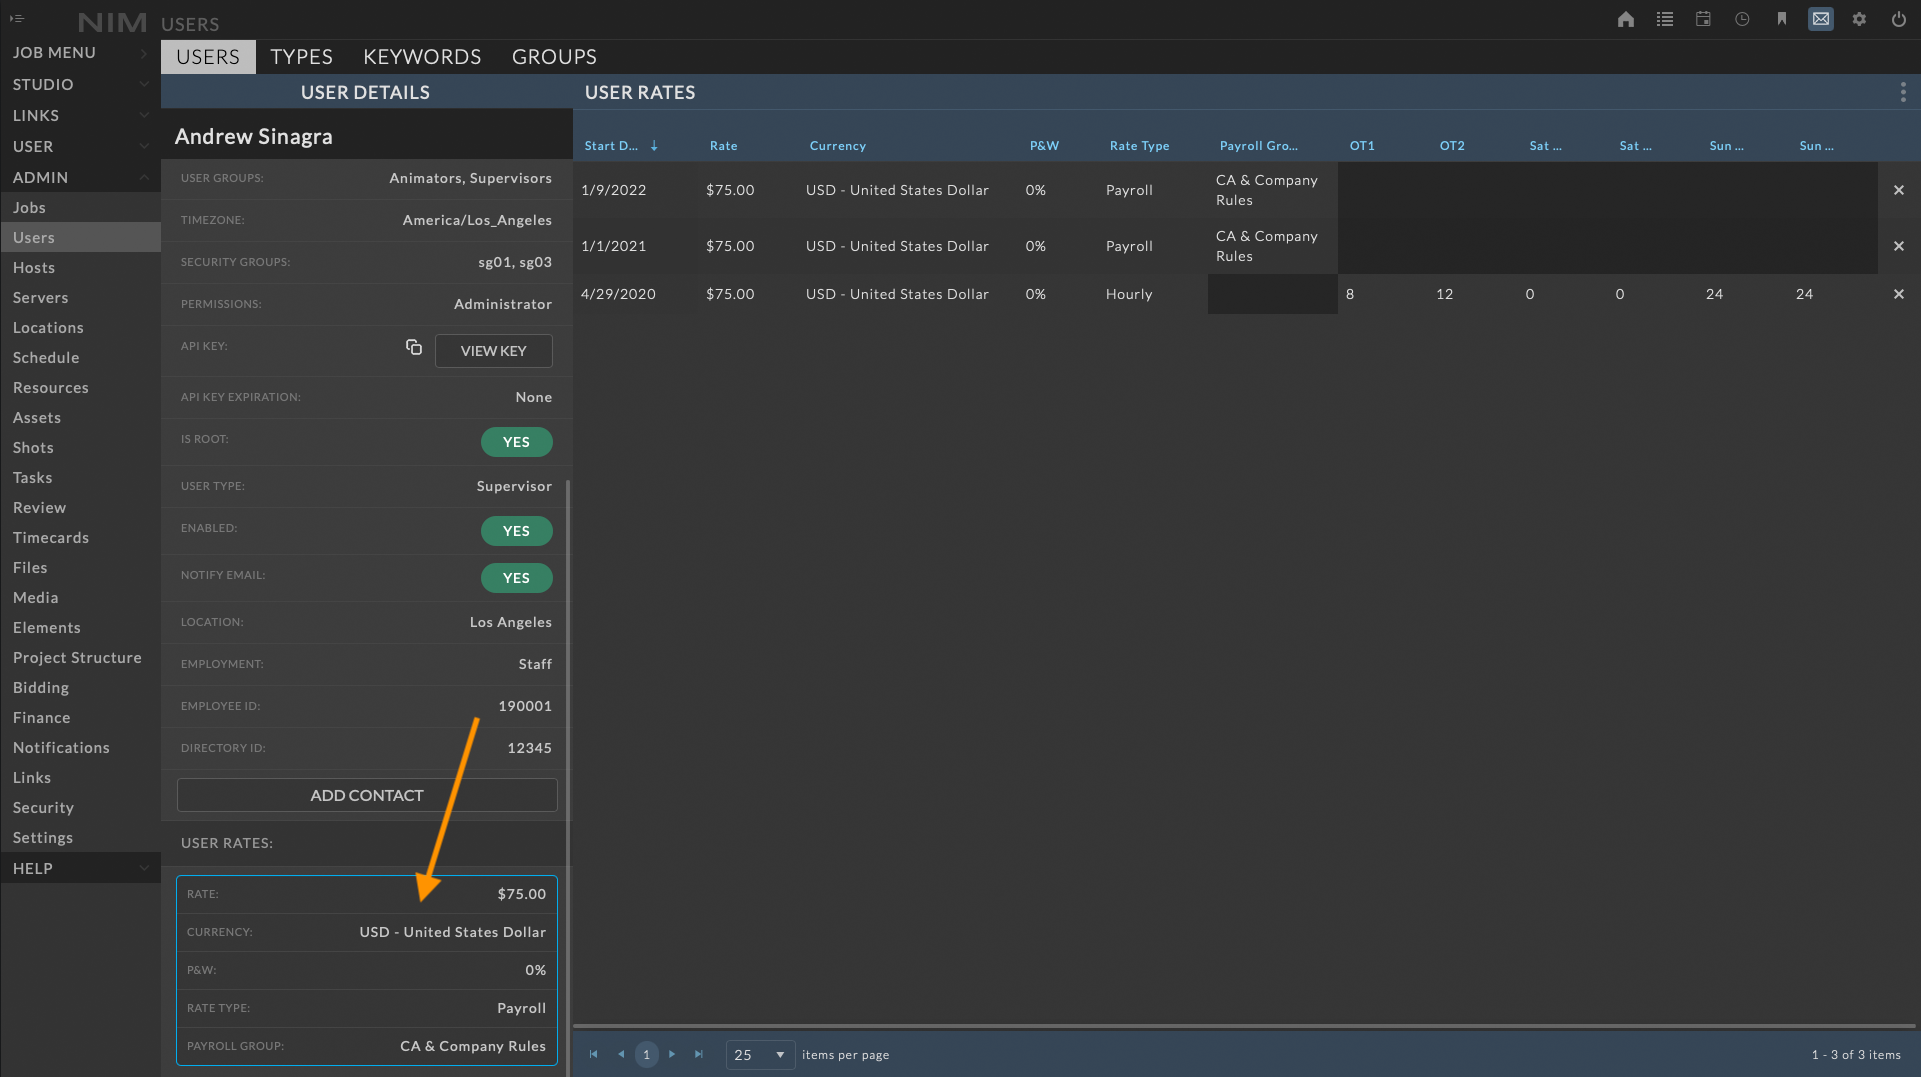
The User Rates table allows you to define and manage the rates used for project actualization for each user. Rates can be set as Hourly, Daily, Fixed, or Payroll and are tracked over time. When a new rate is added, it does not affect the actualization of timecards prior to the start date of the new rate. The user’s current rate is used as the default when they are added to a job crew, but this rate can be overridden on a per-job basis.
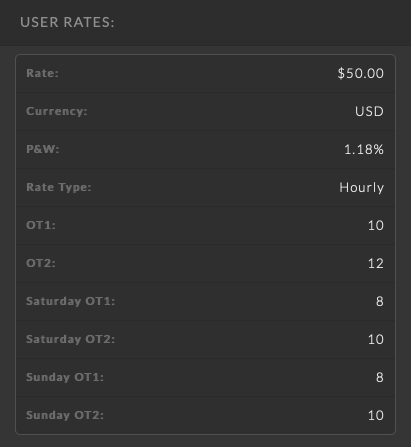
The information displayed in the User Rates table will vary depending on whether the user is using Hourly, Day, or Fixed rates vs using Payroll rules to calculate their cost.
If the latest User Rate entry is set to “Hourly,” “Daily,” or “Fixed”, the rate displayed will include the values for Overtime Rate 1 (OT1) and Overtime Rate 2 (OT2) which are triggered based on the hours entered in timecards.
Different hour-based trigger points can be set for weekdays and weekends.
Note
The labels for OT1 and OT2 can be customized in Admin > Finance > Options.
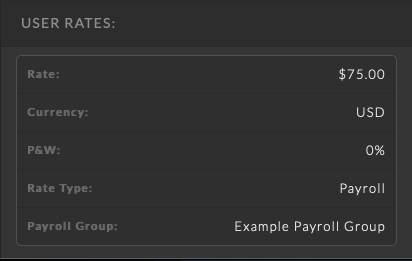
If the latest User Rate entry has the Rate Type set to “Payroll”, the rate displayed will include the Payroll Group that the user is assigned to. The Payroll Group will determine the rules used to calculate the user’s cost.
Each user has their own rate grid for tracking and managing rates over time.
Managing User Rates
To view or adjust a user’s rate:
Access the Rate Grid: Click on the User Rates area in the user info panel (highlighted in blue).
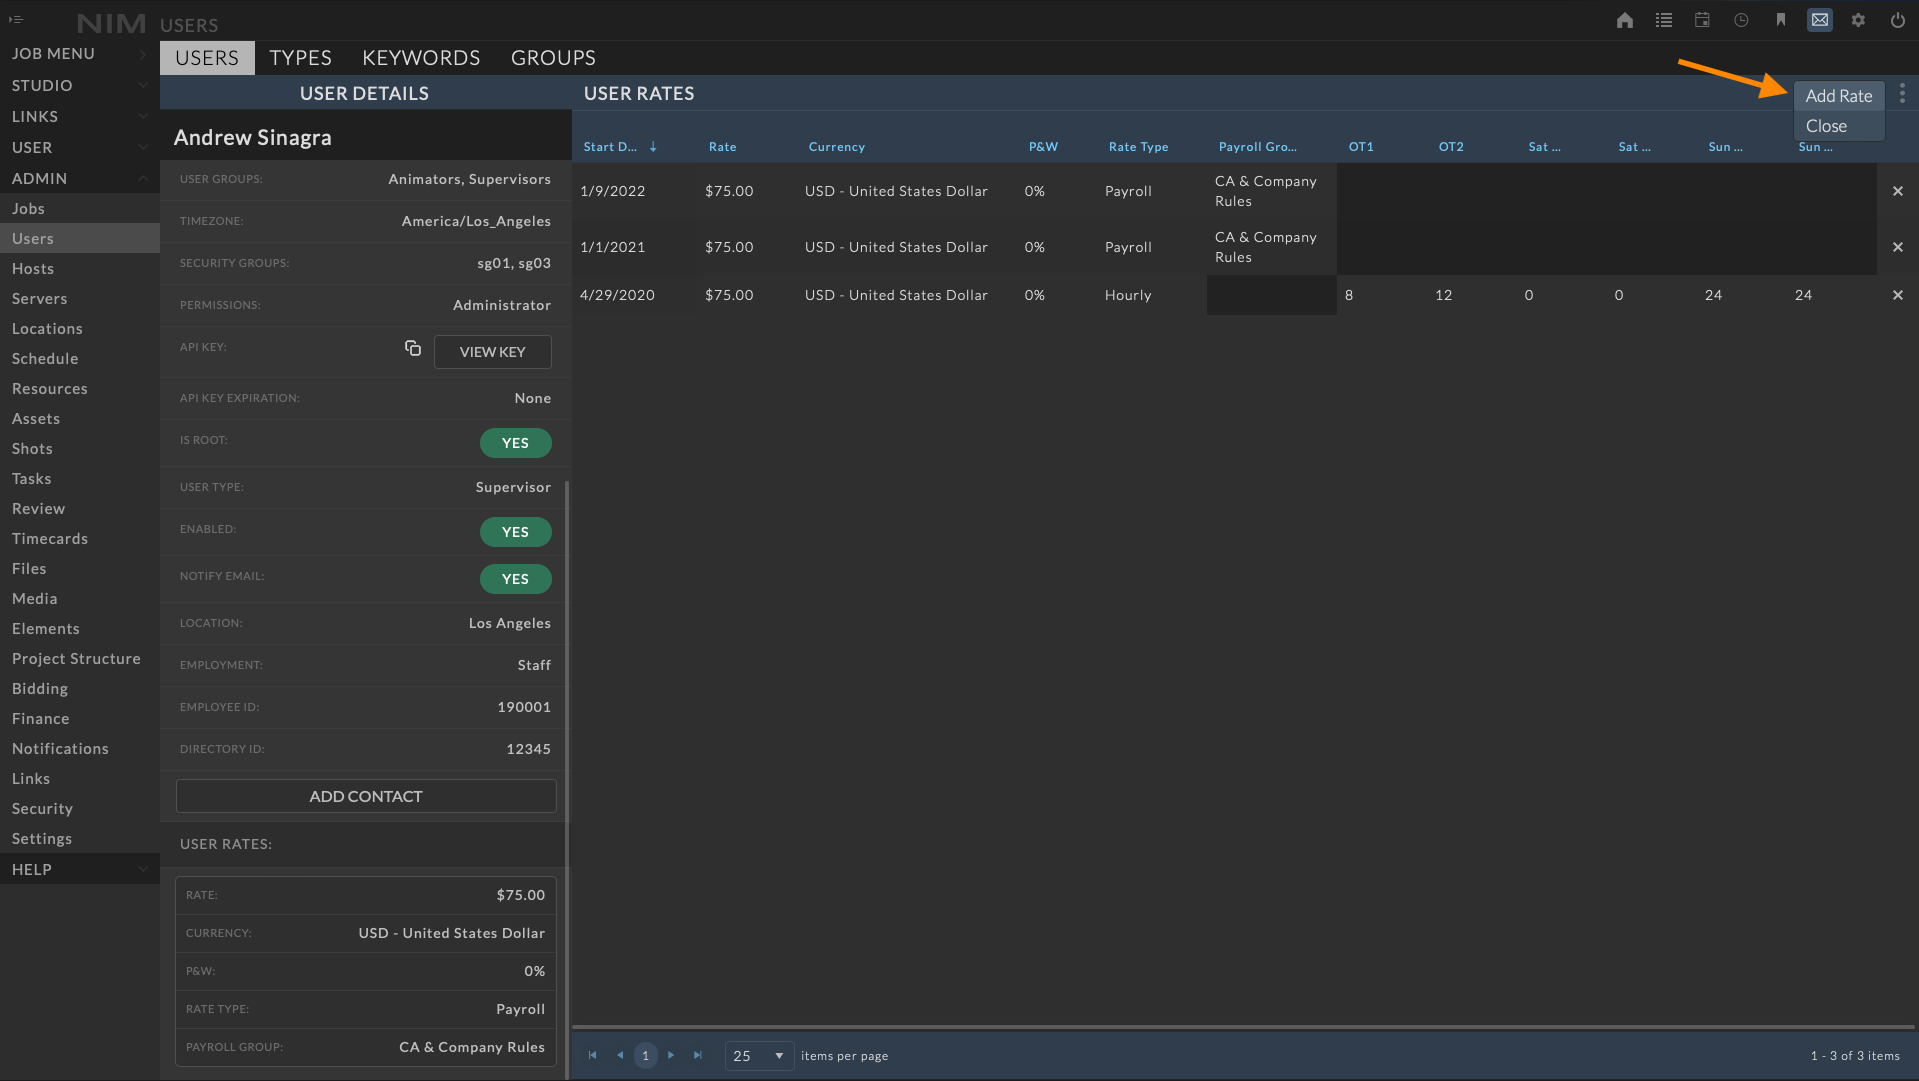
Add a New Rate: Click the ellipsis menu at the top right of the grid and select “Add Rate.” Set the start date and enter the necessary details.
Edit a Rate: Click on the field you wish to edit. Changes are saved automatically when you click out of the field.
Delete a Rate: Click the “X” at the right of the row. A confirmation dialog will appear before deletion.
Close the Rate Grid: Click the ellipsis menu at the top right and select “Close.”
Rate Types
There are four different rate types available:
Hourly Rate |
The rate is applied hourly, with OT1 and OT2 rates used when hours exceed the daily threshold. |
Day Rate |
The rate is applied as a full day cost, regardless of hours worked. OT1 and OT2 thresholds still apply in Timecard views. |
Fixed Rate |
A one-time fee applied regardless of hours worked. At least one timecard must be entered for the rate to be actualized. OT1 and OT2 thresholds still apply in Timecard views. |
Payroll |
Uses the user’s assigned Payroll Group and its rules to determine costs. For more information on Payroll Rules, see the Payroll section of the documentation. |
Rate Options
Available options within User Rates include:
Start Date |
The first date the rate will be used. It remains active until the next defined rate starts. Only one rate can be active per start date. |
Rate |
The amount the user will be paid or the overall cost to the business |
Currency |
The currency in which the user is paid. The rate is displayed in this currency and converted to the job or studio currency when viewing actuals. |
P&W |
Pension & Welfare - The percentage charged by a payroll company to process timecards and paychecks. This value can also represent a percentage of the user’s rate to account for additional overhead costs. The P&W amount can be overridden per job and is factored into Job Actuals. |
Rate Type |
The default rate type for the user. It can be overridden per job. If set to Hourly, Day, or Fixed, OT1 and OT2 triggers will be accessible. If set to Payroll, the Payroll Group will be accessible. |
Payroll Group |
The payroll rules assigned to the user, reflected in all actuals and payroll reconciliation. Available payroll groups are defined in Admin > Timecards > Payroll. |
OT Rate 1 |
The number of hours after which OT1 starts on weekdays. This value can be overridden per job. |
OT Rate 2 |
The number of hours after which OT2 (e.g., double-time) starts on weekdays. This value can be overridden per job. |
Sat OT Rate 1 |
The number of hours after which OT1 starts on Saturdays. This value can be overridden per job. |
Sat OT Rate 2 |
The number of hours after which OT2 starts on Saturdays. This value can be overridden per job. |
Sun OT Rate 1 |
The number of hours after which OT1 starts on Sundays. This value can be overridden per job. |
Sun OT Rate 2 |
The number of hours after which OT2 starts on Sundays. This value can be overridden per job. |
Note
Using a start date in the past will modify previous user actualizations unless the user’s crew rate is locked to the job.
By default, when a user is added to a job crew, their User Rate is used. In the job’s crew settings, you can lock the rate to the job, which locks the current rate and ignores any future User Rate changes.

When the rate is locked to the job, the crew’s “Active Rate” value will display “Job” and any changes made in the user’s rate will not affect the job’s actualization. The “Active Rate” column will display “User” when the rate is determined by the settings in the User Rates panel.
Note
When a user’s rate is locked to a job, a reset button will be displayed when editing the users rate. Clicking this button will reset the user’s rate to the rate set in the User Rates panel.
User Capacity

The User Capacity table allows you to define and manage the capacity value used in schedule planning when determining the user’s per day utilization.
The current capacity values are displayed in the user’s info panel. The capacity value can be set for each user and can be adjusted over time. User capacity is measured in hours per day.
For more information on viewing utilization and capacity in the schedule, please refer to the Schedule Utilization section of the documentation.

If the user’s capacity has no entries, the capacity value will be displayed as “Default” in the user’s info panel.
Note
The default user capacity value is set in the Admin > Users > Options section.
Managing User Capacity


To view or adjust a user’s capacity:
Access the Capacity Grid: Click on the User Capacity area in the user info panel (highlighted in blue).
Add a New Capacity: Click the ellipsis menu at the top right of the grid and select “Add Capacity.” Set the start date and enter the hours per day for the user’s max capacity.
Edit a Capacity: Click on the field you wish to edit. Changes are saved automatically when you click out of the field.
Delete a Capacity: Click the “X” at the right of the row. A confirmation dialog will appear before deletion.
Close the Capacity Grid: Click the ellipsis menu at the top right and select “Close.”
Multi-User Edit / Delete
To edit or delete multiple users simultaneously, click on the first user to be edited. Then Shift-click a second user to select all users in between, or Ctrl-click / Command-click to add non-consecutive users.
The User Details panel will appear from the right.
Click the ellipsis menu in the info panel and select “Edit” to edit the user information.
Fields with matching values will be displayed as normal.
Fields with dissimilar values will be denoted as
---
Only modified values will be saved, and all modified values will be saved for all selected users.
User Import & Merge
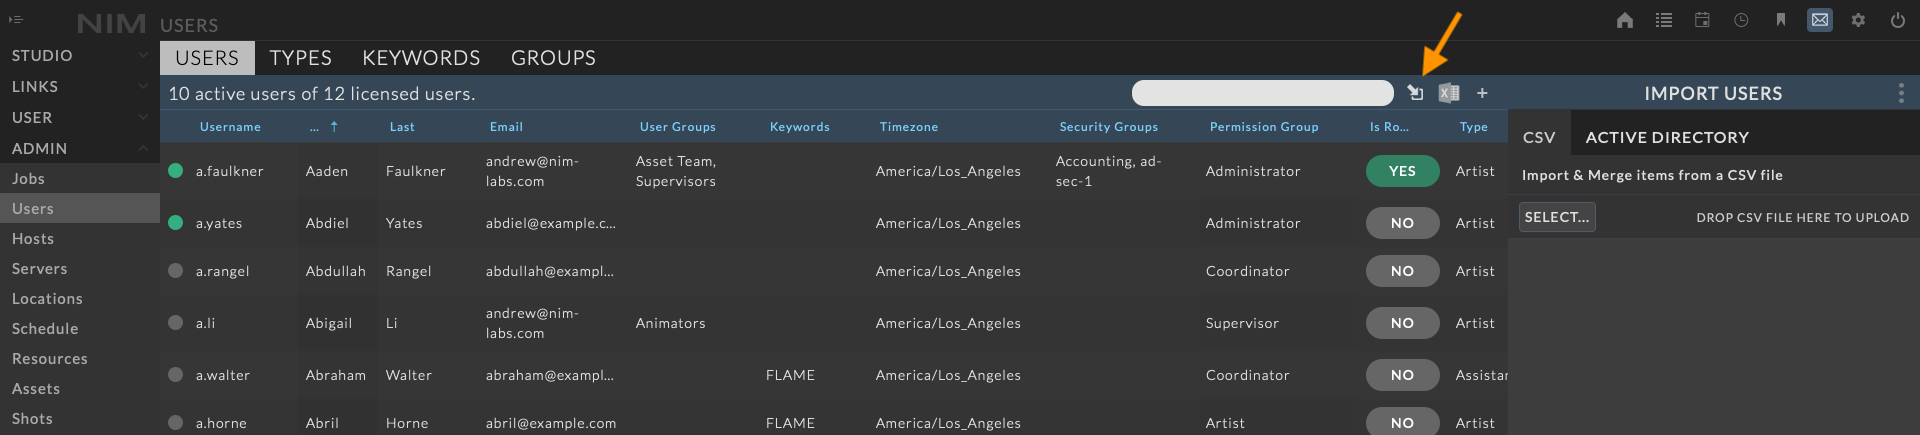
User data can be imported and/or merged with existing users from a CSV file.
Click the import button  to load the Import & Merge panel.
To upload a CSV file, click the SELECT… button to choose a file, or simply drag and drop a CSV file over the button.
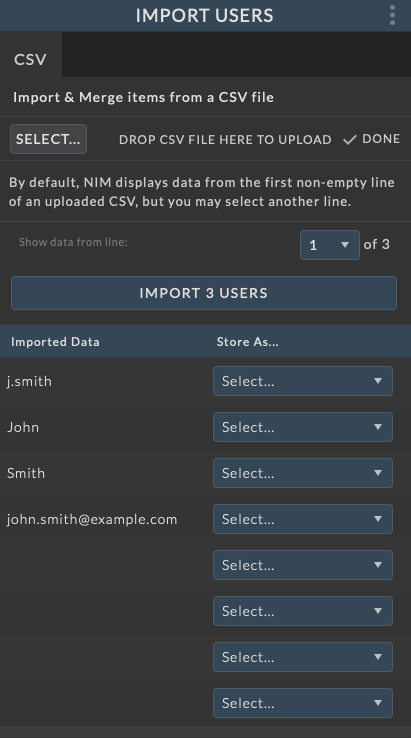
Once the CSV file is uploaded you will see the list of found fields displayed in the Import List. By default, NIM displays data from the first non-empty line of an uploaded CSV, but you may select another line using the Show data from line dropdown.
If your CSV file contains a header row, turn on the Skip header row switch to skip importing the first row of your file.
The left side of the Import List displays the Imported Data found in the CSV.
The right side of the Import List is a series of dropdown menus representing the NIM fields available for users. Use these dropdowns to select the NIM user information to associate with a row of data.
Once all of the desired rows have associated NIM fields, click the Import xx Users button where xx is the number of users that will be imported or merged.
The import result will be displayed in the area at the bottom of the panel.
Note
NIM will attempt to match usernames when importing data and update matching users with the new information.
If data exists in NIM for a field to be imported, then the field will be overwritten using the new information.
If a row in the Import List is not matched with a NIM field then that row will not be imported.
When matching rows to fields with preset values (security groups, keywords, permission groups, etc), if a matching value is not found the field will not be set.
When importing timezones, the timezone must be entered as a valid timezone string. For example, “America/Los_Angeles” or “America/New_York”. A list of valid timezone strings can be found here: https://www.php.net/manual/en/timezones.php
User Type
User types can be defined for refinement in searches, organization, and reporting.

To add a new user type, click the button at the top right of the Types window. The user type details will appear and you can enter a custom name and description. When done click the “Save” button at the bottom of the info panel to save your changes.
To edit a user type, click on a row from the grid to load the user type info panel. Click on the ellipsis menu in the user type info panel and choose “Edit”. Make the necessary changes and click the “Save” button at the bottom of the info panel to save your changes.
Delete a user type entry by selecting the user type from the grid, clicking the ellipsis menu in the user type panel, and selecting “Delete”. You will be prompted to confirm deletion of the user type. Deleting a user type will remove that user type from any previously assigned users.
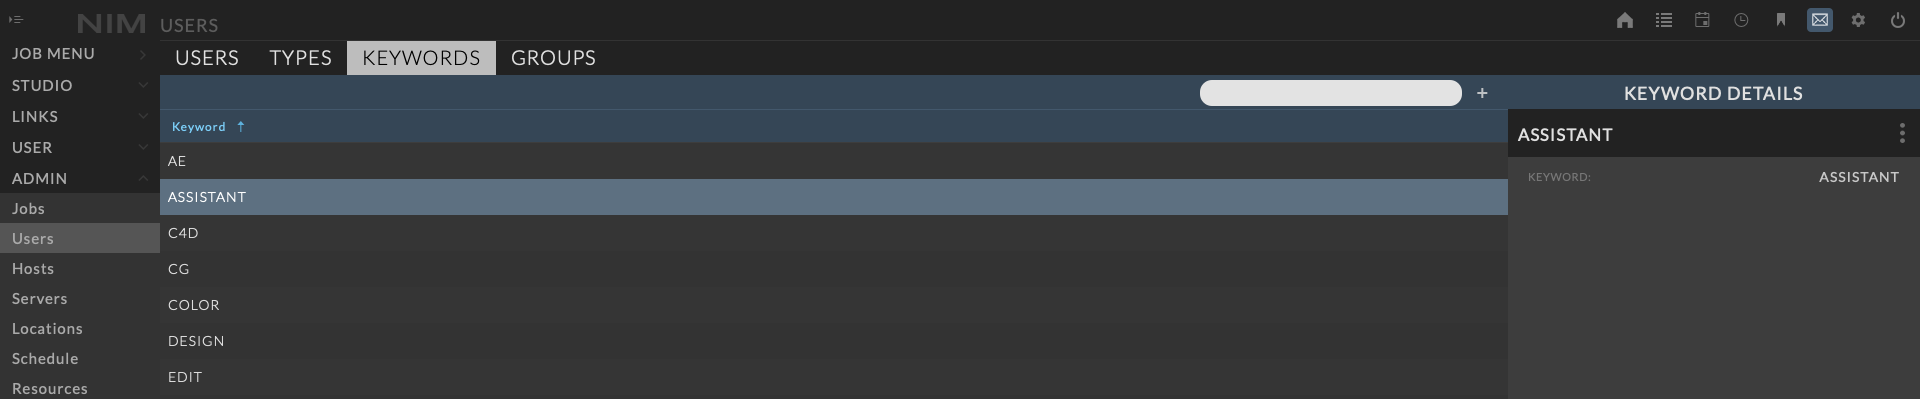
User Keywords
User keywords allow a studio to tag users with an unlimited number of keywords for refinement in searches and organization. In this example some keywords we are using are ae, c4d, cg, design, flame, maya to denote different aspects of production that a user would be appropriate for.
To add new keywords click the button at the top right of the keywords window. The keyword details will appear and you can enter a keyword name. When done click the “Save” button at the bottom of the info panel to save your changes.
To edit a keywords, click on a row from the grid to load the keywords info panel. Click on the ellipsis menu in the keywords info panel and choose “Edit”. Make the necessary changes and click the “Save” button at the bottom of the info panel to save your changes.
Delete a keywords entry by selecting the keywords from the grid, clicking the ellipsis menu in the keywords panel, and selecting “Delete”. You will be prompted to confirm deletion of the keywords. Deleting a keyword will remove that keyword from any previously assigned users.
User Groups
User groups can be defined to manage a set of users across multiple items. This includes being able to add all users of a user group to the crew of a job at once.

To add a new user group, click the button at the top right of the Groups window. The user group details will appear and you can enter a custom name and description. When done click the “Save” button at the bottom of the info panel to save your changes.
To edit a user group, click on a row from the grid to load the user group info panel. Click on the ellipsis menu in the user group info panel and choose “Edit”. Make the necessary changes and click the “Save” button at the bottom of the info panel to save your changes.
Delete a user group entry by selecting the user group from the grid, clicking the ellipsis menu in the user group panel, and selecting “Delete”. You will be prompted to confirm deletion of the user group. Deleting a user group will remove that user group from any previously assigned users.
User Options
User options define the default values for user settings. These settings will be used when creating new users or when no value is set for a user.
Default User Capacity
Default User Capacity is measured in hours per day and each day can have a different capacity value. The default capacity value is used when creating new capacity entries or when no value is set for a user.

To set the default user capacity, click the button at the top right of the panel.
Enter the default capacity value and click the “Save” button at the bottom of the panel to save your changes.
Contacts
Contacts contain the details of people or companies that you interact with in your business.
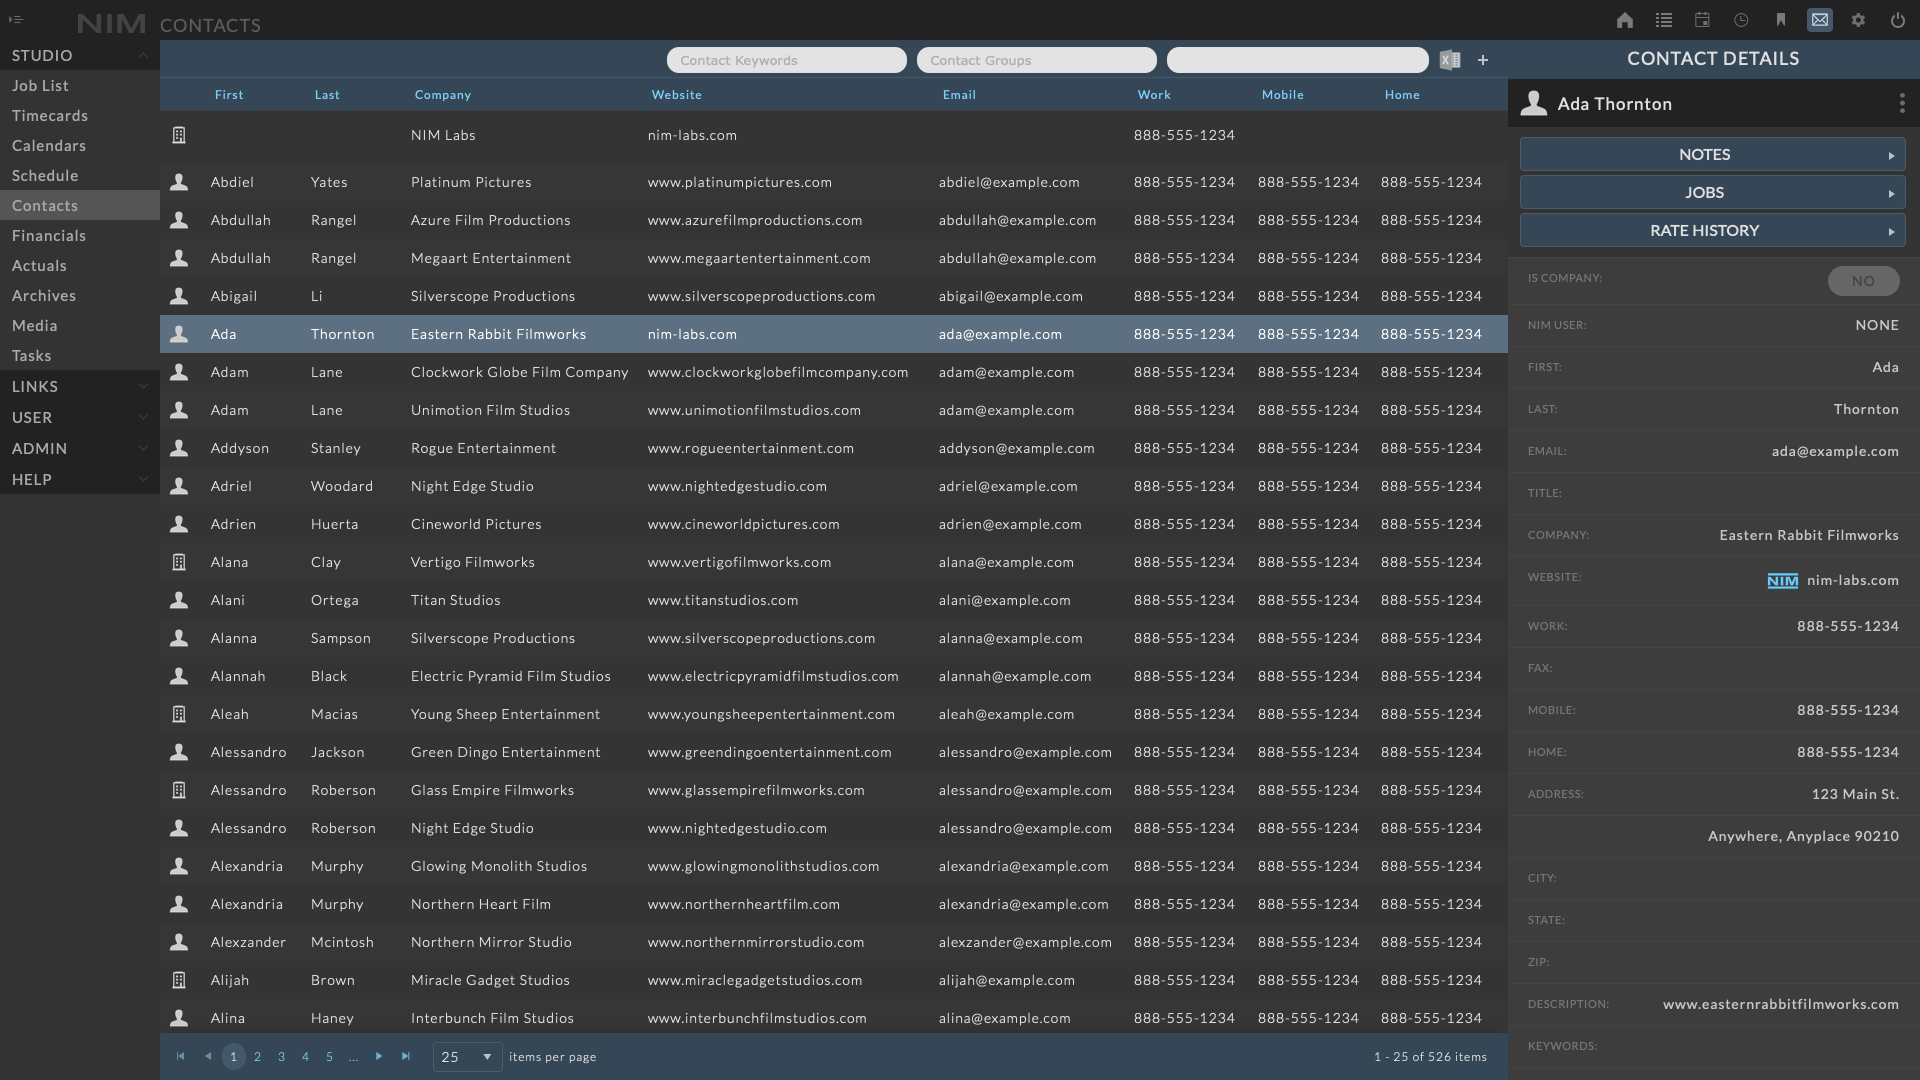
Each contact has the ability to:
Link to other contacts
Link to NIM users
Be associated with jobs and bids
Track per contact notes
Track history of rates charged to the contact on bids
Contacts can be categorized using Contact Keywords, grouped via Contact Groups, and extended by creating contact Custom Fields.
The Contacts Administrative window has 3 tabs including:
Keywords
Groups
Custom
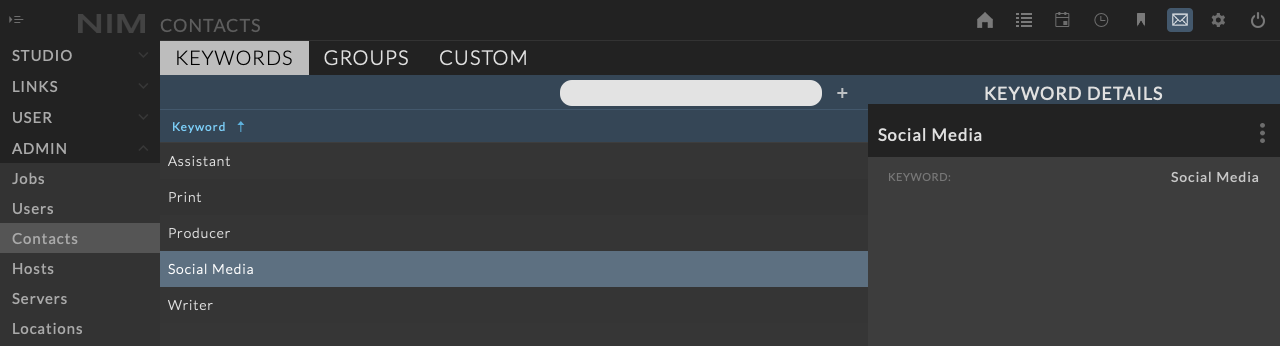
Contact Keywords
Contact keywords allow users to tag contacts with keywords for refinement in searches and organization. In this example, some keywords we are using are Social Media, Print, and Writer to denote different aspects of business that a contact would be appropriate for.
To add new keywords click the button at the top right of the keywords window. The keyword details will appear and you can enter a keyword name. When done click the “Save” button at the bottom of the info panel to save your changes.
To edit a keywords, click on a row from the grid to load the keywords info panel. Click on the ellipsis menu in the keywords info panel and choose “Edit”. Make the necessary changes and click the “Save” button at the bottom of the info panel to save your changes.
Delete a keywords entry by selecting the keywords from the grid, clicking the ellipsis menu in the keywords panel, and selecting “Delete”. You will be prompted to confirm deletion of the keywords. Deleting a keyword will remove that keyword from any previously assigned contacts.
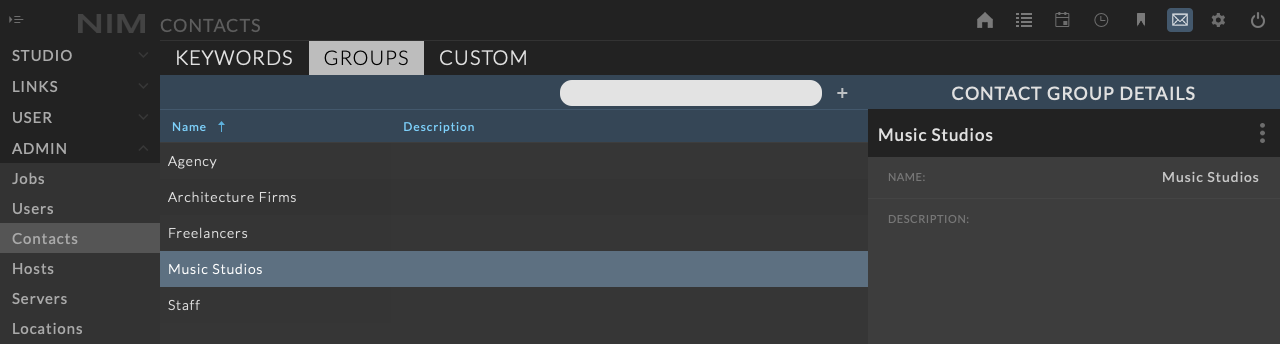
Contact Groups
Contact groups can be defined to manage a set of contacts. In this example, some groups we are using are Agency, Architecture Firms, and Music Studio to categorize the type of business that a contact engages in.
To add a new contact group, click the button at the top right of the Groups window. The contact group details will appear and you can enter a custom name and description. When done click the “Save” button at the bottom of the info panel to save your changes.
To edit a contact group, click on a row from the grid to load the contact group info panel. Click on the ellipsis menu in the contact group info panel and choose “Edit”. Make the necessary changes and click the “Save” button at the bottom of the info panel to save your changes.
Delete a contact group entry by selecting the contact group from the grid, clicking the ellipsis menu in the contact group panel, and selecting “Delete”. You will be prompted to confirm deletion of the contact group. Deleting a contact group will remove that contact group from any previously assigned contacts.
Custom Fields
Contact custom fields work identically to Job custom fields. The main difference is that these fields appear on contacts.
Refer to Custom Job Fields for how to create and edit custom fields.
Hosts
The hosts grid contains the name of items such as servers that can be the sources of archives. The names of the host can be anything that has meaning within your studio. These names populate dropdown menus in Studio / Archives when adding jobs to an archive.
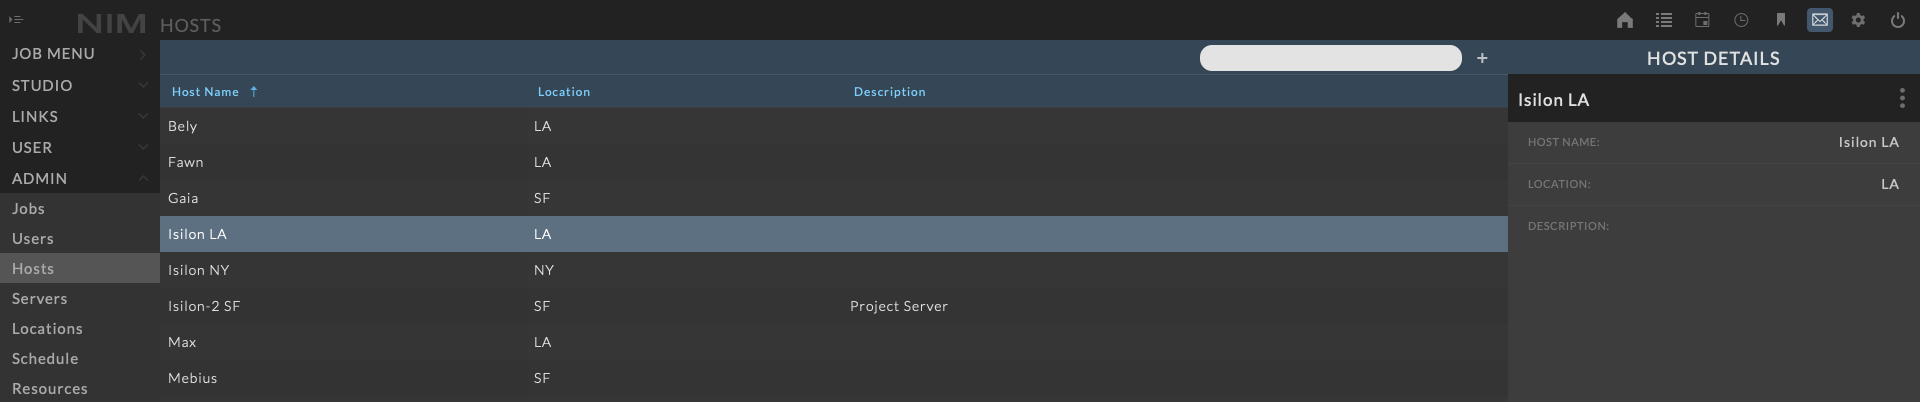
To add new host, click the button at the top right of the host window. The host details will appear and the required information can be entered as needed. When done click the “Save” button at the bottom of the info panel to save your changes.
Host Name - The name assigned to an archive hosts.
Location - The location of the host.
Description - A brief description of the host.
To edit a host, click on a row from the grid to load the host info panel. Click on the ellipsis menu in the host info panel and choose “Edit”. Make the necessary changes and click the “Save” button at the bottom of the info panel to save your changes.
Delete a host entry by selecting the host from the grid, clicking the ellipsis menu in the host panel, and selecting “Delete”. You will be prompted to confirm deletion of the host. Deleting a host will remove that host from any previously assigned host.
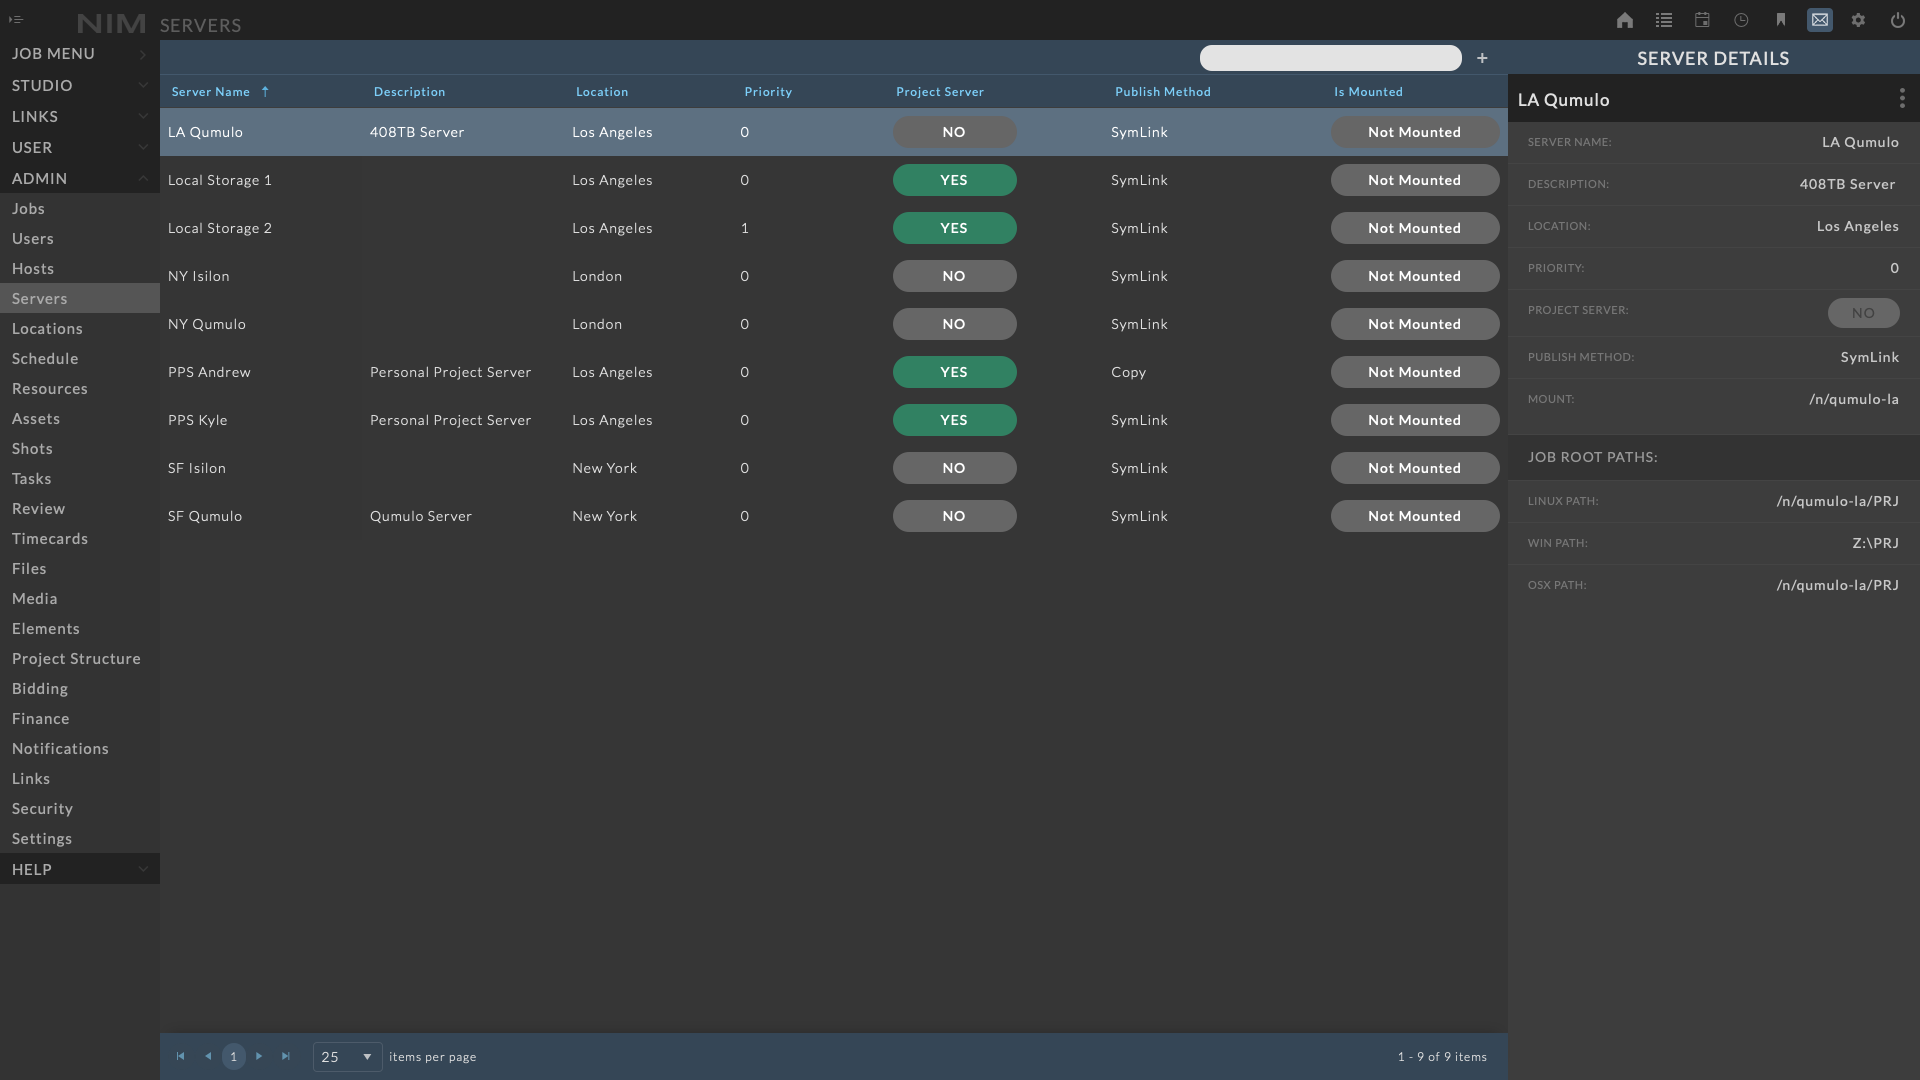
Servers
Servers are the list of file servers available to use for project structures. Here you enter in data related to the VM’s mount point and source share on the file server. Information regarding OS based path resolution for client network accessibility is also included here. The current status of the mount is displayed in the grid of servers, color coded green to indicate that the server is actively mounted on the NIM server, and color coded red to indicate that the server is not mounted.
Adding a Server
To add new server, click the button at the top right of the server window. The server details will appear and the required information can be entered as needed. When done click the “Save” button at the bottom of the info panel to save your changes.
To edit a server, click on a row from the grid to load the server info panel. Click on the ellipsis menu in the server info panel and choose “Edit”. Make the necessary changes and click the “Save” button at the bottom of the info panel to save your changes.
Delete a server entry by selecting the server from the grid, clicking the ellipsis menu in the server panel, and selecting “Delete”. You will be prompted to confirm deletion of the server. Deleting a server will remove that server from any previously assigned server.
Available fields for the server definition include:
Server Name - Name of the server. This does not have to be the server’s physical name.
Description - Description of the server and any relative information.
Location - The location of the server based on the current list of locations available as defined in the locations list.
Priority - A priority number used for sorting the order of servers. Higher numbers denote higher priority.
Project Server - This flag enables or disables a server to be used as a project server. If enabled, this server will appear as an option when bringing a job online and in 3rd party connector menus when saving new files. If disabled, the servers information will remain in the database but will be removed from relevant selection options.
Publish Method - Determines the method used by NIM to create version-less files when publishing. Options include:
SymLink (Default) - Use for Linux based file servers
Copy - Use for Windows based file servers
Mount -
REQUIREDLocal mount point of the shared file system.Warning
NIM uses this path to resolve the validity of the server location.
Job Root Paths
These paths are used to resolve the root location for NIM to create project structures.
Linux Path -
REQUIREDFull path on linux client systems to access the shared file system.This path must be the same across all client computers of the same OS type.
Warning
NIM uses the linux path to resolve its own access to the project server. If this field is not entered NIM will not be able to create project structures when bringing a job online.
Win Path - Full path on windows client systems to access the shared file system.
This path must be the same across all client computers of the same OS type.
OSX Path - Full path on OSX client systems to access the shared file system.
This path must be the same across all client computers of the same OS type.
Locations
The location grid allows studios to define multiple locations to be assigned to various items throughout NIM. In addition, locations are used to organize and filter finances and actuals. These locations do not need to be discreet physical locations but any division of labor that is appropriate, i.e. studio departments.
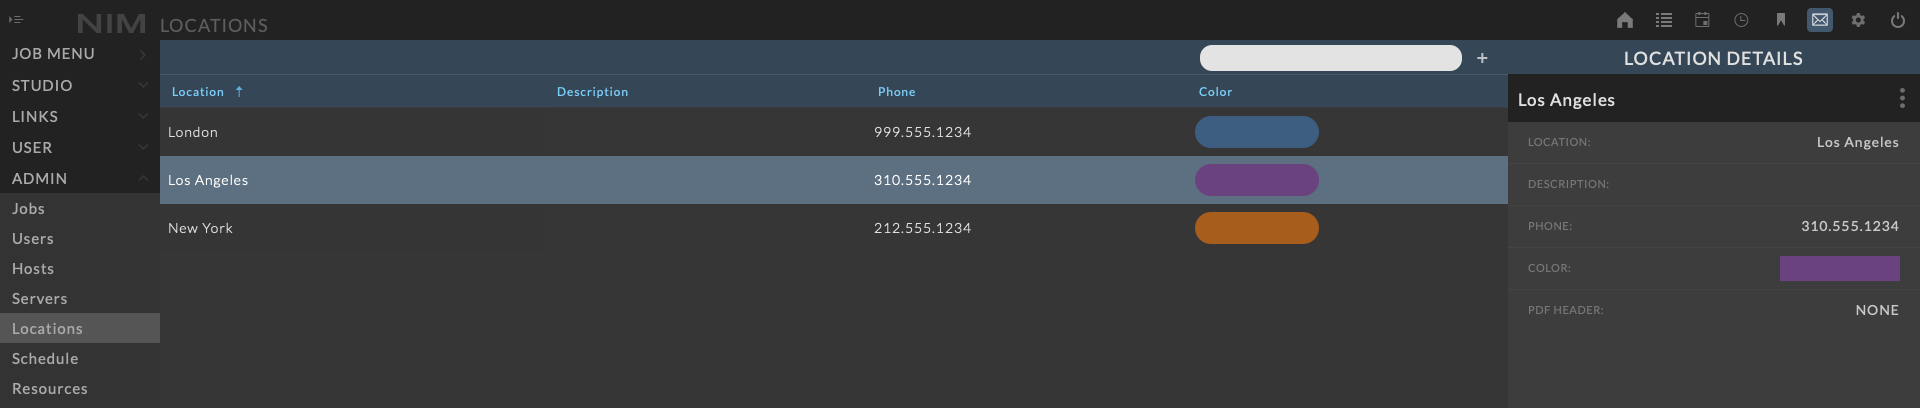
To add a new location, click the button at the top right of the locations window. The location details will appear and the required information can be entered as needed. When done click the “Save” button at the bottom of the info panel to save your changes.
Location - A unique name for the location.
Description - A brief description of the location.
Phone - The phone number associated with this location.
Color - The color assigned to this location when used in calendars and schedules.
PDF Header - The default PDF header image to use for jobs assigned to this location. The list of available options is determined by the PDF Headers uploaded to the Admin > Settings - PDF Headers section of NIM.
To edit a location, click on a row from the grid to load the location info panel. Click on the ellipsis menu in the location info panel and choose “Edit”. Make the necessary changes and click the “Save” button at the bottom of the info panel to save your changes.
Delete a location entry by selecting the location from the grid, clicking the ellipsis menu in the location panel, and selecting “Delete”. You will be prompted to confirm deletion of the location. Deleting a location will remove that location from any previously assigned location.
Schedule
The schedule options allows studios to define custom statuses to be assigned to events in the scheduler, define conflict rules, and set default options for the scheduler.

Event Statuses
The schedule status grid lists the statuses that can be assigned to events in the scheduler. These statuses indicate the current state of an event, such as “In Progress,” “On Hold,” or “Completed.”
Create a New Status
To create a new status for events on the schedule, click the button at the top right of the schedule status window. The status details panel will appear, where you can enter the required information. When finished, click the Save button at the bottom of the panel to save your changes.

Options include:
Status: A title for the status.
Priority: Defines the sorting priority in lists.
BG Color: The background color assigned to events with this status when used in schedules.
Lower Capacity: Setting this value to Yes will reduce the capacity of the schedule item by the event’s utilization value when the status is applied. The default value is No.
This allows you to adjust the user or resource capacity based on their availability or workload, ensuring that utilization values are calculated accurately.
“Lower Capacity” Example:
If a user is on vacation or a resource is undergoing maintenance, you can set their status to “Out of Office” or “Maintenance” and set the “Lower Capacity” value for that status to YES. This will reduce their overall capacity for the day, ensuring that the utilization values are calculated correctly.
Edit a Status
To edit a schedule status, select a row from the grid to load the schedule status info panel.
Click the ellipsis menu in the info panel and choose Edit.
Make the necessary changes, then click the Save button at the bottom of the panel to apply your changes.
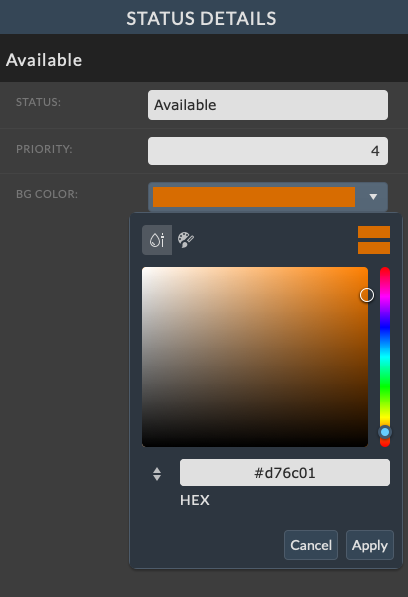
To select a new color, click the color dropdown and choose a color from the palette.
Use the slider below the palette to adjust the hue.
After selecting the desired color, click the Apply button to set it.
Alternatively, if you know the exact hex value of the color, you can manually enter it after the #.
Delete a Status
To delete a schedule status, select the status from the grid, click the ellipsis menu in the info panel, and choose Delete. You will be prompted to confirm the deletion. Deleting a status will remove it from any events where it was previously assigned.
Conflict Rules
Scheduling conflicts occur when events overlap and violate a conflict rule. Users can create custom rules to identify potential scheduling issues and receive warnings when conflicts arise.

Conflict Rule Overview

Conflict rules are customizable conditions that trigger a conflict when met. These rules help identify potential scheduling issues by providing warnings when conflicts are detected.
Create a New Conflict Rule
To create a new conflict rule, click the button at the top right of the conflict rules window.
This will open the conflict rule details panel, where you can enter the necessary information.
Once you’ve configured the rule, click the Save button at the bottom of the panel to apply your changes.
Options include:
Name |
|
Description |
|
Type |
|
Apply Rule To |
|
Rule Details |
|
Note
Conflict rules are applied individually to users and resources, so if any one user or resource meets the conditions defined by the conflict rule, a conflict will be triggered.
For more information on detecting and managing conflicts, refer to the Schedule Conflicts section of the documentation.
Schedule Options
The options set here define how the schedule business hours are defined, the time interval displayed, as well as the default values for resource and user utilization.
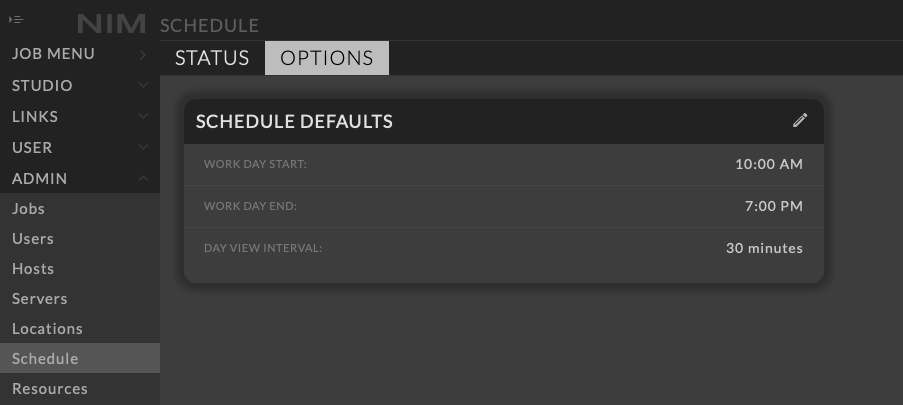
Click the edit button in the Schedule Defaults panel to edit the default values. Click the check mark to save your changes. Click the cancel button to return without saving changes.
Schedule Defaults
Work Day Start - Defines the start hour when the
Show Business Hoursbutton is enabled in the Day view.Work Day End - Defines the end hour when the
Show Business Hoursbutton is enabled in the Day view.Day View Interval - Defines the segments a day is broken down into when displayed in the Day view. Additionally this value determines the default increments in the Event editor time selectors when choosing Start and End times.
Resource Utilization
Resource utilization values determine the utilization amount for any resource assigned to an event. The resource utilization is set in units and calculated against the resource’s capacity for the day.
Resource Utilization Type - The default utilization type used to display the utilization of resources on events. Options include:
Units per Day - Calculates the utilization value as the number units allocated per resource per day. This is the default value.
Percentage - Calculates the utilization value as a percentage of the resource’s total capacity per day.
Resource Utilization Value - The default event utilization value for resources. All new events will be created with this value as the default utilization value for resources.
User Utilization
User utilization values determine the utilization amount for any user assigned to an event. The user utilization is set in hours and calculated against the user’s capacity for the day.
User Utilization Type - The default utilization type used to display the utilization of users on events. Options include:
Hours per Day - Calculates the utilization value as the number hours allocated per user per day. This is the default value.
Percentage - Calculates the utilization value as a percentage of the user’s total capacity per day.
Total Hours - Calculates the utilization value as the total number of hours allocated to the user across all days in the event. User events shorter than 24 hours will have their utilization type automatically set to “total hours” and their value set to the duration of the event.
User Utilization Value - The default event utilization value for users. All new events will be created with this value as the default utilization value for users.
Resources
Resources are used in calendars and schedules to manage the allocation of resources to events. Resources can be anything that is used in the company, such as rooms, equipment, or licenses.
Managing Resources
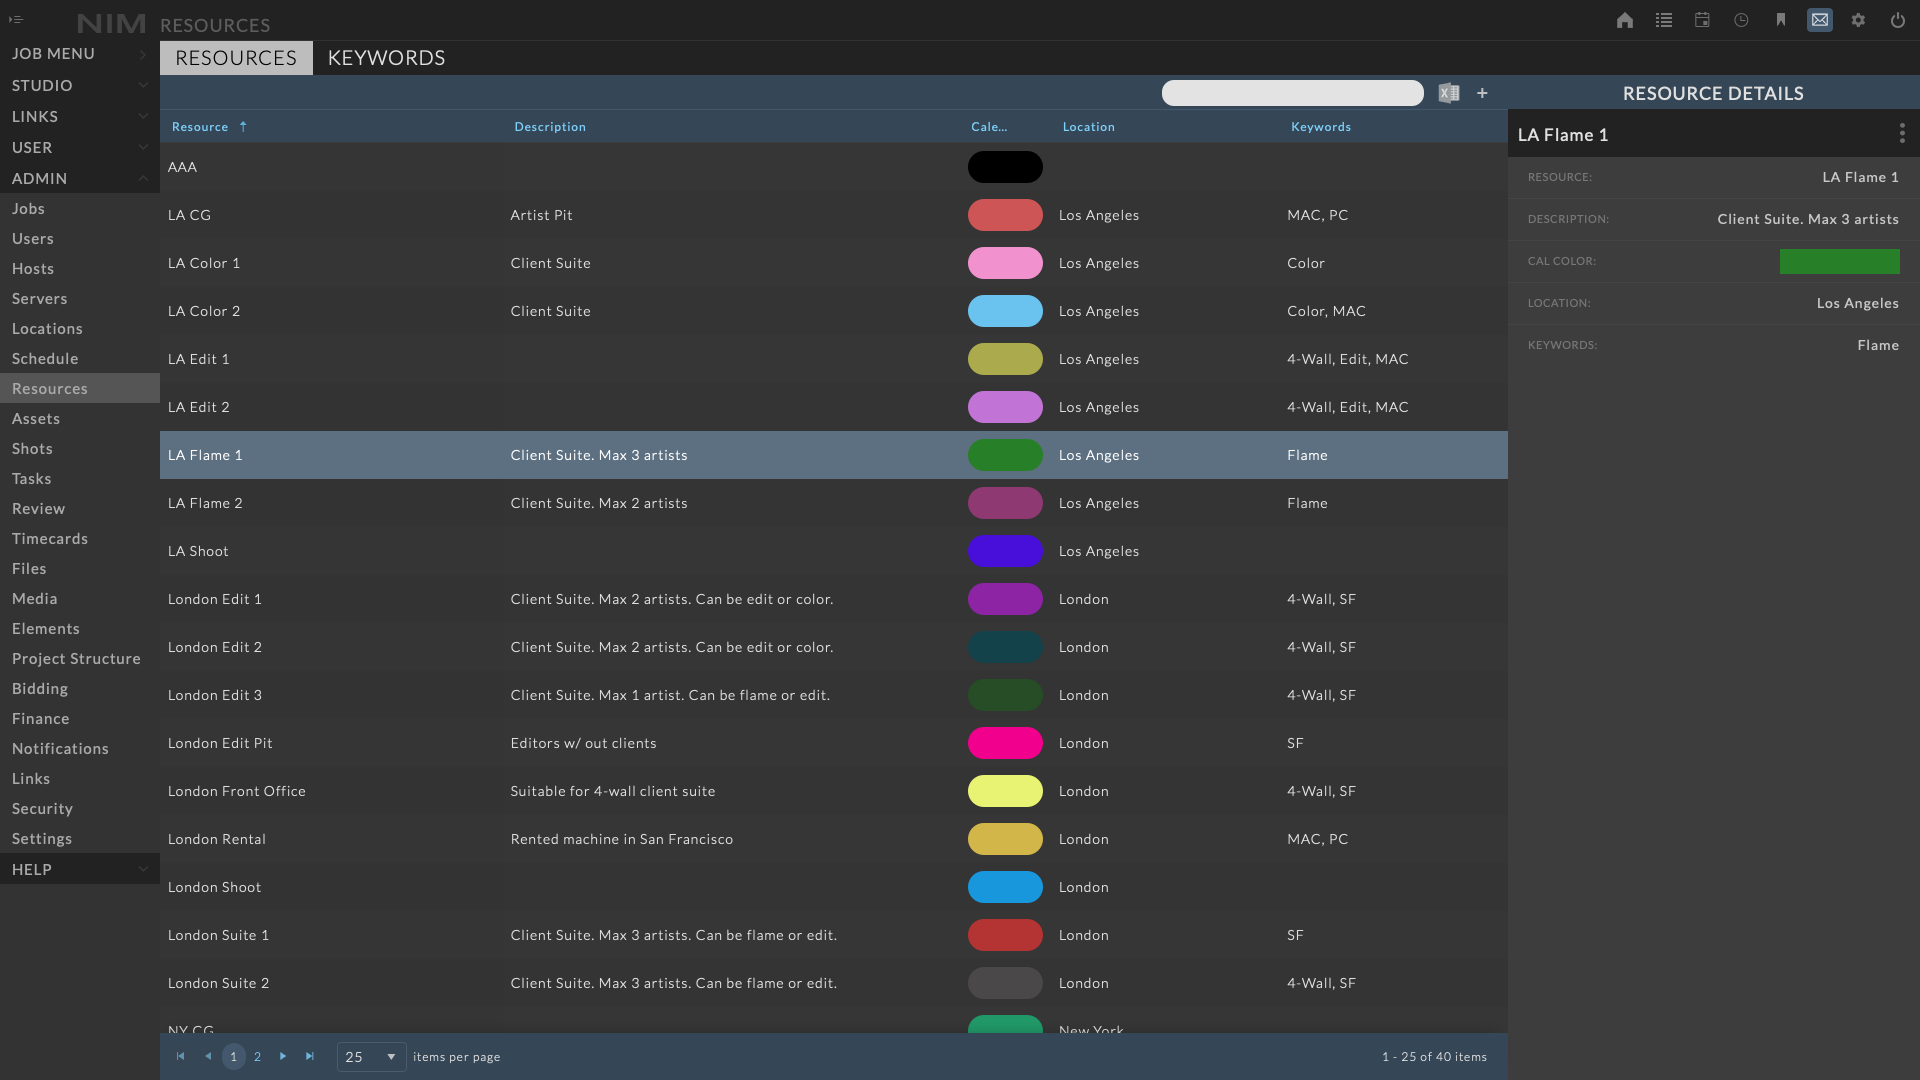
The Resources window displays a list of all resources in the system. You can view, add, edit, and delete resources from this window.
Adding a New Resource
To add a new resource, click the button at the top right of the Resources window. This will open the resource details panel, where you can enter the necessary information. Once you’ve completed the details, click the Save button at the bottom of the panel to save the new resource.
Resource - A unique name for the resource.
Description - A brief description of the resource.
Calendar Color - The color assigned to this resource when used in calendars and schedules.
Location - The location of the resource.
Keywords - Keywords that can be used to tag a resource for filtering and organization. Multiple keywords can be assigned to a resource.
Groups - Resource groups that the resource belongs to. Multiple groups can be assigned to a resource.
Editing a Resource
To edit an existing resource, select the resource from the grid to load its details in the info panel. Click the ellipsis menu in the resource info panel and choose Edit. After making the necessary changes, click the Save button at the bottom of the panel to apply your updates.
Deleting a Resource
To delete a resource, select the resource from the grid, click the ellipsis menu in the resource info panel, and choose Delete. You will be prompted to confirm the deletion. Deleting a resource will remove it from any items where it was previously assigned.
Resource Keywords
User keywords allow a studio to tag resources with an unlimited number of keywords for refinement in searches and organization.
Adding a New Keyword
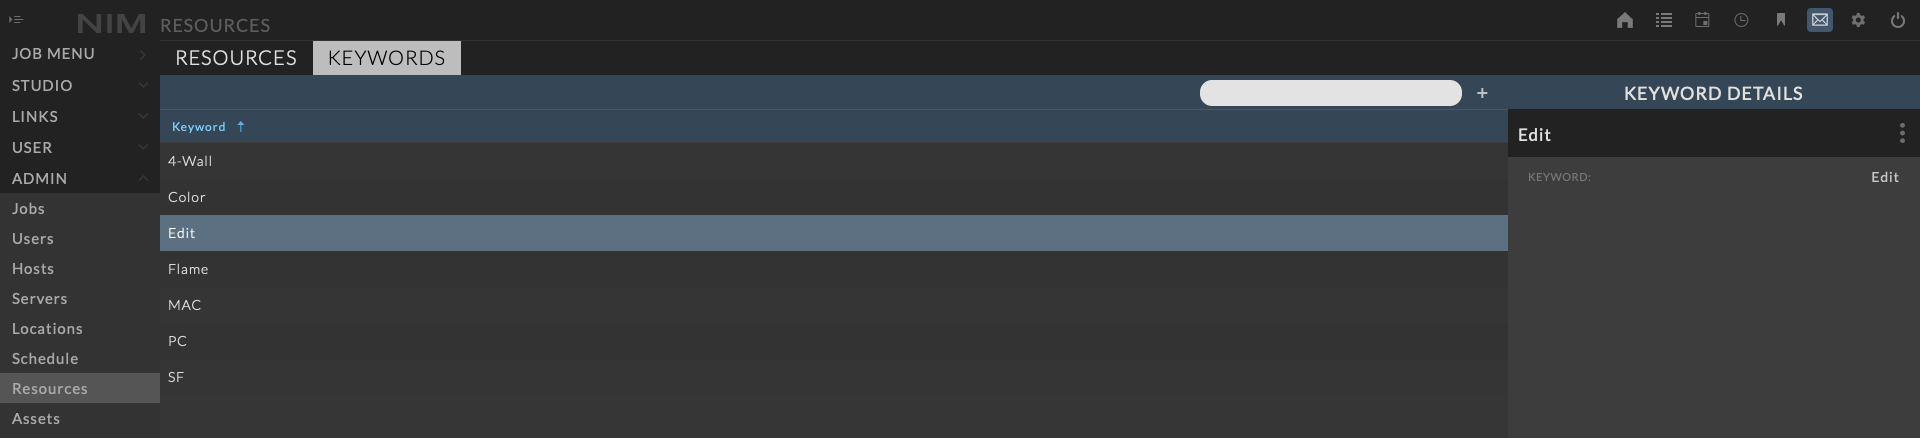
Keywords allow a studio to tag users with an unlimited number of labels for refined searches and better organization. For example, keywords like “Color”, “Edit”, and “Workstation” can denote different aspects of production that a resource might be associated with.
Editing a Keyword
To edit an existing keyword, select the keyword from the grid to load its details in the info panel. Click the ellipsis menu in the keyword info panel and choose Edit. After making the necessary changes, click the Save button at the bottom of the panel to apply your updates.
Deleting a Keyword
To delete a keyword, select the keyword from the grid, click the ellipsis menu in the keyword info panel, and choose Delete. You will be prompted to confirm the deletion. Deleting a keyword will remove it from any resources where it was previously assigned.
Resource Groups
Resource groups allow you to manage a set of resources collectively, making it easy to add all resources in a group to a schedule event at once.

Creating a New Resource Group
To create a new resource group, click the button at the top right of the Groups window. The resource group details panel will appear, where you can enter a custom name and description. Once you’ve finished, click the Save button at the bottom of the panel to save your changes.
Editing a Resource Group
To edit an existing resource group, select the group from the grid to load its details in the info panel. Click the ellipsis menu in the resource group info panel and choose Edit. Make any necessary changes, then click the Save button at the bottom of the panel to apply your changes.
Deleting a Resource Group
To delete a resource group, select the group from the grid, click the ellipsis menu in the resource group info panel, and choose Delete. You will be prompted to confirm the deletion. Deleting a resource group will remove it from any resources where it was previously assigned.
Resource Capacity

The Resource Capacity table allows you to define and manage the capacity value used in schedule planning when determining the resource’s per day utilization.
The current capacity values are displayed in the resource’s info panel. The capacity value can be set for each resource and can be adjusted over time. Resource capacity is measured in units per day.
For more information on viewing utilization and capacity in the schedule, please refer to the Schedule Utilization section of the documentation.

If the resource’s capacity has no entries, the capacity value will be displayed as “Default” in the resource’s info panel.
Note
The default resource capacity value is set in the Admin > Resources > Options section.
Managing Resource Capacity


To view or adjust a resource’s capacity:
Access the Capacity Grid: Click on the Resource Capacity area in the resource info panel (highlighted in blue).
Add a New Capacity: Click the ellipsis menu at the top right of the grid and select “Add Capacity.” Set the start date and enter the hours per day for the resource’s max capacity.
Edit a Capacity: Click on the field you wish to edit. Changes are saved automatically when you click out of the field.
Delete a Capacity: Click the “X” at the right of the row. A confirmation dialog will appear before deletion.
Close the Capacity Grid: Click the ellipsis menu at the top right and select “Close.”
Resource Options
Resource options define the default values for resources. These settings will be used when creating new resources or when no value is set for a resource.
Default Resource Capacity
Default Resource Capacity is measured in units per day and each day can have a different capacity value. The default capacity value is used when creating new capacity entries or when no value is set for a resource.

To set the default resource capacity, click the button at the top right of the panel.
Enter the default capacity value and click the “Save” button at the bottom of the panel to save your changes.
Assets
The assets window includes tabs to define statuses, options, and add custom fields to Assets.

Status
To add new status, click the button at the top right of the status window. The status details will appear and the required information can be entered as needed. When done click the “Save” button at the bottom of the info panel to save your changes.
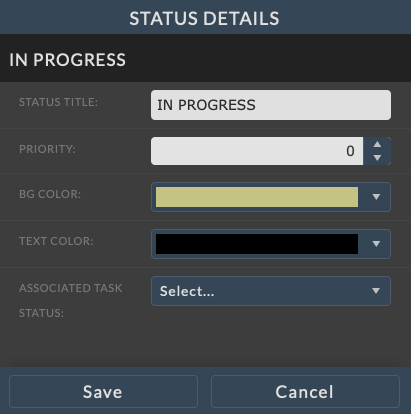
Status Title - The name assigned to a status.
Priority - Defines sorting priority in lists.
BG Color - The background color assigned to the task item.
Text Color - The text color assigned to the task item.
Associated Task Status - Selecting an associated task status sets a trigger for all Task Statuses on the asset to be changed to the associated task status when this status is applied to an asset. Not selecting an associated task status will not adjust the task when this status is applied to an asset.
To edit a status, click on a row from the grid to load the status info panel. Click on the ellipsis menu in the status info panel and choose “Edit”. Make the necessary changes and click the “Save” button at the bottom of the info panel to save your changes.
Delete a status entry by selecting the status from the grid, clicking the ellipsis menu in the status panel, and selecting “Delete”. You will be prompted to confirm deletion of the status. Deleting a status will remove that status from any previously assigned asset.
Options
Asset options include the ability to add an Asset Name Filter. This filter uses a valid regular expression (regex) to remove specific characters in an asset name. This filter will only remove characters from the asset name on manually created assets. This does not filter assets imported form a CSV or created via the API.
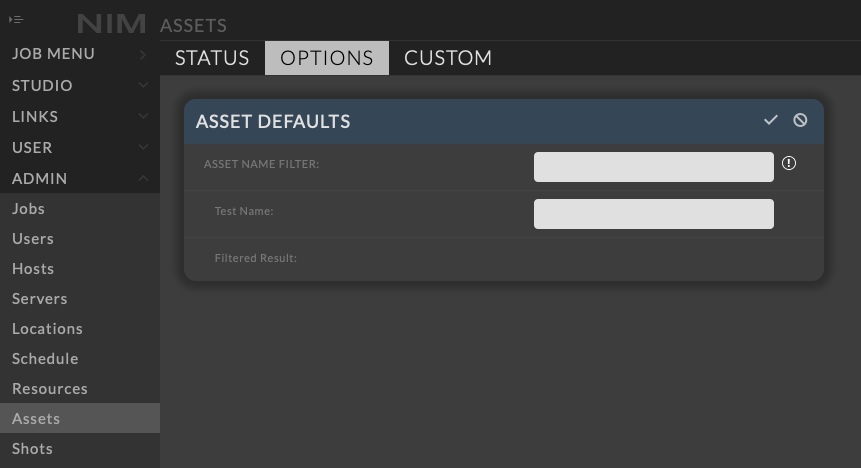
To edit the asset options, click the edit button in the Assets Defaults header. After making the necessary changes, click the check mark button to save. Click the cancel button to return to the view mode without saving changes.
After entering a valid regular expression, you can use the “Test Name” field to check the how the filter will modify the name. The result will be displayed in the “Filtered Results” row.
Custom Fields
Asset custom fields work identically to Job custom fields. The main difference is that these fields appear on assets.
Refer to Custom Job Fields for how to create and edit custom fields.
Shots
The shots window includes tabs to define statuses, add custom fields, and default settings for Shots.
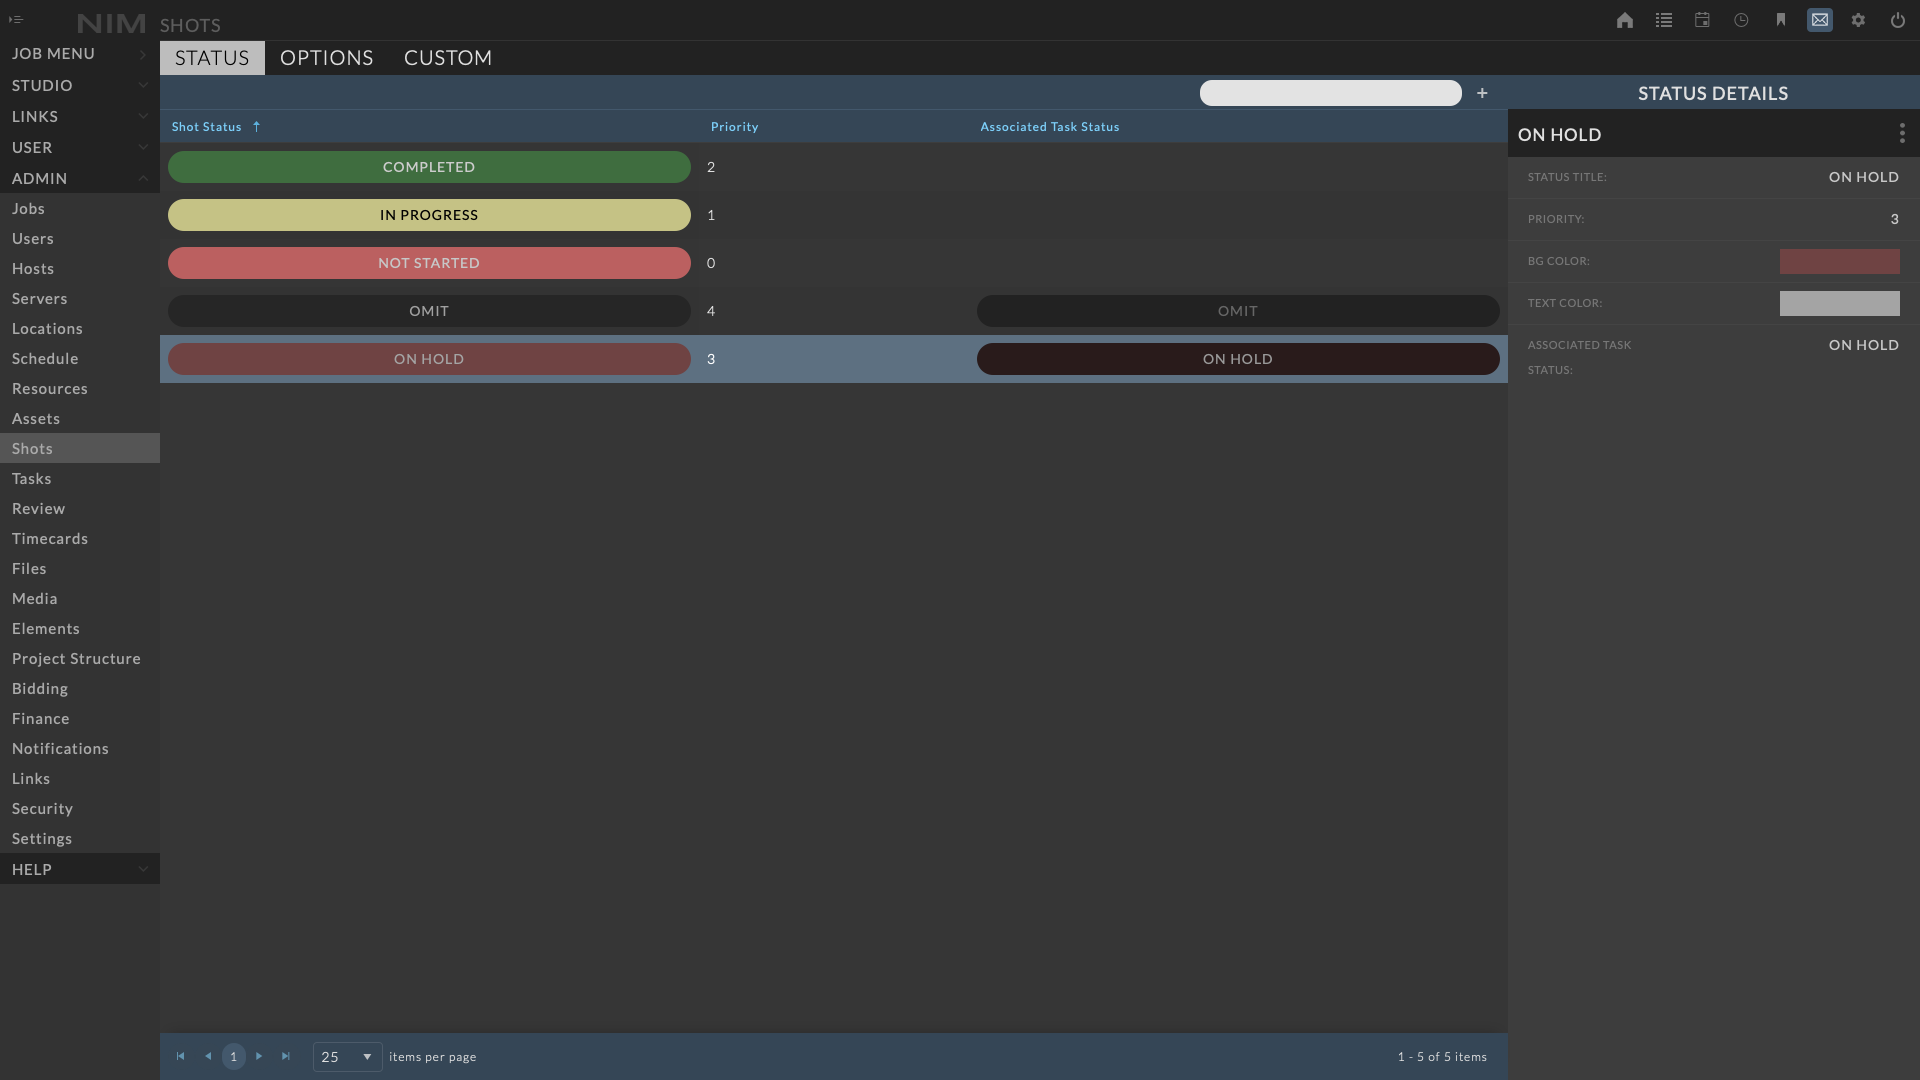
Status
To add new status, click the button at the top right of the status window. The status details will appear and the required information can be entered as needed. When done click the “Save” button at the bottom of the info panel to save your changes.

Status Title - The name assigned to a status.
Priority - Defines sorting priority in lists.
BG Color - The background color assigned to the task item.
Text Color - The text color assigned to the task item.
Associated Task Status - Selecting an associated task status sets a trigger for all Task Statuses on the Shot to be changed to the associated task status when this status is applied to a shot. Not selecting an associated task status will not adjust the task when this status is applied to a shot.
To edit a status, click on a status from the grid to load the status details. Click the edit button in the status details panel. After making the necessary changes, click the check mark button to save. Click the cancel button to return to the view mode without saving changes.
Delete a status entry by selecting the status from the grid and clicking the X at the far right of the status details pane. You will be prompted to confirm deletion of the status.
Options
Shot options and defaults apply to settings for new shot creation.
Options include settings for:
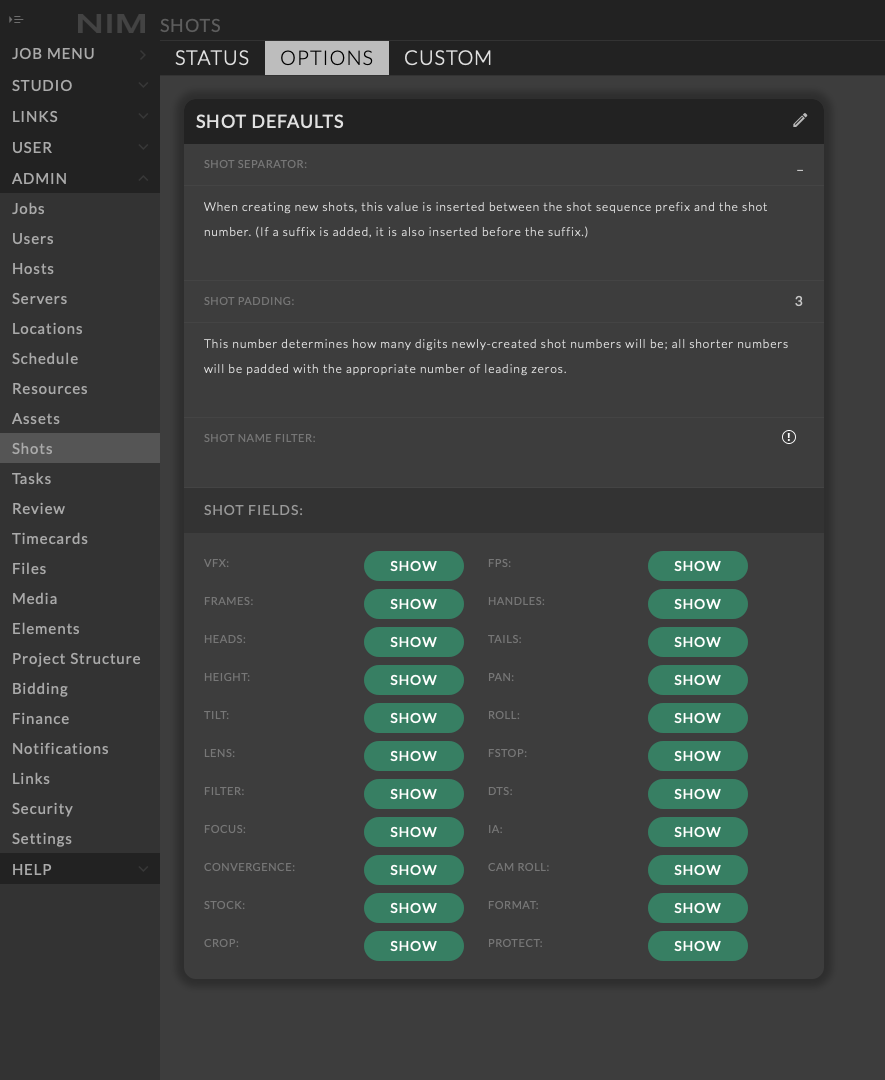
Shot Separator - When creating new shots, this value is inserted between the shot sequence prefix and the shot number. (If a suffix is added, it is also inserted before the suffix.)
Shot Padding - This number determines how many digits newly-created shot numbers will be; all shorter numbers will be padded with the appropriate number of leading zeros.
Shot Name Filter - This filter uses a valid regular expression (regex) to remove specific characters in a shot name. This filter will only remove characters from the shot name on manually created shots. This does not filter shots imported form a CSV or created via the API. After entering a valid regular expression, you can use the “Test Name” field to check the how the filter will modify the name. The result will be displayed in the “Filtered Results” row.
Shot Fields - NIM comes with various default shot fields. Users can choose to hide any of these values by unchecking items from the Shot Fields list.
To edit the shot options, click the edit button in the Shot Defaults header. After making the necessary changes, click the check mark button to save. Click the cancel button to return to the view mode without saving changes.
Shot Custom Fields
Shot custom fields work identically to Job custom fields. The main difference is that these fields appear on shots.
Refer to Custom Job Fields for how to create and edit custom fields.
Tasks
The Tasks Administrative window has 3 tabs including:
Task Types
Task Status
Custom Fields
Task Types
Task types define the tasks that can be assigned to a user on an asset or a shot as well as selected in a timecard.
Tasks can also be assigned to events on calendars with their own unique color. NIM ships with a default set of tasks but you can edit and add as many tasks types as your studio needs.
Files saved by NIM Connectors are organized by task. Consequentially, tasks have an associated folder to be used by NIM Project Structures when saving files via a NIM Connector.
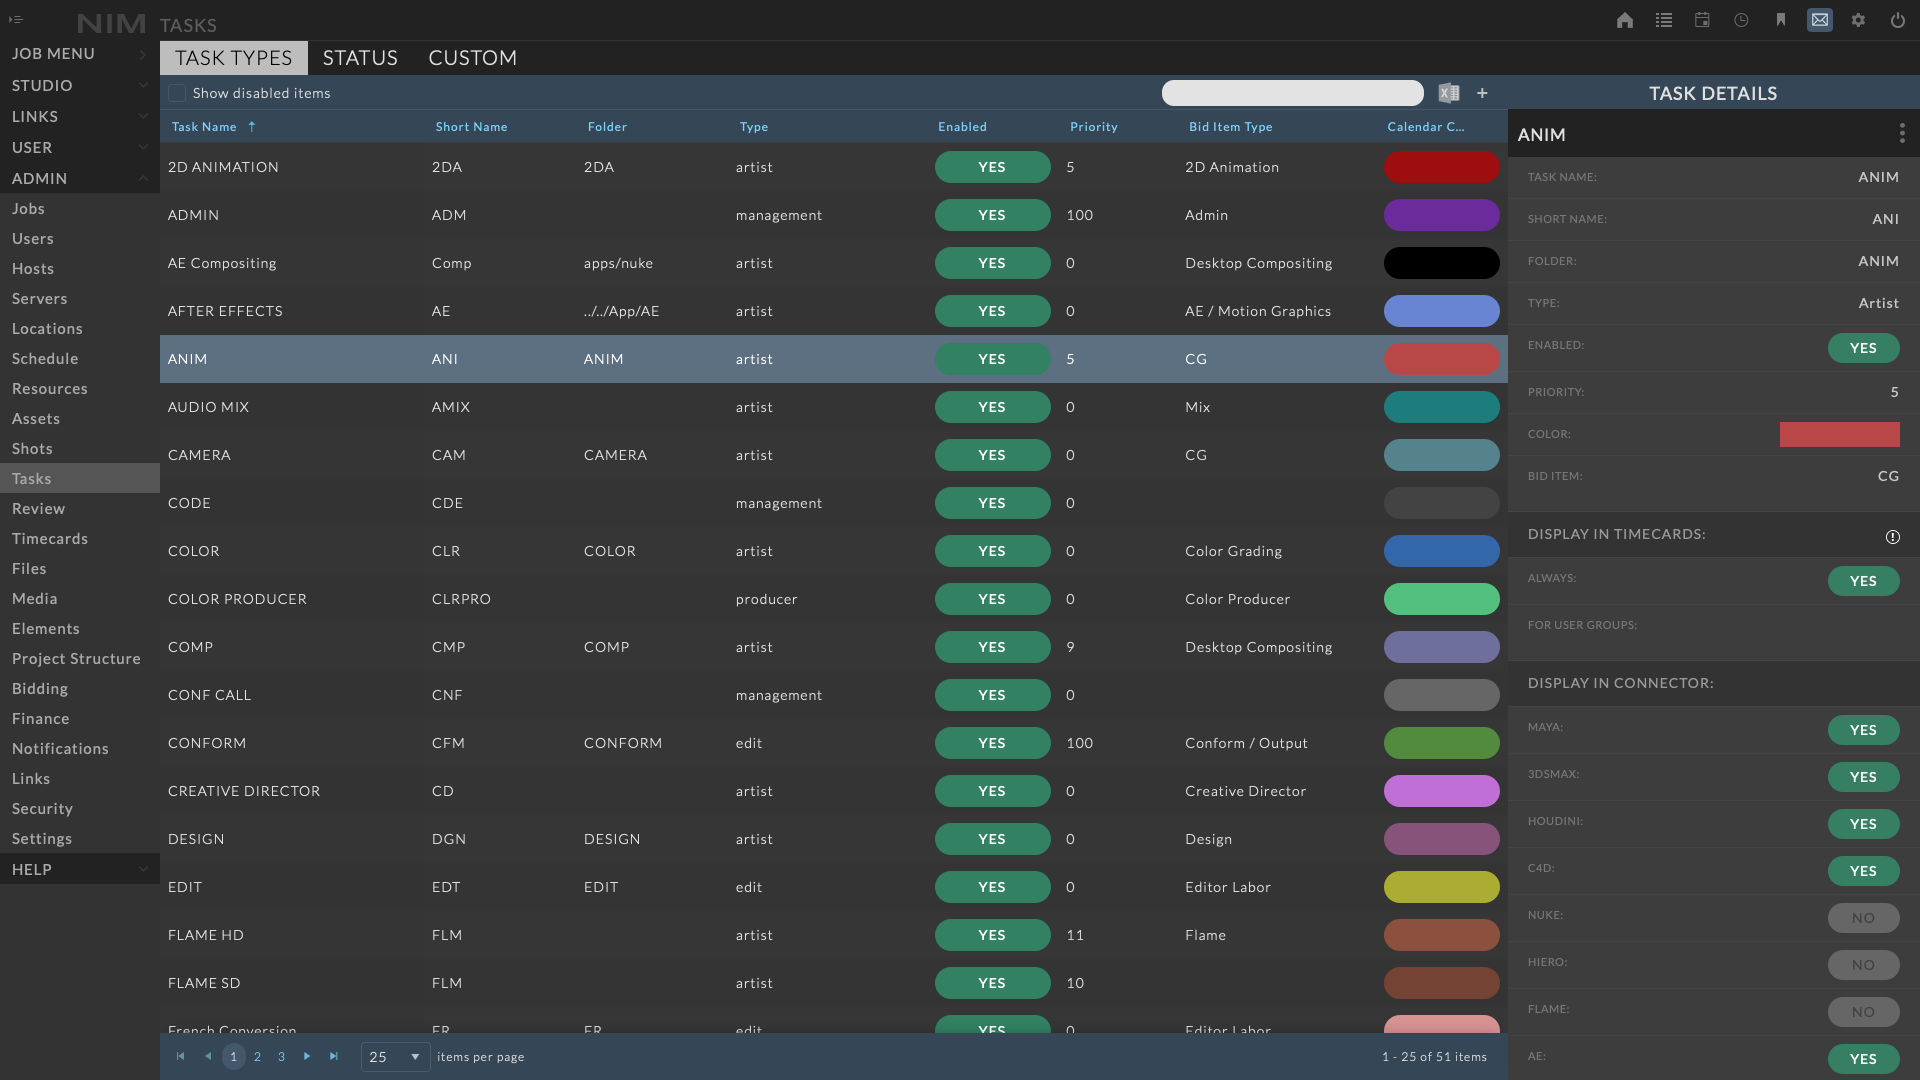
To add new task types, click the button at the top right of the task types window. The task details will appear and the required information can be entered as needed. When done click the “Save” button at the bottom of the info panel to save your changes.
Task Details Include:
Task Name - The name of the task that will be seen throughout NIM and it’s connectors.
Short Name - In some UI elements the short name of this task will be used.
- Folder - When using NIM project structures to manage a job, files are associated with user tasks and organized into task folders based on the project structures asset or shot root using the pattern <asset_root>/<task_folder> or <shot_root>/<task_folder>. The name defined here is the folder name that task files saved using NIM connectors will use.
For example: Saving a comp task from the shot ENG_001 with Nuke using the NIM connector would place the file in the ENG_001/COMP directory.
Not all tasks need a folder name. Only tasks that will be associated with 3rd party applications.
Task folder paths can define multiple folders, for example: comp/nuke
Task folder paths are relative to the asset or shot root. You can get creative and create paths such as: ../../my/tasks to save your files to unique locations.
Enabled - Determines if the task is enabled or disabled. Disabling a task by removing the checkmark will keep previous task assignments, but will remove this task from being selectable in UI elements. Tasks can always be re-enabled by checking the checkbox.
- Type - The type of task used to filter the list in certain UI elements. Options are:
Artist
Producer
Edit
Management
Priority - This value allows for a sorting order in lists based on a priority value rather than alphabetical sorting.
Color - The color to use in schedules and calendars for this task.
- Bid Item - This is the associated Bid Line item. For the purposes of bidding and actualization tasks are associated with corresponding Bid Line Items. Multiple tasks can be associated with a single Bid Line Item.
For Example: Modeling, Rigging, Animation, & Lighting tasks can all be assigned to a single Bid Line Item named CG.
- Display in Timecards
- Always - The option limits the visibility of the task type in timecards. If this is checked, the task type will always be an available option for the timecard task type dropdown. If this field is unchecked, then it will only be visible when one of the following conditions are met:
The user is assigned to a task of this type on the timecard’s selected job
The timecard’s selected job has an awarded bid that contains the bid item associated with this task type
The user is a member of one of the User Groups selected in the “For User Groups” field.
For User Groups - Users that are a member of the selected User Groups will always have this task available as a timecard task type option.
Software Associations - The following series of yes/no dropdowns determine whether or not this task appears in the 3rd party software’s NIM connector, allowing for only the relevant tasks to appear in menus.
To edit a task type, click on a row from the grid to load the task type info panel. Click on the ellipsis menu in the task type info panel and choose “Edit”. Make the necessary changes and click the “Save” button at the bottom of the info panel to save your changes.
Delete a task type entry by selecting the task type from the grid, clicking the ellipsis menu in the task type panel, and selecting “Delete”. You will be prompted to confirm deletion of the task type. Deleting a task type will remove that task type from any previously assigned task, schedule, or calendar item.
Status
NIM ships with a default set of task statuses. You can customize and define as many statuses as needed to fit the needs of your production environment.
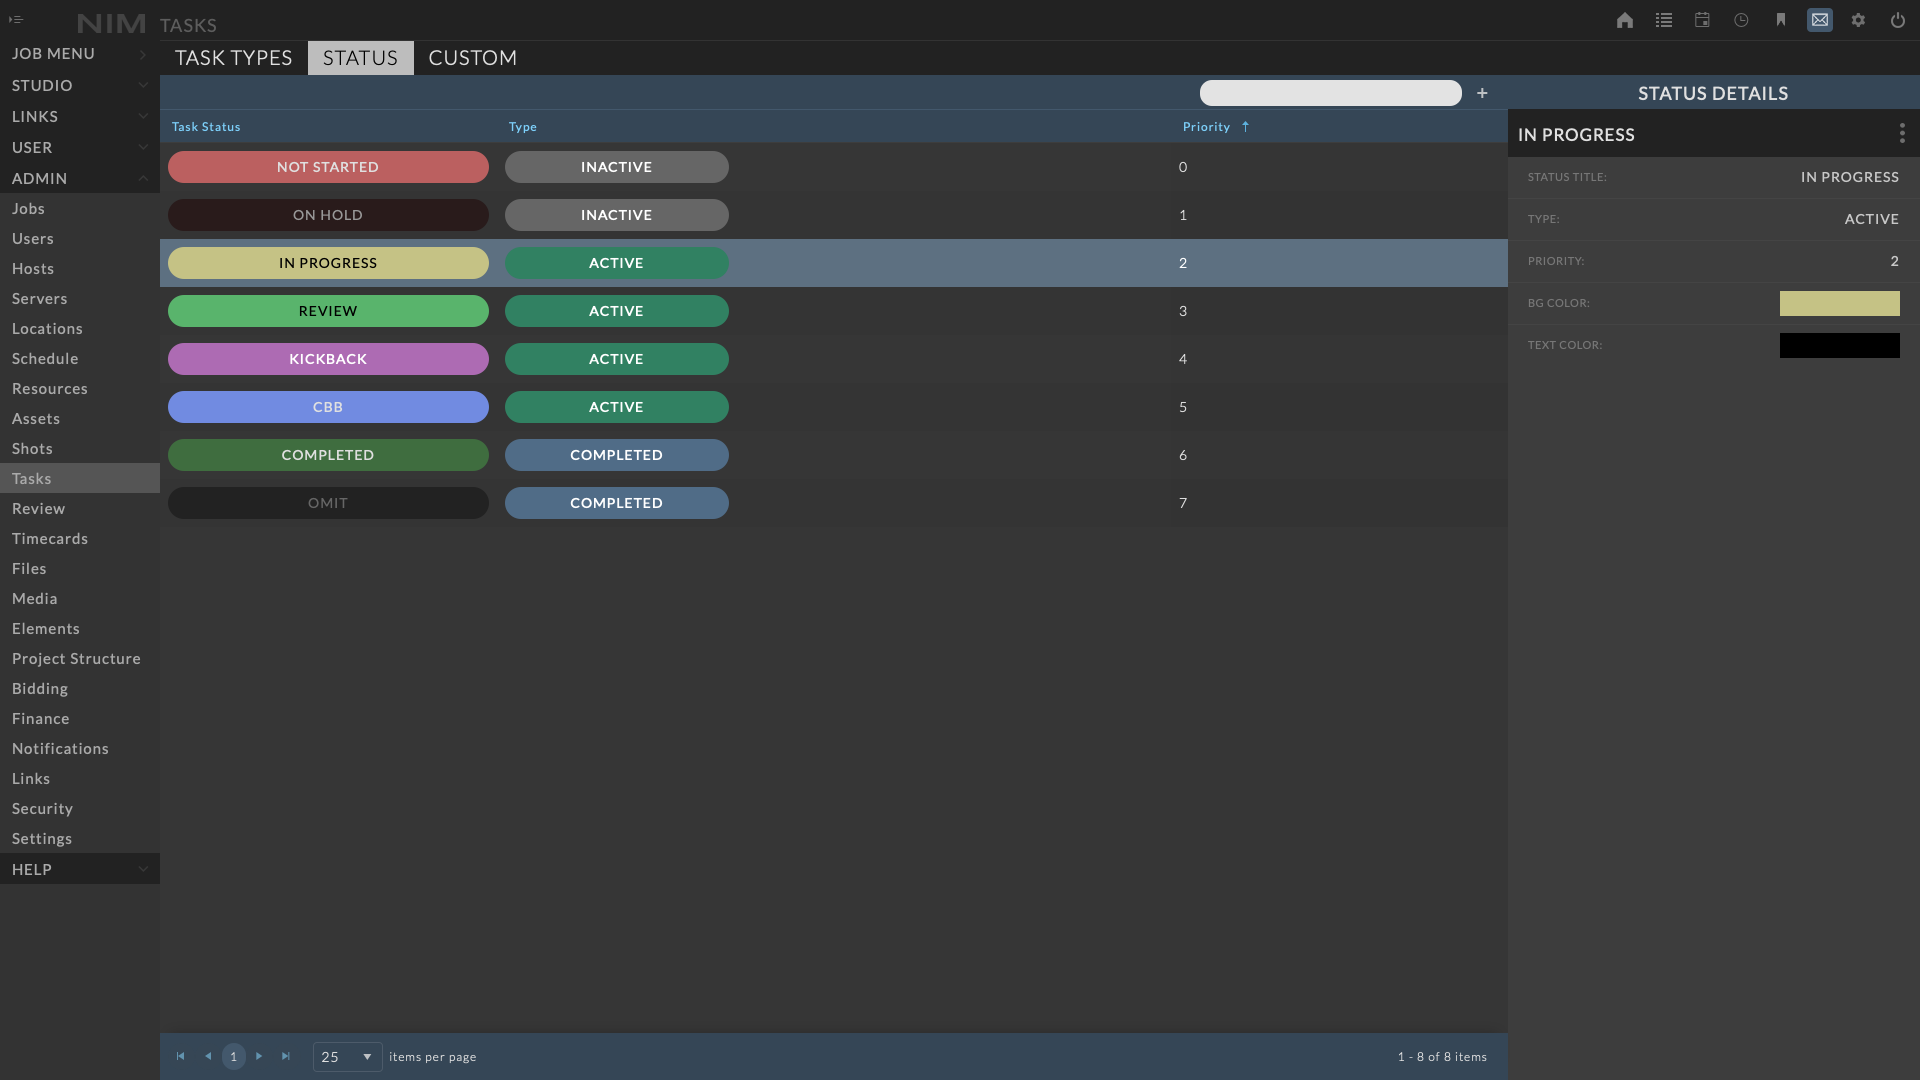
To add new task status, click the button at the top right of the task status window. The task details will appear and the required information can be entered as needed. When done click the check mark to save.
Status Title - The title of the status displayed on tasks.
- Type - This field determines the status type. The available status types are:
Inactive
Active
Completed
Priority - This value allows for a sorting order in lists based on a priority value rather than alphabetical sorting.
BG Color - The background color of the task when appearing in UI elements.
Text Color - The text color of the task when appearing in UI elements.
To edit a task status, click on a row from the grid to load the task status info panel. Click on the ellipsis menu in the task status info panel and choose “Edit”. Make the necessary changes and click the “Save” button at the bottom of the info panel to save your changes.
Delete a task status entry by selecting the task status from the grid, clicking the ellipsis menu in the task status panel, and selecting “Delete”. You will be prompted to confirm deletion of the task status. Deleting a task status will remove that task status from any previously assigned task.
Custom Fields
Task custom fields work identically to Job custom fields. The main difference is that these fields appear on tasks.
Refer to Custom Job Fields for how to create and edit custom fields.
Review
The following settings determine the review item format, type, status, and keywords available to users.
Options
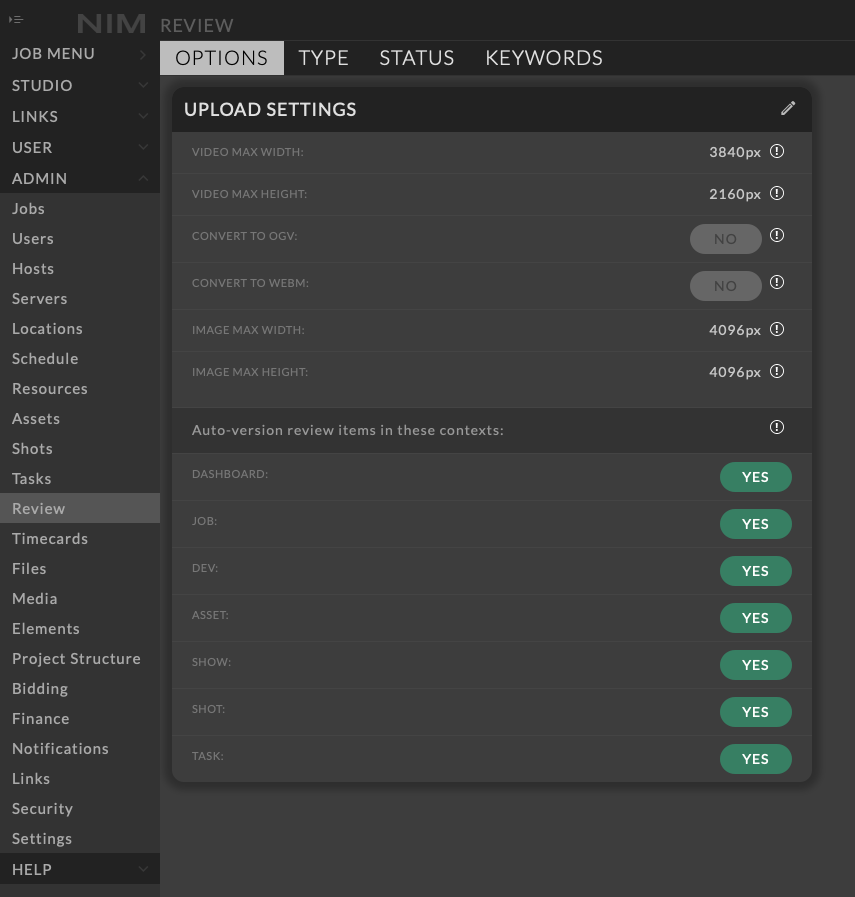
Video Max Width & Video Max Height
These values are the maximum dimensions for all uploaded videos.
Videos that are under the maximum width and height will only be converted if the format specifications are not met.
Format Conversions
NIM uses the MP4/h264 to display movies within the browser.
Uploaded movies that are encoded as MP4/h264 and are equal to or less then the max width and height will not be re-encoded. This will significantly decrease the time required to upload movies as well as reduce processing load on the NIM VM.
It is recommended in large studios to pre-encode movies in the MP4/h264 format prior to uploaded to maximize performance.
Alternatively, studios can increase the number of cores allocated to the NIM VM to provide additionally processing power.
If your studio is continually uploading large files you may need to adjust the max file upload size and temporary directory location. Please refer to this NIM knowledge base article to adjust these settings: http://nim-labs.com/file-upload-settings/
Older browsers do not support MP4 and require alternate HTML5 compatible formats. Studios can opt into the OGV and WEBM conversions if needed.
Convert to OGV - Enable this option to include a OGV conversion on video upload.
Convert to WEBM - Enable this option to include a WEBM conversion on video upload.
Image Max Width & Image Max Height
These values are the maximum dimensions for all uploaded still images.
Still images are converted to PNGs upon upload for browser compatibility.
Auto Version
When uploading a review item with a filename that matches an existing review item in the same context, automatically create a version group or add the new item to the matching item’s existing version group. NIM will ignore any “_v1”-style version indicators when matching names.
Select the appropriate checkbox to enable auto-versioning in each context.
To edit the review options, click the edit button in the Upload Settings header. After making the necessary changes, click the check mark button to save. Click the cancel button to return to the view mode without saving changes.
Type

Review item types allow a studio to classify items as a specific types for refinement in searches and organization. In this example we have types defined for Daily, Edit, and Reference to denote different aspects of production that a job may include.
To add new types, click the button at the top right of the types window. The keyword details will appear and you can enter a custom name. When done click the “Save” button at the bottom of the info panel to save your changes.
To edit a review item type, click on a row from the grid to load the review item type info panel. Click on the ellipsis menu in the review item type info panel and choose “Edit”. Make the necessary changes and click the “Save” button at the bottom of the info panel to save your changes.
Setting the priority determines the order in which these items will appear in dropdown menus.
Delete a review item type entry by selecting the review item type from the grid, clicking the ellipsis menu in the review item type panel, and selecting “Delete”. You will be prompted to confirm deletion of the review item type. Deleting a review item type will remove that review item type from any previously assigned review items.
Status
NIM ships with a default set of review item statuses. You can customize and define as many statuses as needed to fit the needs of your environment.
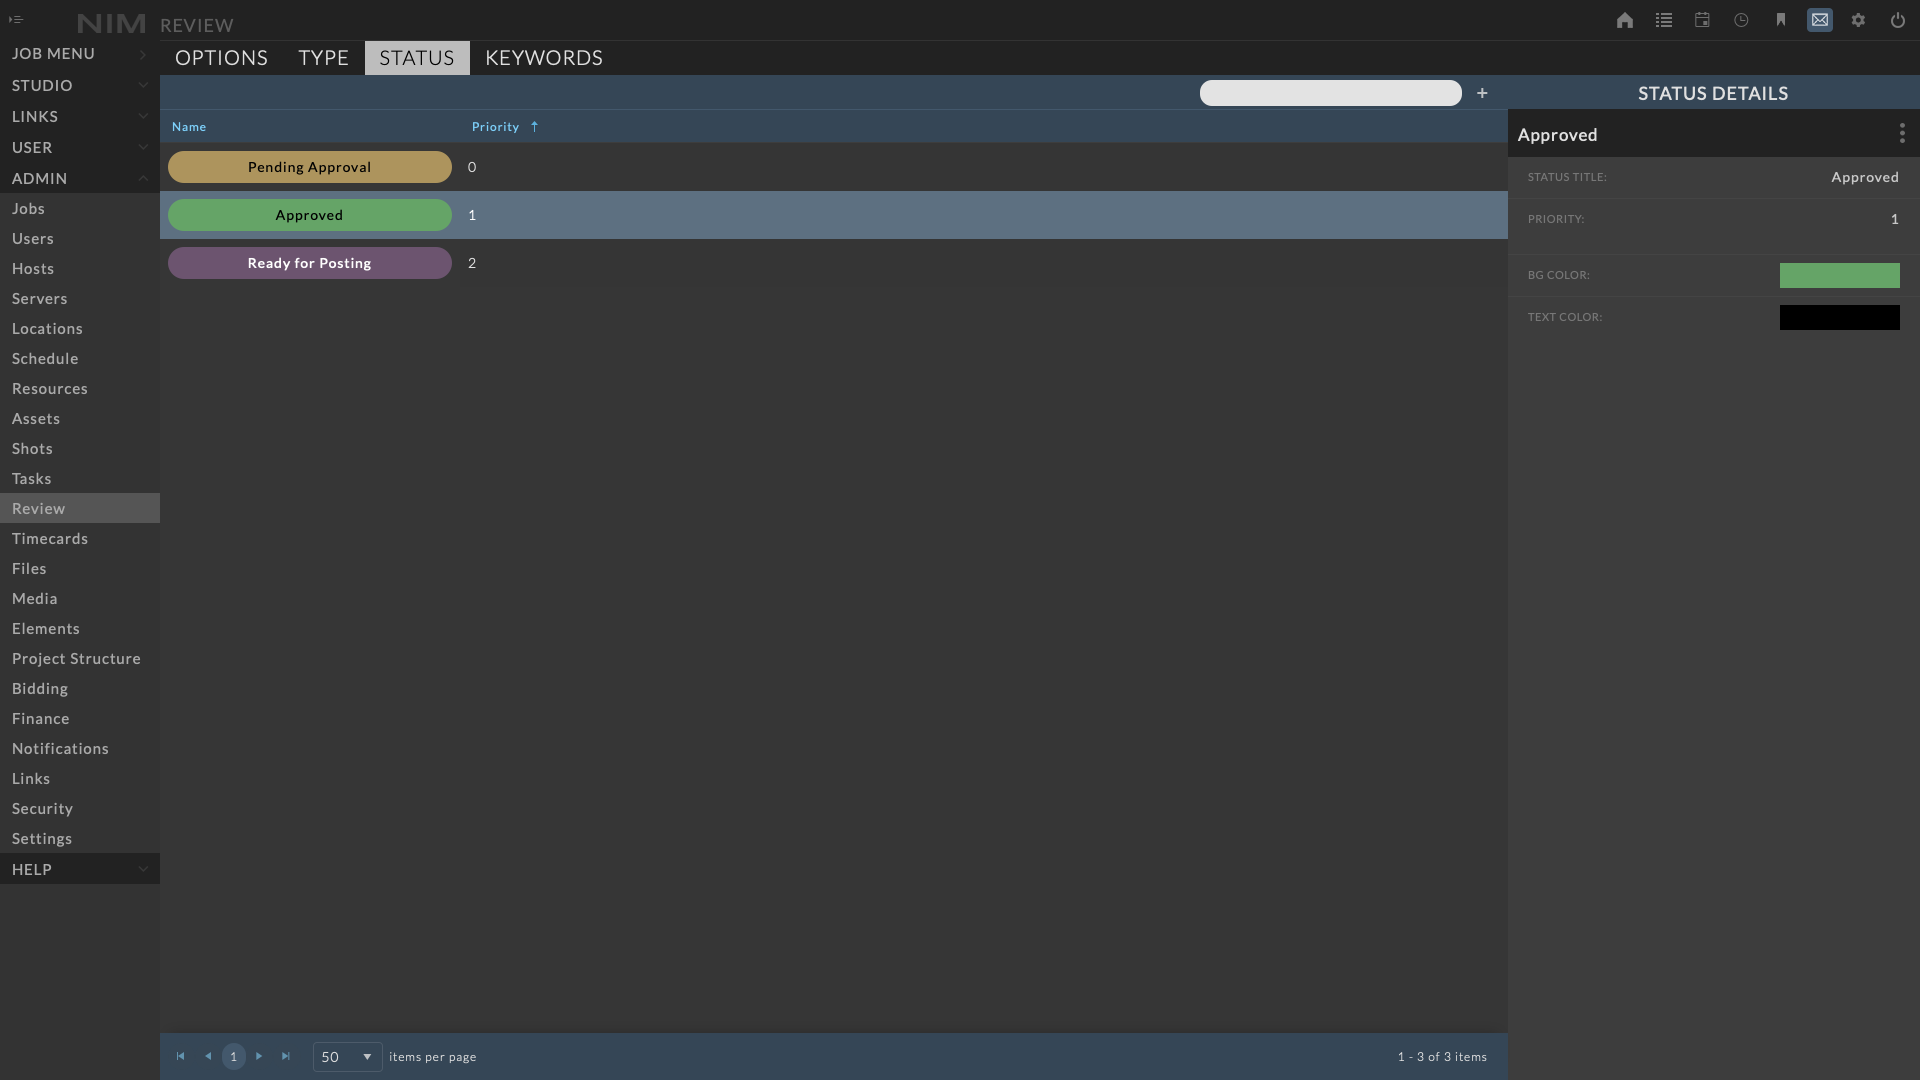
To add new review item status, click the button at the top right of the review item status window. The review item details will appear and the required information can be entered as needed. When done click the “Save” button at the bottom of the info panel to save your changes.
Available options include:
Status Title - The title of the status displayed on review items.
Priority - This value allows for a sorting order in lists based on a priority value rather than alphabetical sorting.
BG Color - The background color of the review item when appearing in UI elements.
Text Color - The text color of the review item when appearing in UI elements.
To edit a review item status, click on a row from the grid to load the review item status info panel. Click on the ellipsis menu in the review item status info panel and choose “Edit”. Make the necessary changes and click the “Save” button at the bottom of the info panel to save your changes.
Delete a review item status entry by selecting the review item status from the grid, clicking the ellipsis menu in the review item status panel, and selecting “Delete”. You will be prompted to confirm deletion of the review item status. Deleting a review item status will remove that review item status from any previously assigned review item.
Keywords
Review item types allow a studio to tag jobs with an unlimited number of keywords for refinement in searches and organization. In this example we have the keywords Color, Live Action, and VFX to denote different aspects of production that a job may include.
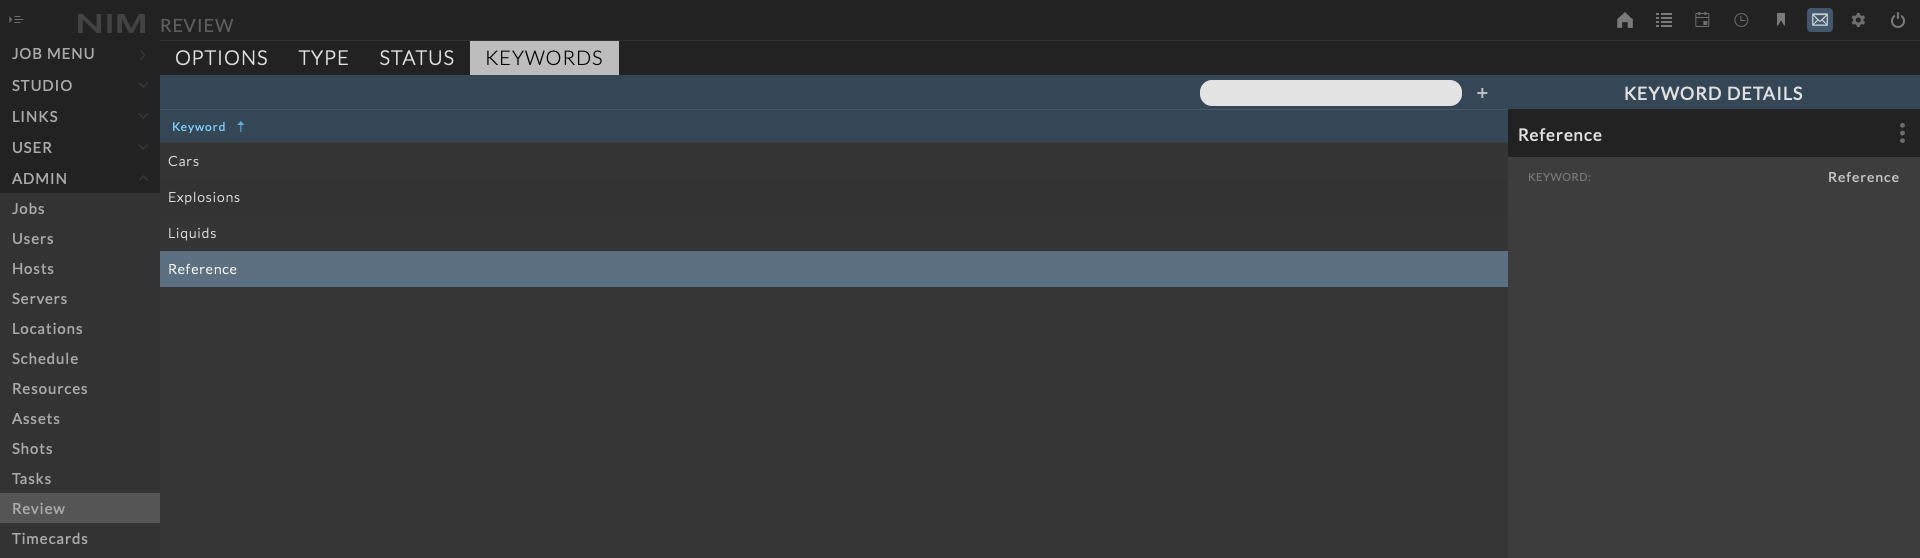
To add new keywords, click the button at the top right of the keywords window. The keyword details will appear and you can enter a custom name. When done click the “Save” button at the bottom of the info panel to save your changes.
To edit a review item keyword, click on a row from the grid to load the review item keyword info panel. Click on the ellipsis menu in the review item keyword info panel and choose “Edit”. Make the necessary changes and click the “Save” button at the bottom of the info panel to save your changes.
Delete a review item keyword entry by selecting the review item keyword from the grid, clicking the ellipsis menu in the review item keyword panel, and selecting “Delete”. You will be prompted to confirm deletion of the review item keyword. Deleting a review item keyword will remove that keyword from any previously assigned review items.
Timecards
The timecard options include settings for how time should be entered as well as options for timecard approvals.
For a brief description of each setting, hover of the  icon to the right of each field.

Options
The timecard options include settings for the format of timecards as well as approval status notification settings.
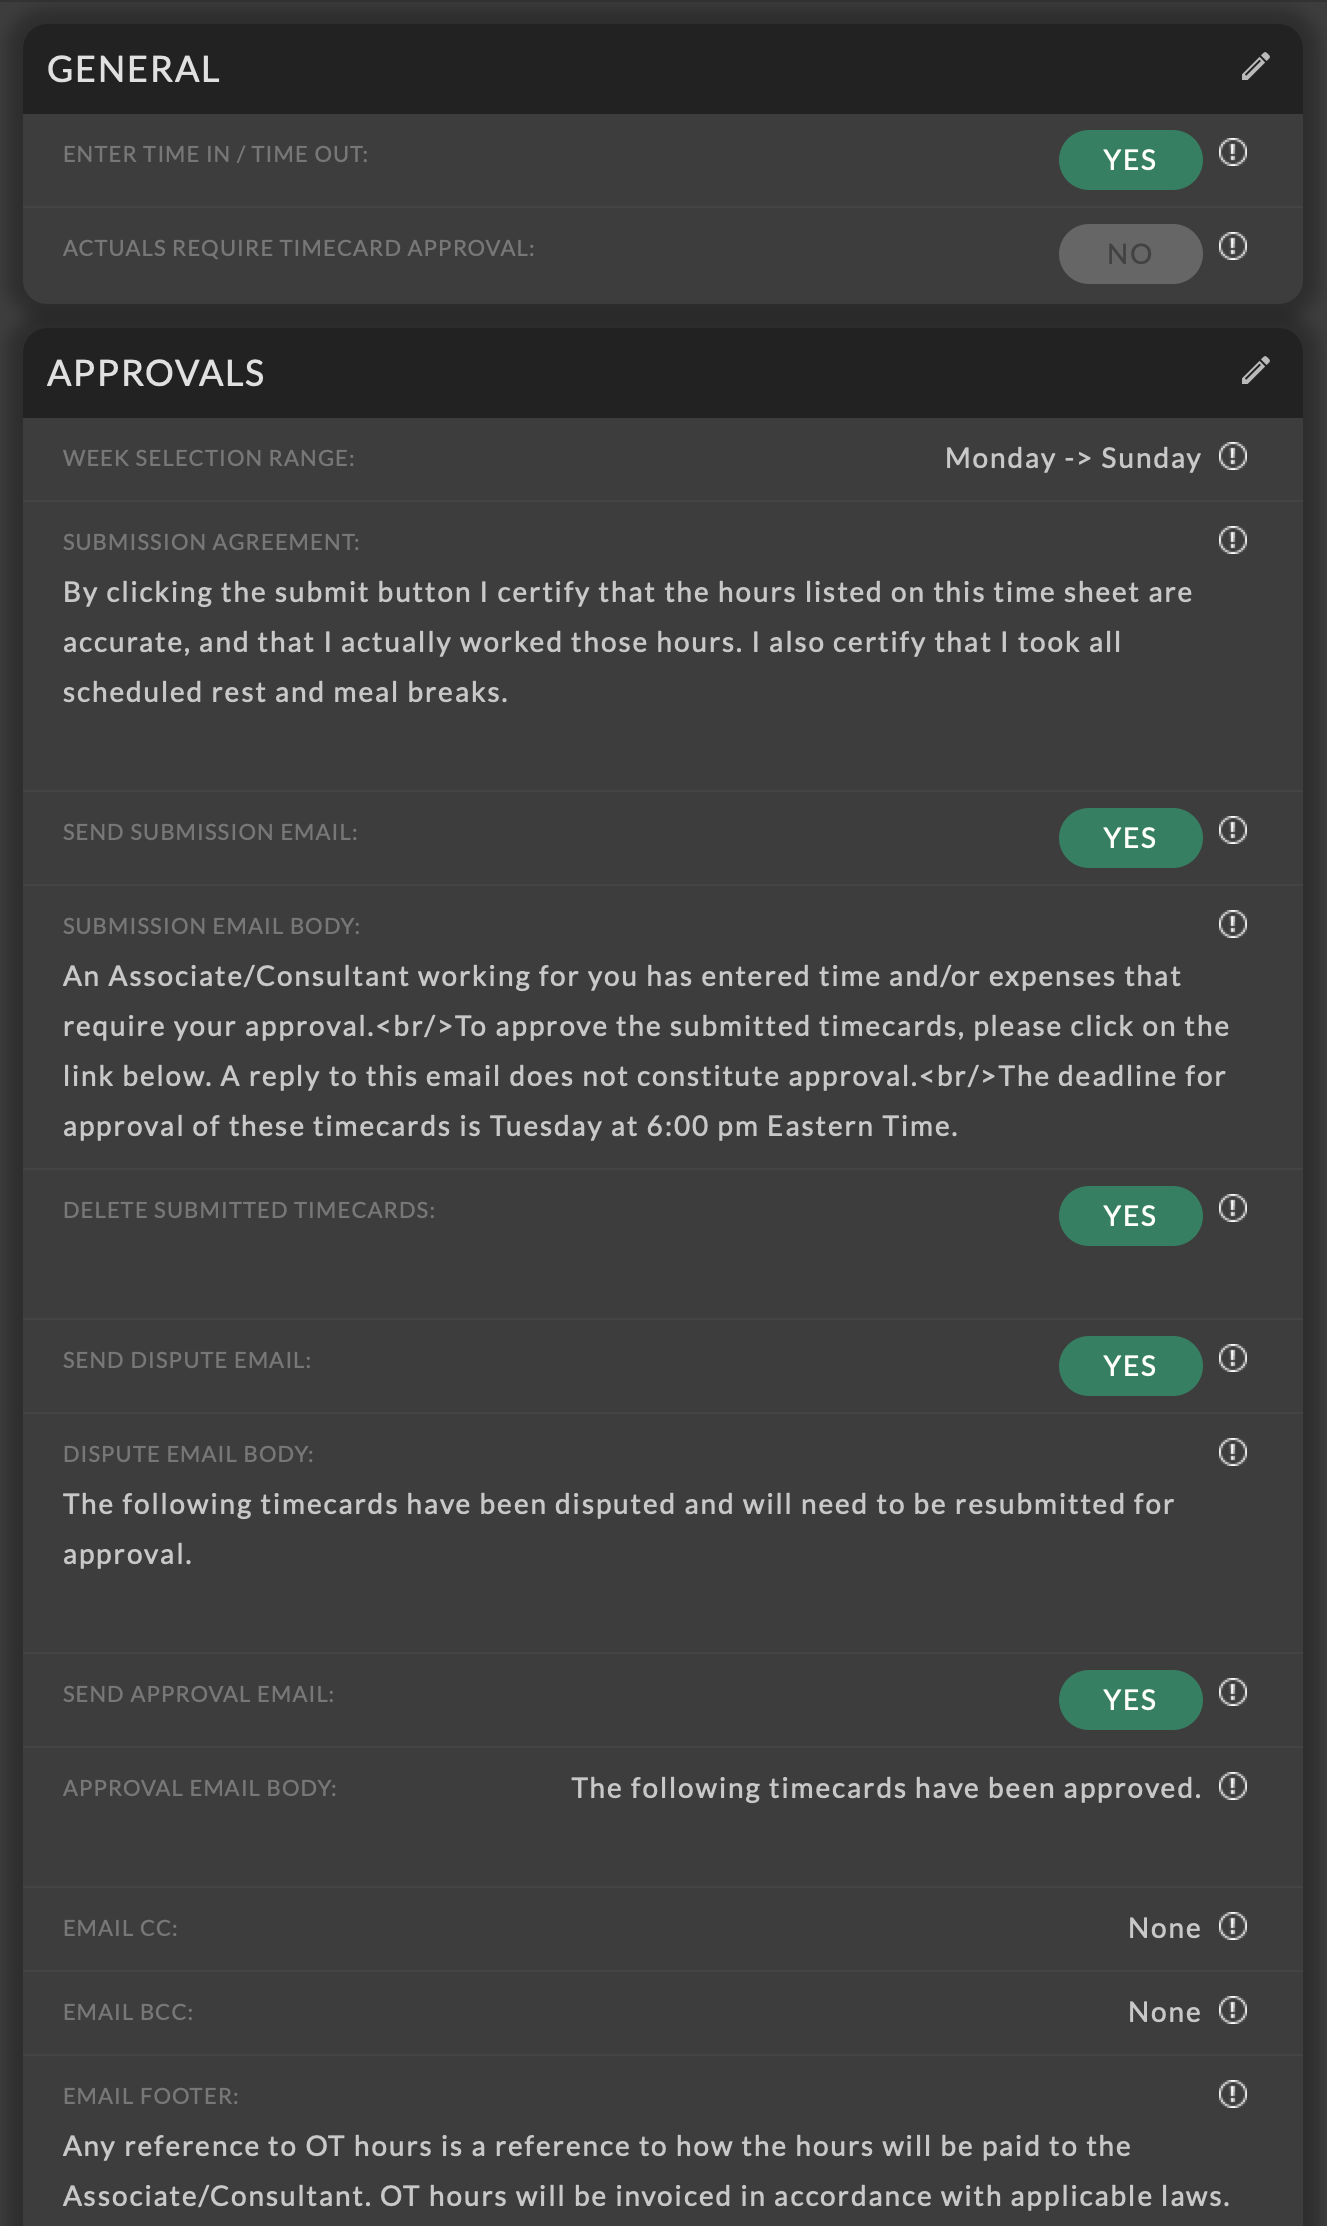
General
Time In/Time Out - Determines the method of time entry. The default option allows for time to be entered in total hour amounts. Enabling this checkbox allows for time to be entered using time in / time out values, calculating the total time for each timecard entry.
Actuals Require Timecard Approval - When selected only timecards that have been approved will be actualized.
Approvals
Week Selection Range - This dropdown sets the default start and end of the week for the submit date range selection. Options include Sunday -> Saturday and Monday -> Sunday.
Submission Agreement - This text will appear above the submit timecards for approval button. If left blank a default message will be used.
Send Submission Email - If selected, an email will be sent to the user selected for submission as well as any CC or BCC addresses included here.
Submission Email Body - This text will appear at the top of the email sent to the user to approve timecards. If left blank a default message will be used.
Delete Submitted Timecards - Enabling this field will allow submitted timecards to be deleted before approval. By default submitted timecards can not be edited but can be deleted.
Send Dispute Email - If selected, an email will be sent to the user whose timecard was disputed as well as any CC or BCC addresses included here.
Dispute Email Body - This text will appear at the top of the email sent to the user for disputed timecards. If left blank a default message will be used.
Send Approval Email - If selected, an email will be sent to the user of timecards that were approved as well as any CC or BCC addresses included here.
Approval Email Body - This text will appear at the top of the email sent to the user of approved timecards. If left blank a default message will be used.
Email CC - Enter email addresses to CC when sending timecard related emails. Please separate multiple addresses using a comma ( , ).
Email BCC - Enter email addresses to BCC when sending timecard related emails. Please separate multiple addresses using a comma ( , ).
Email Footer - This text will appear as fine print at the bottom of any timecard emails sent including submissions for approval, disputes, and approval notifications. If left blank a default message will be used.
To edit the timecard options, click the edit button from the from the corresponding panel. After making the necessary changes, click the check mark button to save.
Time Types
Time types are used to define different categories of timecards. Each timecard that is added to a day will have a time type associated with it. The default time type is “Standard” which is a fixed time type in NIM with no special rules attached. In addition to the “Standard” time type, NIM ships with 2 example types, PTO and Sick representing “paid time off” and “sick leave” respectively. You can add as many time types as you wish to further organize how time is categorized. These time types totals per user are broken down in the Timecard Crew and Users views as well as Payroll.
To add a new time type, click the button at the top right of the time type window. The time type info panel will appear and you can enter the details. When done click the “Save” button at the bottom of the info panel to save your changes.
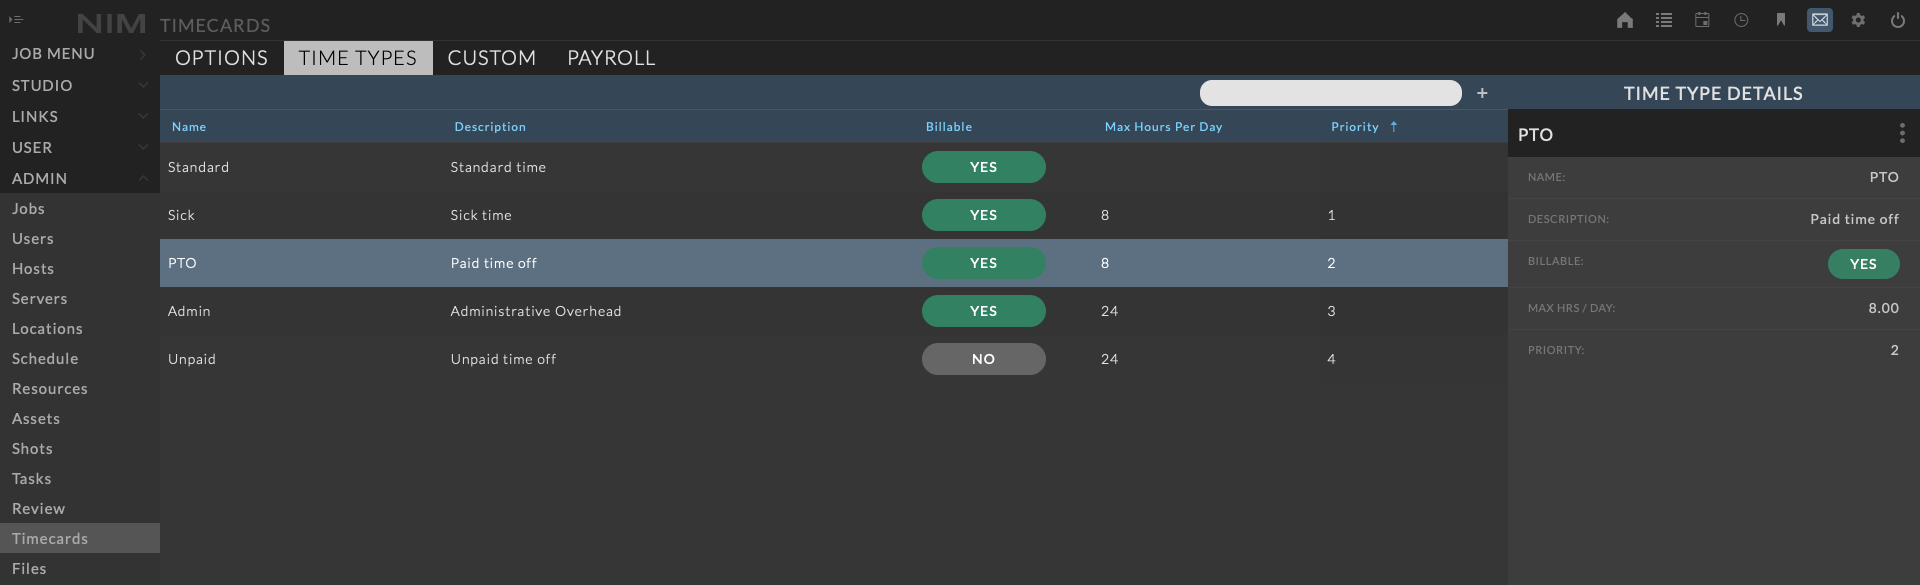
Available Options:
Name - The name of the time type. This is the name that will appear in timecard dropdown options.
Description - A brief description of the time type.
Billable - This flag determines if the time type should be billable back to the company. A time type that is marked non-billable ( empty checkbox ) has a 0 cost associated. For example, this could be used when an employee takes Unpaid Time Off.
Max Hrs/Day - This value limits the total number of hours the time type may have across all timecards on a day.
Priority - Defines sorting priority in lists.
To edit a time type, click on a row from the grid to load the time type info panel. Click on the ellipsis menu in the time type info panel and choose “Edit”. Make the necessary changes and click the “Save” button at the bottom of the info panel to save your changes. Click the cancel button to return to the view mode without saving changes.
Delete a time type entry by selecting the time type from the grid, clicking the ellipsis menu in the time type panel, and selecting “Delete”. You will be prompted to confirm deletion of the time type.
Custom Fields
Timecard custom fields work identically to Job custom fields. The main difference is that these fields appear on timecards.
Refer to Custom Job Fields for how to create and edit custom fields.
Payroll
Payroll is a timecard actualization system which calculates user cost per pay period based on a set of company defined rules. Payroll can be reconciled per pay period as a final check and balance of user costs. Once a pay period is reconciled, the status of all timecards during the pay period are updated to a “Resolved” status and the timecard is permanently locked. Companies have the option to have users on “Payroll” which utilizes the rule based timecard system, or off payroll (default) which will use the fixed rate system. For more information on Payroll actualization please refer to the Payroll section of the documentation.
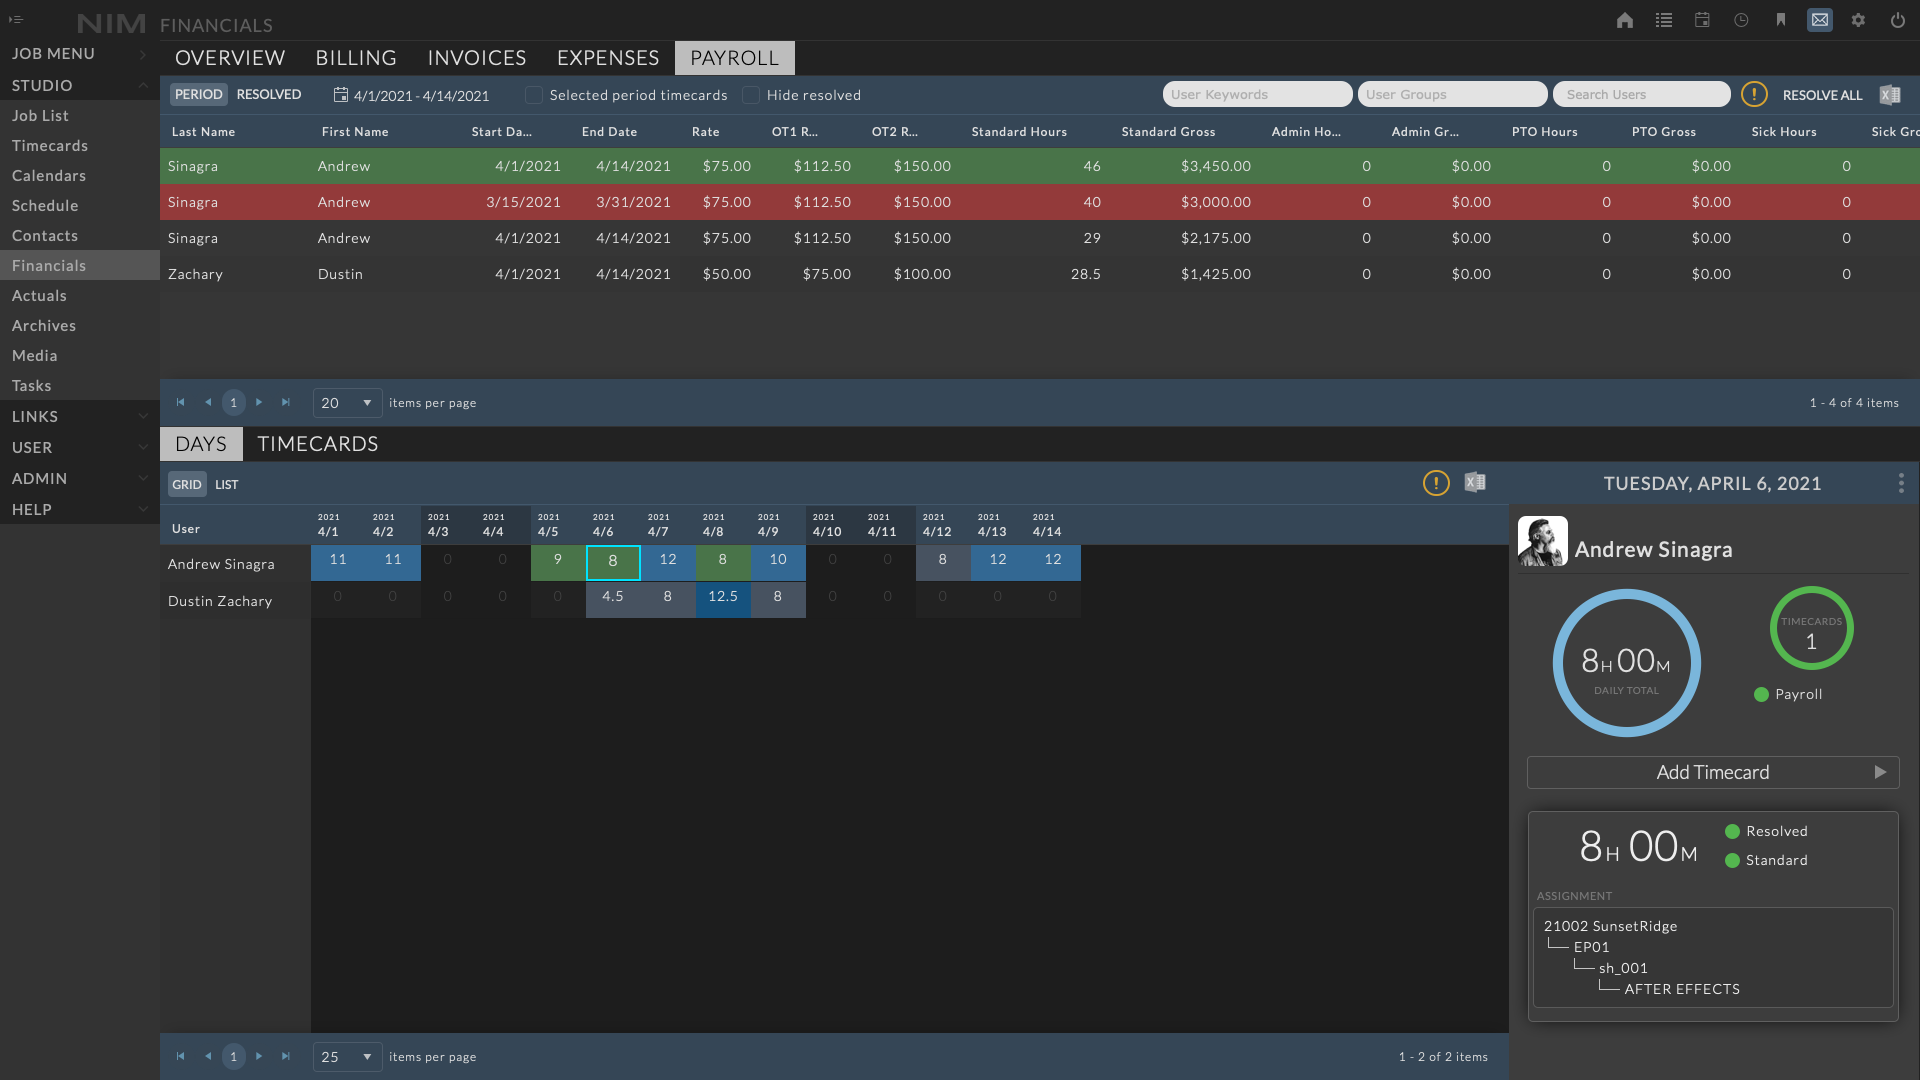
To enable a user for Payroll, navigate to Admin > Users, select the user you wish to add to Payroll and click on the User Rates section in the user info panel to expand user rates. Add a new User Rate, setting the rate type to “Payroll” and selecting a “Payroll Group”. For more information on User Rates please refer to the User Rates section of the documentation.
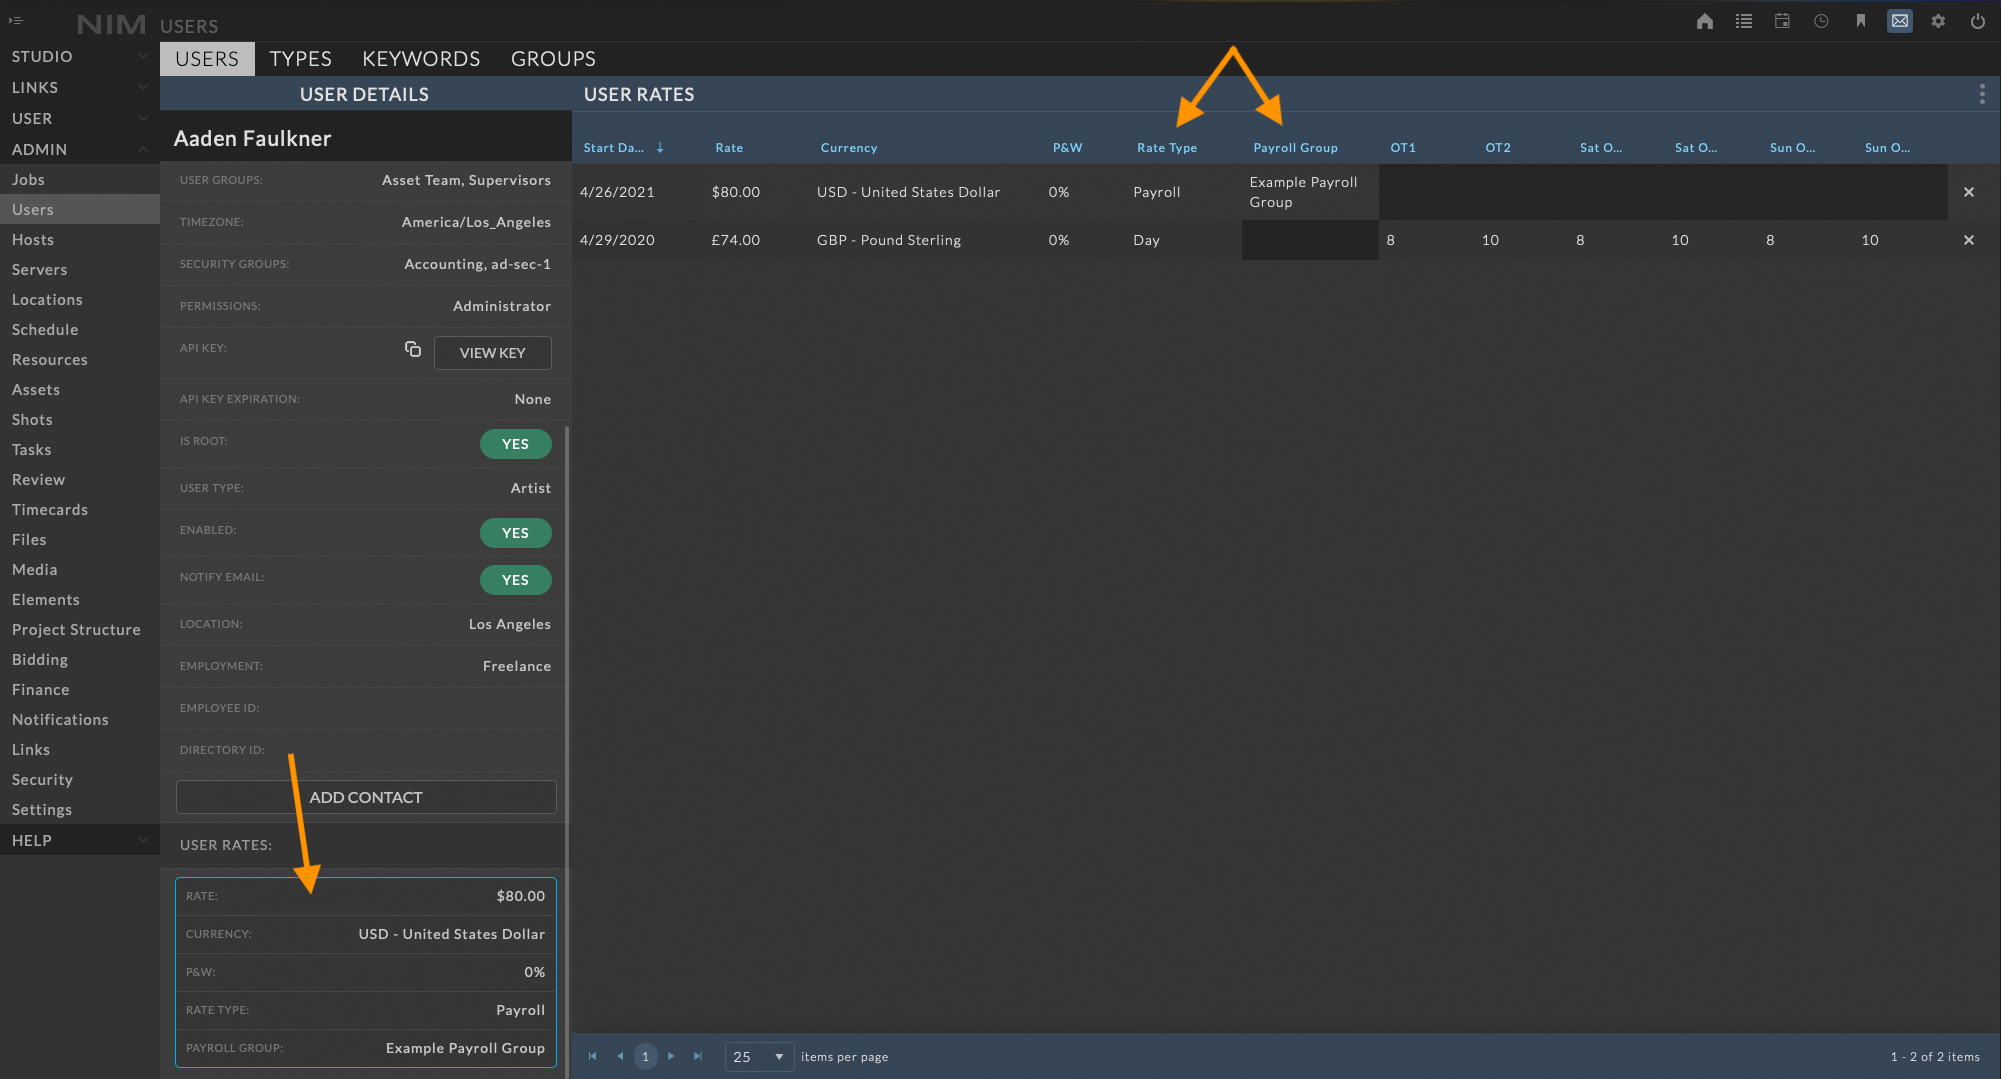
Payroll includes 3 sections required to configure the Payroll timecard system:
Rules
Groups
Pay Period.
Payroll Rules
Payroll rules are the core system which defines the behavior of Payroll actualization. A rule set is a collection of rules to determine the final hourly total and cost per pay period.
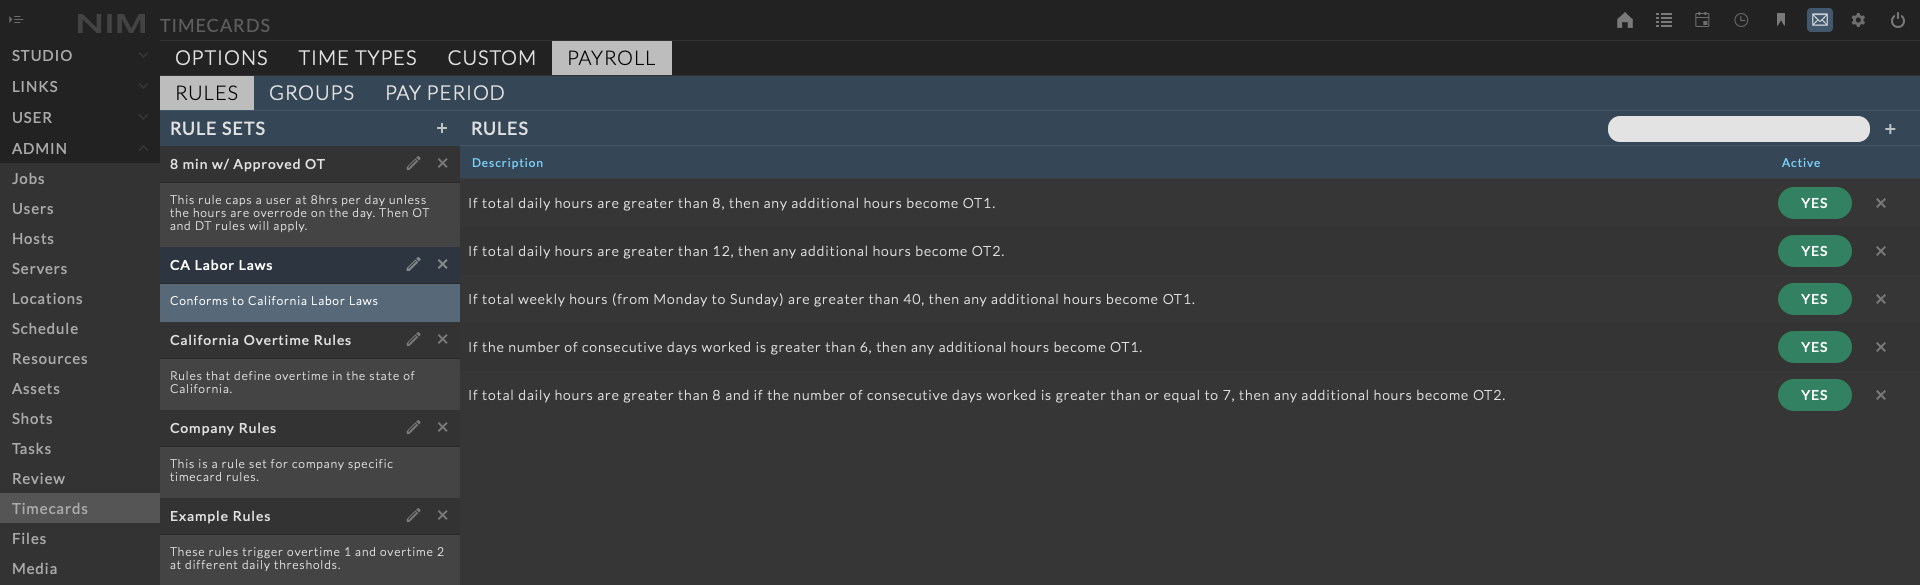
The “Rule Sets” panel lists all available rule sets that have been defined.
Click on a rule set from the list to view the associated rules.
Add Rule Set
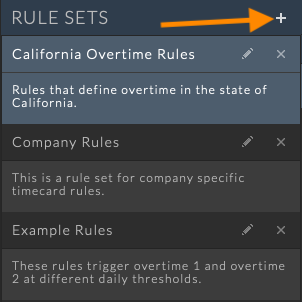
To create a new rule set, click on the at the top right of the “Rule Sets” panel.
To edit the name or description of a rule set, click on the at the right of the rule set name.
To delete a rule set, click on the X at the right of the rule set name. You will be prompted to confirm deletion of the rule set.
Add Rule
To add a new rule to a rule set, click the button at the top right of the Rules panel.
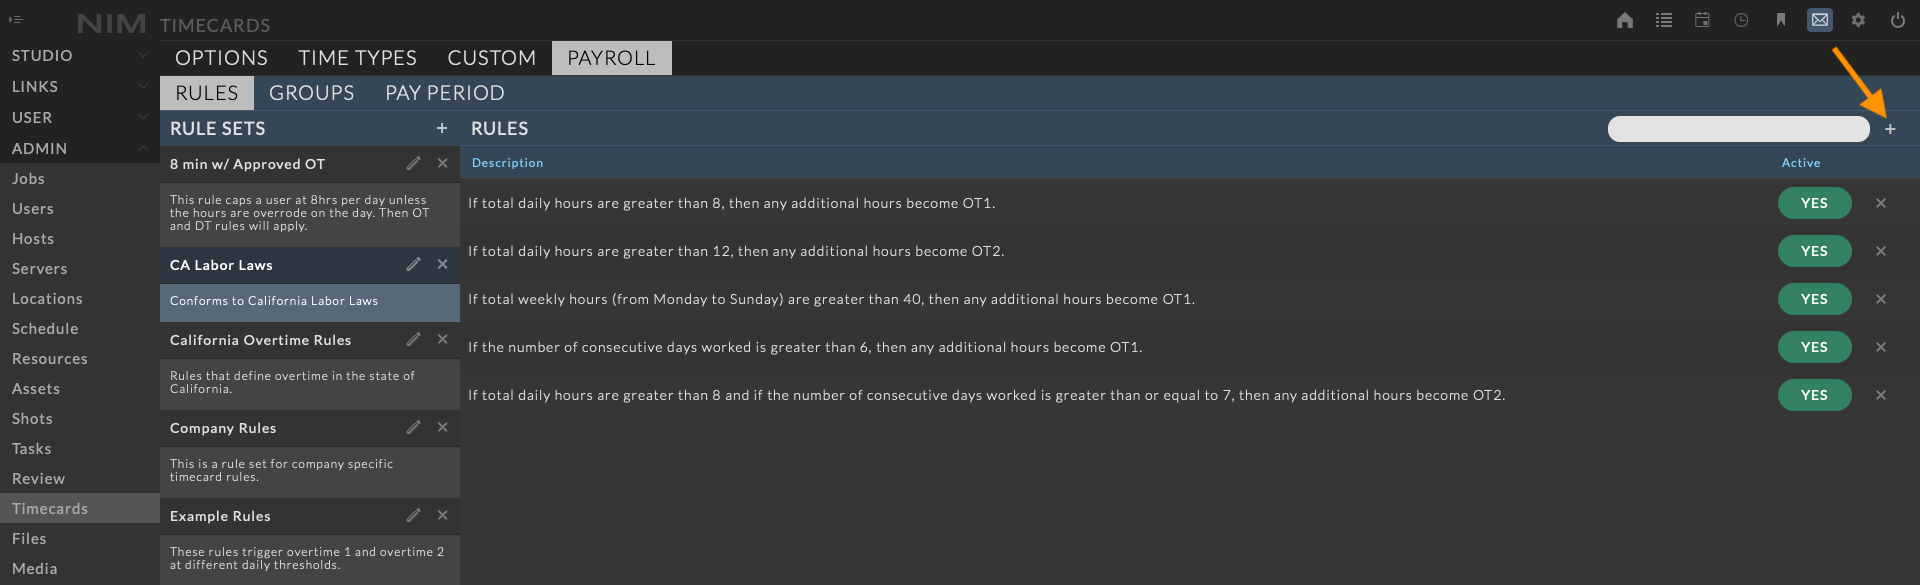
Adding a rule, or selecting an existing rule will slide out two panels for editing the selected rule dividing the UI in the three panels. The left panel is the list of rules for the currently selected rule set. The middle panel is for editing the “Rule Conditions” and the right panel determines the “Rule Effect”.
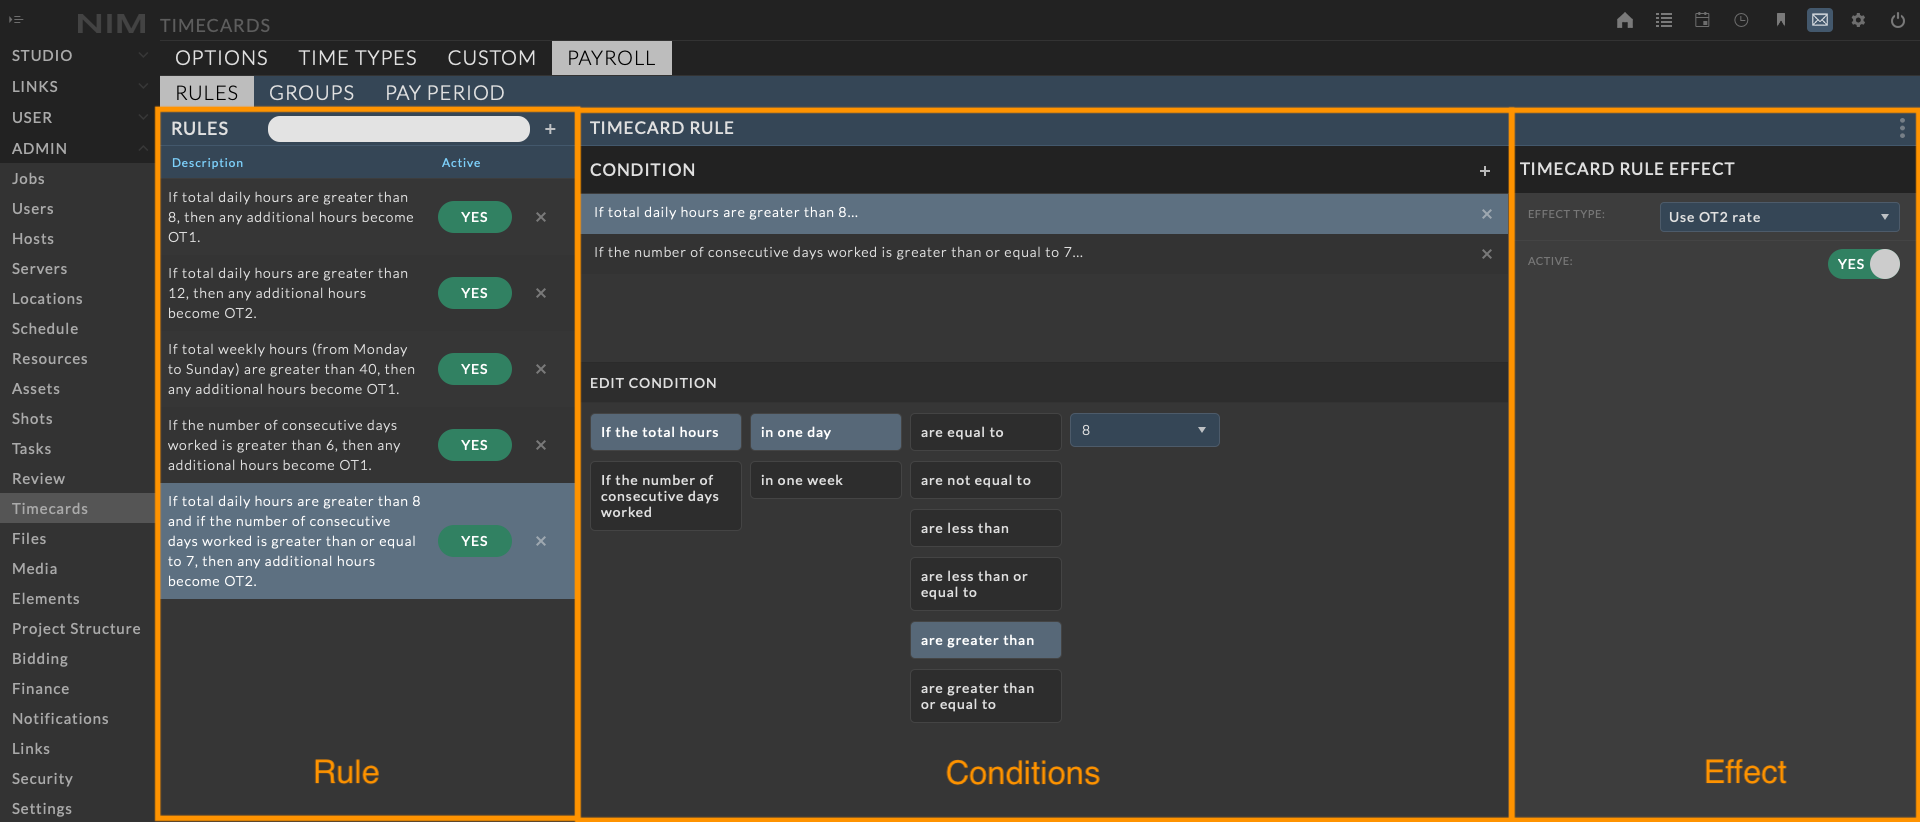
Note
Other rules in the rule set can be edited in this mode by clicking on the desired rule from the “Rules” list.
Conditions & Effect
When the panel is opened, the first condition is automatically selected. You may edit the existing condition, select a different condition, or create additional conditions.

Add Condition
To add a new condition, click the  on the right of the “Condition” toolbar. A new condition will be appended to the conditions list and will automatically be selected to edit. You may add as many conditions as needed to complete the rule.
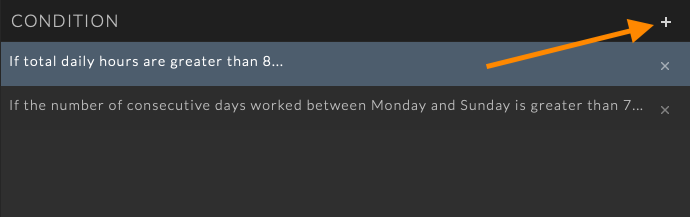
Note
Each rule may contain multiple conditions, however the result of each rule is a single effect.
Edit Condition
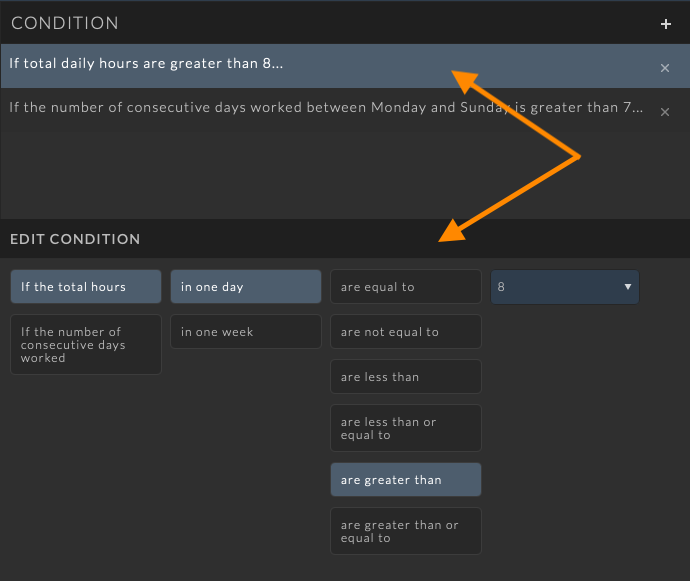
To edit the condition, select the condition you wish to edit from the list of conditions.
The selected condition will be reflected in the edit options available.
Change the options as desired in the “Edit Condition” panel to update the condition.
Start from the left and select options which meet the desired condition.
The secondary options will change depending on the previous selection. The first selection will determine the next set of available options, and so on.
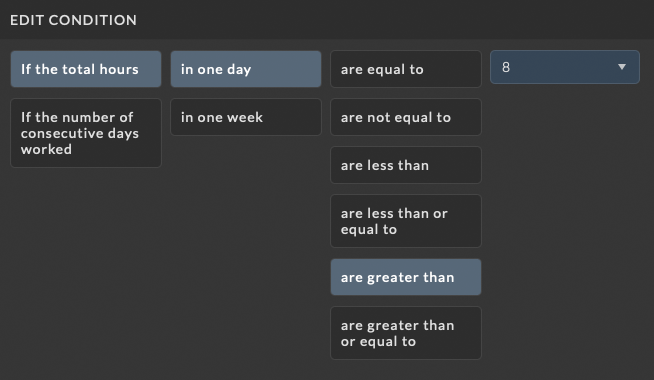
|
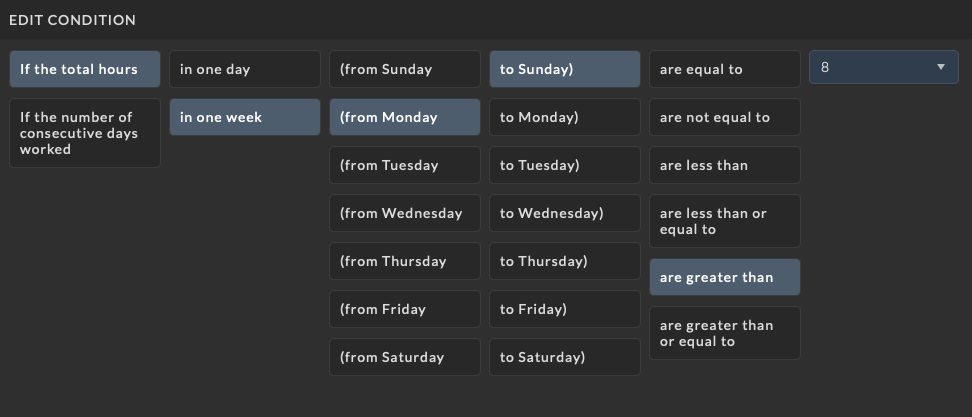
|
The first options in a rule are:
If the total hours…
If the number of consecutive days worked…
The next set of options include:
in one day… (available for if the total hours)
in one week… (available for both previous selections)
in any time period… (available for consecutive days worked)
If “in one week” is selected, the next set of options will allow you to select the start and end days (from X to Y) to be evaluated during the week.
The next set of options determine how the condition is evaluated:
are equal to…
are not equal to…
are less than…
are less than or equal to…
are greater than…
are greater then or equal to…
Lastly is a value dropdown to set the quantity to be evaluated against.
Delete Condition
To delete a condition, click the X at the right of the condition you wish to delete.
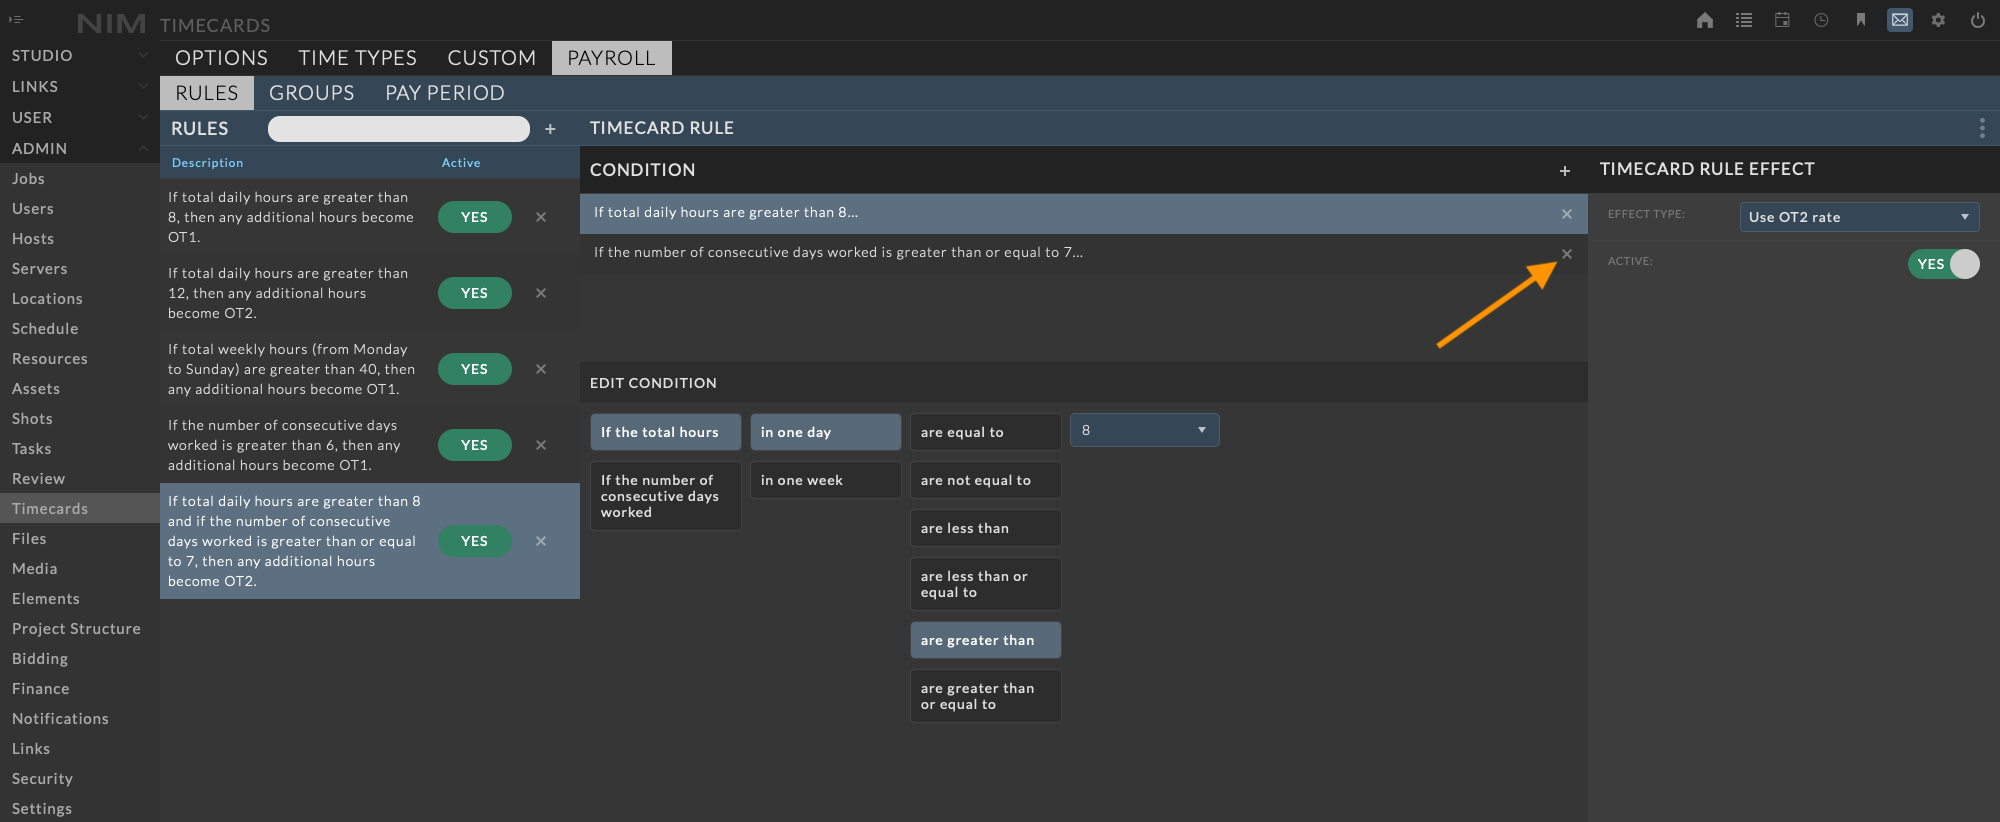
Edit Effect
Each rule contains a single effect that is enforced when all conditions are met. To define the effect, select the desired “Effect Type” and potential “Effect Value” from the “Timecard Rule Effect” panel.
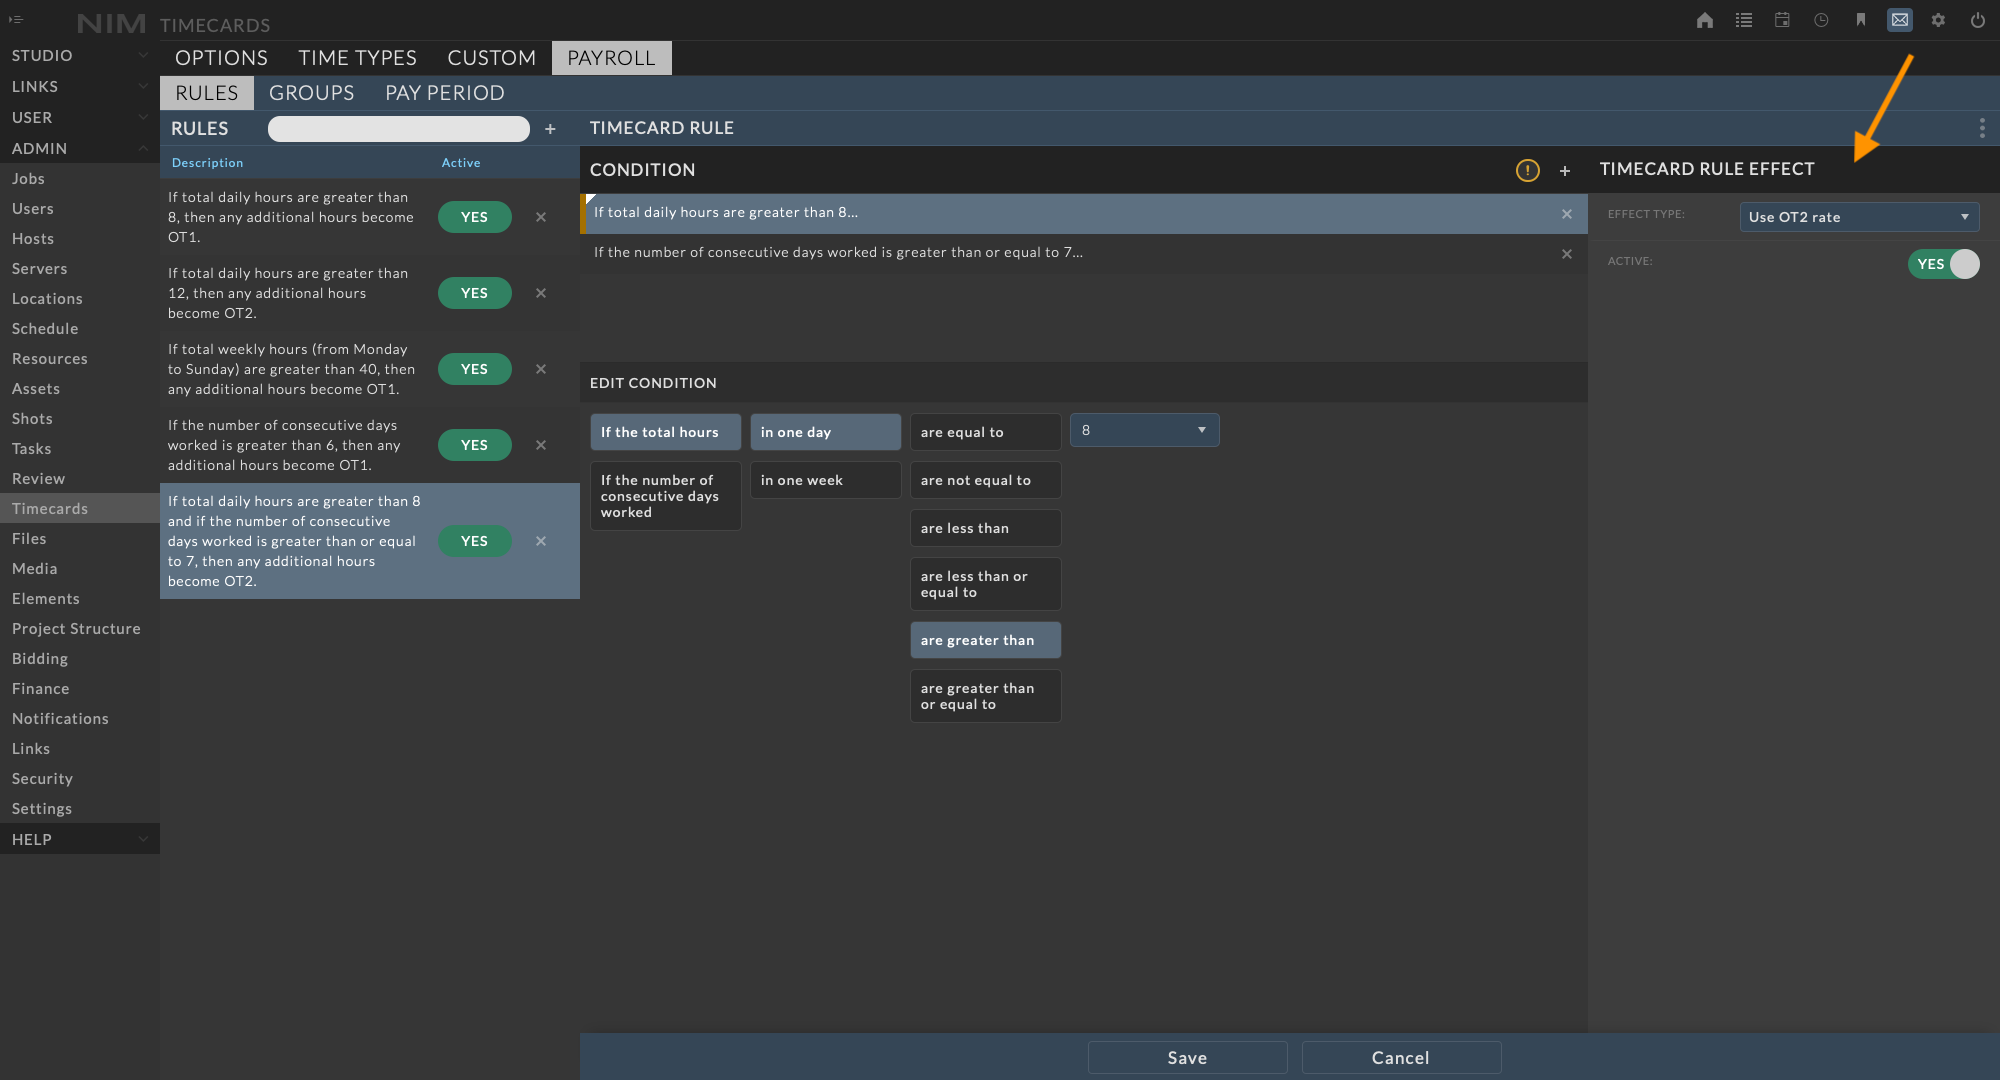
Effect Type options:
Use OT1 rate |
Hours will be calculated at the Overtime Rate 1 rate. |
Use OT2 rate |
Hours will be calculated at the Overtime Rate 2 rate. |
Ignore Hours |
Hours will be not be added to the hourly total. |
Convert to X Hours |
Hours will be converted to the quantity specified by the “Effect Value”. The “Effect Value” field will be available when this option is selected. |
For example:
If a user has a guaranteed minimum of 8 hours per day for any time over 4 hours worked, a rule can be defined where “If the total hours in one day is greater than or equal to 4 and less than 8, then convert to 8 hours.”
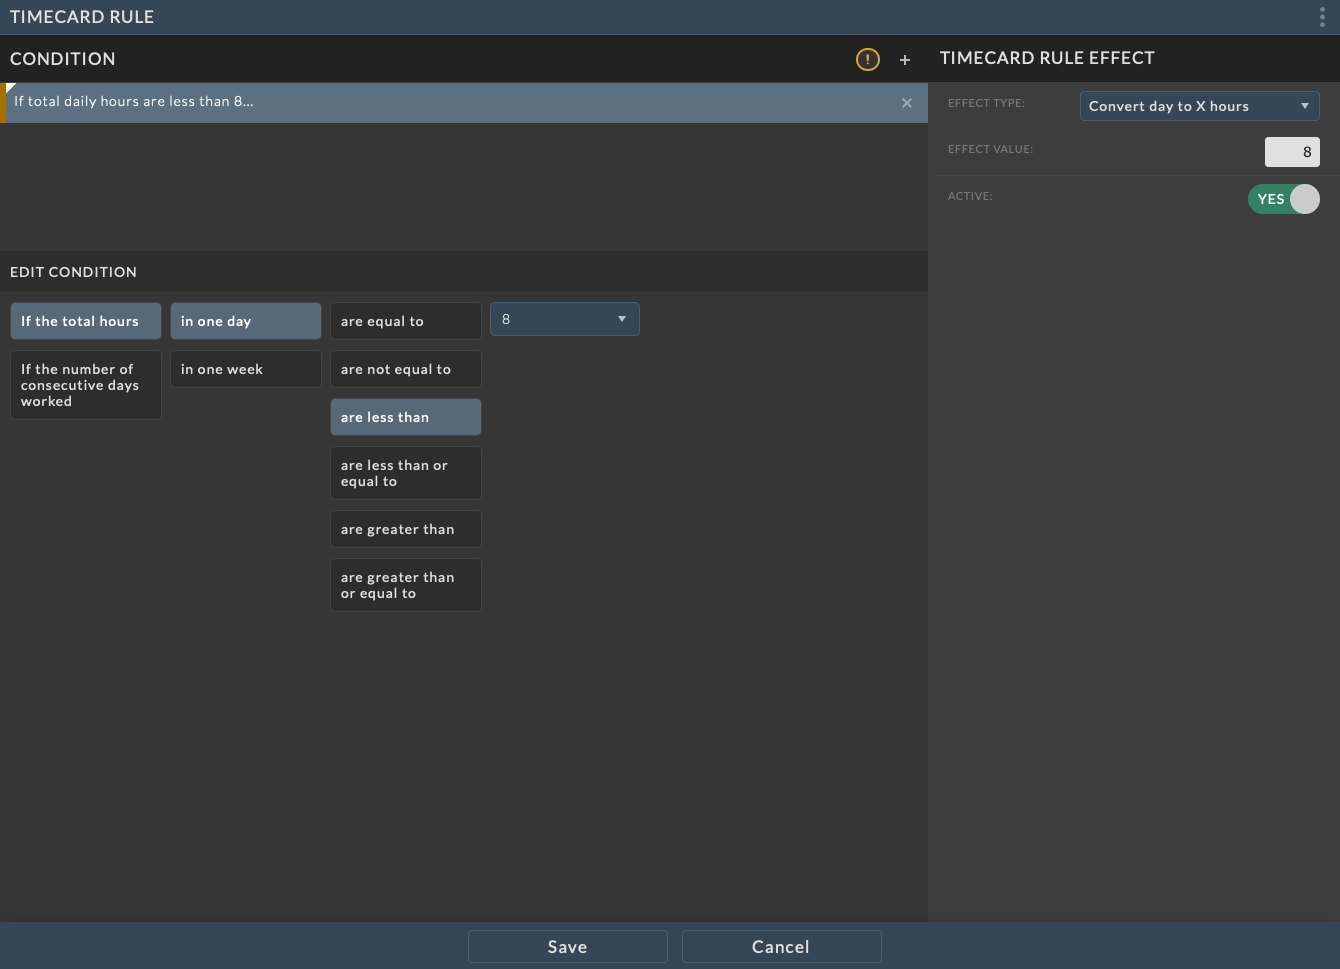
The Active checkbox determines if the selected rule will be enforced. Unchecking this box will disable the selected rule.
Saving the Rule
Modify each condition and the effect as needed. When unsaved changes exist, the Save and Cancel buttons will appear at the bottom of the “Timecard Rule” panel and the conditions and/or effect items will have an orange indicator to denote items with unsaved changes.
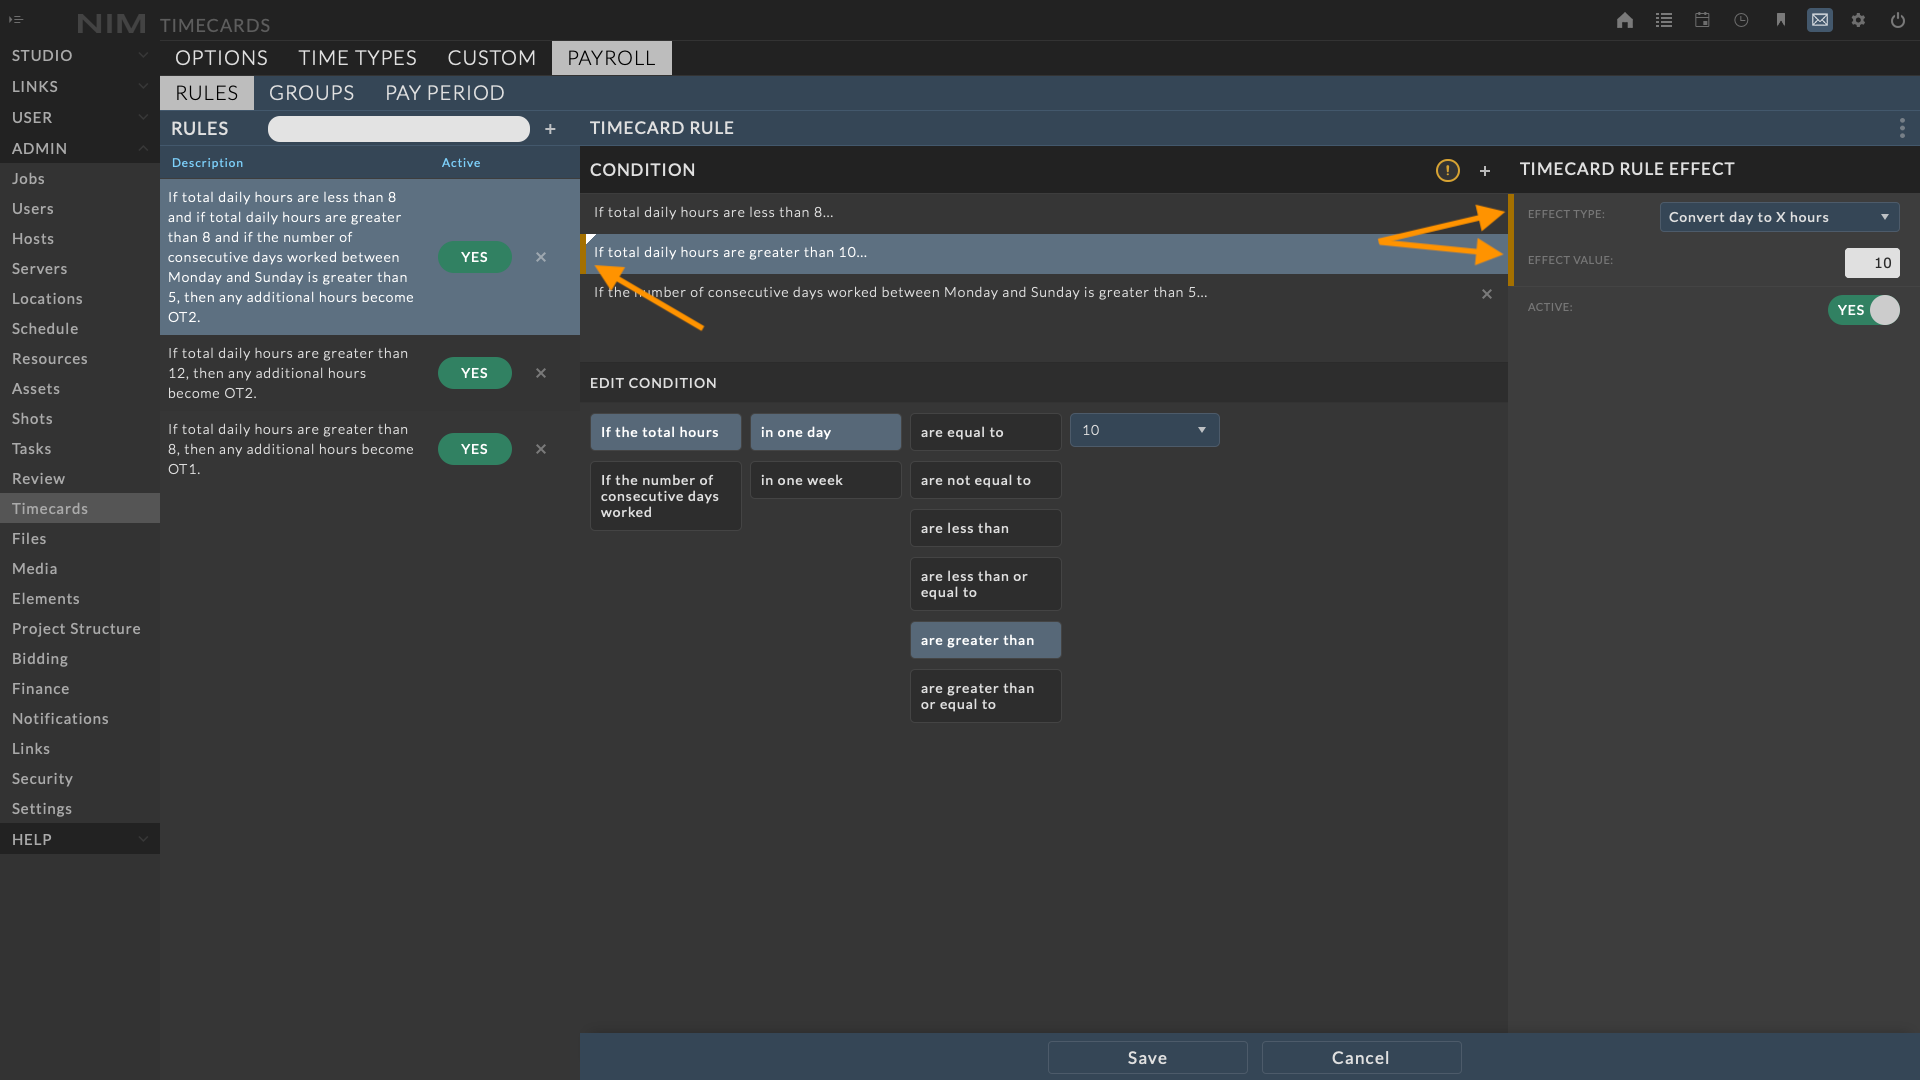
To save all changes to the rule including all conditions and the effect, click on the “Save” button. Click the Cancel button to return to the view mode without saving changes.
Important
Choosing Cancel will revert all unsaved condition and effect changes for the selected rule.
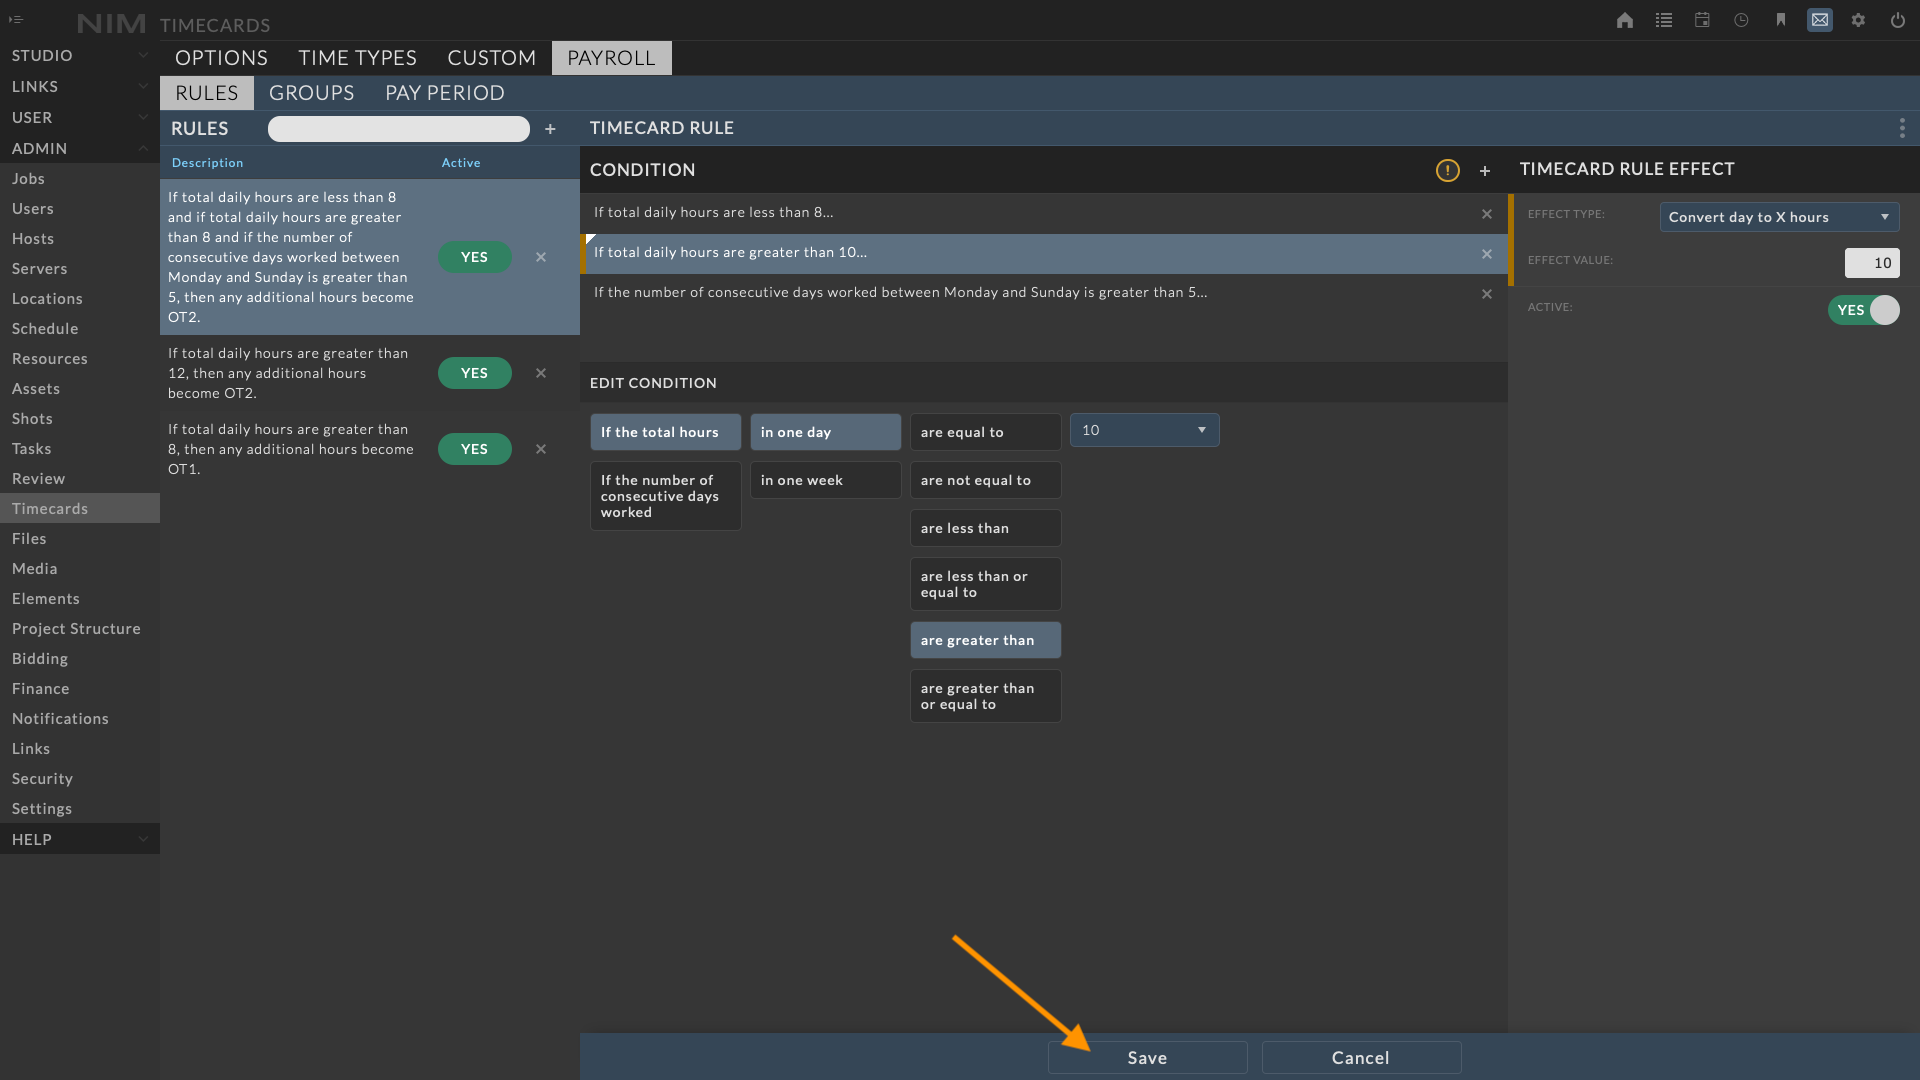
Close Timecard Rule
To close the rule editing area and return to the rule sets, click on the ellipsis menu on the right of the “Timecard Rule” toolbar and choose “Close”. This will collapse the edit panels and return you to the Payroll > Rules section.
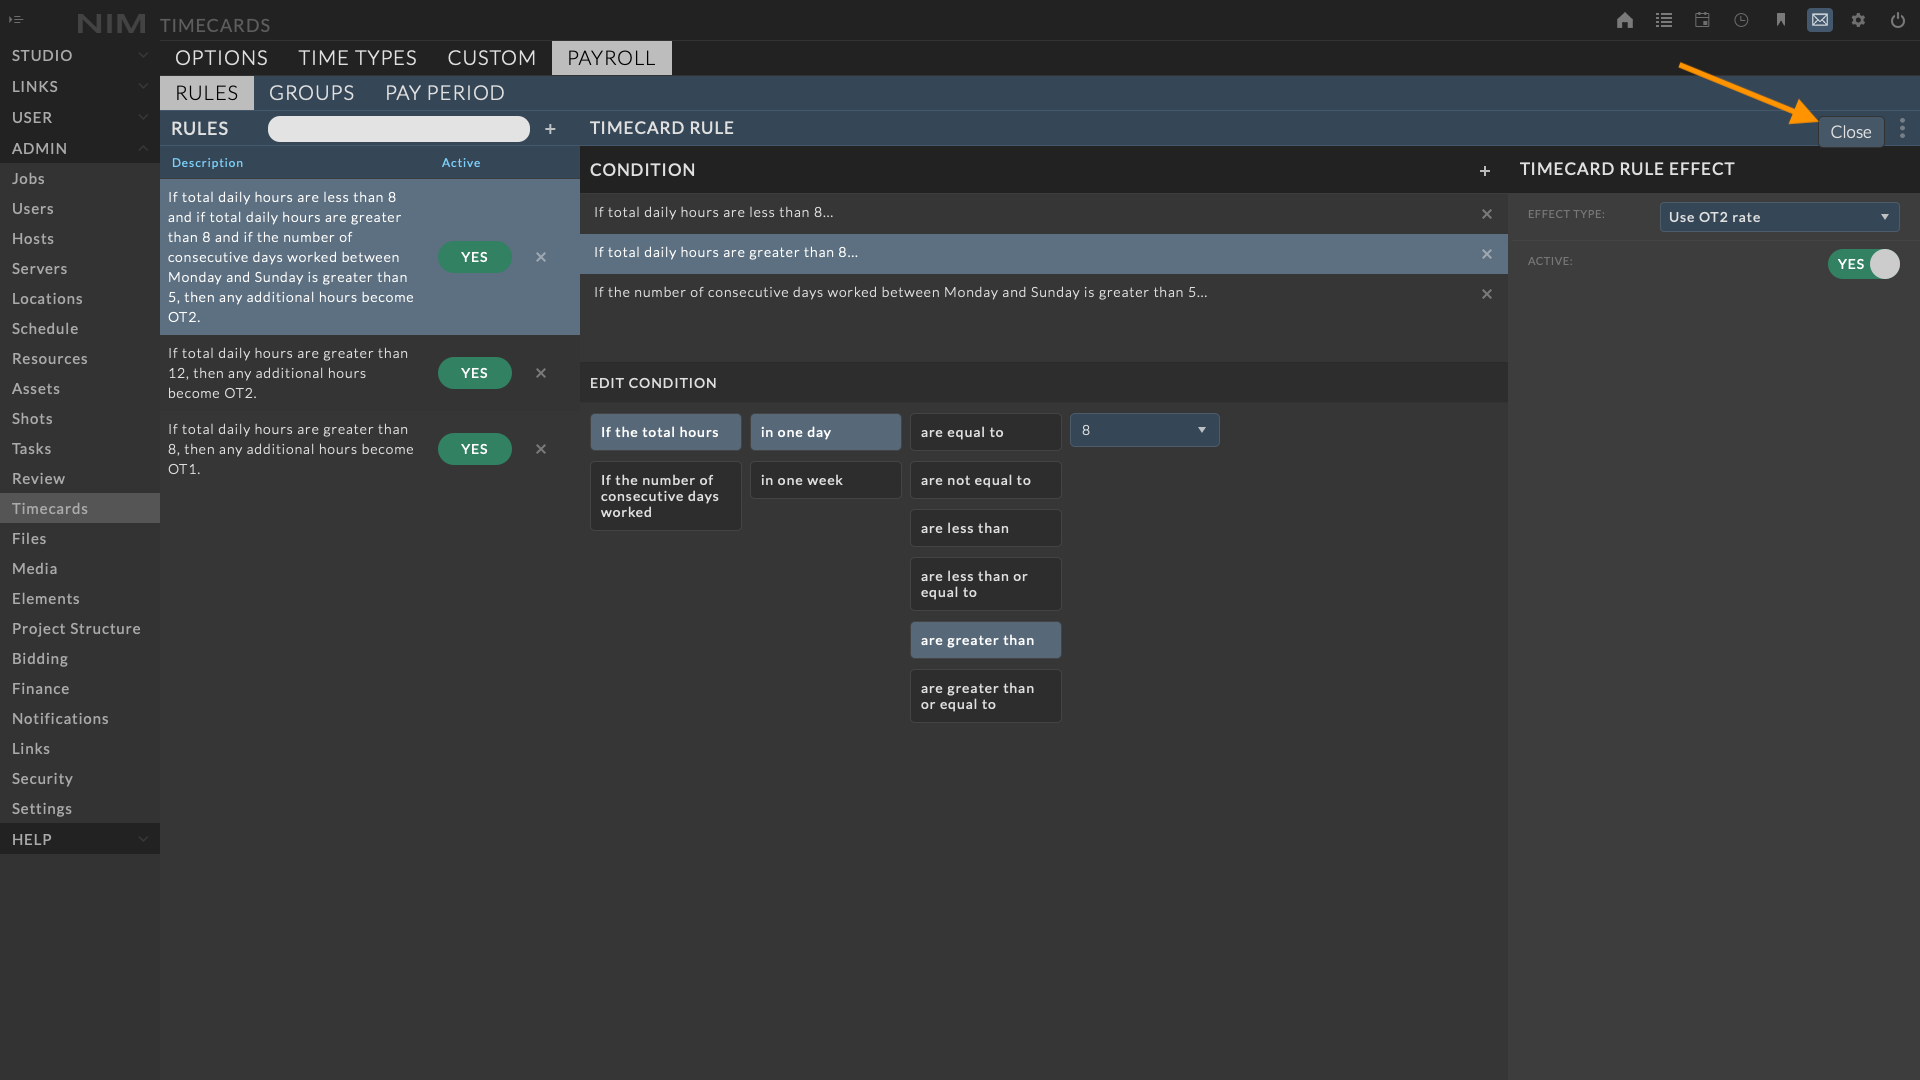
Payroll Groups
Multiple Rule Sets can be grouped together to define complex rule definitions. These are called “Payroll Groups”. Each user in NIM using the Payroll system will have a Payroll Group assigned to their user rate.
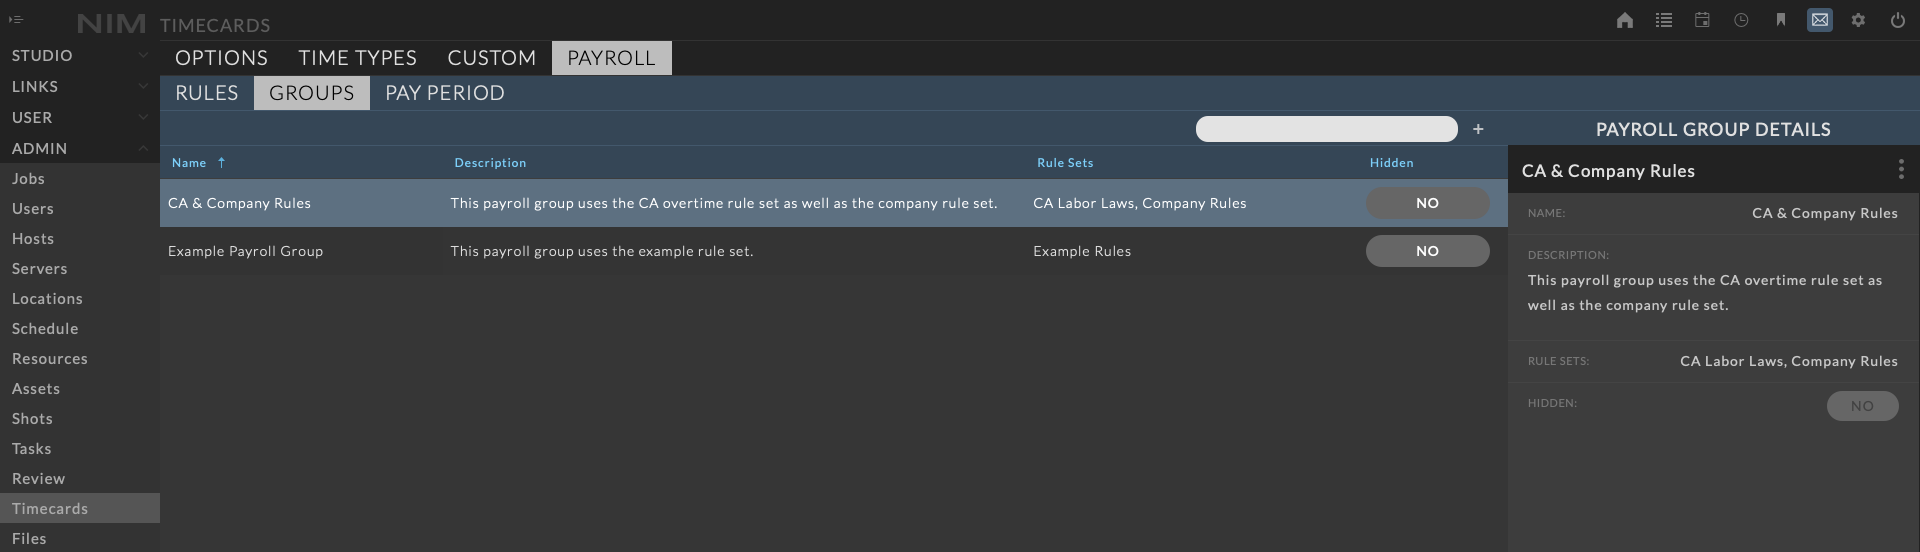
Example
A company may define a rule set to meet local state, country, or regional rules, in addition to company defined rules. A payroll groups can be made to meet these needs combining the company rule set and the local specific rule set.
To add a new payroll group, click the button at the top right of the payroll group window. The payroll group info panel will appear and you can enter the details. When done click the “Save” button at the bottom of the info panel to save your changes.
Available options:
Name - The name of the payroll group. This name will be select-able from user rates when assigning the user to a payroll group.
Description - A brief description of the group.
Rule Sets - Select all rule sets that should be part of the group.
Hidden - Hides the group from being selectable in user rates.
To edit a payroll group, click on a row from the grid to load the payroll group info panel. Click on the ellipsis menu in the payroll group info panel and choose “Edit”. Make the necessary changes and click the “Save” button at the bottom of the info panel to save your changes. Click the cancel button to return to the view mode without saving changes.
Delete a payroll group entry by selecting the payroll group from the grid, clicking the ellipsis menu in the payroll group panel, and selecting “Delete”. You will be prompted to confirm deletion of the payroll group.
Pay Period
Pay Periods are defined by rules to determine the start and end of your pay periods used for Payroll actualization. Entries can be created with a start date and frequency defined by either “Every X Weeks” or “Specific Dates each Month”.
A base rule is set by default and can not be deleted. The base rule can be modified and will be in effect until a new pay period is created and timecards are entered after the start date of the new pay period rule.
To add a new pay period rule, click the button at the top right of the pay period rule window. The pay period rule info panel will appear and you can enter the details. When done click the “Save” button at the bottom of the info panel to save your changes.
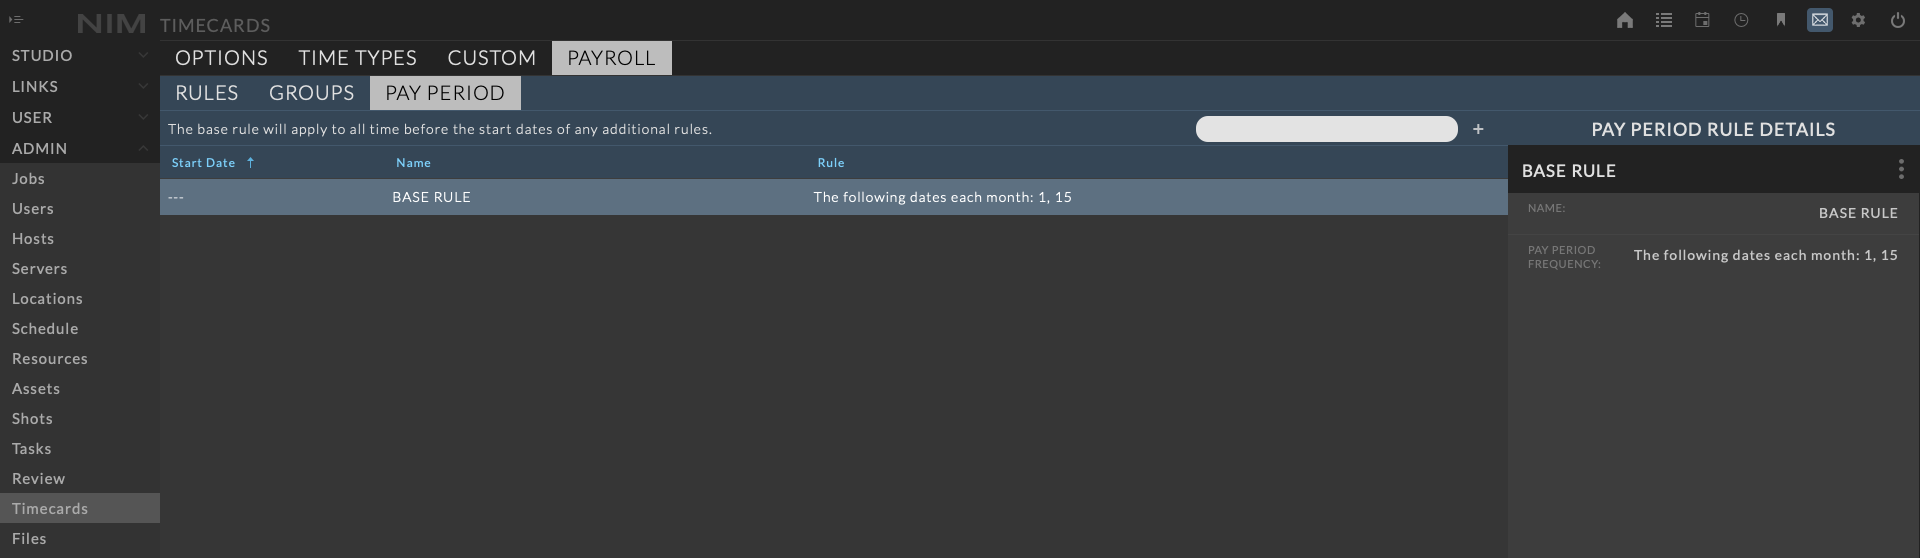
Available Options:
Name - The name of the pay period rule. This name is only displayed here for administrative purposes.
- Pay Period Frequency - Sets the start and end of the pay period
Every X Weeks
Specific Dates Every Month
Additional options are dependent upon the Payroll Frequency setting:
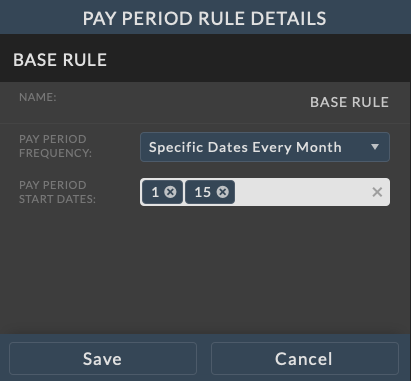
Specific Dates Every Month:
When this option is selected, the Pay Period Start Dates field is available to choose dates which start a new pay period. Multiple dates can be selected to define specific pay periods.
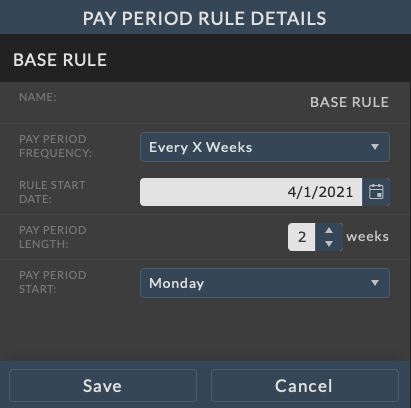
Every X Weeks:
When this option is selected additional fields are made available:
Rule Start Date - This is the date the pay period rule starts on.
Pay Period Length - This value is the period length in weeks.
Pay Period Start - This value is the day the pay period starts.
Note
When starting a new pay period, if the rule start date and pay period start day do not align, then the first period will be adjusted to end on the day closest to the end of the payroll period length without going past the next pay period start day.
To edit a pay period rule, click on a row from the grid to load the pay period rule info panel. Click on the ellipsis menu in the pay period rule info panel and choose “Edit”. Make the necessary changes and click the “Save” button at the bottom of the info panel to save your changes. Click the cancel button to return to the view mode without saving changes.
Delete a pay period rule entry by selecting the pay period rule from the grid, clicking the ellipsis menu in the pay period rule panel, and selecting “Delete”. You will be prompted to confirm deletion of the pay period rule.
Files
NIM files are logged to assets and shots containing the owner, date, path, server, and version number. Studios can extend the fields stored on files using the file custom fields.
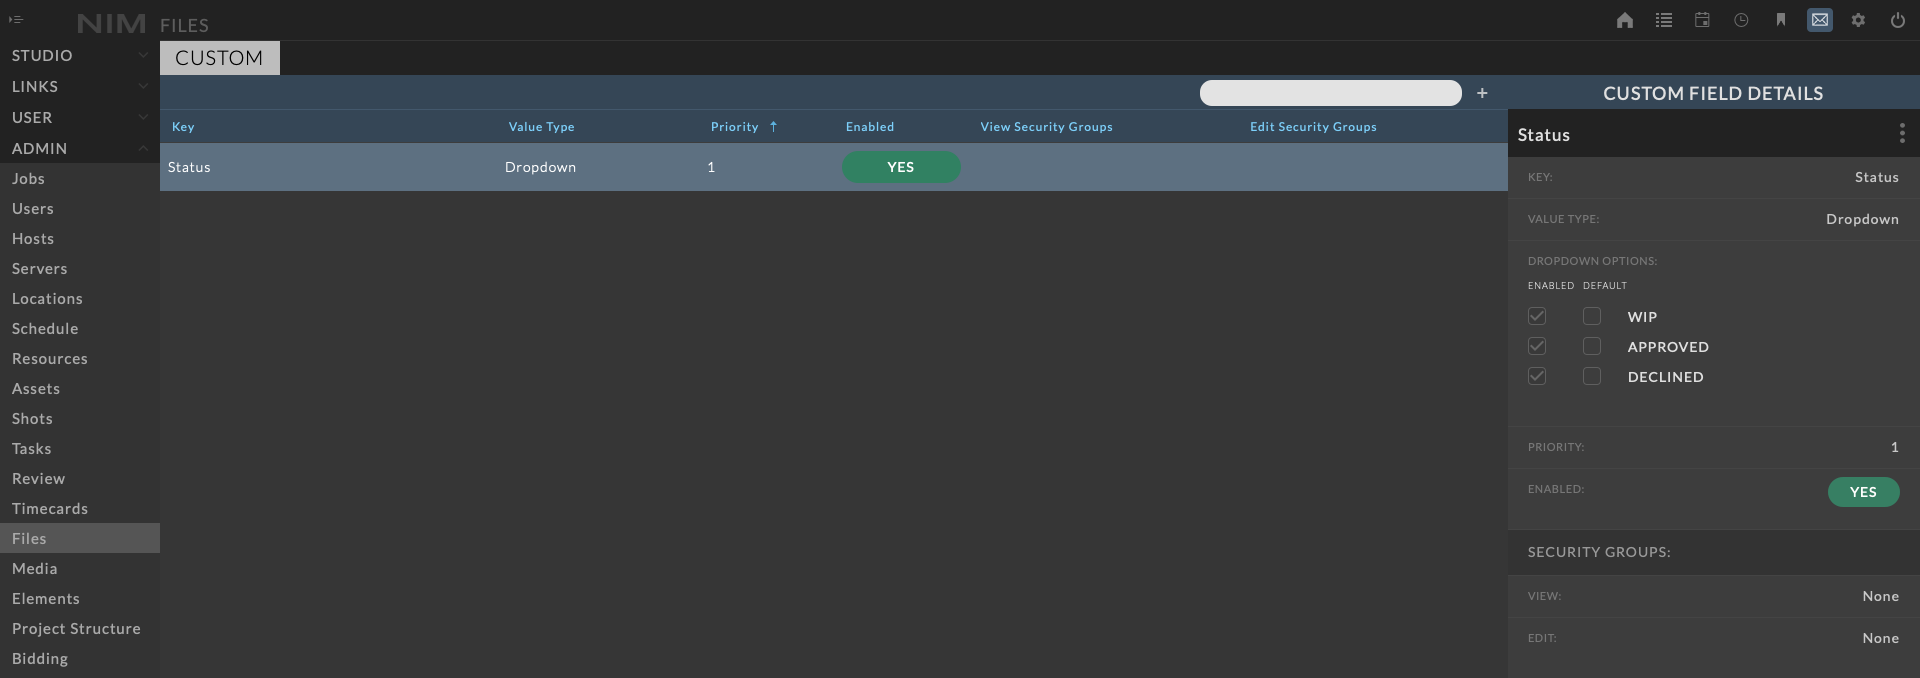
Custom Fields
Files custom fields work identically to Job custom fields. The main difference is that these fields appear on files.
Refer to Custom Job Fields for how to create and edit custom fields.
Media
NIM provides studios with a system for logging all media coming into and out of the facility with custom fields and per item tracking information.
Media Types
The media types grid contains the name of media used in NIM media and archive logging. The media types populate dropdown menus in the following menus when adding jobs to an archive or media item:
Main Menu / Studio / Archives
Main Menu / Studio / Media
Job Menu / Production / Media
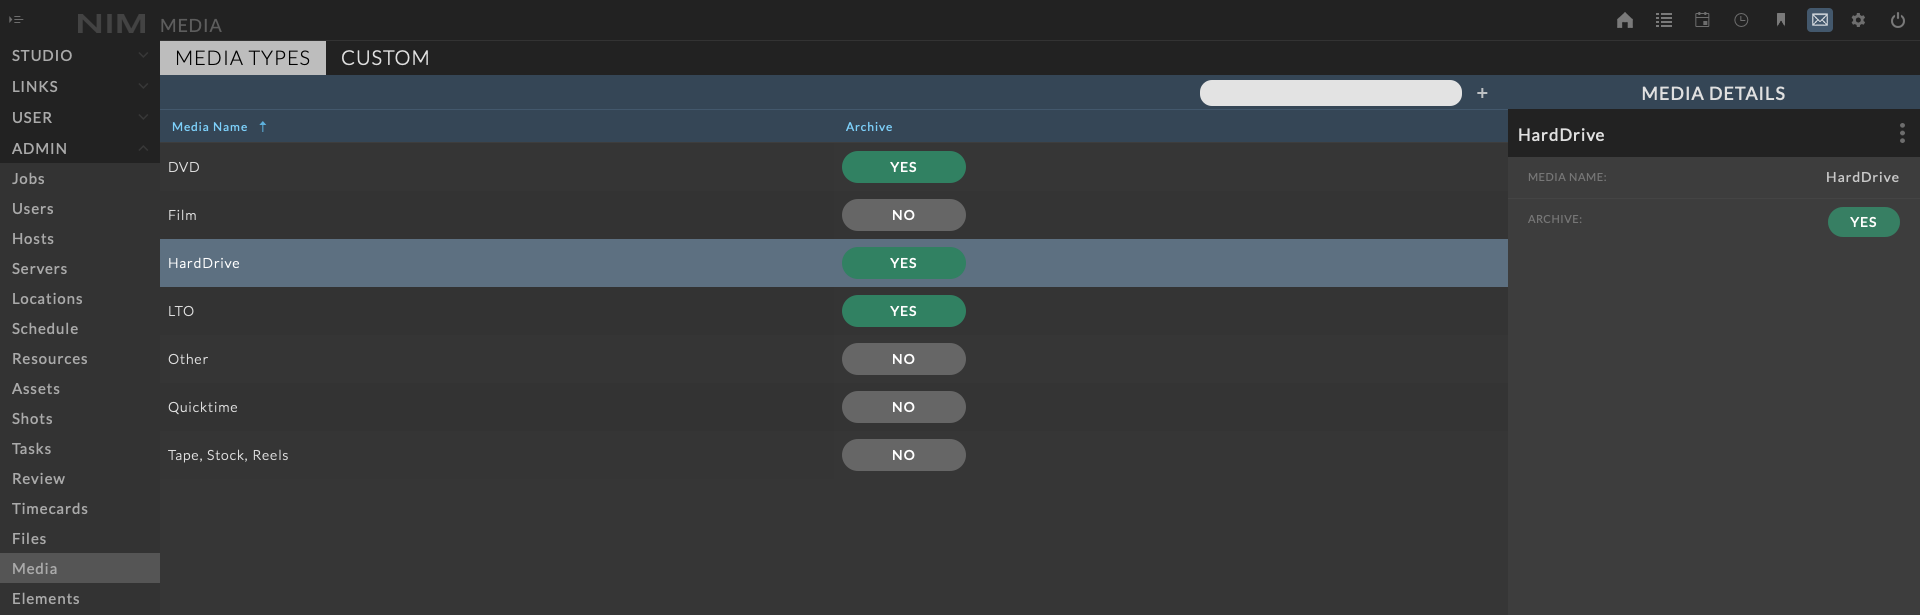
To add a new media type, click the button at the top right of the media types window. The media type details will appear and the required information can be entered as needed. When done click the “Save” button at the bottom of the info panel to save your changes.
Available Options:
Media Name - The name of the media.
Archive - The dropdown determines if the media type appears in the archives media type list.
To edit a media type, click on a row from the grid to load the media type info panel. Click on the ellipsis menu in the media type info panel and choose “Edit”. Make the necessary changes and click the “Save” button at the bottom of the info panel to save your changes.
Delete a media type entry by selecting the media type from the grid, clicking the ellipsis menu in the media type panel, and selecting “Delete”. You will be prompted to confirm deletion of the media type. Deleting a media type will remove that media type from any previously assigned media.
Custom Fields
Media custom fields work identically to Job custom fields. The main difference is that these fields appear on media.
Refer to Custom Job Fields for how to create and edit custom fields.
Elements
Elements are a way to categorize items associated with an asset, shot, or render. They are tracked separate from files which are typically associated with a project or scene file.
For example a Maya scene (.ma/.mb) would be considered a file while the EXR that was rendered from it would be considered an element.
Types
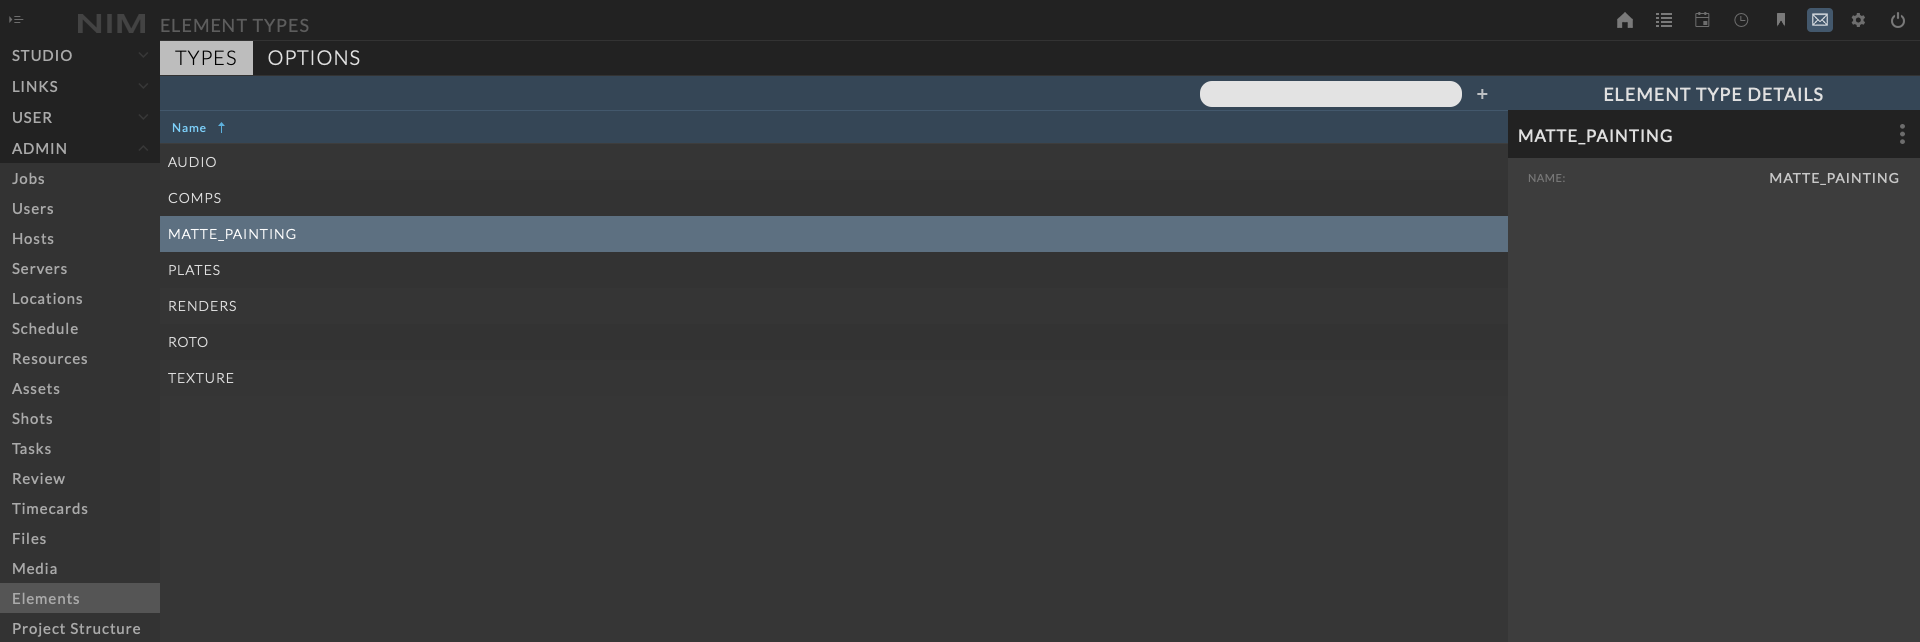
To add new element, click the button at the top right of the element window. The element details will appear and the required information can be entered as needed. When done click the “Save” button at the bottom of the info panel to save your changes.
Available Options:
Element Name - The name assigned to an element.
To edit an element type, click on a row from the grid to load the element type info panel. Click on the ellipsis menu in the element type info panel and choose “Edit”. Make the necessary changes and click the “Save” button at the bottom of the info panel to save your changes.
Delete an element type entry by selecting the element type from the grid, clicking the ellipsis menu in the element type panel, and selecting “Delete”. You will be prompted to confirm deletion of the element type. Deleting an element type will remove the type association from any existing elements using the type.
Options
The element options tab allows for the editing of the default element options.
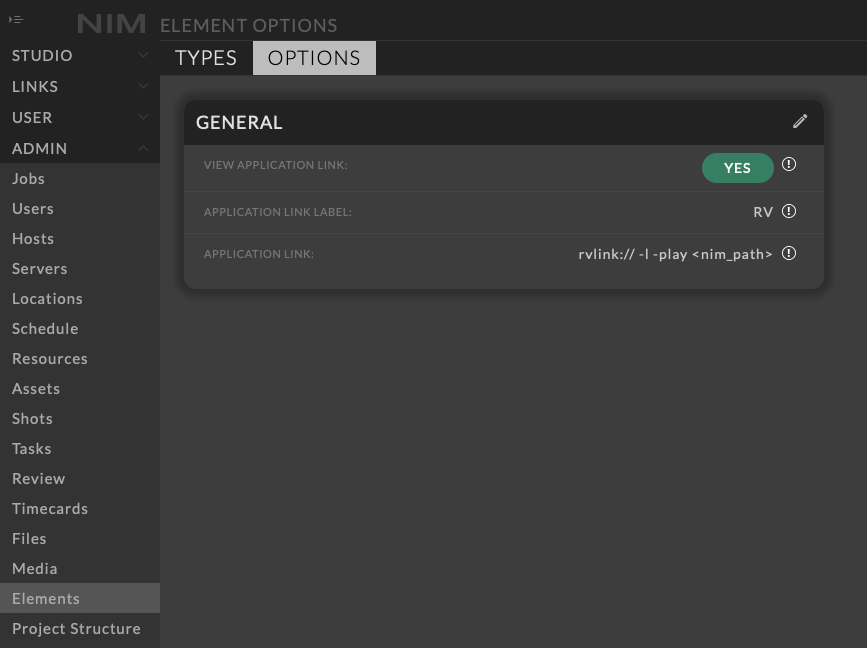
Some 3rd party applications support application links which allows for files to be opened with a locally installed application.
General Options:
View Application Link - Display the application link on element pages. Application links provide direct opening of files in 3rd party applications that support URL links.
Application Link Label - The label used in the column of the element grid.
Application Link - Enter the application link here with the
<nim_path>variable in place of the image path.
Example:
To open an element using Tweak Software’s RV enter the following line:
rvlink:// -l -play <nim_path>
Note
Do not add quotes around the <nim_path> variable. These will be added automatically.
To edit the timecard options, click the edit button from the from the corresponding panel. After making the necessary changes, click the check mark button to save.
Project Structures
NIM can manage your production file structure with studio defined directory templates. Using the drag and drop interface, administrators can define multiple project structures for all production related tasks. Project structures are selected when a job is brought online and at that point locked to the project. Project structures are created at the mount point of selected servers within a job. A job may have any number of servers attached to the job. NIM will create duplicate project structures across all assigned servers to ensure consistency between production locations. NIM ships with a default project structure that can be customized as needed.
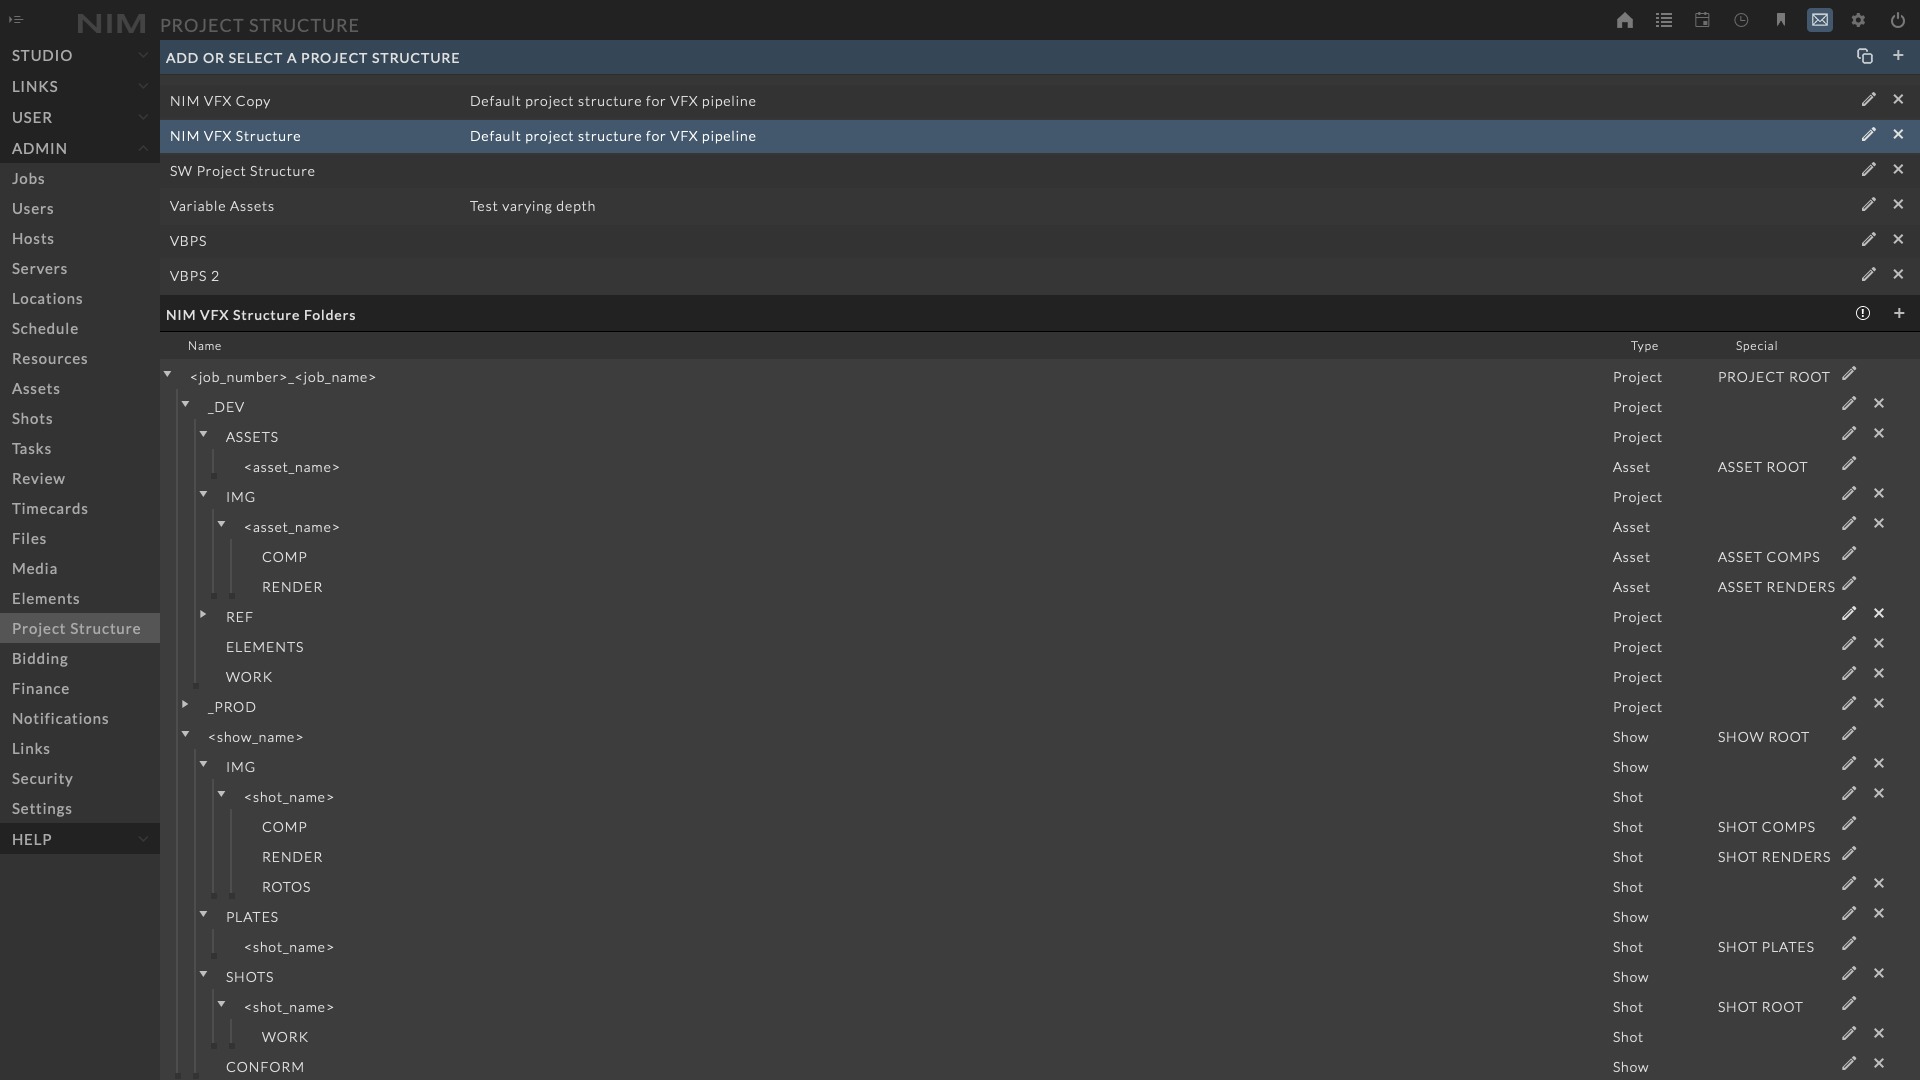
- Add Project Structure
To add a new project structure click the
at the top right of the Project Structure panel.To edit the title of an existing project structure, click the edit button at the right of the project structure title.
To delete a project structure, click the X at the right of the project structure title. You will be prompted to confirm deletion.
To edit the structure of an existing project structure template, simply click on the project structure title in the top list. The folder structure will be loaded in the window below and the title of the selected project structure will appear in the title bar.
Add Project Structure Folder
To add a new folder to a project structure click the
at the right of the project structure folders title bar.Drag and drop to rearrange the folder structure as needed.
To edit a folders name, click the edit button at the right of the folder’s name.
To delete a folder, click the X at the right of the folder’s name. You will be prompted to confirm deletion.
Copy Project Structure
To copy an existing project structure click the copy button
 at the top right of the Project Structure panel.
NIM production structures are flexible, allowing studios to tailor the workflow to individual needs. Folders are created with folder types that define the event to trigger folder creation. For Example: folders with a type of SHOT will be created for each new shot made.
Folder types:
Project
Asset
Show
Shot
Note
Changes to a project structure template will NOT affect any jobs that have already be brought online.
Variable Folders
Job, asset, and shot variables, including custom fields, can be used in folder names that will update at the time of creation. These can be selected from the Insert a variable... dropdown when a folder name is being edited. These variable folders can be placed above the asset or shot root to allow for unique grouping of entities.
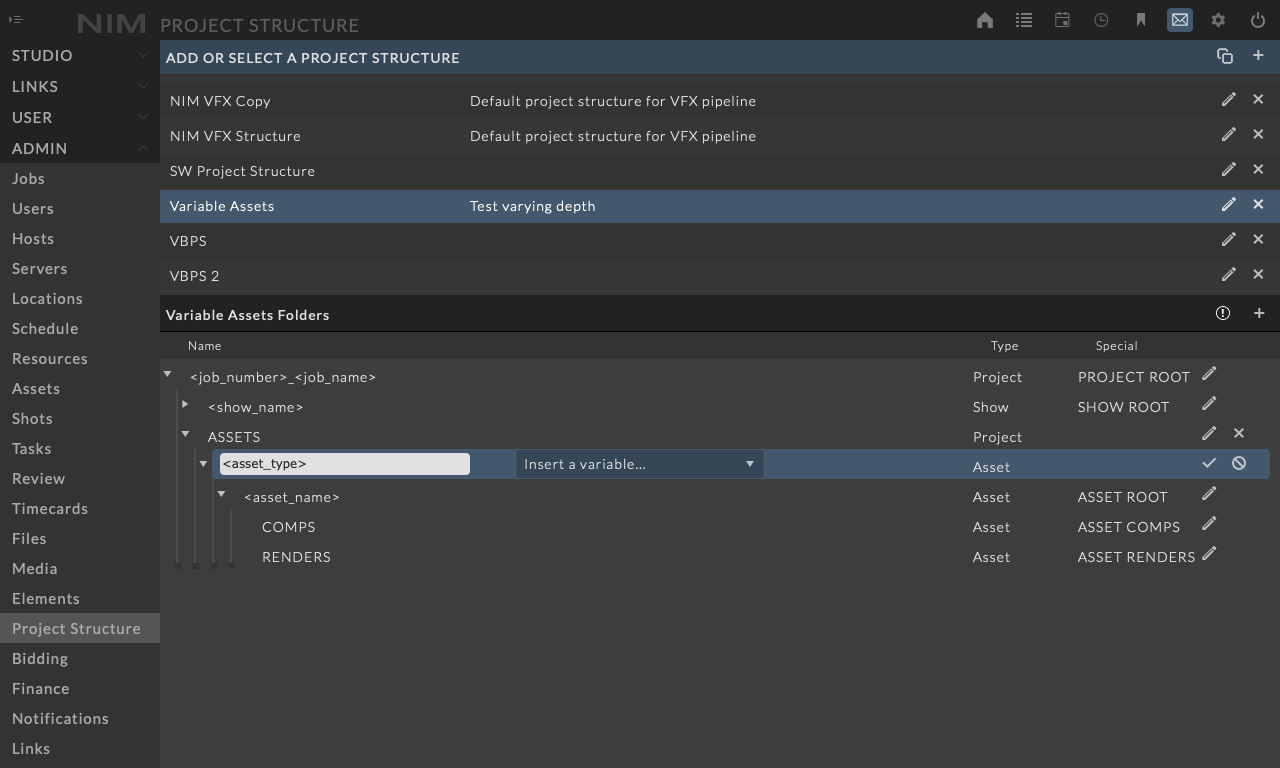
Example:
In this example, a custom field dropdown has been made for Assets called Type which has the following options: Char, Prop, Env.
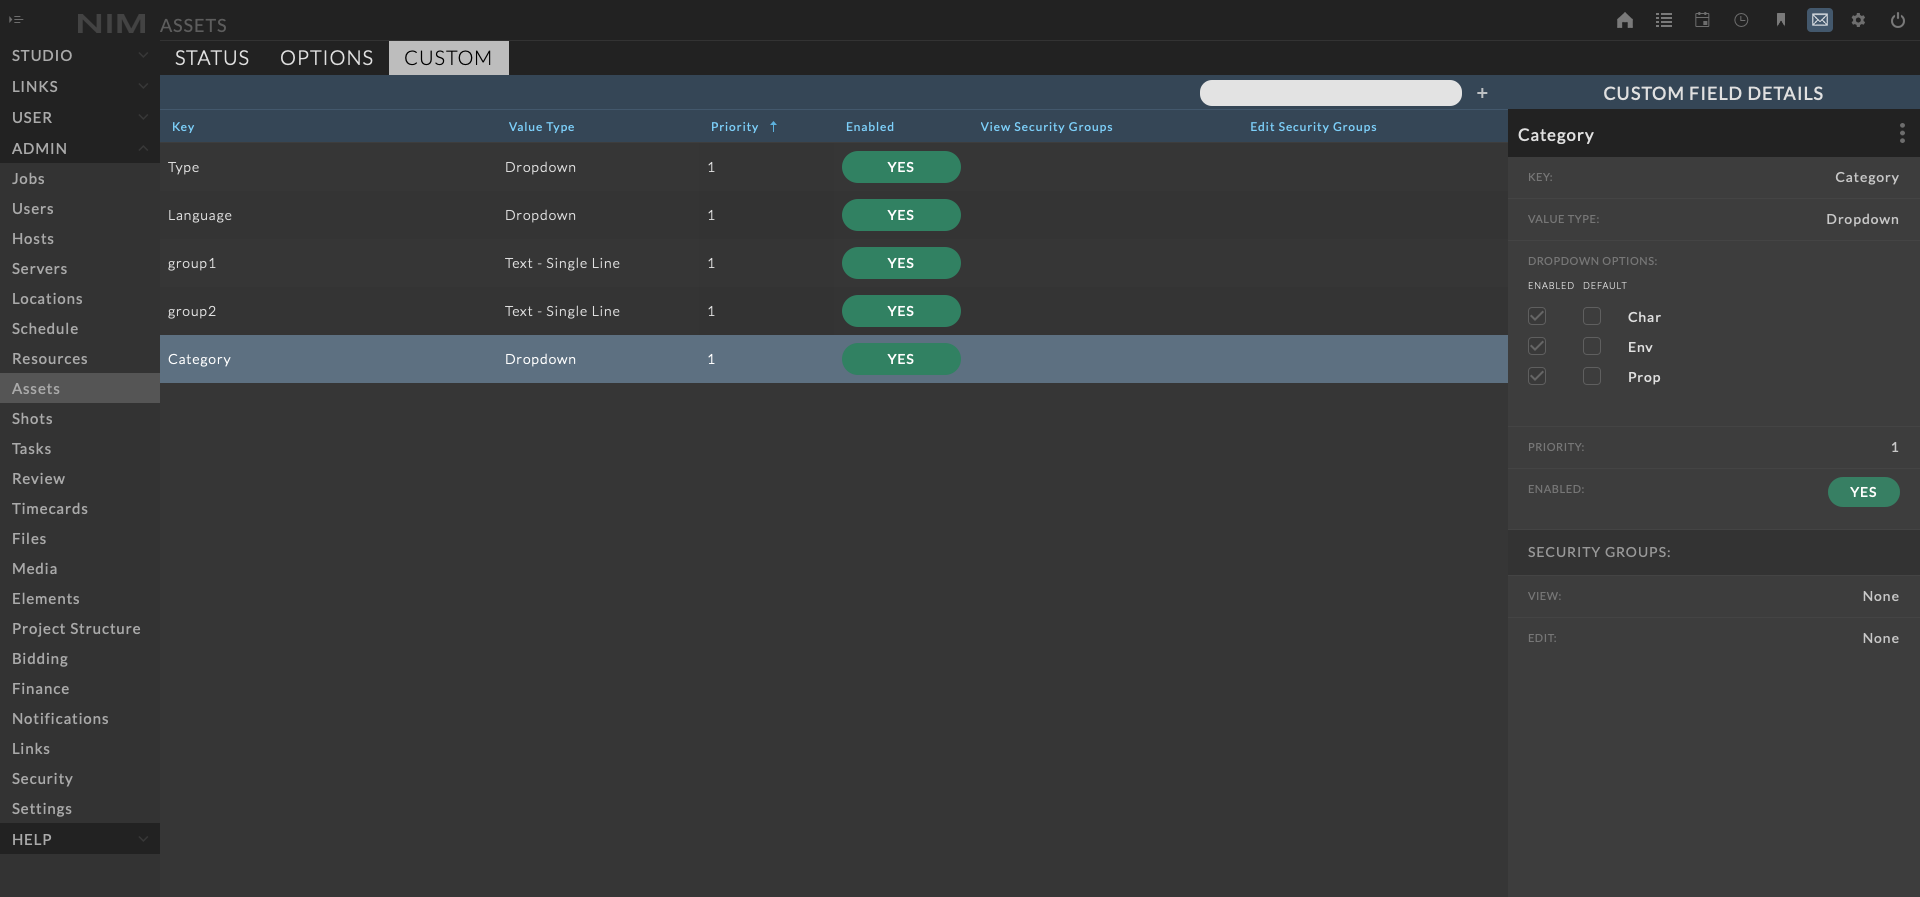
In the project structure, <asset_type> has been used as the folder name above the asset root.
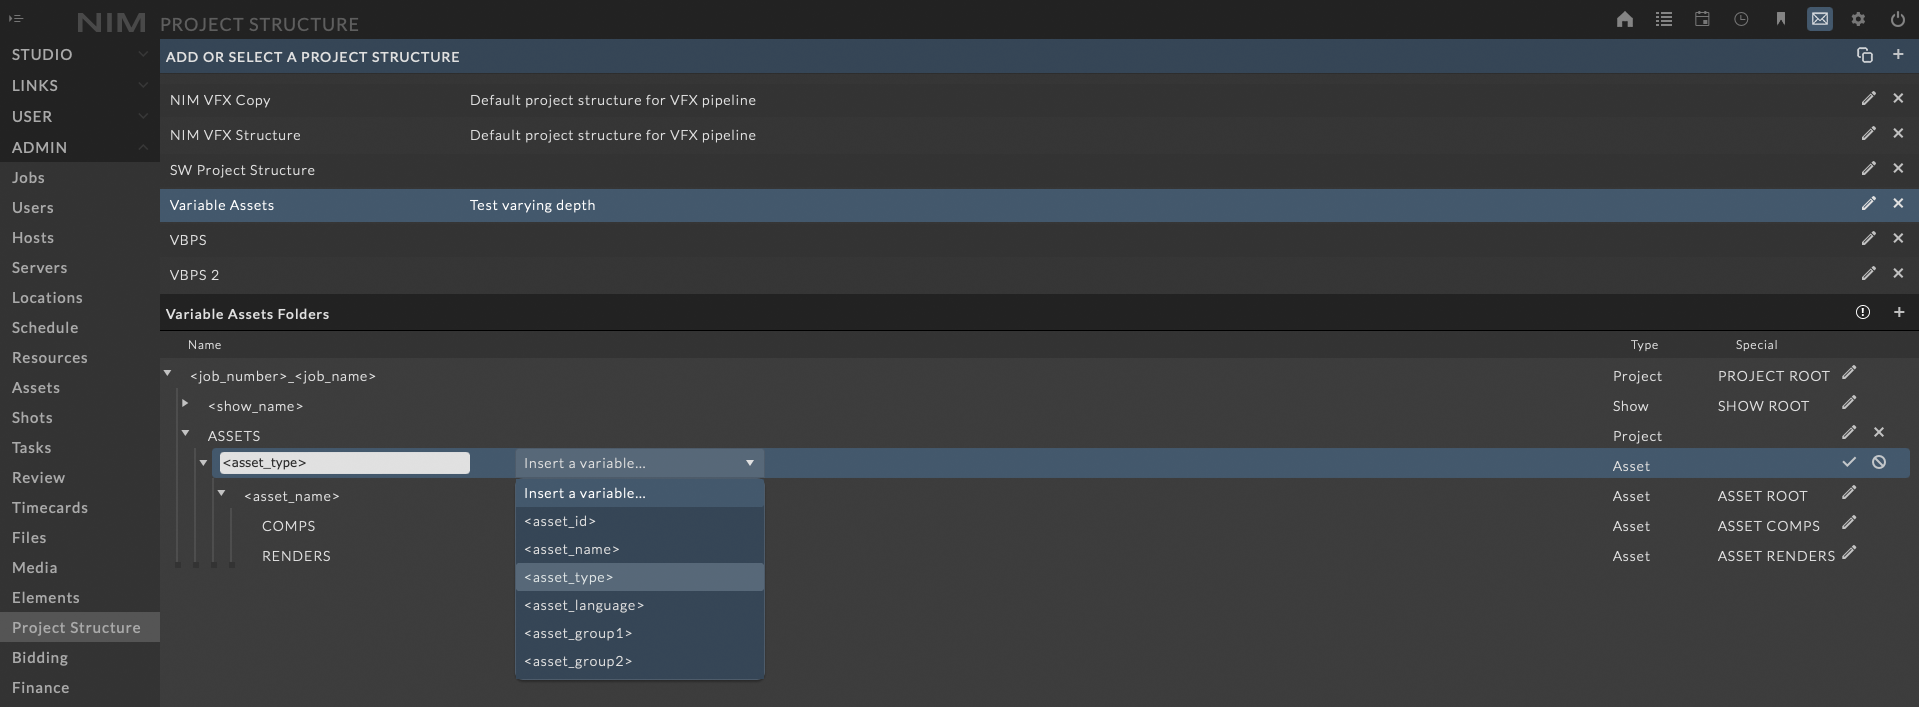
This will group all assets of a common type in the same folder. Multiple levels of variable based folders can be defined to create extremely refined organization options. In the below image, 2 assets have been placed in the PROP folder.

Note
When bringing entities online that are variable dependent, an alert will rise notifying you that further action is needed before the items can be brought online. After resolving the fields that are required these items can be brought online. For further information please refer to the Job Configuration section of the documentation.
Special Folders
In addition, project structures have several special folders with tags allowing NIM to understand where to place files of a certain type. Only one of each of these special folders can exist within a project structure template.
Special folders:
- PROJECT ROOT - The root folder for a job / project. This folder uses the variables <job_number> and <job_name> to substituting the corresponding information on creation.
eg. Using a PROJECT ROOT folder named <job_number>_<job_name> and bringing a job online with a job number of 15000 and a job name of Drive will create the folder 15000_Drive.
- ASSET ROOT - The root folder created for an asset. This folder uses the variable <asset_name> substituting the corresponding asset name on creation.
eg. When creating an asset called CARS, a folder with a matching name “CARS” will be created.
- ASSET RENDERS - The folder that renders created for an asset will be directed to.
eg. When using the integrated Deadline Maya Submission, asset renders will be rendered to a subdirectory using the renders name within this directory.
- ASSET COMPS - The folder that comps created for an asset will be directed to.
eg. When using the integrated Deadline Submission and the Nuke NIM write gizmos, asset comps will be rendered to a subdirectory using the comps name within this directory.
- SHOW ROOT - The root folder created for an show. This folder uses the variable <show_name> substituting the corresponding show name on creation.
eg. When creating a show called ENGINE, a folder with a matching name “ENGINE” will be created.
- SHOT ROOT - The root folder created for a shot. This folder uses the variable <shot_name> substituting the corresponding shot name on creation.
eg. When creating a shot called ENG_010, a folder with a matching name “ENG_010” will be created.
- SHOT PLATES - The folder that plates created for a shot will be directed to.
eg. When using the integrated Hiero / NukeStudio connectors, shot plates will be rendered to this directory.
- SHOT RENDERS - The folder that renders created for a shot will be directed to.
eg. When using the integrated Deadline Maya Submission, shot renders will be rendered to a subdirectory using the renders name within this directory.
- SHOT COMPS - The folder that comps created for a shot will be directed to.
eg. When using the integrated Deadline Submission and the Nuke NIM write gizmos, shot comps will be rendered to a subdirectory using the comps name within this directory.
Folder Rules
There are a few rules that need to be followed to keep NIM from creating redundant directories. If you drag a folder into a structure that can not exist NIM will alert you.
Assets and Shots are equal entities in NIM. This means that a shot can not live inside an asset and an asset can not live inside a shot. Assets are considered global to the job, and shots are children of shows.
Project folder types must be children of other “Project” types (or root nodes).
Asset folder types must be one of the following:
A child of another “Asset” type
A child of a “Project” type (or a root node) with a name that contains “<asset_name>”
Show folder types must be one of the following:
A child of another “Show” type
A child of a “Project” type (or a root node) with a name that contains “<show_name>”
Shot folder types must be one of the following:
A child of another “Shot” type
A child of a “Show” type with a name that contains “<shot_name>”
A child of a “Project” type (or a root node) with a name that contains both “<show_name>” and “<shot_name>”
Bidding
The bidding section covers items regarding bid items, types, terms, and options.
Bid Items
Bid items define the default set of bid line items available when creating a bid. These items are calculated against timecards when factoring job projections, actualizations, and studio wide finances.
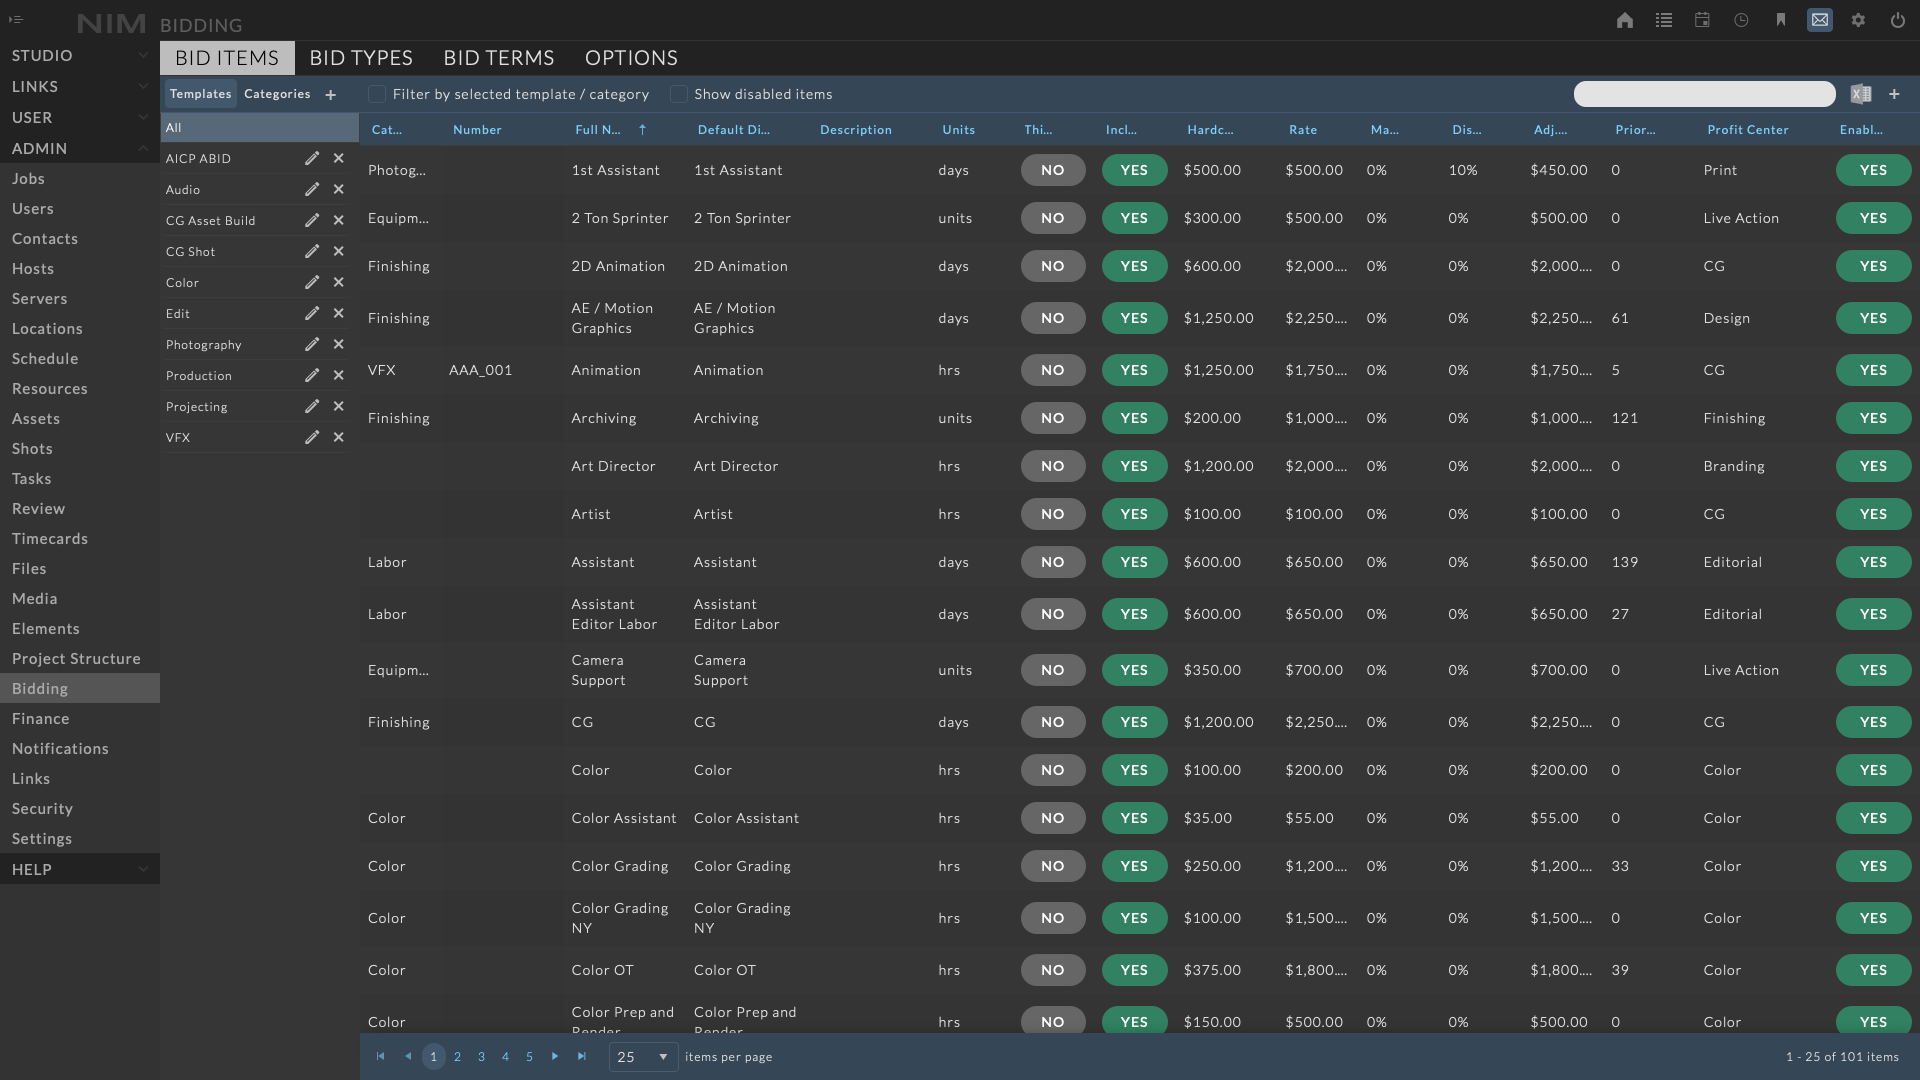
Users can create bid templates to quickly add a group of line items to a bid.
Bid categories are used to group and organize bid items within a bid and the exported bid PDFs.
Creating Bid Templates
Bid item templates allows users to add a group of bid line items to a bid at once. This enables users to quickly create bids with all of the required line items in a single drag and drop action. This is extremely useful when you want to add all of the potential line items you may use for a particular type of bid. More than one template can be added to a bid, and additional templates can be added at any time. When saving a bid, only the line items with a quantity greater than 0 are retained so users are only working with line items that are relevant to the bid. Expenses are automatically included in a predefined template named “Expenses”.
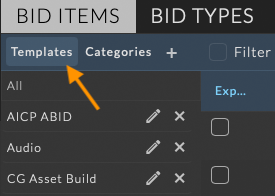
To create a new bid item template, ensure that the Template button is highlighted at the top left of the Bid Items window.
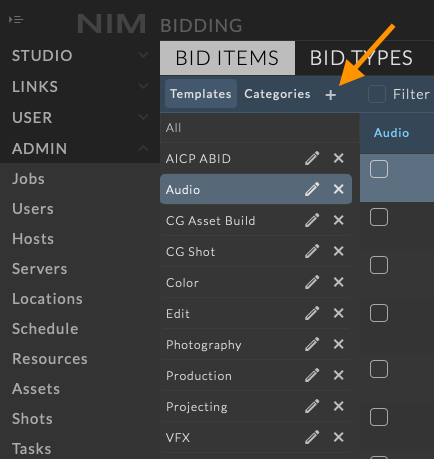
Click the button at the top right of the column.
A new bid item template will be created named New Bid Template. Click the edit button to the right of the template name to change it.
Clicking the checkmark will save your changes.
Clicking the cancel icon will exit the editor without saving your changes.
Creating Bid Categories
Bid item categories allows users to group line items into organized structures with a bid. Categories may be used to group items by production process, department, or any other grouping that is useful to your bidding process.
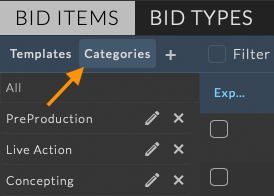
To create a new bid item category, ensure that the Category button is highlighted at the top left of the Bid Items window.
Click the button at the top right of the column. A new bid item category will be created named New Bid Item Category. Click the edit button to the right of the category name to change it. Clicking the checkmark will save your changes.
You can delete templates and categories by clicking on the X to the right of it’s name. You will be prompted to confirm deletion.
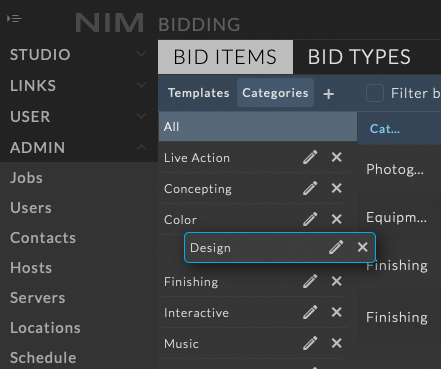
The category order displayed here will be the default category order used when exporting bids. The category order can be customized per bid in the bid export settings.
Users can change the order of categories by dragging and dropping the category rows to the desired order. Click and hold on the name of the category and drag it to the desired position. Release the mouse button to drop the category in the new position.
Assigning a template/category to a group of bid items is done by first selecting the bid template/category from the bid template or bid category list. The first column in the bid items grid will now be titled with the name of the selected template or category. Select the checkbox at the beginning of each bid item’s row. This will include that bid item in the selected template or category.
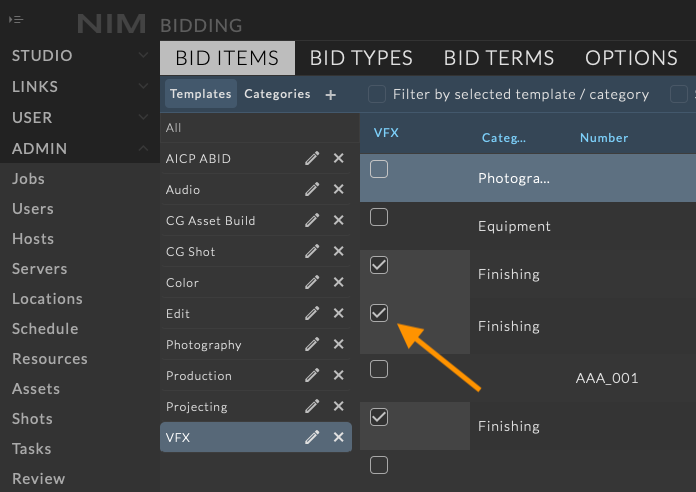
To verify which items are included in a particular template or category select the template/category you wish to view from the appropriate list.
Now select the checkbox at the top of the bid items grid labeled: Filter by selected template/category. The grid will update to include only those items included in the template or category.
De-select the Filter by selected template / category checkbox to view the full list of bid items.
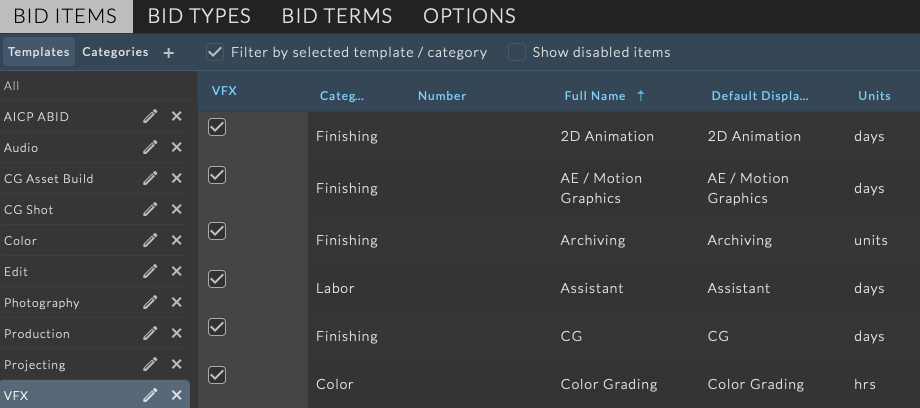
Adding a Bid Item
The default bid items can be edited in addition to defining new items to fit the needs of your bidding process.
To add a new bid item, click the button at the top right of the bid items window. The bid item details will appear and the required information can be entered as needed. When done click the “Save” button at the bottom of the info panel to save your changes.
Available Options:
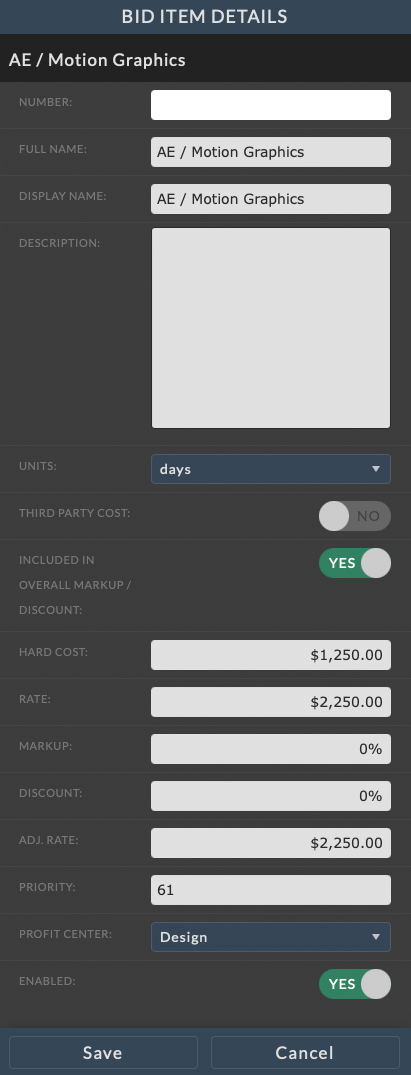
Number - This value can be used to match items to external spreadsheets or associated asset names or shot numbers. In a bid estimate, items can be Grouped by Number to display subtotals for associated items.
Full Name - A unique name for the bid item. This name is only visible on the bid estimate in NIM and is for internal use only.
Display Name - This is the name that will appear on the exported bid PDFs. This value can be overrode within the bid.
Description - A brief description of the bid item.
Units - The default unit type for this line item. This value can be overrode within the bid.
Options are:
hrs
days
units
Third Party Cost - The default value identifying this line item as a third party cost. This value can be overrode within the bid.
Included in Overall Markup/Discount - The default value identifying this line item as included in the overall markup/discount. This value can be overrode within the bid.
Hard Cost - The default hard cost associated with this line item. This value is used in determining estimated cost, job margins, and actualizations. This value can be overrode within the bid.
Rate - The default rate associated with this line item. This value is used in determining estimated cost, job margins, bid totals, and actualizations. This value can be overrode within the bid.
Markup - This value is the default percentage of markup applied to the rate. Entering a markup percentage will modify the Adjusted Rate accordingly.
Discount - This value is the default percentage of discount applied to the rate. Entering a discount percentage will modify the Adjusted Rate accordingly.
Adj. Rate - This value is the Adjusted Rate and is calculated from any markup or discount applied to the rate. Entering an adjusted rate directly will adjust the respective markup or discount accordingly.
Priority - This value allows for a sorting order in lists based on a priority value rather than alphabetical sorting.
Profit Center - This dropdown will select the Profit Center the bid item will be associated with. Profit Centers are defined in the Admin > Finance - Profit Centers tab. When viewing profit center totals, NIM actualizes the individual line items across jobs and awarded bids to determine profit margins of each Profit Center independently.
Enabled - This checkbox determines if the item is enabled or disabled. A disabled bid line item will still exist on older bids that used the line item, however it will no longer be a selectable choice for new bids. Use this to remove bid items you no longer wish to use but have been used on bids in the past.
To edit a bid item, click on a row from the grid to load the bid item info panel. Click on the ellipsis menu in the bid item info panel and choose “Edit”. Make the necessary changes and click the “Save” button at the bottom of the info panel to save your changes.
Delete a bid item entry by selecting the bid item from the grid, clicking the ellipsis menu in the bid item panel, and selecting “Delete”. You will be prompted to confirm deletion of the bid item.
Disabling a Bid Item
Attempting to delete a bid item that has been previous used will result in the following message:
This bid item type is in use and cannot be deleted. You can disable this bid item type instead. Disabled bid item types will only appear on bids they were previously included in and this admin page..
If you no longer wish to use a bid item that has been previously used, you can disable the bid item by setting the Enabled switch to NO. This will remove the bid item from the list of available bid items when creating new bids, however it will still appear on any bids that have used the bid item in the past. This allows for historical bids to remain accurate while removing the bid item from future bids.
Disabled bid items are hidden from the bid items grid by default. To view any bid items that have been disabled, select the Show Disabled Items checkbox at the top of the bid items grid. This will display all disabled bid items in the grid.
Bid Types
Bid types appear on the bid dashboard as an option to define the purpose and/or type of bid.
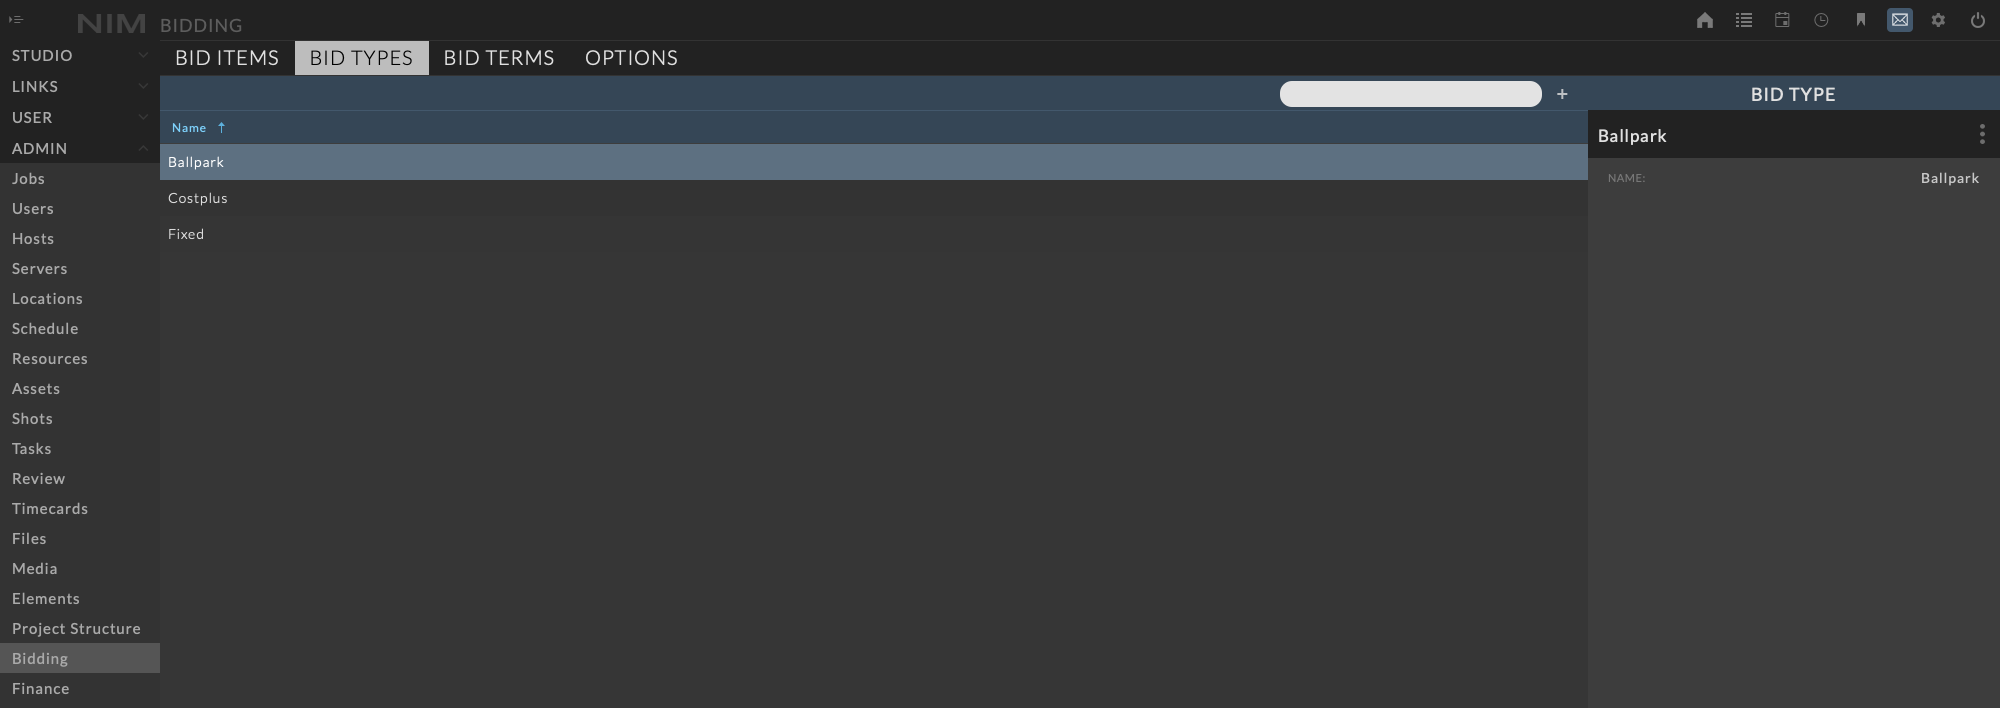
To add new bid type, click the button at the top right of the bid type grid. The bid type details will appear and the required information can be entered as needed. When done click the “Save” button at the bottom of the info panel to save your changes.
Name - The name assigned to an bid type.
To edit a bid type, click on a row from the grid to load the bid type info panel. Click on the ellipsis menu in the bid type info panel and choose “Edit”. Make the necessary changes and click the “Save” button at the bottom of the info panel to save your changes.
Delete a bid type entry by selecting the bid type from the grid, clicking the ellipsis menu in the bid type panel, and selecting “Delete”. You will be prompted to confirm deletion of the bid type.
Bid Terms
Bid terms define a set of default terms that can be selected from within the job’s bid. Studios can define as many different types of terms as needed.
A default bid term can be set in Admin > Bidding - Options to be automatically selected upon new bid creation. Alternate bid terms can be selected within the bid export settings.
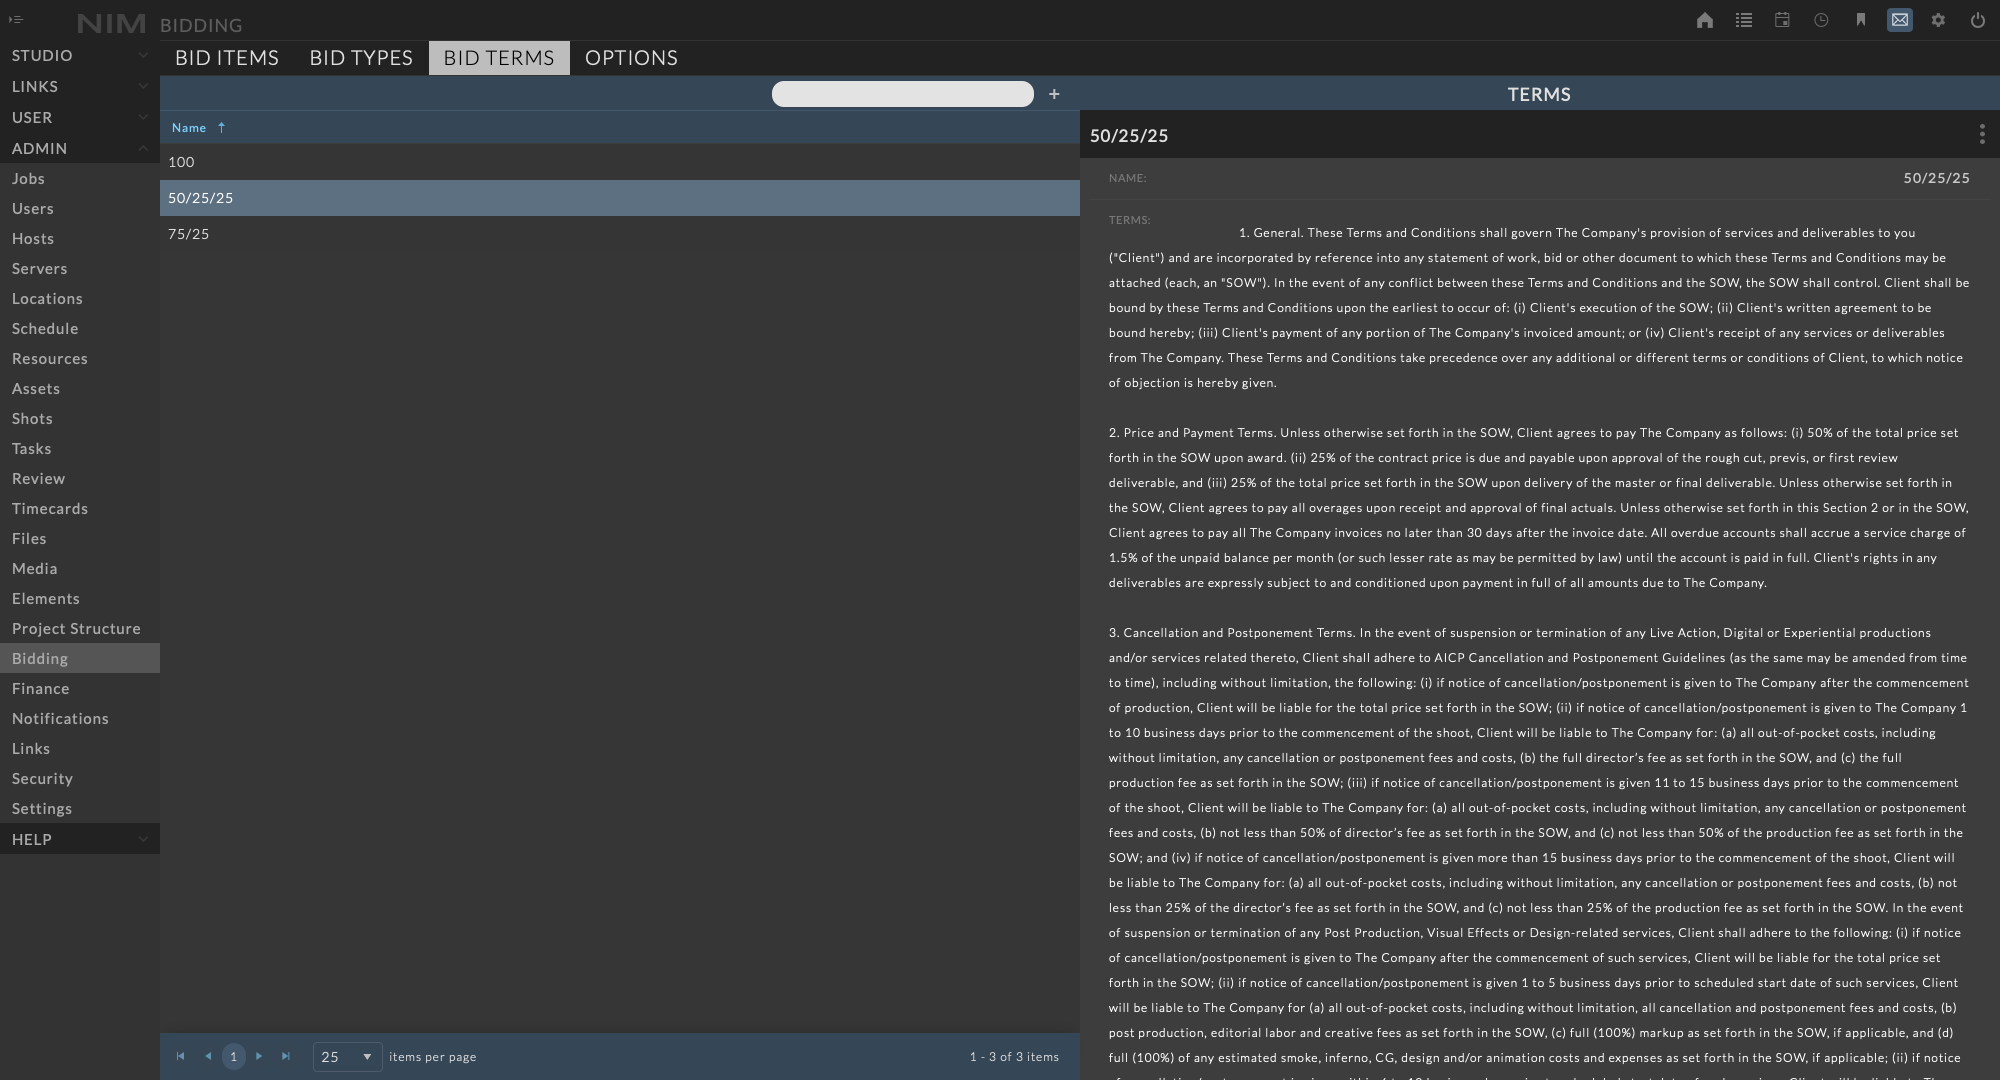
To add a new bid term, click the button at the top right of the bid terms window. The bid term details will appear and the required information can be entered as needed. When done click the “Save” button at the bottom of the info panel to save your changes.
Name - A unique name for the bid term.
Terms - The specific terms of the bid to be included with the job bid.
To edit a bid term, click on a row from the grid to load the bid term info panel. Click on the ellipsis menu in the bid term info panel and choose “Edit”. Make the necessary changes and click the “Save” button at the bottom of the info panel to save your changes. Click the cancel button to return to the view mode without saving changes.
Delete a bid term entry by selecting the bid term from the grid, clicking the ellipsis menu in the bid term panel, and selecting “Delete”. You will be prompted to confirm deletion of the bid term. Deleting a bid term will remove that bid term from any previously assigned bids.
Bid Options
Bid options define the bid default settings for all bids. This includes the default Comments, Statement of Work, Assumptions, Terms, Tax, ABID Export and PDF Structure.
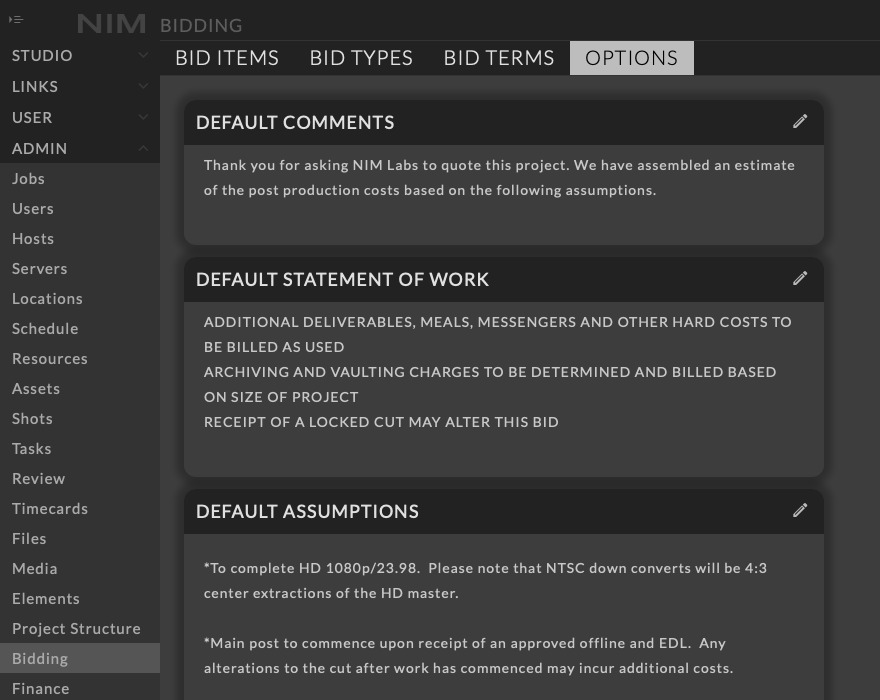
Default Components
The Comments, Statement of Work, and Assumptions components include basic tools for text formatting when in edit mode. The text area can be made larger by clicking and dragging the arrow in the lower right corner of the input.
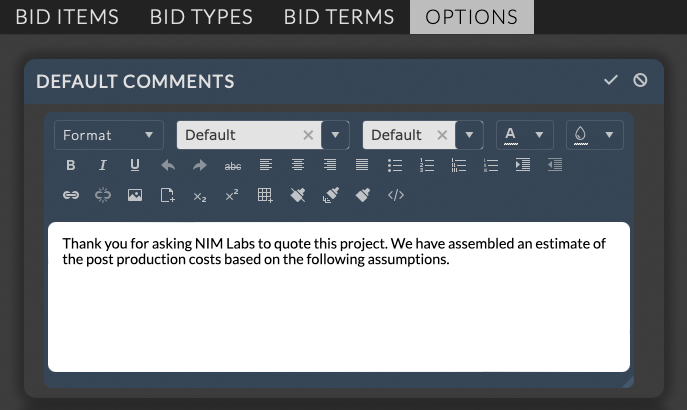
To edit any of the bidding options, click the edit button in the header of the corresponding panel.
When in edit mode the panel header will turn blue.
After making the necessary changes, click the check mark button to save.
Click the cancel button to return to the view mode without saving changes.
ABID
ABID Options provides support for exporting NIM bids to ABID, the AICP Bid Management Platform. To find out more about ABID please visit https://aicp.bid.
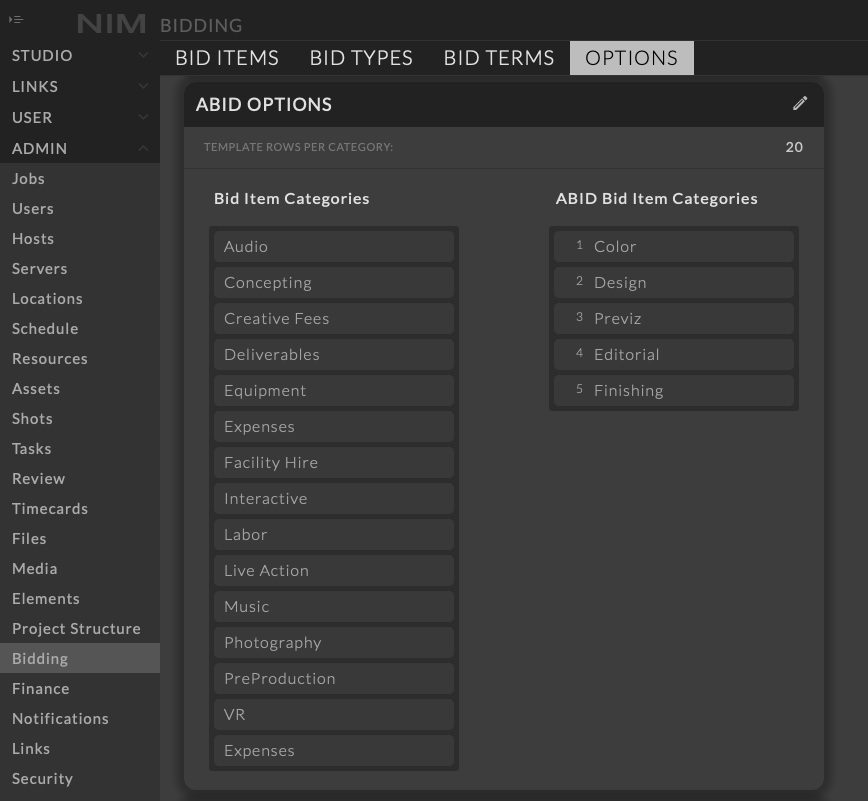
The Bid Item Categories list to the left is the full list of bid categories defined in NIM. ABID import supports a fixed order category template. To build the proper ABID template structure, drag and drop a category you plan to use with the ABID platform from the “Bid Item Categories” list to the “ABID Bid Item Categories” list. Additionally, you can drag the ABID Bid Item Categories vertically in the list to change the order they will be structured in the template.
An ABID template has a fixed number of rows available per template category. Set the Template Rows Per Category value to the maximum number of rows you expect to use in an ABID template. You can use as many rows as you like without affecting the bid, however if you use more line items on a bid then you have allocated in a template, you will need to update your ABID template to be able to import all of the items.
Bid Defaults
In the Bid Defaults section, users can define the default settings used for new bids including the bid terms, general settings, bid section sequence settings, and PDF settings.
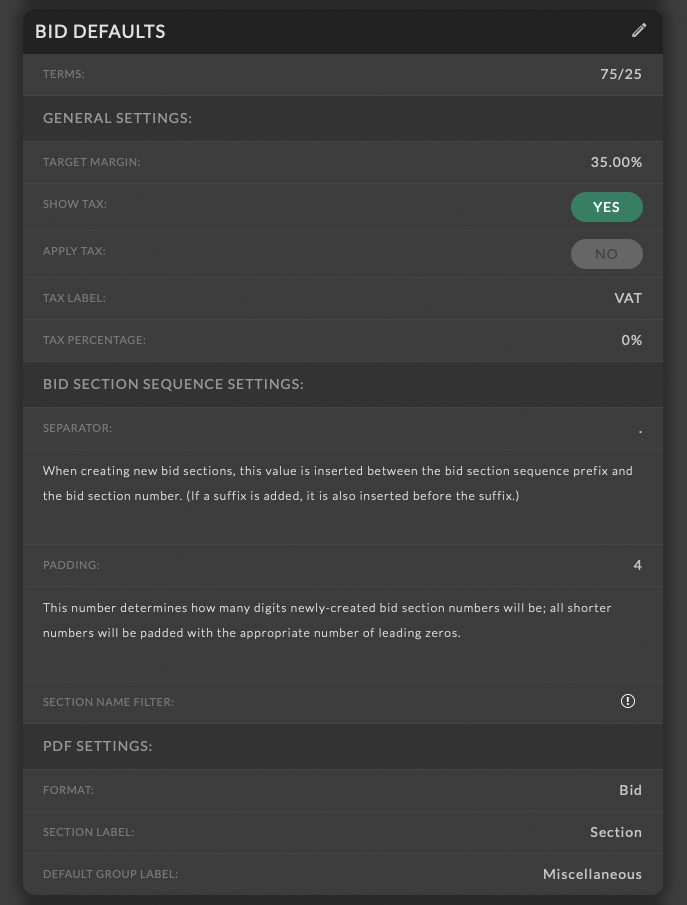
These settings include the following:
Terms - The default terms to use for new bids
- General Settings:
Target Margin - Indicates the target margin to be used for all bids. This value is represented as a percentage and used as a reference point to determine if the bid margin is above or below the company target. This value is displayed on the bid dashboard in both chart and value formats.
Show Tax - Determines is a tax line should be included on the bid.
Apply Tax - Determines if bids should apply tax by default.
Tax Label - The title to use for the tax, eg. VAT.
Tax Percentage - The default tax percentage to be applied to a bid. This value can be overwritten on a per bid basis.
Note
Any changes to the tax rate in the General Settings will not affect prior bids. To change the tax rate on an existing bid, the bid will need to be modified directly.
- Bid Section Sequence Settings
Separator - When creating a new section sequence, this value is inserted between the section prefix and the section number. (If a suffix is added, it is also inserted before the suffix.)
Padding - This number determines how many digits newly-created section sequence numbers will be; all shorter numbers will be padded with the appropriate number of leading zeros.
Section Name Filter - This filter uses a valid regular expression (regex) to remove specific characters in a section name.
- PDF Settings
Format - Sets the default bid PDF format to use during export. If a custom bid PDF template has been created, they will appear as an option in this dropdown. For more information on bid PDF formats, please refer to the PDF Export Formats section of the documentation.
Section Label - Sets the default label for the section header column on a bid PDF.
Default Group Label - Sets the default group label for items that do not have a defined group name on a bid PDF.
Default PDF Structure
The PDF structure settings offer a wide variety of options to define organizational defaults for bid PDFs. These settings are used to determine the default structure of a bid PDF including how items are grouped, organized, and displayed when exporting a bid. These settings will be applied to every new bid created and can be overwritten on a per bid basis.
Here is an overview of the UI and the available options:
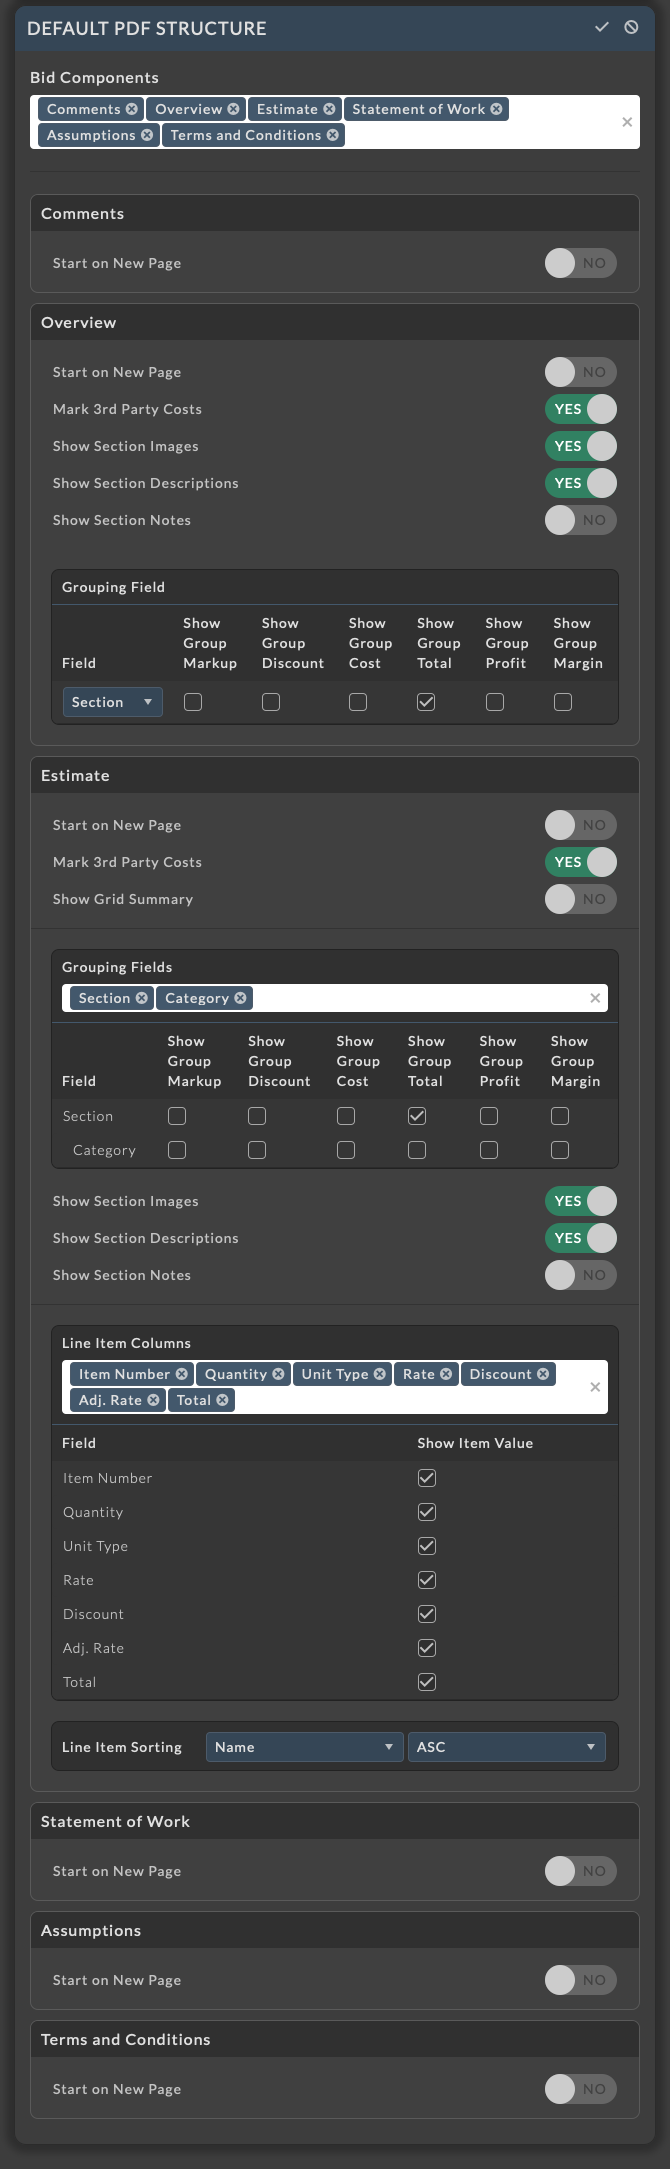
Bid Components
The bid components control determines which components of a bid are included on the exported PDF. To select a component, click on the input and a dropdown will appear with the available options. Select the desired component and it will be added to the list. To remove an option, click the X to the right of the option name. All components can be added at once by selecting the Add All option. All components can be removed at once by deselecting the Add All option.
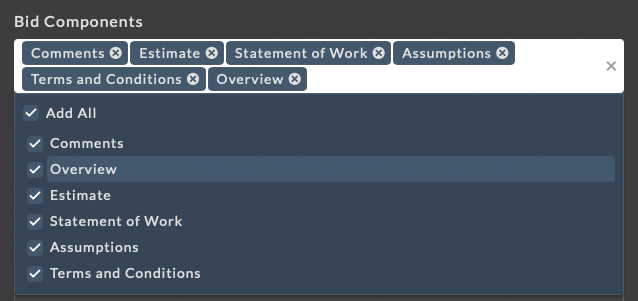
The available components are:
Comments - The comments section of the bid which provides an independent area to include an overall note or comment for the bid.
Overview - The overview section of the bid which provides an area on bid PDFs that includes totals per selected overview group as well as bid totals.
Estimate - The estimate section of the bid which displays the bid line items and their associated costs in a hierarchical or grid format.
Statement of Work - The statement of work section of the bid which provides an independent area to include the bid’s statement of work.
Assumptions - The assumptions section of the bid which provides an independent area to include bid assumptions.
Terms and Conditions - The terms and conditions section which of the bid provides an independent area to include the bid’s terms and conditions.
Reorder Bid Components
Bid components can be reordered by dragging and dropping each component setting within the UI. Hovering over a component area will highlight the border in blue, indicating it can be dragged to a new position.

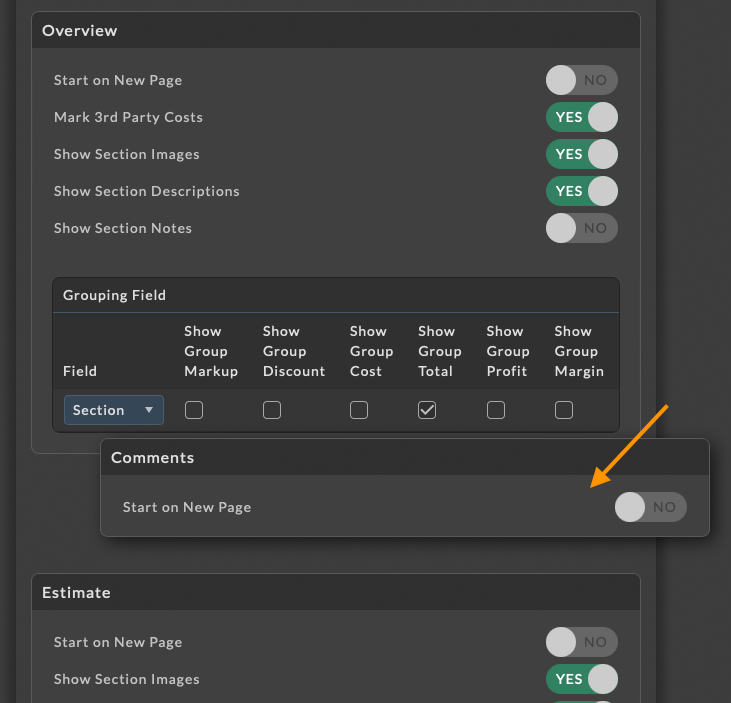
To reorder, click and hold on the component settings and drag it to the desired position. Release the mouse button to drop the component in the new position.
The order of the components in the list will determine the order they appear in the exported PDF. The order defined here will be the default order used when exporting a bid.
The component order can be customized per bid in the bid export settings.
Comments
The Comments component provides an independent area to include an overall note or comment for the bid. Settings within the Comments component include the option to start the Comments on a new page in the exported PDF.

Overview
The Overview component provides an independent area on bid PDFs which includes totals per selected Overview grouping field as well as bid totals.
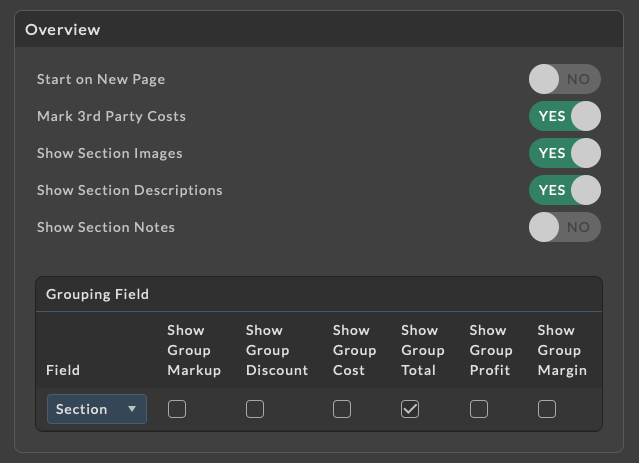
Options within the Overview component include the following:
Start on New Page - Setting this value to YES will start the Overview on a new page of the exported PDF.
Mark 3rd Party Costs - Setting this value to YES will mark any Overview subtotals that include 3rd party costs with an asterisk.
Show Section Images - If section is set as the Grouping Field in the Overview component, this option will display the section image for each row in the Overview.
Show Section Descriptions - If section is set as the Grouping Field in the Overview component, this option will display the section description for each row in the Overview.
Show Section Notes - If section is set as the Grouping Field in the Overview component, this option will display the section notes for each row in the Overview.
Overview Grouping Field
The Grouping Field within the Overview defines the estimate column by which line items will be grouped to determine totals in the Overview section. A single grouping field can be selected in the Overview.
To select an Overview Grouping Field, click on the dropdown under the column Field. A list of available fields will appear. Select the desired field to use for grouping line items in the Overview.
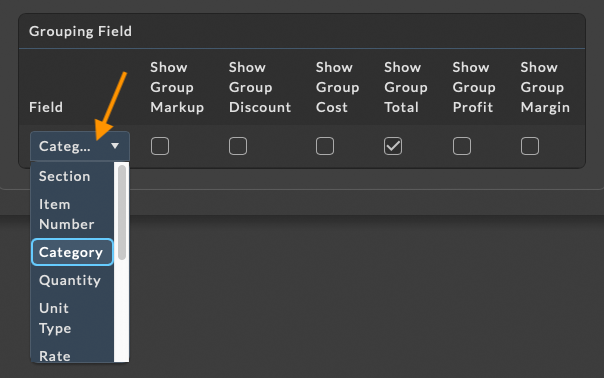
For each row in the Overview, a series of values can be displayed. Check the checkbox under the corresponding column to display the value in the Overview.
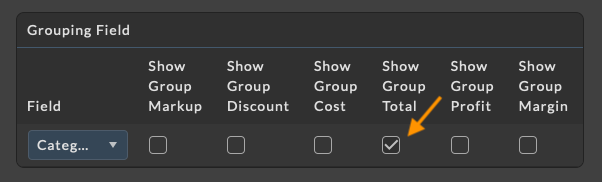
Estimate
The Estimate component displays the bid line items and their associated costs in a hierarchical or grid format.
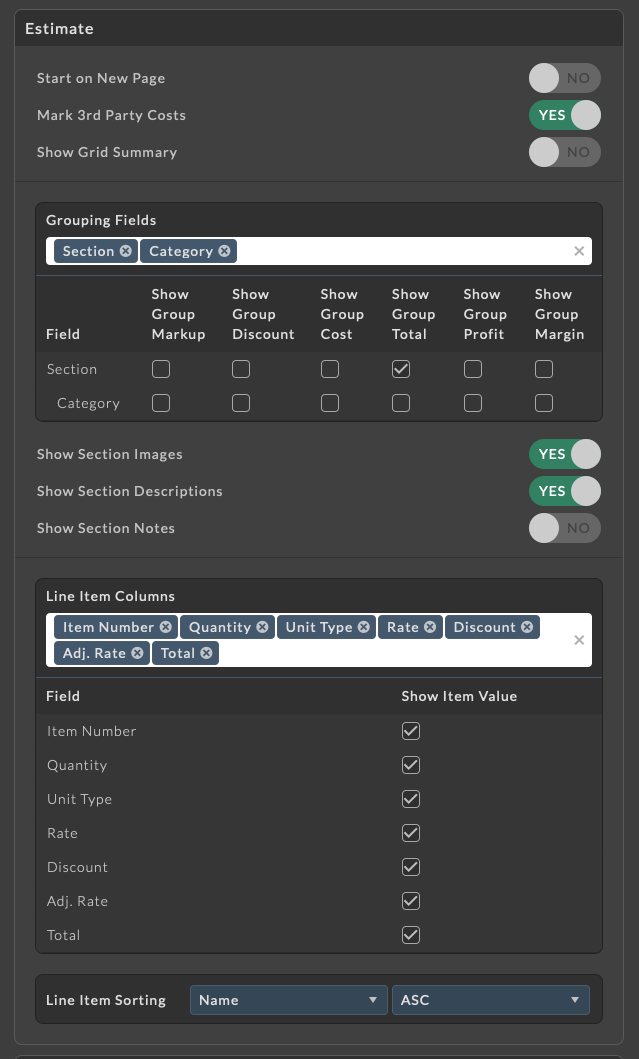
Options within the Estimate component include the following:
Start on New Page - Setting this value to YES will start the Estimate on a new page of the exported PDF.
Mark 3rd Party Costs - Setting this value to YES will mark any Estimate subtotals that include 3rd party costs with an asterisk.
Show Grid Summary - When using the Grid Estimate format, setting this value to YES will display a summary of the bid item columns at the bottom of the Estimate. The Grid Estimate format can be selected from the Bid Format dropdown in the bid export settings. Additionally, custom PDF templates can be created to use the Grid Estimate format. For more information on creating custom PDF templates, please refer to the Bid PDF Export Templates section.
Show Section Images - If sections are included as a Grouping Field in the Estimate component, this option will display the section image for each section group in the Estimate.
Show Section Descriptions - If sections are included as a Grouping Field in the Estimate component, this option will display the section description for each section group in the Estimate.
Show Section Notes - If sections are included as a Grouping Field in the Estimate component, this option will display the section notes for each section group in the Estimate.
Estimate Grouping Fields
Line items can be grouped by multiple fields to create a hierarchical structure in the Estimate. To select fields to group by, click on the dropdown under Grouping Fields. A list of available fields will appear. Select the desired fields to use for grouping line items in the Estimate.
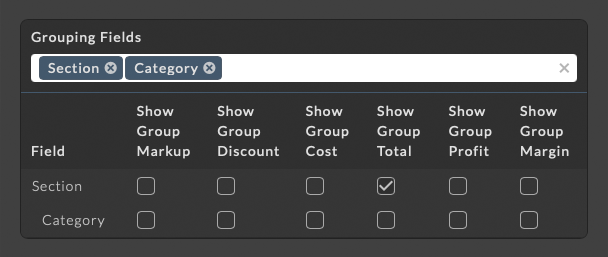
The order of the grouping fields will determine the hierarchy of the groups in the PDF. Hovering over the grouping field area will highlight the row border in blue, indicating it can be dragged to a new position. To reorder the grouping fields, click and hold on the grouping field and drag it to the desired position. Release the mouse button to drop the grouping field in the new position.
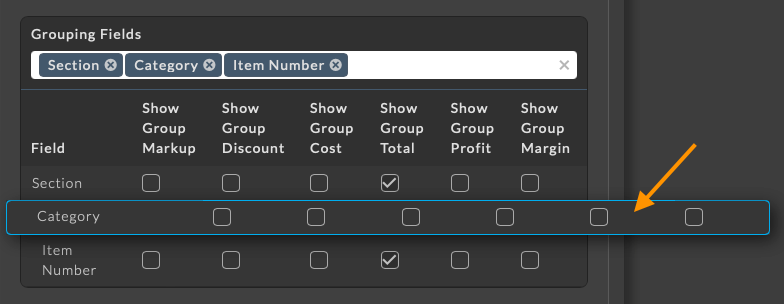
For each row in the Estimate Grouping Fields, a series of values can be displayed. Check the checkbox under the corresponding column to display the value in the Estimate Grouping Field row.
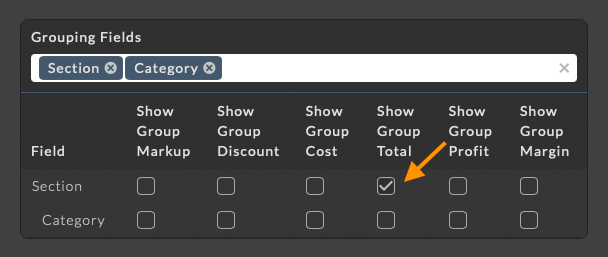
Estimate Line Item Columns
The line items columns to display in the Estimate can be selected by clicking on the dropdown under Line Item Columns. A list of available fields will appear. Select the desired fields to display as columns in the Estimate.
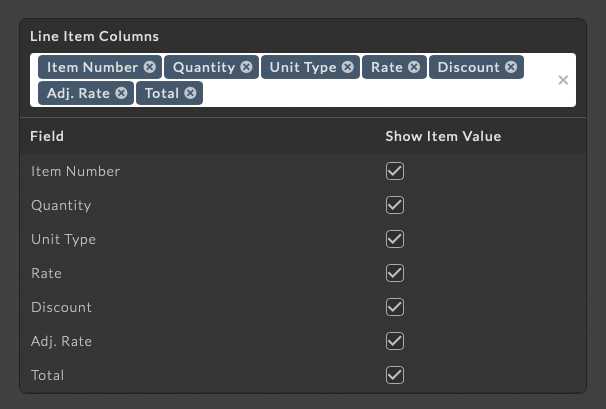
The order of the line item columns will determine the order they appear in the Estimate. Hovering over the line item column area will highlight the row border in blue, indicating it can be dragged to a new position. To reorder the line item columns, click and hold on the line item column and drag it to the desired position. Release the mouse button to drop the line item column in the new position.
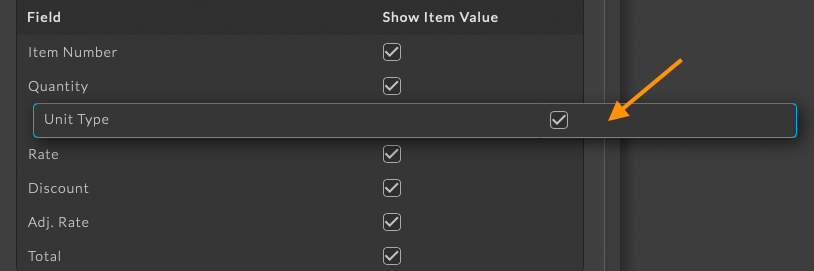
Line item columns can be included in the estimate without showing the item value. You may want to do this when including a column value for an Estimate Grouping Field and you do not want to see a per line item value. To include a line item column without showing the value, deselect the checkbox under the Show Item Value column. This will display the line item column without the value.
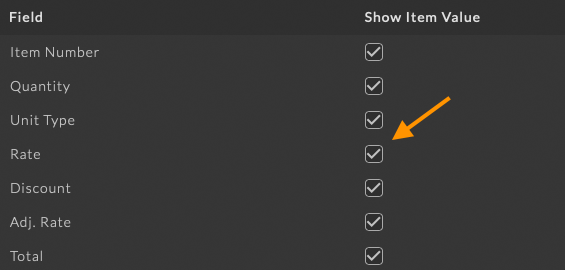
Note
Deselecting the Show Item Value checkbox for a field that is not included as an Estimate Grouping Field will result in the line item being removed from the Line Item Columns field list. Selecting an Estimate Grouping Field value that is not included in the Line Item Columns field list will automatically add the field to the Line Item Columns field list and the Show Item Value will be deselected by default.
Estimate Line Item Sorting
The line item sorting settings determines the order of bid line items within the Estimate. Line items can be sorted by visible columns as well as those not included in the Estimate Line Item Columns. For example, if you wish to order your line items by priority but do not wish to display the priority column in the Estimate, you can still use the priority column to sort the line items.

To select the line item order, use the first dropdown to select the line item column to sort by, and then the second dropdown to select the sort order. The sort order options are:
Ascending (ASC) - Sorts the line items in ascending order.
Descending (DESC) - Sorts the line items in descending order.
Statement of Work
The Statement of Work component provides an independent area to include a statement of work for the bid. Settings within the Statement of Work component include the option to start the Statement of Work on a new page in the exported PDF.

Assumptions
The Assumptions component provides an independent area to include the bid assumptions. Settings within the Assumptions component include the option to start the Assumptions on a new page in the exported PDF.

Terms and Conditions
The Terms and Conditions component provides an independent area to include the bid terms and conditions. Settings within the Terms and Conditions component include the option to start the Terms and Conditions on a new page in the exported PDF.

Bid PDF Export Templates
Custom bid PDF export templates can be created to customize the look and organization of generated bid PDFs. The PDF export template is an HTML formatted file that will need to be uploaded to the NIM VM. Once the template is placed in the proper location on the VM, the template will be accessible from the Admin > Bidding - Options : Bid Defaults panel to set the default template for all bids, or on a per bid basis under the Export tab.
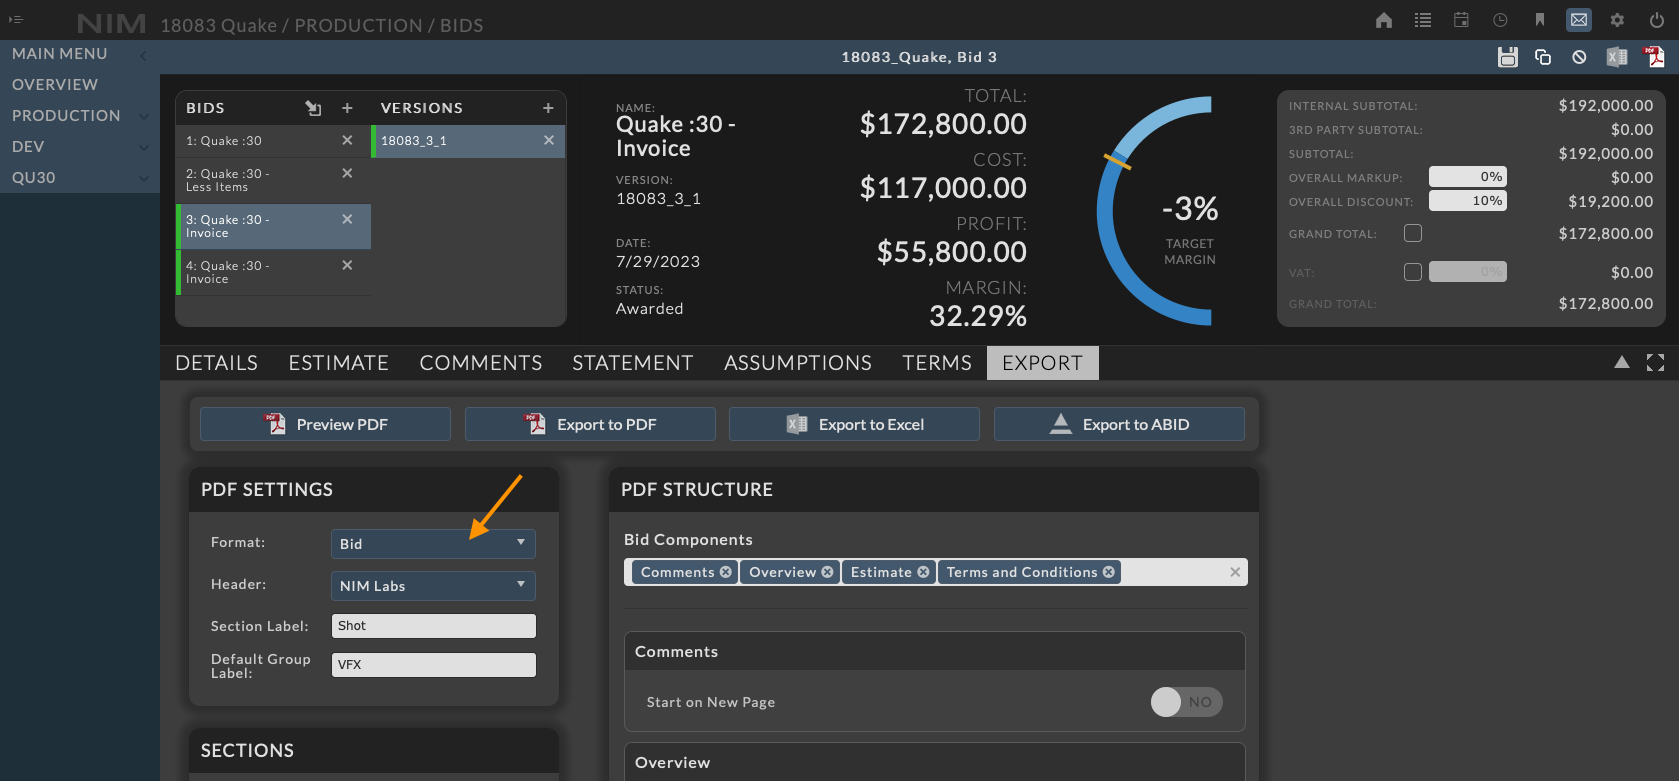
Example File
An example bid PDF template has been supplied on the NIM VM in the following location:
/var/www/html/_custom/bidTemplates/Sample Bid Template.example
This file can be used as a starting point to create a new bid PDF template. The example template matches the default NIM PDF export format.
All HTML/CSS within the file is customizable. Use <nim> tags as shown in the example (and explained below) to insert job and bid specific data and pre-formatted HTML sections.
To use the example provided as a starting point for a new template, copy the “Sample Bid Template.example” file to the same folder and replace the .example extension with .html. The name of the HTML file will be available as a dropdown option in the Bid PDF Settings - Format dropdown.
Note
The example file may be overwritten in subsequent NIM updates.
Template Options
NIM parses special <nim> HTML elements and translates them to the referenced values.
There are 5 attributes available for the <nim> HTML element:
You can include variables related to the current bid or the job using the
varattribute with the following syntax. The full list of variables is available in the Template Variables section.<nim var="variable_name" />
You can include the values of custom job fields using the following syntax:
<nim customjobfield="MyCustomFieldName" />
Note
The value that the “customjobfield” attribute is set to must exactly match the name of your custom field.
You can include the contents of another HTML file on the NIM VM using the following syntax:
<nim file="_custom/my_header.html" />
Note
The path given is relative to “/var/www/html” on the VM. We recommend putting any custom files you might be using for this purpose in the _custom directory as shown in the example above.
You can replace labels returned from any of the NIM bid section variables using the following syntax:
<nim var="estimate_component" replacements="quantity: New Quantity Label, grandTotal: New Grand Label" />
Note
The “replacements” attribute needs to be used with the corresponding “_component” variable. The label name and its replacement value need to be separated by a colon. Multiple labels can be defined per section by separating each label and its replacement value by commas. The full list of label names are available in the OVERVIEW REPLACEMENT LABELS: section.
The
estimate_componentvariable constructs the bid estimate on the exported PDF. This variable has an additional attribute calledtypethat can be set to “grid” or “invoice” to format the estimate using the Grid or Invoice template styling respectively. The default format uses Bid template styling and does not need to be specified.<nim var="estimate_component" type="grid" />
Template Variables
Below is a list of all variables you can set the var attribute:
GENERAL PDF VARIABLES:
banner_image (this creates an <img> tag that points to the pdf header image)
pdf_header_filename
JOB VARIABLES:
jobID
job_name
job_number
job_description
job_client
job_currency
agency
agency_producer
agency_phone
agency_email
prod_co
prod_director
prod_contact
prod_phone
prod_email
prod_shoot_date
prod_location
prod_supervised
editorial
editor
grading
colorist
music
mix
sound
creative_lead
start_date
end_date
BID COMPONENTS:
Note
All variables that end with “_component” inserts large chunks of HTML that build out the entire component in question.
comment_component
overview_component
statement_component
estimate_component
The
typeattribute can be set to “grid” or “invoice” to format the estimate using the Grid or Invoice styling respectively. The default format is Bid and does not need to be specified.
assumptions_component
terms_component
BID VARIABLES:
Note
All variables that end with “_newPage” have a value of either 0 or 1, depending on the checkbox setting in your bid’s PDF settings.
bid_number
description
prepared_by
client
PO
created (this is the bid date)
ungrouped_title
comment
statement
assumptions terms
type
version
phone_number
overall_markup
overall_discount
use_vat
vat
vat_label
currencyCode
currencySymbol
symbolAfterNumber
decimalPoint
thousandsSeparator
pdf_format
pdf_grouping
pdf_sorting
pdf_sortDir
pdf_comment
pdf_overview
pdf_overview_newPage
pdf_statement
pdf_statement_newPage
pdf_estimate
pdf_estimate_newPage
pdf_assumptions
pdf_assumptions_newPage
pdf_terms
pdf_terms_newPage
pdf_number
pdf_quantity
pdf_units
pdf_mark3rdPartyCosts
pdf_origRate
pdf_markup
pdf_discount
pdf_adjRate
pdf_cost
pdf_group_cost
Replacement Variables
ITEM |
LABEL |
REPLACEMENT ITEM |
|---|---|---|
Title |
overview |
The Overview Component Label |
Column Headers |
bidSection_thumbnail |
Thumbnail |
Column Headers |
bidSection_description |
Description |
Column Headers |
bidSection_notes |
Notes |
Totals |
internalSubtotal |
Internal Costs |
Totals |
thirdPartySubtotal |
Third Party Costs |
Totals |
subtotal |
Subtotal |
Totals |
overallMarkup |
Overall Markup |
Totals |
overallDiscount |
Overall Discount |
Totals |
preTaxTotal |
Pre-Tax Total |
Totals |
grandTotal |
Grand Total |
Footnotes |
someThirdParty |
Some items in this group are third party costs. |
Footnotes |
someNotInMarkup |
Some items in this group are not included in the overall markup. |
Footnotes |
someNotInDiscount |
Some items in this group are not included in the overall discount. |
ITEM |
LABEL |
REPLACEMENT ITEM |
|---|---|---|
Title |
statement |
The Statement Component Label |
ITEM |
LABEL |
REPLACEMENT ITEM |
|---|---|---|
Title |
estimate |
The Statement Component Label |
Column Headers |
bidSection_thumbnail |
Thumbnail |
Column Headers |
bidSection_description |
Description |
Column Headers |
bidSection_notes |
Notes |
Column Headers |
number |
Number |
Column Headers |
category |
Category |
Column Headers |
item |
Item |
Column Headers |
quantity |
Quantity |
Column Headers |
units |
Units |
Column Headers |
rate |
Rate |
Column Headers |
markup |
Markup |
Column Headers |
discount |
Discount |
Column Headers |
adjRate |
Adj. Rate |
Column Headers |
cost |
Cost |
Column Headers |
total |
Total |
Column Headers |
profit |
Profit |
Column Headers |
margin |
Margin |
Unit Values |
unitType_units |
Units |
Unit Values |
unitType_hrs |
Hrs |
Unit Values |
unitType_days |
Days |
Totals |
summary |
Summary |
Totals |
internalSubtotal |
Internal Costs |
Totals |
thirdPartySubtotal |
Third Party Costs |
Totals |
subtotal |
Subtotal |
Totals |
overallMarkup |
Overall Markup |
Totals |
overallDiscount |
Overall Discount |
Totals |
preTaxTotal |
Pre-Tax Total |
Totals |
grandTotal |
Grand Total |
Footnotes |
theseThirdParty |
These items are third party costs. |
Footnotes |
theseNotInMarkup |
These items are not included in the overall markup. |
Footnotes |
theseNotInDiscount |
These items are not included in the overall discount. |
ITEM |
LABEL |
REPLACEMENT ITEM |
|---|---|---|
Title |
assumptions |
The Assumptions Component Label |
ITEM |
LABEL |
REPLACEMENT ITEM |
|---|---|---|
Title |
terms |
The Terms Component Label |
Note
Templates are translated to PDFs using a PHP library called MPDF. You can use MPDF specific code to create recurring headers, footers, page numbers, and a variety of other features. The the full MPDF documentation is located here: https://mpdf.github.io/
Finance
The Finance section of NIM covers items regarding expense categories, payment methods, and invoice status.
Expense Types
Expense types define categories that are used in calculating bids, projections, actualization, and studio wide finances. Expenses exist within each job to log job specific receipts organized by expense type. Expense line items in a bid are actualized against theses categorized receipts.
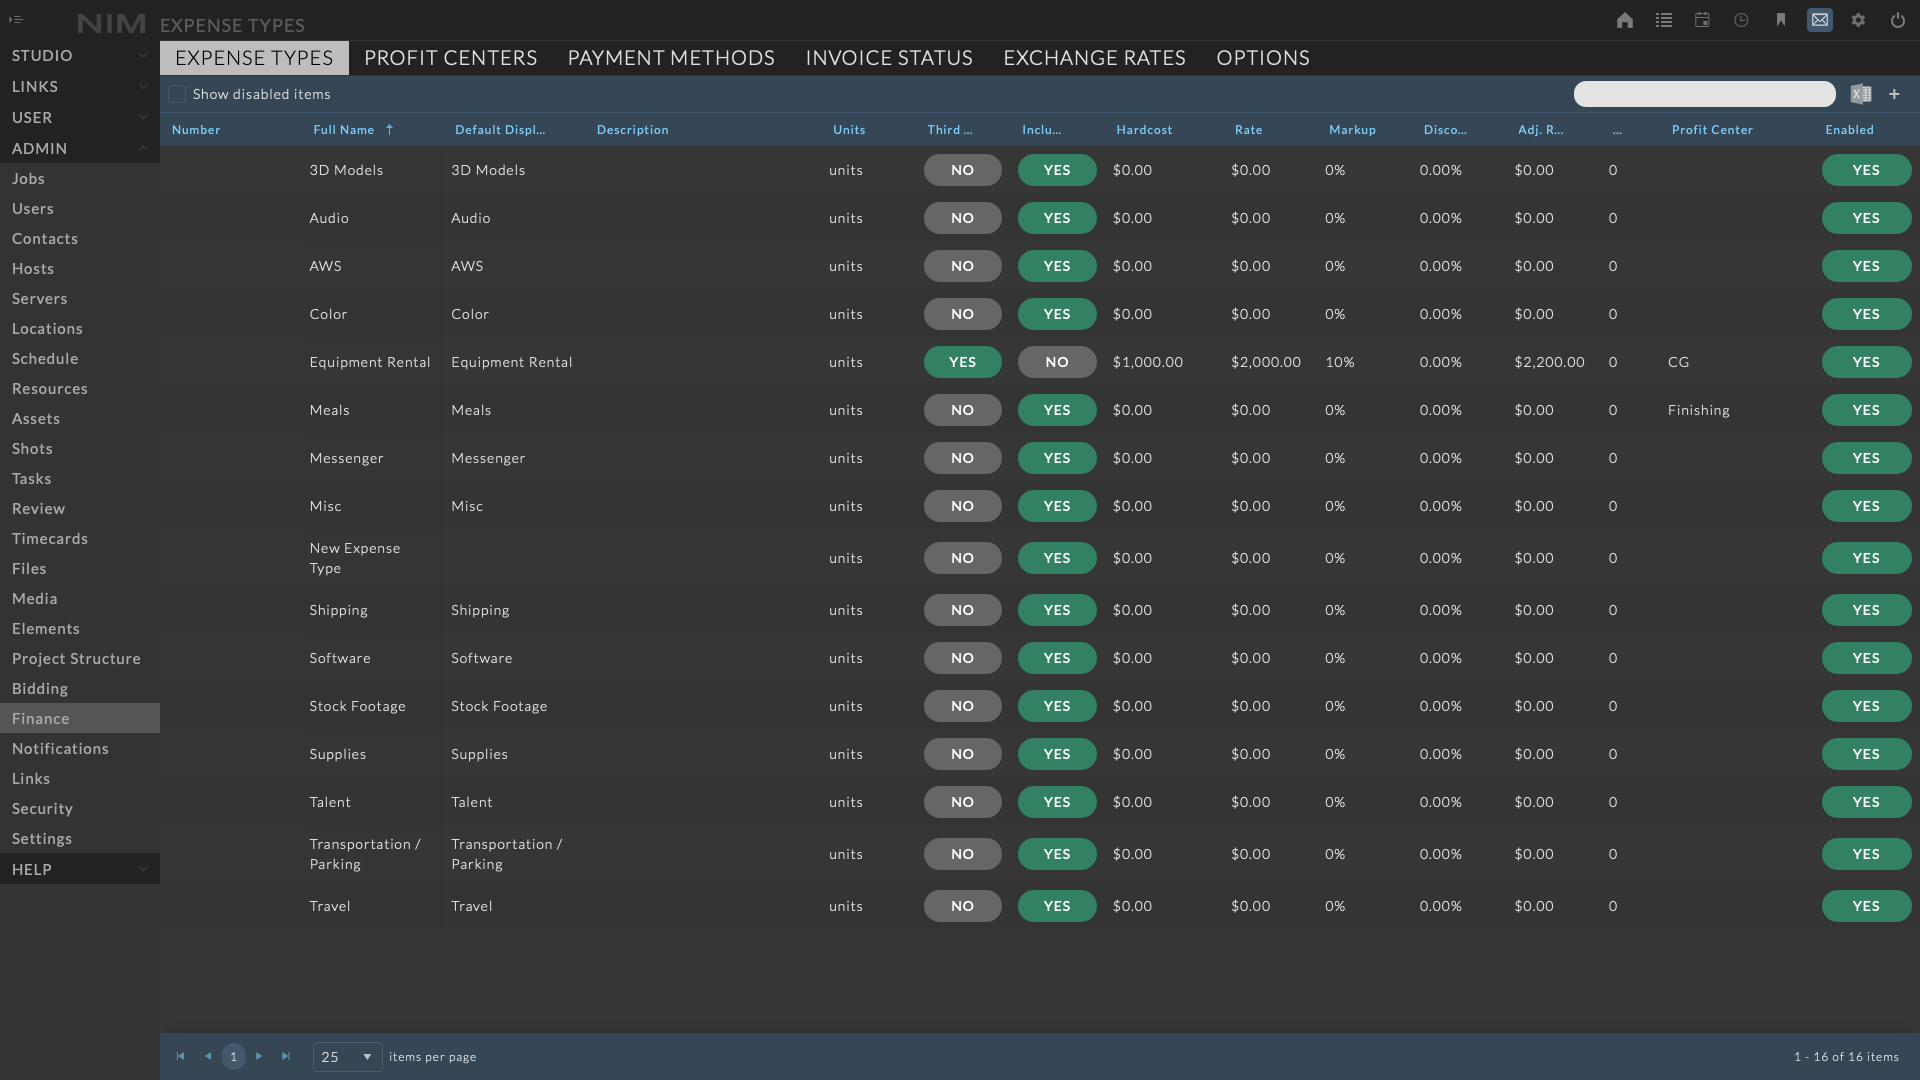
To add a new expense type, click the button at the top right of the expense types window. The expense type details will appear and the required information can be entered as needed. When done click the “Save” button at the bottom of the info panel to save your changes.

Available Options:
Number - This value can be used to match items to external spreadsheets or associated asset names or shot numbers. In a bid estimate, items can be Grouped by Number to display subtotals for associated items.
Full Name - A unique name for the expense type. This name is only visible on the bid estimate in NIM and is for internal use only.
Display Name - This is the name that will appear on the exported bid PDFs. This value can be overrode within the bid.
Description - A brief description of the expense type.
Units - The default unit type for the expense line item. This value can be overrode within the bid.
Options are:
hrs
days
units
Third Party Cost - The default value identifying this expense line item as a third party cost. This value can be overrode within the bid.
Included in Overall Markup/Discount - The default value identifying this expense line item as included in the overall markup/discount. This value can be overrode within the bid.
Hard Cost - The default hard cost associated with this expense line item. This value is used in determining estimated cost, job margins, and actualizations. This value can be overrode within the bid.
Rate - The default rate associated with this expense line item. This value is used in determining estimated cost, job margins, bid totals, and actualizations. This value can be overrode within the bid.
Markup - This value is the default percentage of markup applied to the rate in a bid estimate. Entering a markup percentage will modify the Adjusted Rate accordingly. This value will also be used as the default markup value assigned to these expense items types when applying reconciliation amounts in job actualizations.
Discount - This value is the default percentage of discount applied to the rate in a bid estimate. Entering a discount percentage will modify the Adjusted Rate accordingly.
Adj. Rate - This value is the Adjusted Rate and is calculated from any markup or discount applied to the rate. Entering an adjusted rate directly will adjust the respective markup or discount accordingly.
Priority - Defines sorting priority in lists.
Profit Center - This dropdown will select the Profit Center the expense type will be associated with. Profit Centers are defined in the Admin > Finance - Profit Centers tab. When viewing profit center totals, NIM actualizes the individual line items across jobs and awarded bids to determine profit margins of each Profit Center independently.
Enabled - This checkbox determines if the expense type is enabled or disabled. A disabled expense type will still exist on older bids and jobs that used the expense type, however it will no longer be a selectable expense type choice. Use this to remove expense types you no longer wish to use but have been used in the past.
To edit a expense type, click on a row from the grid to load the expense type info panel. Click on the ellipsis menu in the expense type info panel and choose “Edit”. Make the necessary changes and click the “Save” button at the bottom of the info panel to save your changes. Click the cancel button to return to the view mode without saving changes.
Delete a expense type entry by selecting the expense type from the grid, clicking the ellipsis menu in the expense type panel, and selecting “Delete”. You will be prompted to confirm deletion of the expense type. Deleting a expense type will remove that expense type from any previously assigned expense type.
Profit Centers
Profit Centers are used to group bid line items and expenses across all jobs to determine their specific profitability. When viewing profit center totals, NIM actualizes the individual line items across jobs and awarded bids to determine profit margins of each Profit Center independently. This allows studios to see the profitability of different revenue sources independent of the job’s profit/margin.
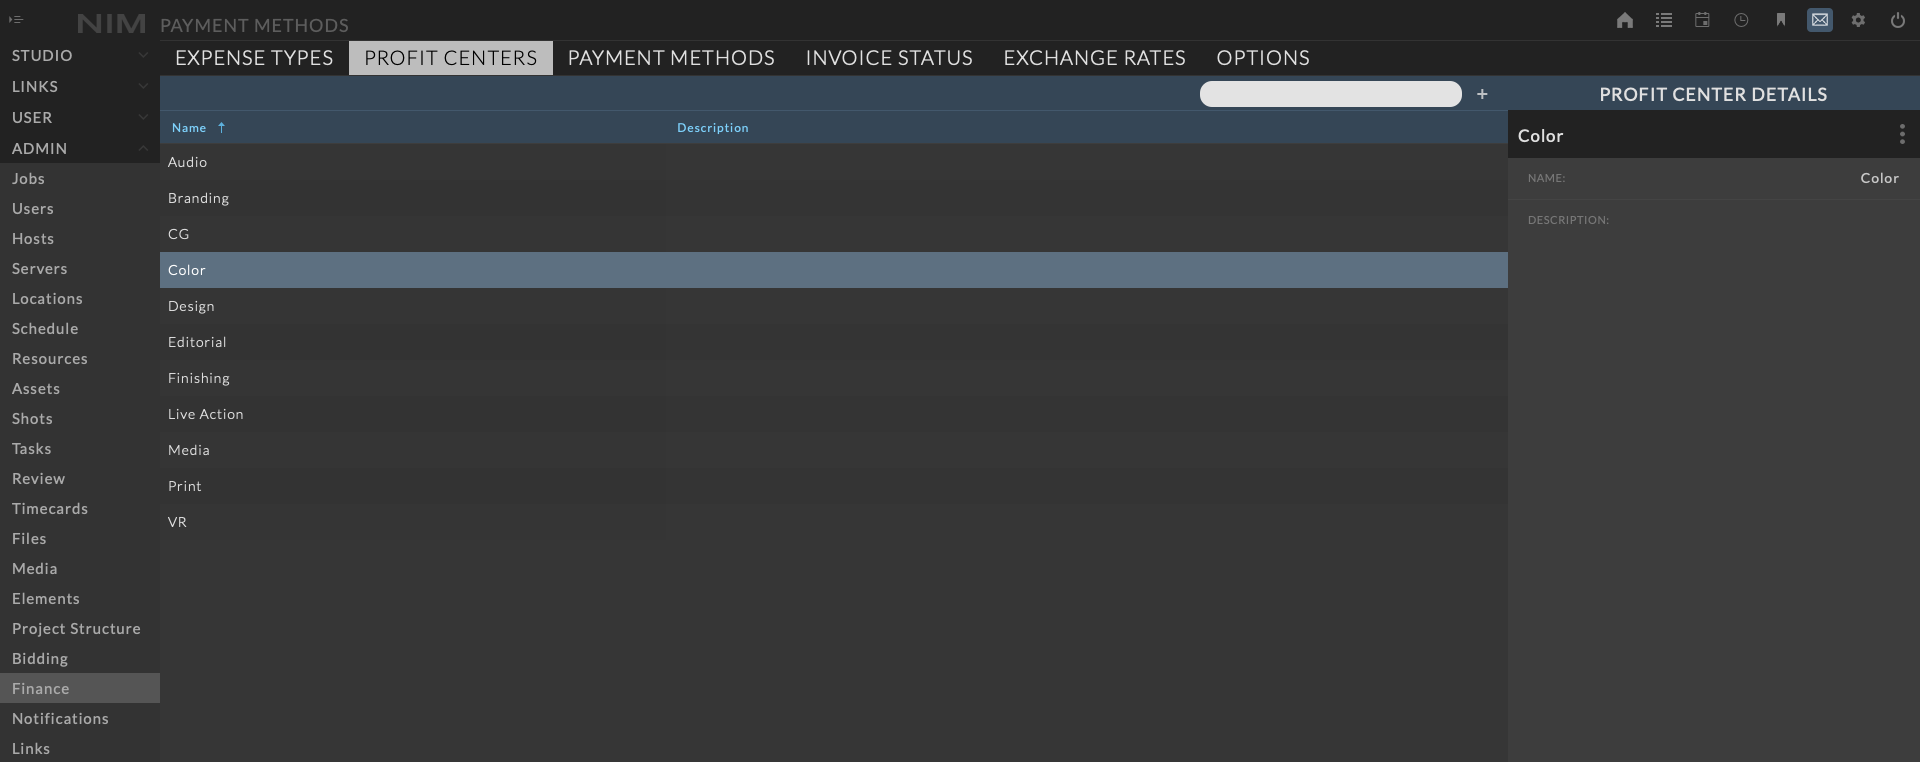
To use a profit center, add the desired profit center to a bid item or expense type in Admin > Bidding - Bid Items or Admin > Finance - Expense Types respectively. Once the profit center is assigned to items, NIM will automatically gather all financial data for this group and display the results in the Studio > Actuals - Profit Centers section of NIM.
To add a new profit center, click the button at the top right of the Profit Centers window. The profit center details will appear and you can enter a custom name and description. When done click the “Save” button at the bottom of the info panel to save your changes.
Available Options:
Name - A unique name for the profit center.
Description - A brief description of the profit center.
To edit a profit center, click on a row from the grid to load the profit center info panel. Click on the ellipsis menu in the profit center info panel and choose “Edit”. Make the necessary changes and click the “Save” button at the bottom of the info panel to save your changes. Click the cancel button to return to the view mode without saving changes.
Delete a profit center entry by selecting the profit center from the grid, clicking the ellipsis menu in the profit center panel, and selecting “Delete”. You will be prompted to confirm deletion of the profit center. Deleting a profit center will remove that profit center from any previously assigned items.
Payment Methods
Payment methods are used when adding job expenses to organize and sort job receipts.
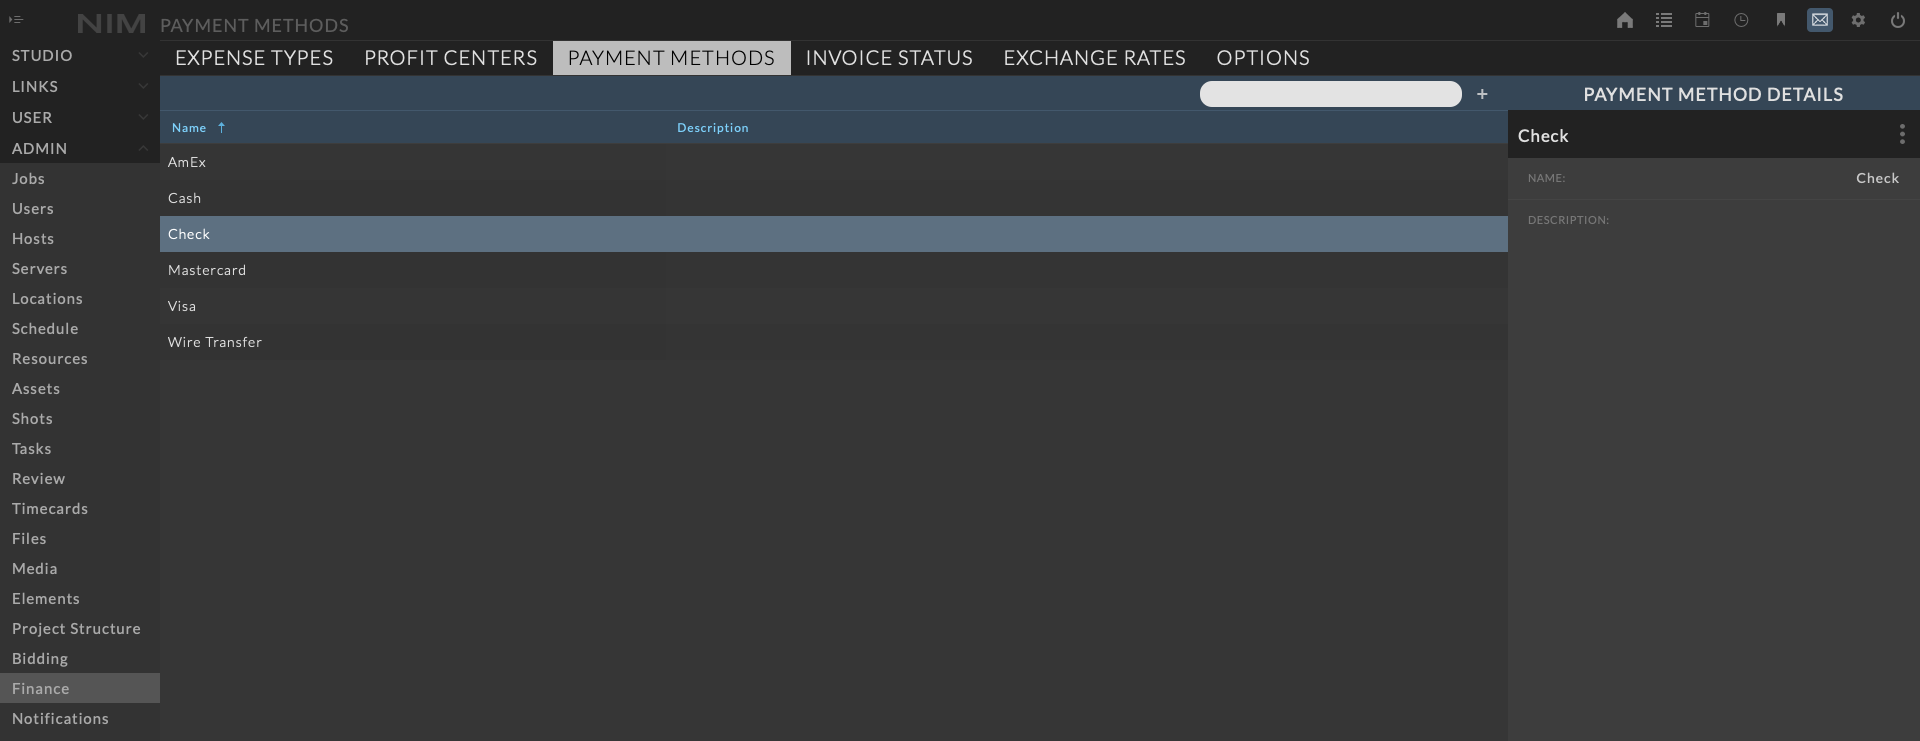
To add a new payment method, click the button at the top right of the payment methods window. The payment method details will appear and the required information can be entered as needed. When done click the “Save” button at the bottom of the info panel to save your changes.
Available Options:
Name - A unique name for the payment method.
Description - A brief description of the payment method.
To edit a payment method, click on a row from the grid to load the payment method info panel. Click on the ellipsis menu in the payment method info panel and choose “Edit”. Make the necessary changes and click the “Save” button at the bottom of the info panel to save your changes. Click the cancel button to return to the view mode without saving changes.
Delete a payment method entry by selecting the payment method from the grid, clicking the ellipsis menu in the payment method panel, and selecting “Delete”. You will be prompted to confirm deletion of the payment method. Deleting a payment method will remove that payment method from any previously assigned payment method.
Invoice Status
Invoice status items are used to determine the payment status of a logged invoice in NIM. The combined total of each invoice status on a job determines the displayed billing status of the job. The invoice status is automatically determined based on the invoice dates vs the current date for the scheduled, sent, due, and paid fields.
Note
These items can not be deleted but can be renamed and assigned unique color codes.
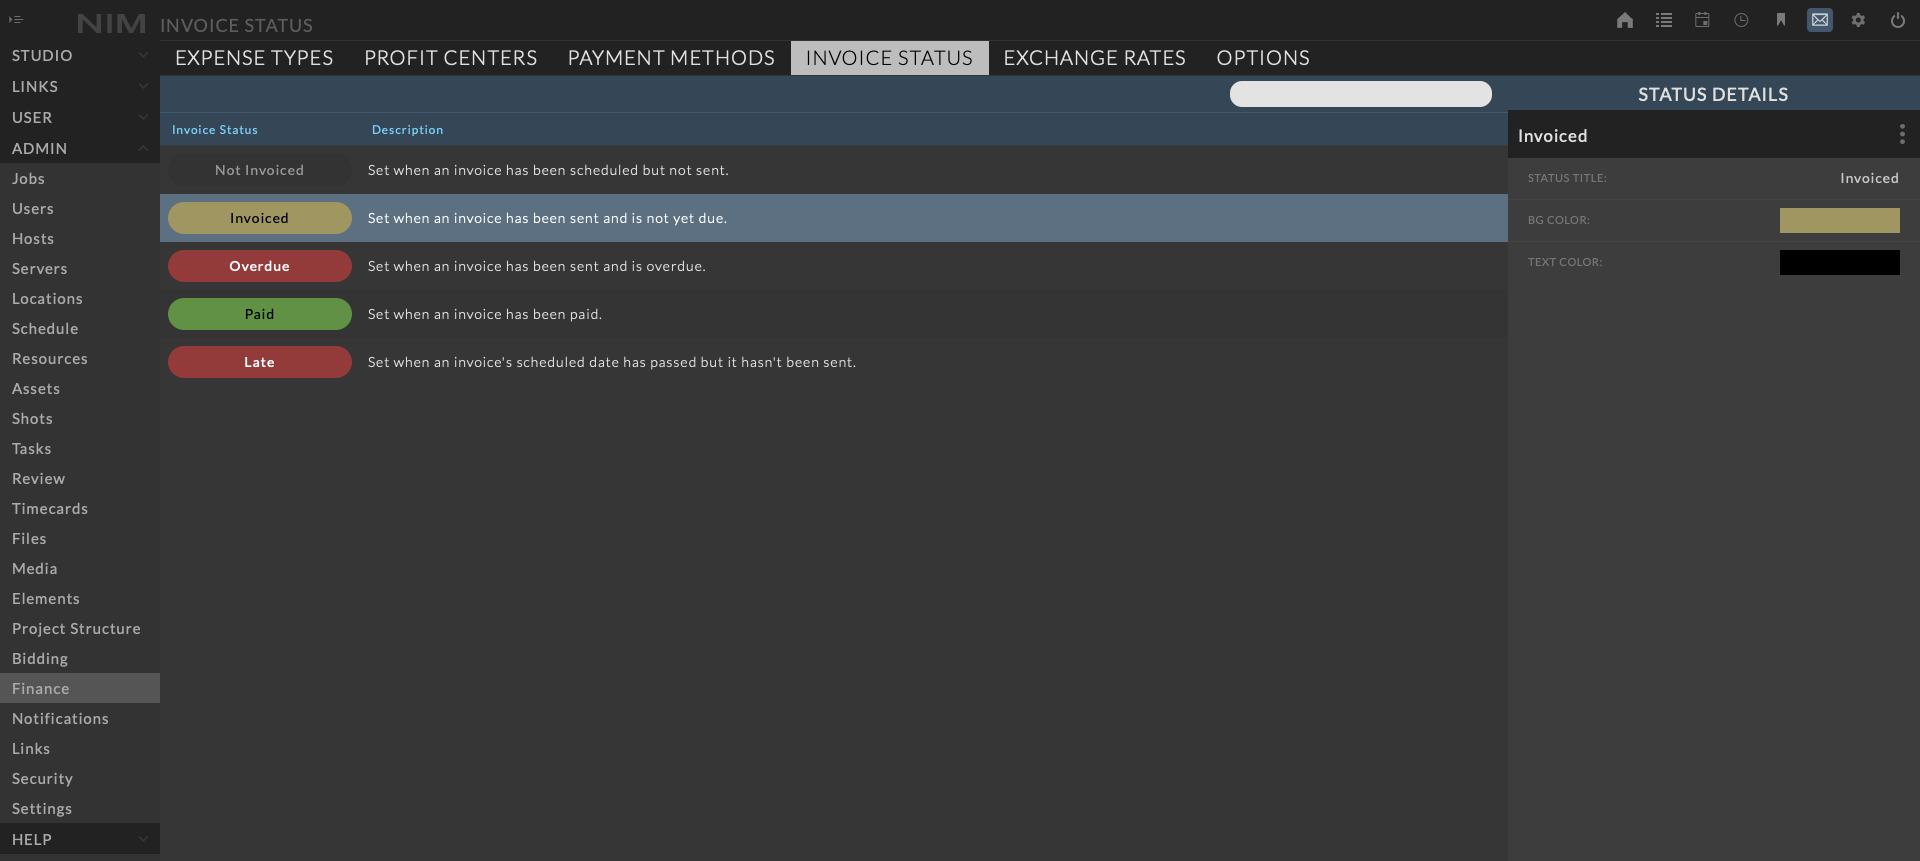
Available Options:
Status Title - The title of the status displayed on invoices.
BG Color - The background color of the invoice status when appearing in UI elements.
Text Color - The text color of the task invoice status appearing in UI elements.
To edit a invoice status, click on a row from the grid to load the invoice status info panel. Click on the ellipsis menu in the invoice status info panel and choose “Edit”. Make the necessary changes and click the “Save” button at the bottom of the info panel to save your changes. Click the cancel button to return to the view mode without saving changes.
Exchange Rates
Exchange rates are used throughout NIM to convert one currency type to another. Each row represents the exchange rates for a single date between all currencies that NIM supports.
When an item with an associated date needs to be converted to another currency, it will use the most recent exchange rate row on or before that date.
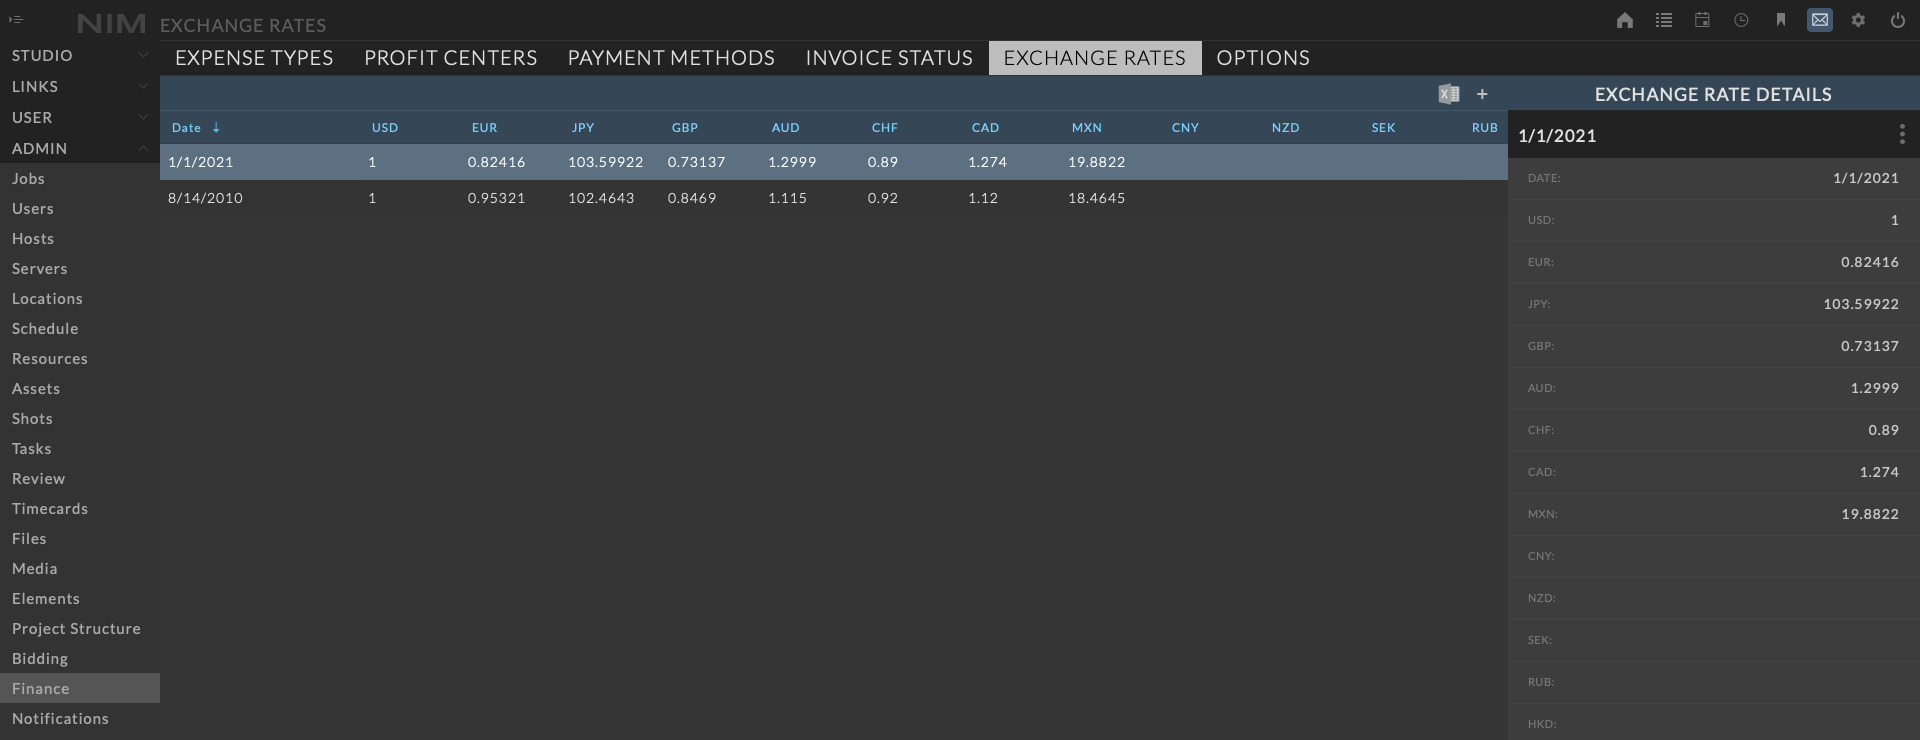
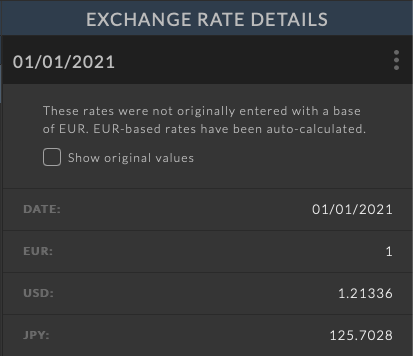
The base rate is determined by the Studio Currency settings in Admin > Finance - Options : Currency. Whichever currency is selected as the studio currency will always be a base of 1 in exchange rates.
If you entered exchange rates prior to changing your studio currency, NIM will automatically calculate the equal exchange rate centered around the new base and the following message will appear in the exchange rate details.
You have the option to display the rates in their original entered values by checking the “Show original values” checkbox.
To add a set of exchange rates, click the button at the top right of the exchange rates window. A new list of exchange rate types will appear and the required information can be entered as needed. When done click the “Save” button at the bottom of the info panel to save your changes.
Note
A single exchange rate entry can exist per day. If an entry is created or edited to be on the same day as an existing exchange rate row, the next available date will be used.
To edit an exchange rate, click on a row from the grid to load the exchange rate info panel. Click on the ellipsis menu in the exchange rate info panel and choose “Edit”. Make the necessary changes and click the “Save” button at the bottom of the info panel to save your changes. Click the cancel button to return to the view mode without saving changes.
Delete a exchange rate entry by selecting the exchange rate from the grid, clicking the ellipsis menu in the exchange rate panel, and selecting “Delete”. You will be prompted to confirm deletion of the exchange rates.
Finance Options
The Finance Options tab allows you to set various financial settings including rate labels and multipliers as well as the default studio currency and currency conversion behaviors.
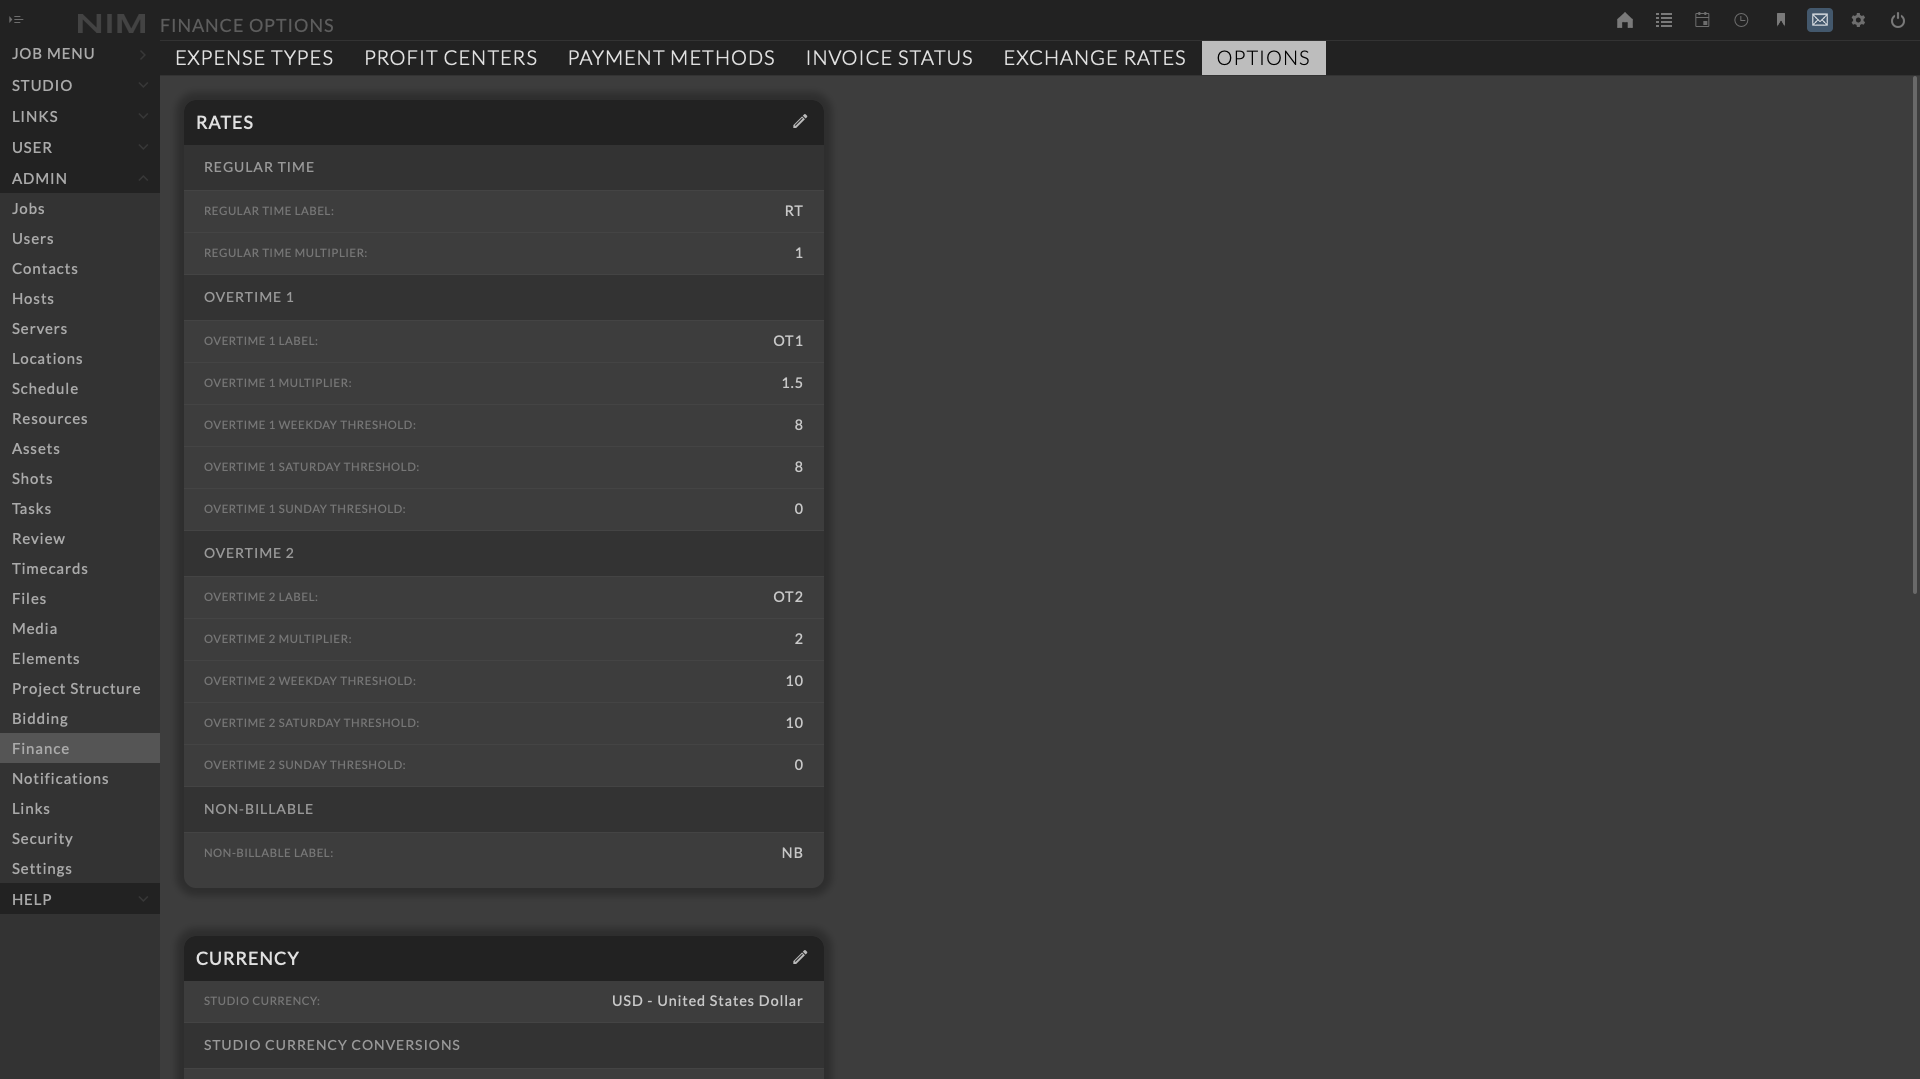
Rates
These values determine rate labels and multipliers for how costs are calculated for timecards that belong to users with the “Hourly” rate type
Regular Time Label - This is the label for standard user rates throughout NIM. By default, it is set to “RT”, which stands for Regular Time.
Regular Time Multiplier - When a user is set to the “Hourly” rate type, hours that are allocated to regular time (or RT) will be multiplied by this number. By default, it is 1.
Overtime 1 Label - This is the label for the first overtime rate. By default, it is set to “OT”, which stands for Overtime.
Overtime 1 Multiplier - When a user is set to the “Hourly” rate type, hours that are allocated to their first overtime rate (or OT) will be multiplied by this number. By default, it is 1.5.
Overtime 1 Weekday Threshold - Default number of hours at which the overtime rate 1 starts on weekdays when creating a new user rate entry.
Overtime 1 Saturday Threshold - Default number of hours at which the overtime rate 1 starts on Saturday when creating a new user rate entry.
Overtime 1 Sunday Threshold - Default number of hours at which the overtime rate 1 starts on Sunday when creating a new user rate entry.
Overtime 2 Label - This is the label for the second overtime rate. By default, it is set to “DT”, which stands for Double Time.
Overtime 2 Multiplier - When a user is set to the “Hourly” rate type, hours that are allocated to their second overtime rate (or DT) will be multiplied by this number. By default, it is 2.
Overtime 1 Weekday Threshold - Default number of hours at which the overtime rate 2 starts on weekdays when creating a new user rate entry.
Overtime 1 Saturday Threshold - Default number of hours at which the overtime rate 2 starts on Saturday when creating a new user rate entry.
Overtime 1 Sunday Threshold - Default number of hours at which the overtime rate 2 starts on Sunday when creating a new user rate entry.
Non-Billable Label - This is the label used for all non-billable time. By default, it is set to “NB”, which stands for Non-Billable.
Currency
These settings are used when changing the Studio Currency and specify how that change will affect items throughout NIM.
Studio Currency - The currency that will be used in all non-job-specific sections of NIM, including Studio / Financials and Studio / Actuals. All new jobs and users will default to using this currency. In addition, this setting determines the current “culture”, which affects how certain values are displayed throughout NIM. For example, dates will display as Month / Day / Year with the default setting of United States Dollar, but will change to Day / Month / Year if changed to Euro. Decimal points, comma separators, and other calendar info can also vary based on this setting.
Studio Currency Conversions - When changing the Studio Currency, these settings determine how currency values on specific studio-wide items will change. An example is given to the right of each item to show how it would change if you proceed with your selected Studio Currency change.
Users - User rates can either retain their existing currency and value, change currency but retain value, or change currency and convert value (based on the most recent Exchange Rates row).
Bid Items - Default Bid Item costs and rates must be updated to the new Studio Currency, so they can either retain their existing values in the new currency or convert their values (based on the most recent Exchange Rates row).
Job Currency Conversions - When changing the Studio Currency, these settings determine how currency values on specific job items will change. An example is given to the right of each item to show how it would change if you proceed with your selected Studio Currency change.
Jobs - Jobs don’t have any currency numbers directly tied to them, so their “currency” setting only determines the currency you’ll view their actuals in and the default currency for items created within them. When changing your Studio Currency, existing jobs can either retain their currency or change to the new currency.
Crew - Crew rates can either retain their existing currency and value, change currency but retain value, or change currency and convert value (based on the most recent Exchange Rates row on or before the job’s Start Date).
Bids - Bids can either retain their existing currency and values, change currency but retain values, or change currency and convert values (based on the most recent Exchange Rates row on or before the bid’s Bid Date).
Expenses - Expenses can either retain their existing currency and value, change currency but retain value, or change currency and convert value (based on the most recent Exchange Rates row on or before the expense’s date).
Invoices - Invoices can either retain their existing currency and value, change currency but retain value, or change currency and convert value (based on the most recent Exchange Rates row on or before the invoice’s date).
To edit the finance options options, click the edit button in the header for the section you would like to edit. After making the necessary changes, click the check mark button to save. Click the cancel button to return to the view mode without saving changes.
Misc
Fiscal year Start - This date is used to select the start of the fiscal year. This value is used when viewing the financial overview charts Year over Year and Quarter over Quarter modes.
Hours Per Day - This value is used to convert work days to work hours when that conversion must take place. When the unit of a bid item is days, this value determines how each day is converted to hours in the “Bid Hours” column in a jobs Timecard Actualization section. When a user has a day rate type, this value is used to convert their projected hours to a projected cost.
Default P&W - Used in Crew Rates and Actualization, new user rates will start with this P&W value, which will be added (as a percentage) to all of their calculated costs.
Notifications
The notifications section allows users to define rule based notifications triggered by actions and changes to objects in NIM.
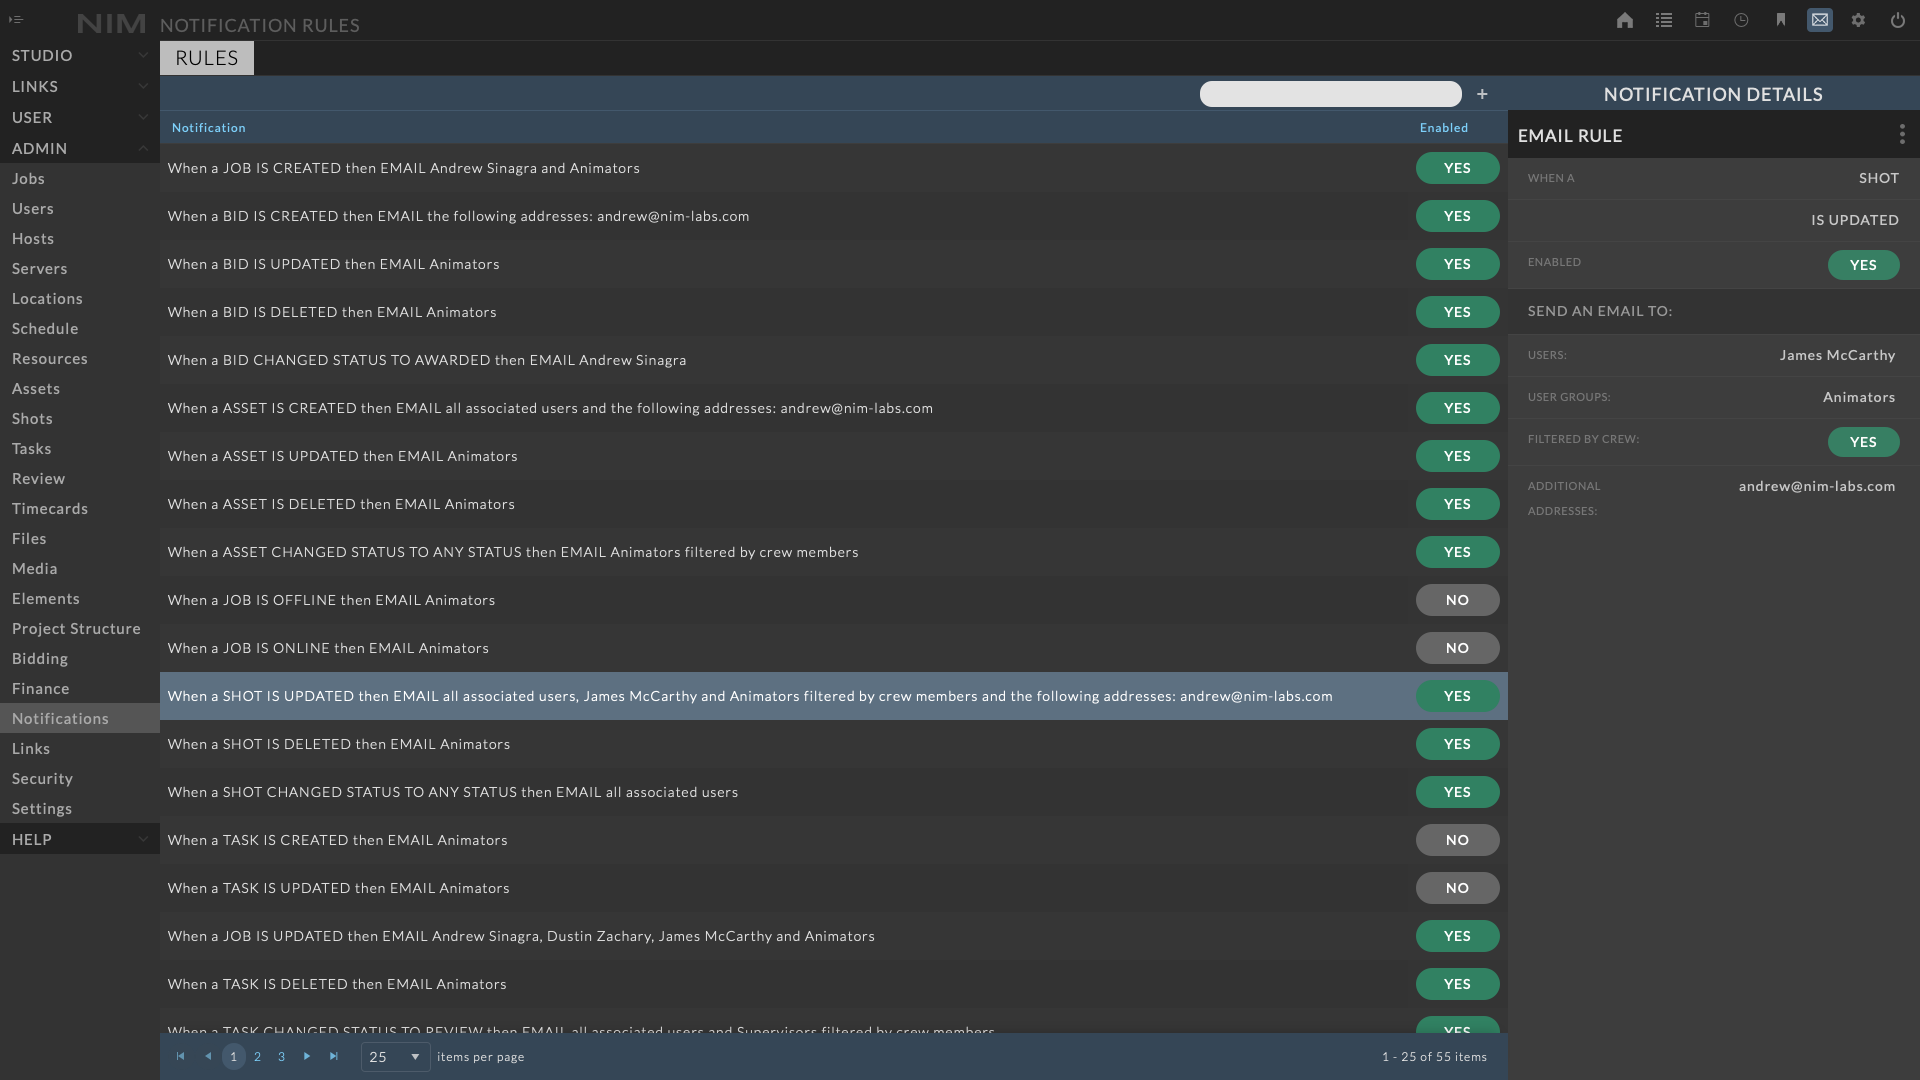
To add new notification rule, click the button at the top right of the rules grid. The notification details will appear and the required information can be entered as needed. When done click the “Save” button at the bottom of the info panel to save your changes.
A rule definition includes the target object and action determining what triggers the notification.
Example Rule Definition:
When a task status is changed to review, then email all associated users and Supervisors filtered by crew.
This will send an email to the user who is assigned the task, as well as all users in the Supervisors user group that are on the crew of the job when any task has its status changed to review.
These notifications are sent via email and can be sent to:
Users - Add specific NIM users to receive the notification defined
User Groups - Add user groups to include all users that are members of the group.
Associated Users - Any user that has direct association with the object being affected. For Example: a user that is assigned a task on the shot receiving a note.
Filtered By Crew - Limits the notification to users that are assigned to the crew that is associated with the object being affected. For Example: A notification with a user group will only be sent to users within the group that are assigned to the crew for a task that received a status update.
Additional Addresses - Any valid email address
To edit a notification rule, click on a row from the grid to load the notification rule info panel. Click on the ellipsis menu in the notification rule info panel and choose “Edit”. Make the necessary changes and click the “Save” button at the bottom of the info panel to save your changes. Click the cancel button to return to the view mode without saving changes.
Notifications can be disabled by clicking the ellipsis menu in the notification rule info panel and changing the “Enabled” setting to “NO”. To re-enable a notification, click the ellipsis menu in the notification rule info panel and set “Enabled” to “YES”.
Delete a notification rule entry by selecting the notification rule from the grid, clicking the ellipsis menu in the notification rule panel, and selecting “Delete”. You will be prompted to confirm deletion of the notification rule.
The following is an example email received when a task is updated:
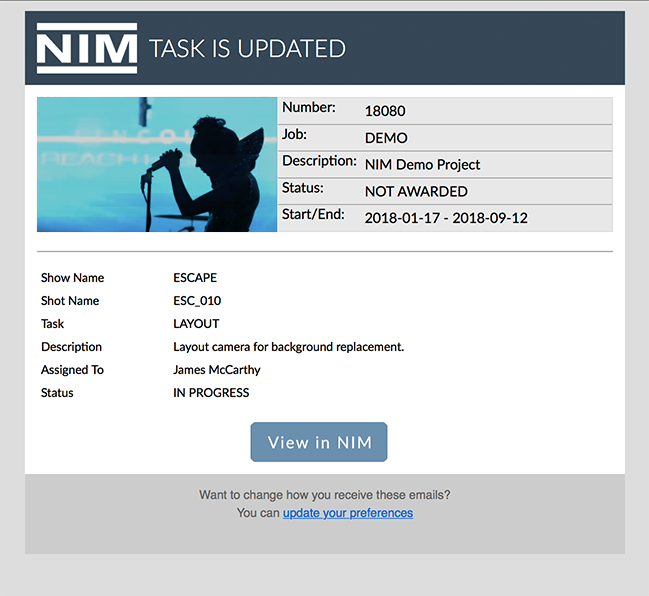
The rule options for notifications are as follows:
OBJECT |
ACTION |
|---|---|
ASSET |
Is Created |
Is Updated |
|
Is Deleted |
|
Changed Status To |
|
Note Added |
|
Note Edited |
|
Note Deleted |
|
BID |
Is Created |
Is Updated |
|
Is Deleted |
|
Changed Status To |
|
JOB |
Is Created |
Is Updated |
|
Is Deleted |
|
Changed Status To |
|
Is Offline |
|
Is Online |
|
Note Added |
|
Note Edited |
|
Note Deleted |
|
Crew Member Added |
|
Crew Member Updated |
|
Crew Member Deleted |
|
RENDER |
Is Created |
Is Updated |
|
Is Deleted |
|
REVIEW |
Is Created |
Is Updated |
|
Is Deleted |
|
Changed Status To |
|
Note Added |
|
Note Edited |
|
Note Deleted |
|
SCHEDULE |
Event Is Created |
Event Is Updated |
|
Event Is Deleted |
|
Event Changed Status To |
|
SHOT |
Is Created |
Is Updated |
|
Is Deleted |
|
Changed Status To |
|
Note Added |
|
Note Edited |
|
Note Deleted |
|
SHOW |
Is Created |
Is Updated |
|
Is Deleted |
|
TASK |
Is Created |
Is Updated |
|
Is Deleted |
|
Changed Status To |
|
Is Assigned |
|
Note Added |
|
Note Edited |
|
Note Deleted |
Links
Custom links allow studios to add their own internal or external URLs to the LINKS menu in NIM.
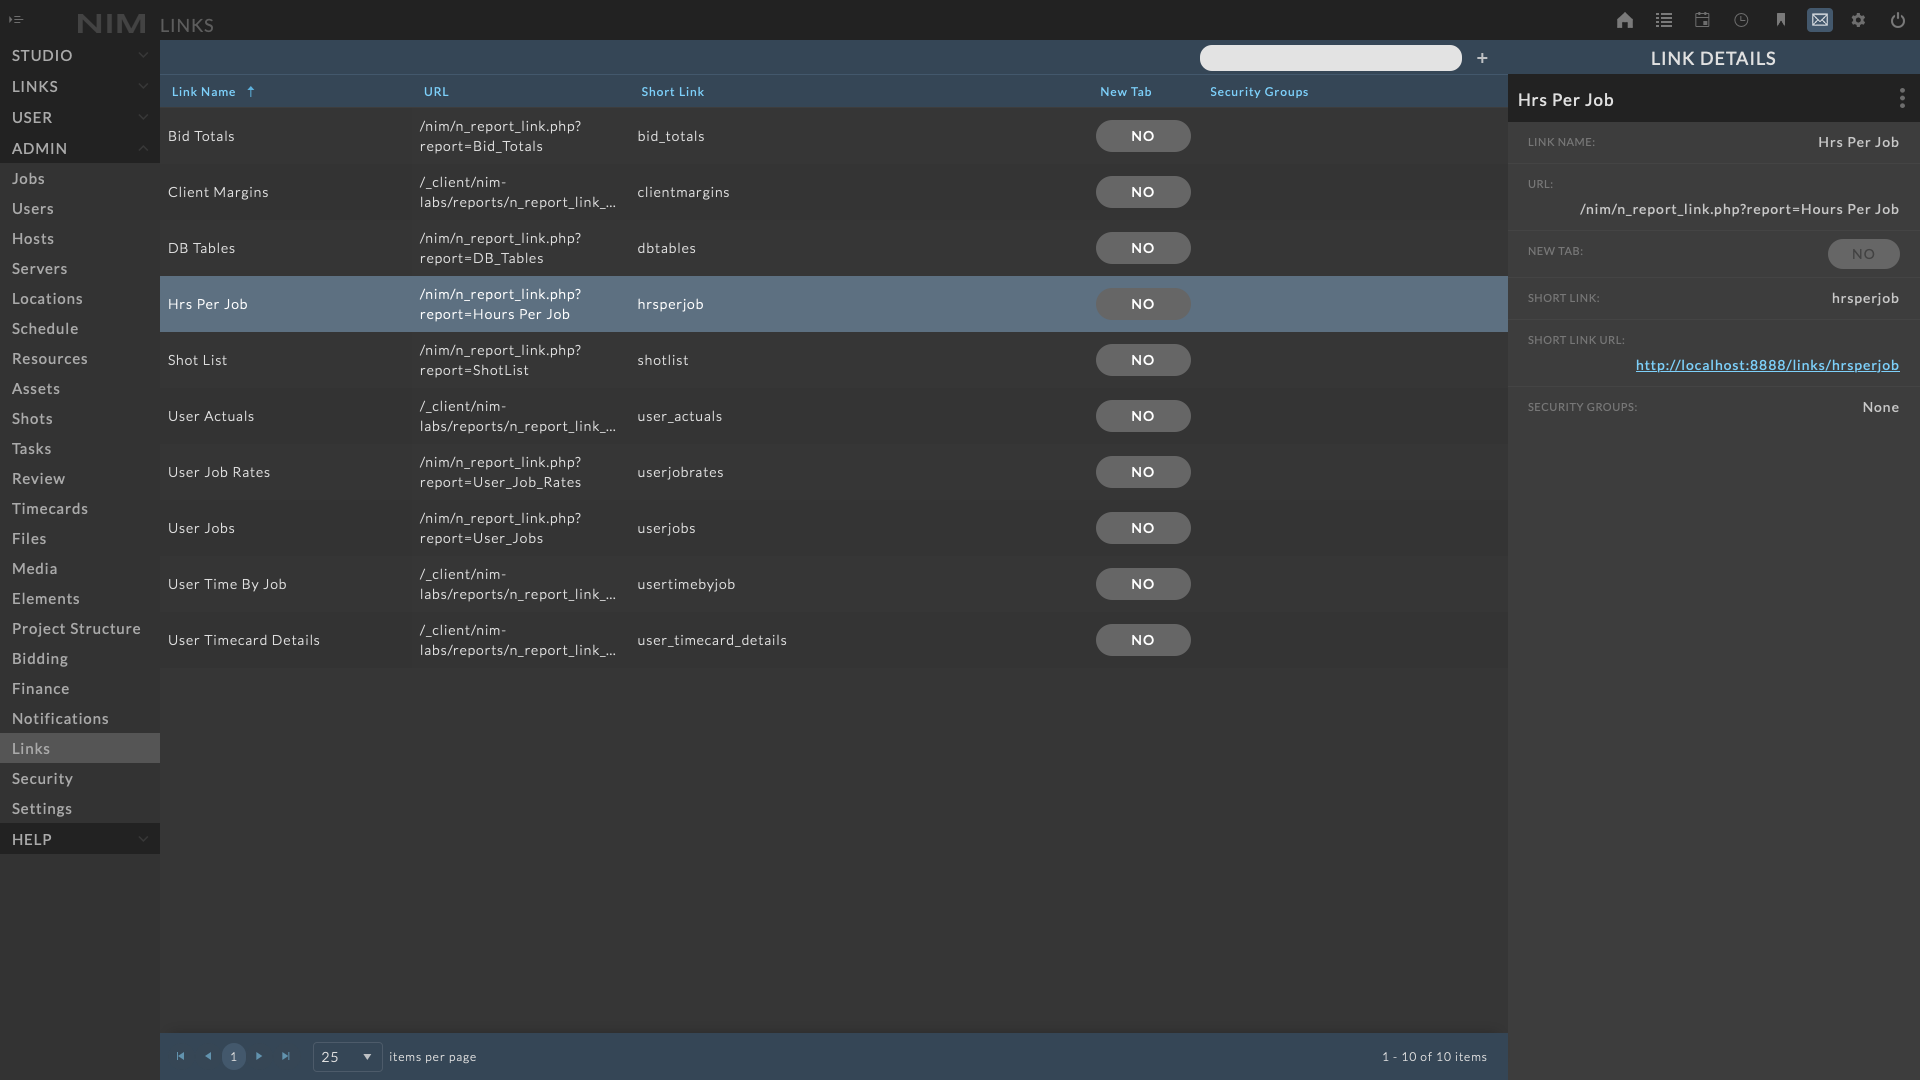
To add a new link, click the button at the top right of the link grid. The link details will appear and the required information can be entered as needed. When done click the “Save” button at the bottom of the info panel to save your changes.
Note
The LINKS menu will only appear after the first link is made. If no link entries exist then the LINKS menu will be removed from the UI.
Available Options:
Link Name - The name assigned to the link.
URL - The URL that will be loaded when accessed.
Short Link - This is a name that can be appended to a NIM URL for direct access to the page. This name will be appended to the root
http://NIM_URL/linkswhereNIM_URLis address you use to access NIM.Short Link URL - This displays the full NIM URL to use for direct access to the link destination.
Example:
If the short link entered is company_email then the direct URL will be http://NIM_URL/links/company_email.
New Tab - This determines if the link should be opened within NIM or in a new browser tab. Some websites do not allow their content to be embedded and will require that they are opened in a new tab.
Security Groups - Adding a security group to a link will make the link visible in the UI only to users associated with the same security group.
Example:
For an IT team to have quick access to an RLM license server webpage, but keep this information and link hidden to all other users, create a security group called RLM and add the IT team users. Then add the same RLM security group to the link. The RLM license server link will only display for those users in the RLM security group.
To edit a link, click on a row from the grid to load the link info panel. Click on the ellipsis menu in the link info panel and choose “Edit”. Make the necessary changes and click the “Save” button at the bottom of the info panel to save your changes. Click the cancel button to return to the view mode without saving changes.
Delete a link entry by selecting the link from the grid, clicking the ellipsis menu in the link panel, and selecting “Delete”. You will be prompted to confirm deletion of the link.
Example:
In the following image a local Autodesk® Wiretap™ Server was added as a custom link and displayed directly in NIM.
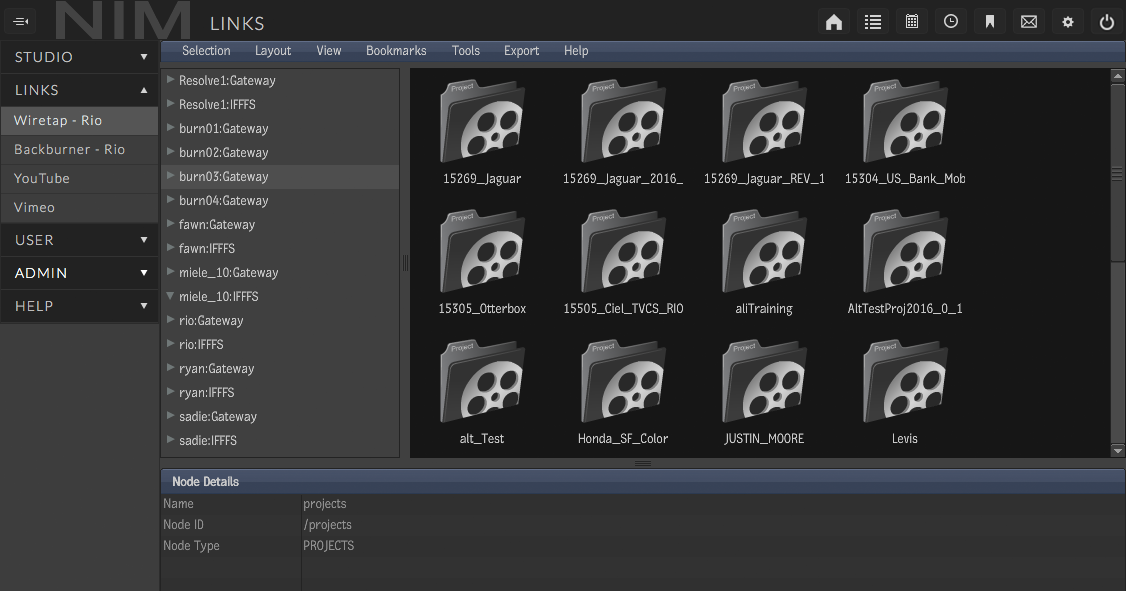
Custom Reports
For users who wish to build their own reports querying data directly from the NIM database, we have provided a quick method for creating NIM grids without the need for any UI code. These custom reports can be added as files directly on the NIM VM and are accessible using a custom link.
The contents of all report files must contain a valid MySQL query. The query will run when the report is accessed, and the results will be displayed in a grid that is sortable, filterable, and can be exported to excel.
Example File
An example report has been supplied on the NIM VM in the following location:
/var/www/html/_custom/reports/jobs.example
This file can be used as a starting point to create a new report. The example provides a simple list of job numbers and names for the latest 50 jobs.
To use the example provided as a starting point for a new report, copy the “jobs.example” file to the same folder and replace the .example extension with .rpt. All reports must end in a .rpt extension.
To view reports, access the following URL while logged into NIM:
http://[NIM SERVER]/nim/n_report_link.php?report=[REPORT FILENAME]
For example, to access jobs.rpt, access:
http://[NIM SERVER]/nim/n_report_link.php?report=jobs
To view reports within NIM, add the report URL as a new link in Admin > Links.
Note
The example file may be overwritten in subsequent NIM updates.
Security
NIM provides varying levels of user security based on the studios needs.
User security in NIM is defined at multiple levels:
Permissions Groups
Security Groups
Private Jobs
Permission groups are action based permissions that provide access and functionality to UI elements. For example the ability to view the full job list, or add shots to a job are based on a users permission group.
Security groups are object based and are applied directly to entities created in NIM. These can be applied to a job, asset, shot, or custom field. Only users that are part of the assigned security group will have access to those entities.
Private Jobs allow the studio a way to quickly make a job available to only it’s crew members without the need to set granular permissions, or create security groups. This is a high level access feature that removes access to the job’s information for anyone that is not on the crew.
Note
If a job was both private and had an associated security group, then any users needing job access will need to be both part of the crew and part of the security group.
The NIM VM by default has both HTTP and HTTPS connections available for use. The ports can be configured to limit all traffic to HTTPS ensuring secure communications from both the browser and API.
Optional API keys provides user level authentication when accessing the NIM API.
Combining HTTPS only access with Require API Keys provides the highest level of security for all users accessing NIM.
NIM can additionally be configured to use your company’s Active Directory or LDAP server for user authentication and permission management.
Permission Groups
Permission Groups are defined to restrict user access to UI elements and functionality within NIM. Studios can define any combination of permission groups as needed for production. Users are assigned directly to a group within the Admin > Users panel.
Note
Nearly every aspect of NIM is permission controlled. Items that the user does not have access to View will not appear in the NIM interface, customizing the end users experience to only show them the information they need.
For example: A user that does not have access to View the studio job list will only see the jobs that they have been assigned on their dashboard.
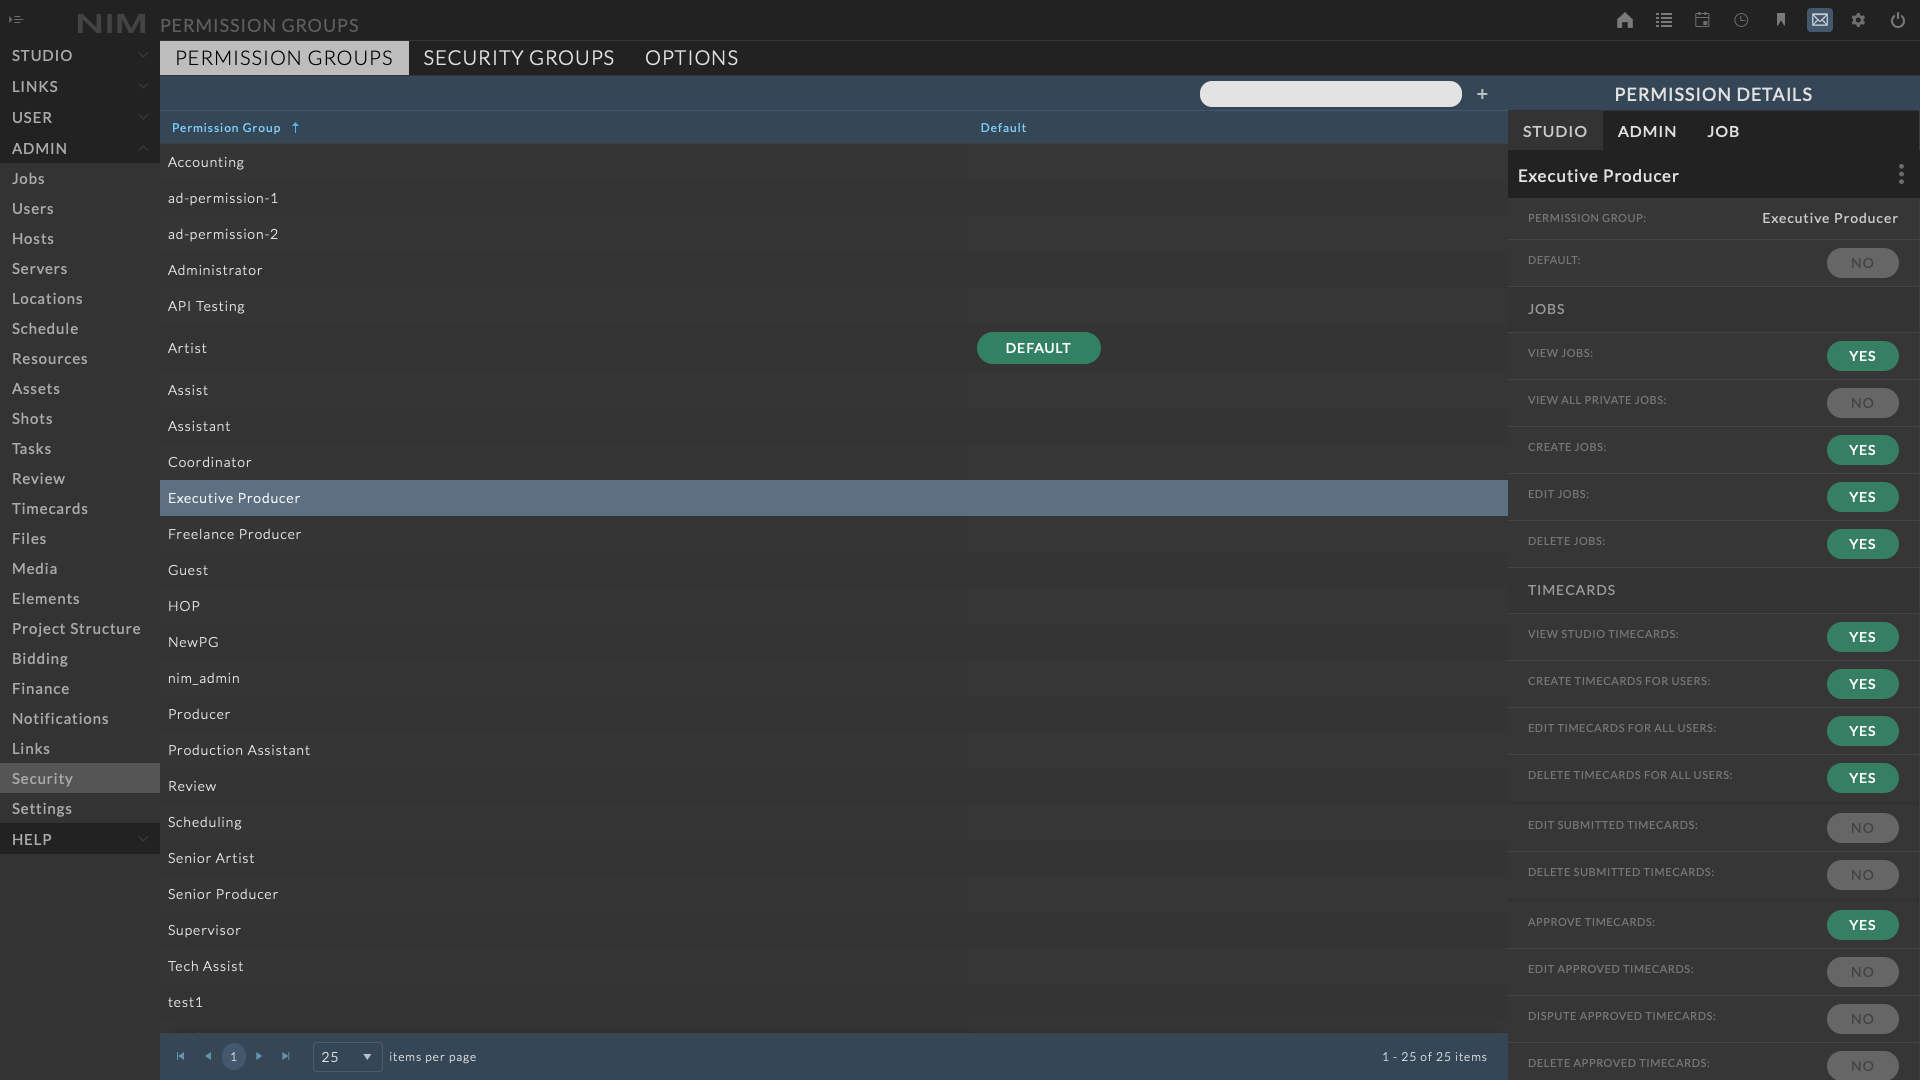
To add a new permission group, click the button at the top right of the permissions window. The permission details will appear and the required information can be entered as needed. When done click the “Save” button at the bottom of the info panel to save your changes.
Available Options:
Permission Group - A unique name for the permission group.
Default - A permission group marked as default will be auto-assigned to new users when they are created. Only one permission group can be marked as default. If no permission groups are marked as default, new users will have no permission group upon creation.
Permission Setting - See the table below for the list of permission settings available.
Note
Having no permission group is the same as having a permission group with all permissions turned off.
All new permission groups will use the default permission group settings as a starting point. After creating a new permission group, edit the permission settings as needed.
To copy a permission group, select a permission group to copy from the grid and click the button at the top right of the permissions window. The new permission group details will be selected in the grid and loaded in the info panel.
To edit a permission group, click on a row from the grid to load the permission group info panel. Click on the ellipsis menu in the permission group info panel and choose “Edit”. Make the necessary changes and click the “Save” button at the bottom of the info panel to save your changes. Click the cancel button to return to the view mode without saving changes.
Delete a permission group entry by selecting the permission group from the grid, clicking the ellipsis menu in the permission group panel, and selecting “Delete”. You will be prompted to confirm deletion of the permission group. Deleting a permission group will remove that permission group from any previously assigned user.
Studio Permissions
Permission |
Description |
|---|---|
JOBS |
|
View Jobs |
Enables access to the job list through the studio menu and job list button |
View All Private Jobs |
Grants access to all private jobs regardless if the user is on the crew. |
Create Jobs |
Enables the ability to create a new job. |
Edit Jobs |
Allows users to edit job information in the job overview and job config. |
Delete Jobs |
Allows users to delete jobs from the job list. This places the job in a Delete Jobs list. To permanently delete a job the Permanently Delete Jobs permission in the Admin Permission section is required. |
TIMECARDS |
|
View Studio Timecards |
Provides access to studio wide timecards in the Studio/Timecards menu. |
Create Timecards For Users |
Enables the user to be able to create timecards for any user. This applies to both the Studio and Jobs timecards. If this is disabled, users will only be able to create their own timecards. |
Edit Timecards For All Users |
Enables the user to edit any user’s timecard. If this is disabled, users will only be able to modify their own timecards. |
Delete Timecards For All Users |
Enables the user to delete any user’s timecard. If this is disabled, users will only be able to modify their own timecards. |
Edit Submitted Timecards |
Enables users to edit timecards which are in the submitted stage. By default submitted timecards are locked for any modifications. |
Delete Submitted Timecards |
Enables users to delete timecards which are in the submitted stage. By default submitted timecards can not be deleted |
Approve Timecards |
Enables users to approve timecards. This will add the user’s name to the list of users to submit a timecard to, as well as enable the Users/Approvals menu. |
Edit Approved Timecards |
Enables users to edit timecards which are in the approved stage. By default approved timecards are locked for any modifications. |
Dispute Approved Timecards |
Enables the ability to dispute approved timecards. When this is disabled, approved timecards can not be modified. |
Delete Approved Timecards |
Enables users to delete timecards which are in the approved stage. By default approved timecards can not be deleted |
CALENDAR |
|
View Studio Calendar |
Provides access to the studio calendars in the Studio/Calendars menu. |
Add Studio Calendar |
Enables the ability to create new calendars in Studio/Calendars. |
Edit Studio Calendar |
Enables the ability to edit existing calendars in Studio/Calendars. |
Delete Studio Calendar |
Enables the ability to delete calendars from Studio/Calendars. |
SCHEDULE |
|
View Studio Schedule |
Provides access to the studio schedule from the Studio/Schedule menu option. |
Edit Studio Schedule |
Enables the ability to add, edit, and delete schedule events in the studio schedule. |
Edit Schedule Bundles |
Enables the ability to create and edit schedule bundles in the studio schedule. |
CONTACTS |
|
View Contacts |
Provides access to the studio contacts in the Studio/Contacts menu. |
Add Contacts |
Enables the ability to create new contacts in Studio/Contacts. |
Edit Contacts |
Enables the ability to edit existing contacts in Studio/Contacts. |
Delete Contacts |
Enables the ability to delete contacts from Studio/Contacts. |
View Contact Notes |
Provides access to view contact notes. |
Add Contact Notes |
Enables the ability to create new contact notes. |
Edit Any Contact Notes |
Enables the ability to edit any contact notes. If this permission is disabled, users will only have access to edit their own notes. |
Delete Any Contact Notes |
Enables the ability to delete any contact notes. If this permission is disabled, users will only have access to delete their own notes. |
View Contact Jobs |
Provides access to the studio contacts jobs list. |
View Contact Rates |
Provides access to the studio contacts rate history. |
FINANCIALS |
|
View Studio Financials |
Provides access to the studio financials overview, billing, and invoices in the Studio/Financial menu. |
View Studio Expenses |
Provides access to the studio expenses in the Studio/Financial menu. |
View Studio Payroll |
Provides access to the studio payroll in the Studio/Financial menu. |
Edit Studio Payroll |
Provides the ability to edit the studio payroll in the Studio/Financial menu. |
ACTUALS |
|
View Studio Actuals Overview |
Provides access to the studio actuals in the Studio/Actuals menu. |
View Studio Job Margins |
Provides access to the studio job margins in the Studio/Actuals menu. |
View Studio Client Margins |
Provides access to the studio client margins in the Studio/Actuals menu. |
View Studio Profit Centers |
Provides access to the studio profit centers in the Studio/Actuals menu. |
View Studio Task Actuals |
Provides access to the studio task actuals in the Studio/Actuals menu. |
View Studio User Actuals |
Provides access to the studio user actuals in the Studio/Actuals menu. |
View Studio Timecard Actuals |
Provides access to the studio actuals timecard overview in the Studio/Actuals menu. |
ARCHIVES |
|
View Archives |
Provides access to the studio archives in the Studio/Archives menu. |
Add Archives |
Enables the ability to create new archives in Studio/Archives. |
Edit Archives |
Enables the ability to edit existing archives in Studio/Archives. |
Delete Archives |
Enables the ability to delete archives from Studio/Archives. |
Add Archives Item |
Enables the ability to add new items, jobs and tracking information, to archives in Studio/Archives. |
MEDIA |
|
View Media |
Provides access to the studio media in the Studio/Media menu. |
Add Media |
Enables the ability to create new media in Studio/Media. |
Edit Media |
Enables the ability to edit existing media in Studio/Media. |
Delete Media |
Enables the ability to delete media from Studio/Media. |
Add Media Item |
Enables the ability to add new tracking information to media in Studio/Archives. |
STUDIO TASKS |
|
View Studio Tasks |
Provides access to the studio tasks in the Studio/Tasks menu. |
SECURITY GROUPS |
|
View Assigned Security Groups |
Enables the ability to see security groups that items throughout NIM are assigned to. |
Assign Security Groups |
Enables the ability to add or remove security groups on various items throughout NIM. |
USER RATES |
|
View User Rates |
Enables users with this permission to see the rates for other users in NIM, including on the user info panel, job crews, and actuals. Disabling this permission will remove user rates from any location they would be displayed. |
REVIEW |
|
View Dashboard Review |
Provides access to the user dashboard level of review. |
Admin Permissions
Permission |
Description |
|---|---|
JOBS |
|
Edit Job Defaults |
Enables the ability to edit the job options in the Admin/Jobs Options tab. |
View Job Status |
Provides access to the job status tab in the Admin/Jobs menu. |
Add Job Status |
Enables the ability to create new job statuses in the Admin/Jobs Status tab. |
Edit Job Status |
Enables the ability to edit existing job statuses in the Admin/Jobs Status tab. |
Delete Job Status |
Enables the ability to delete job statuses in the Admin/Jobs Status tab. |
View Job Keywords |
Provides access to the job keywords tab in the Admin/Jobs menu. |
Add Job Keywords |
Enables the ability to create new job keywords in the Admin/Jobs Keywords tab. |
Edit Job Keywords |
Enables the ability to edit existing job keywords in the Admin/Jobs Keywords tab. |
Delete Job Keywords |
Enables the ability to delete job keywords in the Admin/Jobs Keywords tab. |
View Job Number Templates |
Provides access to the job numbering tab in the Admin/Jobs menu. |
Add Job Number Templates |
Enables the ability to create new job number templates in the Admin/Jobs Numbering tab. |
Edit Job Number Templates |
Enables the ability to edit existing job templates in the Admin/Jobs Numbering tab. |
Delete Job Number Templates |
Enables the ability to delete job templates in the Admin/Jobs Numbering tab. |
View Custom Job Keys |
Provides access to the job custom tab in the Admin/Jobs menu. |
Add Custom Job Keys |
Enables the ability to create new job custom fields in the Admin/Jobs Custom tab. |
Edit Custom Job Keys |
Enables the ability to edit existing job custom fields in the Admin/Jobs Custom tab. |
Delete Custom Job Keys |
Enables the ability to delete job custom fields in the Admin/Jobs Custom tab. |
View Deleted Jobs |
Provides access to the job deleted tab in the Admin/Jobs menu. |
Permanently Delete Jobs |
Enables the ability to permanently delete jobs or restore jobs in the Admin/Jobs Deleted tab. |
USERS |
|
View Users Admin |
Provides access to the Admin/Users menu. |
Add Users |
Enables the ability to create new users in the Admin/Users grid. |
Edit Users |
Enables the ability to edit existing users in the Admin/Users grid. |
Delete Users |
Enables the ability to delete users in the Admin/Users grid. |
Reset User Passwords |
Enables the ability to reset user’s passwords in the Admin/Users info panel. |
Edit User Permissions |
Enables the ability to directly edit a user’s passwords in the Admin/Users info panel. |
View User Notes |
Provides access to the Admin/Users - Notes section. |
Add User Notes |
Enables the ability to create new user notes in the Admin/Users Notes tab. |
Edit Any User Notes |
Enables the ability to edit any user notes in the Admin/Users Notes tab. |
Delete Any User Notes |
Enables the ability to delete any user notes in the Admin/Users Notes tab. |
View User Jobs |
Provides access to the Admin/Users - Jobs section. |
View User Types |
Provides access to the Admin/Users - Types section. |
Add User Types |
Enables the ability to create new user types in the Admin/Users Types tab. |
Edit User Types |
Enables the ability to edit existing user types in the Admin/Users Types tab. |
Delete User Types |
Enables the ability to delete user types in the Admin/Users Types tab. |
View User Keywords |
Provides access to the Admin/Users - Keywords section. |
Add User Keywords |
Enables the ability to create new user keywords in the Admin/Users Keywords tab. |
Edit User Keywords |
Enables the ability to edit existing user keywords in the Admin/Users Keywords tab. |
Delete User Keywords |
Enables the ability to delete user keywords in the Admin/Users Keywords tab. |
View User Groups |
Provides access to the Admin/Users - Groups section. |
Add User Groups |
Enables the ability to create new user groups in the Admin/Users Groups tab. |
Edit User Groups |
Enables the ability to edit existing user groups in the Admin/Users Groups tab. |
Delete User Groups |
Enables the ability to delete user groups in the Admin/Users Groups tab. |
View User Options |
Provides access to the Admin/Users - Options section. |
Edit User Options |
Enables the ability to edit user options in the Admin/Users - Options tab. |
CONTACTS |
|
View Contact Keywords |
Provides access to the Admin/Contact - Keywords section. |
Add Contact Keywords |
Enables the ability to create new contact keywords in the Admin/Contact Keywords grid. |
Edit Contact Keywords |
Enables the ability to edit existing contact keywords in the Admin/Contact Keywords grid. |
Delete Contact Keywords |
Enables the ability to delete contact keywords in the Admin/Contact Keywords grid. |
View Contact Groups |
Provides access to the Admin/Contact - Groups section. |
Add Contact Groups |
Enables the ability to create new contact groups in the Admin/Contact Groups grid. |
Edit Contact Groups |
Enables the ability to edit existing contact groups in the Admin/Contact Groups grid. |
Delete Contact Groups |
Enables the ability to delete contact groups in the Admin/Contact Groups grid. |
View Custom Contact Keys |
Provides access to the contact custom tab in the Admin/Contacts menu. |
Add Custom Contact Keys |
Enables the ability to create new contact custom fields in the Admin/Contacts Custom tab. |
Edit Custom Contact Keys |
Enables the ability to edit existing contact custom fields in the Admin/Contacts Custom tab. |
Delete Custom Contact Keys |
Enables the ability to delete contact custom fields in the Admin/Contacts Custom tab. |
HOSTS |
|
View Hosts |
Provides access to the Admin/Hosts menu. |
Add Hosts |
Enables the ability to create new hosts in the Admin/Hosts grid. |
Edit Hosts |
Enables the ability to edit existing hosts in the Admin/Hosts grid. |
Delete Hosts |
Enables the ability to delete hosts in the Admin/Hosts grid. |
SERVERS |
|
View Servers |
Provides access to the Admin/Servers menu. |
Add Servers |
Enables the ability to create new servers in the Admin/Servers grid. |
Edit Servers |
Enables the ability to edit existing servers in the Admin/Servers grid. |
Delete Servers |
Enables the ability to delete servers in the Admin/Servers grid. |
LOCATIONS |
|
View Locations |
Provides access to the Admin/Locations menu. |
Add Locations |
Enables the ability to create new locations in the Admin/Locations grid. |
Edit Locations |
Enables the ability to edit existing locations in the Admin/Locations grid. |
Delete Locations |
Enables the ability to delete locations in the Admin/Locations grid. |
SCHEDULE |
|
View Schedule Event Status |
Provides access to the Admin/Schedule - Status tab. |
Add Schedule Event Status |
Enables the ability to create new schedule event statuses in the Admin/Schedule - Status grid. |
Edit Schedule Event Status |
Enables the ability to edit existing schedule event statuses in the Admin/Schedule - Status grid. |
Delete Schedule Event Status |
Enables the ability to delete schedule event statuses in the Admin/Schedule - Status grid. |
View Schedule Conflicts |
Provides access to the Admin/Schedule - Conflicts tab. |
Add Schedule Conflicts |
Enables the ability to create new schedule conflicts in the Admin/Schedule - Conflicts tab. |
Edit Schedule Conflicts |
Enables the ability to edit existing schedule conflicts in the Admin/Schedule - Conflicts tab. |
Delete Schedule Conflicts |
Enables the ability to delete schedule conflicts in the Admin/Schedule - Conflicts tab. |
View Schedule Options |
Provides access to the Admin/Schedule - Options tab. |
Edit Schedule Options |
Enables the ability to edit schedule options in the Admin/Schedule - Options tab. |
RESOURCES |
|
View Resources |
Provides access to the Admin/Resources menu. |
Add Resources |
Enables the ability to create new resources in the Admin/Resources grid. |
Edit Resources |
Enables the ability to edit existing resources in the Admin/Resources grid. |
Delete Resources |
Enables the ability to delete resources in the Admin/Resources grid. |
View Resource Keywords |
Provides access to the Admin/Resources - Keywords tab. |
Add Resource Keywords |
Enables the ability to create new resource keywords in the Admin/Resources Keywords tab. |
Edit Resource Keywords |
Enables the ability to edit existing resource keywords in the Admin/Resources Keywords tab. |
Delete Resource Keywords |
Enables the ability to delete resource keywords in the Admin/Resources Keywords tab. |
View Resource Groups |
Provides access to the Admin/Resources - Groups tab. |
Add Resource Groups |
Enables the ability to create new resource groups in the Admin/Resources - Groups tab. |
Edit Resource Groups |
Enables the ability to edit existing resource groups in the Admin/Resources - Groups tab. |
Delete Resource Groups |
Enables the ability to delete resource groups in the Admin/Resources - Groups tab. |
View Resource Options |
Provides access to the Admin/Resources - Options tab. |
Edit Resource Options |
Enables the ability to edit resource options in the Admin/Resources - Options tab. |
EXPENSES |
|
View Expense Types |
Provides access to the Admin/Finance menu - Expense Types tab. |
Add Expense Types |
Enables the ability to create new expense types in the Admin/Finance - Expense Types tab. |
Edit Expense Types |
Enables the ability to edit existing expense types in the Admin/Finance - Expense Types tab. |
Delete Expense Types |
Enables the ability to delete expense types in the Admin/Finance - Expense Types tab. |
PROFIT CENTERS |
|
View Profit Centers |
Provides access to the Admin/Finance menu - Profit Centers tab. |
Add Profit Centers |
Enables the ability to create new Profit Centers in the Admin/Finance - Profit Centers tab. |
Edit Profit Centers |
Enables the ability to edit existing Profit Centers in the Admin/Finance - Profit Centers tab. |
Delete Profit Centers |
Enables the ability to delete Profit Centers in the Admin/Finance - Profit Centers tab. |
PAYMENT METHODS |
|
View Payment Method |
Provides access to the Admin/Finance menu Payment Methods tab. |
Add Payment Method |
Enables the ability to create new payment methods in the Admin/Finance - Payment Methods grid. |
Edit Payment Method |
Enables the ability to edit existing payment methods in the Admin/Finance - Payment Methods grid. |
Delete Payment Method |
Enables the ability to delete payment methods in the Admin/Finance - Payment Methods grid. |
INVOICE STATUS |
|
View Invoice Status |
Provides access to the Admin/Finance menu Invoice Status tab. |
Edit Invoice Status |
Enables the ability to edit existing invoice statuses in the Admin/Finance - Invoice Status grid. |
EXCHANGE RATES |
|
View Exchange Rates |
Provides access to the Admin/Finance - Exchange Rates tab. |
Add Exchange Rates |
Enables the ability to create new exchange rates in the Admin/Finance - Exchange Rates tab. |
Edit Exchange Rates |
Enables the ability to edit existing exchange rates in the Admin/Finance - Exchange Rates tab. |
Delete Exchange Rates |
Enables the ability to delete exchange rates in the Admin/Finance - Exchange Rates tab. |
FINANCE |
|
View Finance Options |
Provides access to the Admin/Finance - Options tab. |
Edit Finance Options |
Enables the ability to edit finance options in the Admin/Finance - Options tab. |
ASSETS |
|
Edit Asset Defaults |
Enables the ability to edit the asset options in the Admin/Assets - Options tab. |
View Asset Status |
Provides access to the Admin/Assets menu Status tab. |
Add Asset Status |
Enables the ability to create new asset statuses in the Admin/Assets - Status grid. |
Edit Asset Status |
Enables the ability to edit existing asset statuses in the Admin/Assets - Status grid. |
Delete Asset Status |
Enables the ability to delete asset statuses in the Admin/Assets - Status grid. |
View Custom Asset Keys |
Provides access to the asset custom tab in the Admin/Assets menu. |
Add Custom Asset Keys |
Enables the ability to create new asset custom fields in the Admin/Assets - Custom tab. |
Edit Custom Asset Keys |
Enables the ability to edit existing asset custom fields in the Admin/Assets - Custom tab. |
Delete Custom Asset Keys |
Enables the ability to delete asset custom fields in the Admin/Assets - Custom tab. |
SHOTS |
|
Edit Shot Defaults |
Enables the ability to edit the shot options in the Admin/Shots - Options tab. |
View Shot Status |
Provides access to the Admin/Shots menu Status tab. |
Add Shot Status |
Enables the ability to create new shot statuses in the Admin/Shots - Status grid. |
Edit Shot Status |
Enables the ability to edit existing shot statuses in the Admin/Shots - Status grid. |
Delete Shot Status |
Enables the ability to delete shot statuses in the Admin/Shots - Status grid. |
View Custom Shot Keys |
Provides access to the shot custom tab in the Admin/Shots menu. |
Add Custom Shot Keys |
Enables the ability to create new shot custom fields in the Admin/Shots - Custom tab. |
Edit Custom Shot Keys |
Enables the ability to edit existing shot custom fields in the Admin/Shots - Custom tab. |
Delete Custom Shot Keys |
Enables the ability to delete shot custom fields in the Admin/Shots - Custom tab. |
TASKS |
|
View Task Types |
Provides access to the Admin/Tasks menu Type Types tab. |
Add Task Types |
Enables the ability to create new task types in the Admin/Tasks - Task Types grid. |
Edit Task Types |
Enables the ability to edit existing task types in the Admin/Tasks - Task Types grid. |
Delete Task Types |
Enables the ability to delete task types in the Admin/Tasks - Task Types grid. |
View Task Status |
Provides access to the Admin/Tasks menu Status tab. |
Add Task Status |
Enables the ability to create new task statuses in the Admin/Tasks - Status grid. |
Edit Task Status |
Enables the ability to edit existing task statuses in the Admin/Tasks - Status grid. |
Delete Task Status |
Enables the ability to delete task statuses in the Admin/Tasks - Status grid. |
View Custom Task Keys |
Provides access to the Admin/Tasks menu Custom tab. |
Add Custom Task Keys |
Enables the ability to create new task custom fields in the Admin/Tasks - Custom tab. |
Edit Custom Task Keys |
Enables the ability to edit existing task custom fields in the Admin/Tasks - Custom tab. |
Delete Custom Task Keys |
Enables the ability to delete task custom fields in the Admin/Tasks - Custom tab. |
REVIEW |
|
View Review Options |
Enables the ability to view the review options in the Admin > Review - Custom tab. |
Edit Review Options |
Enables the ability to edit the review options in the Admin > Review - Custom tab. |
View Review Keywords |
Enables the ability to create view Review Keywords in the Admin > Review Keywords tab. |
Add Review Keywords |
Enables the ability to create new Review Keywords in the Admin > Review Keywords tab. |
Edit Review Keywords |
Enables the ability to edit existing Review Keywords in the Admin > Review Keywords tab. |
Delete Review Keywords |
Enables the ability to delete Review Keywords in the Admin > Review Keywords tab. |
View Review Types |
Enables the ability to create view Review Types in the Admin > Review Types tab. |
Add Review Types |
Enables the ability to create new Review Types in the Admin > Review Types tab. |
Edit Review Types |
Enables the ability to edit existing Review Types in the Admin > Review Types tab. |
Delete Review Types |
Enables the ability to delete Review Types in the Admin > Review Types tab. |
View Review Status |
Enables the ability to create view Review Status in the Admin > Review Status tab. |
Add Review Status |
Enables the ability to create new Review Status in the Admin > Review Status tab. |
Edit Review Status |
Enables the ability to edit existing Review Status in the Admin > Review Status tab. |
Delete Review Status |
Enables the ability to delete Review Status in the Admin > Review Status tab. |
TIMECARDS |
|
View Custom Timecard Keys |
Provides access to the Admin/Timecards menu Custom tab. |
Add Custom Timecard Keys |
Enables the ability to create new timecard custom fields in the Admin/Timecards - Custom tab. |
Edit Custom Timecard Keys |
Enables the ability to edit existing timecard custom fields in the Admin/Timecards - Custom tab. |
Delete Custom Timecard Keys |
Enables the ability to delete timecard custom fields in the Admin/Timecards - Custom tab. |
View Timecard Defaults |
Provides access to the timecard options tab in the Admin/Timecards menu. |
Edit Timecard Defaults |
Enables the ability to edit the timecard options in the Admin/Timecards - Options tab. |
View Time Types |
Provides access to the time types tab in Admin > Timecards. |
Edit Time Types |
Enables the ability to edit the time types options in Admin > Timecards. |
View Timecard Payroll |
Provides access to the timecard payroll tab in Admin > Timecards. |
Edit Timecard Payroll |
Enables the ability to edit the timecard payroll options in Admin > Timecards. |
FILES |
|
View Custom Files Keys |
Provides access to the Admin/Files menu Custom tab. |
Add Custom Files Keys |
Enables the ability to create new Files custom fields in the Admin/Files - Custom tab. |
Edit Custom Files Keys |
Enables the ability to edit existing Files custom fields in the Admin/Files - Custom tab. |
Delete Custom Files Keys |
Enables the ability to delete Files custom fields in the Admin/Files - Custom tab. |
MEDIA |
|
View Media Types |
Provides access to the Admin/Media Types menu. |
Add Media Types |
Enables the ability to create new media types in the Admin/Media Types grid. |
Edit Media Types |
Enables the ability to edit existing media types in the Admin/Media Types grid. |
Delete Media Types |
Enables the ability to delete media types in the Admin/Media Types grid. |
View Custom Media Keys |
Provides access to the Admin/Media menu Custom tab. |
Add Custom Media Keys |
Enables the ability to create new Media custom fields in the Admin/Media - Custom tab. |
Edit Custom Media Keys |
Enables the ability to edit existing Media custom fields in the Admin/Media - Custom tab. |
Delete Custom Media Keys |
Enables the ability to delete Media custom fields in the Admin/Media - Custom tab. |
ELEMENTS |
|
View Element Types |
Provides access to the Admin/Elements menu Types tab. |
Add Element Types |
Enables the ability to create new element types in the Admin/Elements - Types grid. |
Edit Element Types |
Enables the ability to edit existing element types in the Admin/Elements - Types grid. |
Delete Element Types |
Enables the ability to delete element types in the Admin/Elements - Types grid. |
View Element Options |
Provides access to the Admin/Elements - Options tab. |
Edit Element Options |
Enables the ability to edit element options in the Admin/Elements - Options tab. |
PROJECT STRUCTURES |
|
View Project Structures |
Provides access to the Admin/Project Structure menu |
Add Project Structures |
Enables the ability to create new project structures in Admin/Project Structure. |
Edit Project Structures |
Enables the ability to edit existing project structures in Admin/Project Structure. |
Delete Project Structures |
Enables the ability to delete project structures in Admin/Project Structure. |
BIDDING |
|
Edit Bid Defaults |
Enables the ability to edit bid default options in the Admin/Bidding - Options tab. |
View Bid Items |
Provides access to the Admin/Bidding menu Bid Items tab. |
Add Bid Items |
Enables the ability to create new bid items in the Admin/Bidding - Bid Items grid. |
Edit Bid Items |
Enables the ability to edit existing bid items in the Admin/Bidding - Bid Items grid. |
Delete Bid Items |
Enables the ability to delete bid items in the Admin/Bidding - Bid Items grid. |
View Bid Types |
Provides access to the Admin/Bidding menu Bid Types tab. |
Add Bid Types |
Enables the ability to create new bid types in the Admin/Bidding - Bid Types grid. |
Edit Bid Types |
Enables the ability to edit existing bid types in the Admin/Bidding - Bid Types grid. |
Delete Bid Types |
Enables the ability to delete bid types in the Admin/Bidding - Bid Types grid. |
View Bid Terms |
Provides access to the Admin/Bidding menu Bid Terms tab. |
Add Bid Terms |
Enables the ability to create new bid terms in the Admin/Bidding - Bid Terms grid. |
Edit Bid Terms |
Enables the ability to edit existing bid terms in the Admin/Bidding - Bid Terms grid. |
Delete Bid Terms |
Enables the ability to delete bid terms in the Admin/Bidding - Bid Terms grid. |
PERMISSION GROUPS |
|
View Permission Groups |
Provides access to the Admin/Security menu Permission Groups tab |
Add Permission Groups |
Enables the ability to create new permission groups in the Admin/Security - Permission Groups grid. |
Edit Permission Groups |
Enables the ability to edit existing permission groups in the Admin/Security - Permission Groups grid. |
Delete Permission Groups |
Enables the ability to delete permission groups in the Admin/Security - Permission Groups grid. |
SECURITY GROUPS |
|
View Security Groups |
Provides access to the Admin/Security menu Security Groups tab |
Add Security Groups |
Enables the ability to create new security groups in the Admin/Security - Security Groups grid. |
Edit Security Groups |
Enables the ability to edit existing security groups in the Admin/Security - Security Groups grid. |
Delete Security Groups |
Enables the ability to delete security groups in the Admin/Security - Security Groups grid. |
Security Options |
Enables the ability to edit security options in the Admin/Security - Options tab. |
NOTIFICATIONS |
|
Studio Wide Notifications |
Allows the user to receive studio wide notifications. |
Private Job Notifications |
Allows the user to receive studio wide, private job notifications on jobs which they are not members of the crew. |
View Notification Rules |
Provides access to the Admin/Notifications menu |
Add Notification Rules |
Enables the ability to create new Notification Rules in the Admin/Notifications - Rules grid. |
Edit Notification Rules |
Enables the ability to edit existing Notification Rules in the Admin/Notifications - Rules grid. |
Delete Notification Rules |
Enables the ability to delete Notification Rules in the Admin/Notifications - Rules grid. |
LINKS |
|
View Menu Links |
Provides access to the Admin/Links menu. |
Add Menu Links |
Enables the ability to create new links in the Admin/Links grid. |
Edit Menu Links |
Enables the ability to edit existing links in the Admin/Links grid. |
Delete Menu Links |
Enables the ability to delete links in the Admin/Links grid. |
GLOBALS |
|
Edit Global Settings |
Enables the ability to edit NIM's global options in the Admin/Settings. |
View Logs |
Provides access to the Help/Logs menu displaying NIM's console output. |
Job Permissions
Permission |
Description |
|---|---|
JOB SETTINGS |
|
View Job Overview |
Provides access to the information contained in the job overview. |
Set Job Private |
Enables the ability to modify the job’s private status. |
PRODUCTION |
|
View Job Production Menu |
Provides access to the job Production menu. Disabling this permission will remove the entire Production menu from the user’s UI. |
Edit Job Settings |
Enables the ability to modify the job settings in the job Production/Config menu - Job tab. |
Edit Job Icon |
Enables the ability to change the job icon in the job Production/Config menu - Job tab. |
View Job Config |
Provides access to the job Production/Config menu. |
Bring Jobs Online |
Enables the ability to change the jobs offline/online status in the job Production/Config menu - Project tab. |
Edit Job Servers |
Enables the ability to add and remove project servers to the job in the job Production/Config menu - Project tab. |
Create Show |
Enables the ability to add a new show in the job Production/Config menu - Job tab. |
Edit Show |
Enables the ability to edit an existing show in the job Production/Config menu - Job tab. |
Delete Show |
Enables the ability to delete a show in the job Production/Config menu - Job tab. |
View Crew |
Provides access to the job Production/Crew menu. |
Add Crew |
Enables the ability to add a new crew member in the job Production/Crew menu. |
Edit Crew |
Enables the ability to edit a crew member’s job settings in the job Production/Crew menu. |
Delete Crew |
Enables the ability to remove a crew member from a job in the job Production/Crew menu. |
View Job Calendar |
Provides access to the job Production/Calendar menu. |
Add Job Calendar |
Enables the ability to add a job calendar in the job Production/Calendar menu. |
Edit Job Calendar |
Enables the ability to edit an existing job calendar in the job Production/Calendar menu. |
Delete Job Calendar |
Enables the ability to delete a job calendar in the job Production/Calendar menu. |
View Job Timecards |
Provides access to all job timecards in the job Production/Timecards menu. |
View Bids |
Provides access to the job Production/Bids menu. |
Create Bids |
Enables the ability to add a bid in the job Production/Bids menu. |
Edit Bids |
Enables the ability to edit an existing bid in the job Production/Bids menu. |
Delete Bids |
Enables the ability to delete a bid in the job Production/Bids menu. |
View Expenses |
Provides access to the job Production/Expenses menu. |
Add Expenses |
Enables the ability to add an expense in the job Production/Expenses menu. |
Edit Expenses |
Enables the ability to edit an existing expense in the job Production/Expenses menu. |
Delete Expenses |
Enables the ability to delete an expense in the job Production/Expenses menu. |
View Job Actuals Overview |
Provides access to the job Production/Actuals - Overview. |
View Job Projections |
Provides access to the job Production/Actuals - Projections. |
View Job Actualization |
Provides access to the job Production/Actuals - Actualization. |
View Job Task Actuals |
Provides access to the job Production/Actuals - Tasks. |
View Job Crew Actuals |
Provides access to the job Production/Actuals - Crew. |
Edit Job Actuals |
Enables the ability to edit the job actuals in the job Production/Actuals menu. |
View User Costs in Actuals |
Provides access to user costs/rate on the job Production/Actuals page. |
View Invoices |
Provides access to the job Production/Invoices menu. |
Add Invoices |
Enables the ability to add an invoice in the job Production/Invoices grid. |
Edit Invoices |
Enables the ability to edit an existing invoice in the job Production/Invoices info panel |
Delete Invoices |
Enables the ability to delete an invoice from the job Production/Invoices grid. |
ASSETS |
|
View Job Dev Menu |
Provides access to the job DEV menu. Disabling this permission will remove the entire DEV menu from the user’s UI. |
View Asset List |
Provides access to the job DEV menu - Asset List View. Disabling this permission will remove the view from the user’s UI. |
View Asset Grid |
Provides access to the job DEV menu - Asset Grid View. Disabling this permission will remove the view from the user’s UI. |
View Asset Task Grid |
Provides access to the job DEV menu - Asset Task Grid View. Disabling this permission will remove the view from the user’s UI. |
View Asset Board |
Provides access to the job DEV menu - Asset Board View. Disabling this permission will remove the view from the user’s UI. |
Create Assets |
Enables the ability to add an asset, create a series of assets, or import & merge assets in the job DEV/Assets grid. |
Edit Asset Info |
Enables the ability to edit an existing asset in the asset info panel. |
Delete Asset |
Enables the ability to delete an asset from the job DEV/Assets grid. |
Assign Asset Status |
Enables the ability to set the asset status in any of the asset views. |
View Asset Elements |
Provides access to the asset Elements in the asset info panel. |
View Asset Files |
Provides access to the asset Files in the asset info panel. |
View Asset Notes |
Provides access to the asset Notes in the asset info panel. |
View Job Tasks |
Provides access to the job DEV/Tasks menu. Disabling this permission will remove the menu from the user’s UI. |
SHOTS |
|
View Job Show Menus |
Provides access to any of the job’s show menus. Disabling this permission will remove all show menus from the user’s UI. |
View Shot List |
Provides access to the job SHOW/Sequence menu - Sequence List View. Disabling this permission will remove the view from the user’s UI. |
View Shot Grid |
Provides access to the job SHOW/Sequence menu - Sequence Grid View. Disabling this permission will remove the view from the user’s UI. |
View Shot Task Grid |
Provides access to the job SHOW/Sequence menu - Sequence Task Grid View. Disabling this permission will remove the view from the user’s UI. |
View Shot Board |
Provides access to the job SHOW/Sequence menu - Sequence Board View. Disabling this permission will remove the view from the user’s UI. |
Create Shots |
Enables the ability to add a shot, create a sequence of shots, or import & merge shots in the job SHOW/Sequence grid. |
Edit Shot Info |
Enables the ability to edit an existing shot in the shot info panel. |
Delete Shot |
Enables the ability to delete a shot from the job SHOW/Sequence grid. |
Assign Shot Status |
Enables the ability to set the shot status in any of the shot views. |
View Shot Elements |
Provides access to the shot Elements in the shot info panel. |
View Shot Files |
Provides access to the shot Files in the shot info panel. |
View Shot Notes |
Provides access to the shot Notes in the shot info panel. |
View Show Tasks |
Provides access to the job SHOW/Tasks menu. Disabling this permission will remove the menu from the user’s UI. |
TASKS |
|
Add Task |
Enables the ability to add a task to an asset or shot. |
Edit Task |
Enables the ability to edit an existing task on an asset or shot. |
Delete Task |
Enables the ability to delete a task on an asset or shot. |
Assign User To Task |
Enables the ability to assign a user to an existing task. |
Set Status On Any Task |
Enables the ability to set the status of any task regardless of assignment. Please note that users can always set the status of a task that has been assigned to them. |
View Task Budget |
Enables the ability to view the task budget and the task budget bar. |
Edit Estimated Hours |
Enables the ability to set the number of estimated hours on a task. |
NOTES |
|
View Job Notes |
Provides access to view job notes. |
Add Job Note |
Enables the ability to create new job notes. |
Edit Any Job Note |
Enables the ability to edit any job notes. If this permission is disabled, users will only have access to edit their own notes. |
Delete Any Job Note |
Enables the ability to delete any job notes. If this permission is disabled, users will only have access to delete their own notes. |
Add Asset Or Shot Note |
Enables the ability to add asset or shot notes. |
Edit Any Asset Or Shot Note |
Enables the ability to edit any asset or shot note. If this permission is disabled, users will only have access to edit their own notes. |
Delete Any Asset Or Shot Note |
Enables the ability to delete any asset or shot note. If this permission is disabled, users will only have access to delete their own notes. |
FILES |
|
Publish Files |
Enables the ability to publish files in the NIM UI. |
Publish Asset Master |
Enables the ability to publish an asset master in the NIM UI. |
REVIEW |
|
View Job Review |
Provides access to the job Review panel. Disabling this permission will remove the panel from the user’s UI. |
View Dev Review |
Provides access to the dev Review panel. Disabling this permission will remove the panel from the user’s UI. |
View Asset Review |
Provides access to the asset Review panel. Disabling this permission will remove the panel from the user’s UI. |
View Show Review |
Provides access to the show Review panel. Disabling this permission will remove the panel from the user’s UI. |
View Shot Review |
Provides access to the shot Review panel. Disabling this permission will remove the panel from the user’s UI. |
Delete Review Items |
Enables the ability to delete a review item not owned by the user. |
Security Groups
Security groups limit user access to objects within NIM. These objects include:
Jobs
Assets
Shots
Custom Fields ( View and/or Edit access )
By creating a security group and assigning it to one of the above objects, only users attached to the group are given access. Users without access will not see the object in the UI.
Example:
If select members of a job’s crew is disclosed on an asset, the disclosed crew members can be assigned to a security group in the Admin > User settings. Then apply the same security group to the disclosed asset in the asset info panel. Those assets will only be displayed to users within the security group.
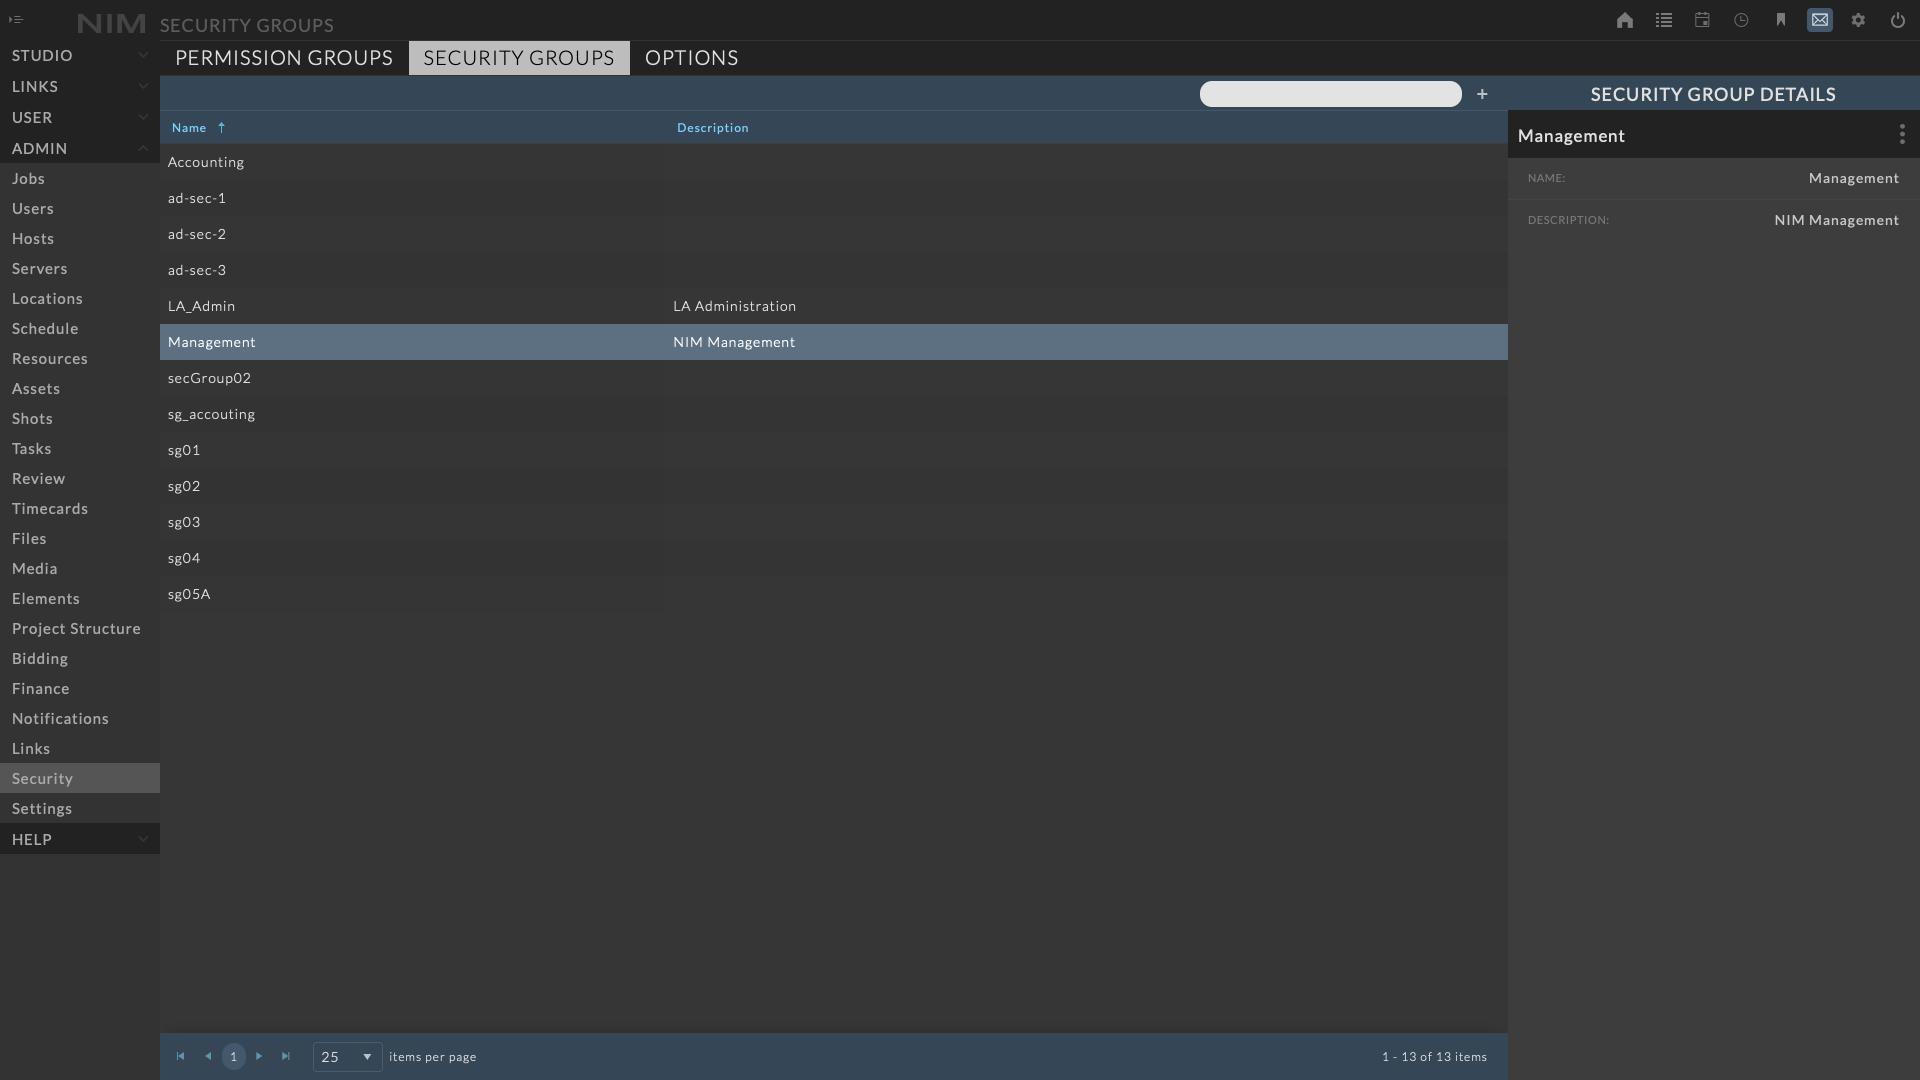
To add a new security group, click the button at the top right of the security group grid. The security group details will appear and the required information can be entered as needed. When done click the “Save” button at the bottom of the info panel to save your changes.
Available Options:
Name - The name assigned to the security group.
Description - A brief description of the security group.
To edit a security group, click on a row from the grid to load the security group info panel. Click on the ellipsis menu in the security group info panel and choose “Edit”. Make the necessary changes and click the “Save” button at the bottom of the info panel to save your changes. Click the cancel button to return to the view mode without saving changes.
Delete a security group entry by selecting the security group from the grid, clicking the ellipsis menu in the security group panel, and selecting “Delete”. You will be prompted to confirm deletion of the security group. Deleting a security group will remove that security group from any items it has been assigned to.
Note
Any objects that do not have an associated security group will be available to all users with the exception of Private Jobs.
Enabling
Require API Keyswill enforce security group rules when accessing the NIM API including any of of the NIM Connectors.
Options
The security options available contain settings for the status of current ports open on the NIM VM, the default password strength, and options for requiring the use of API keys.
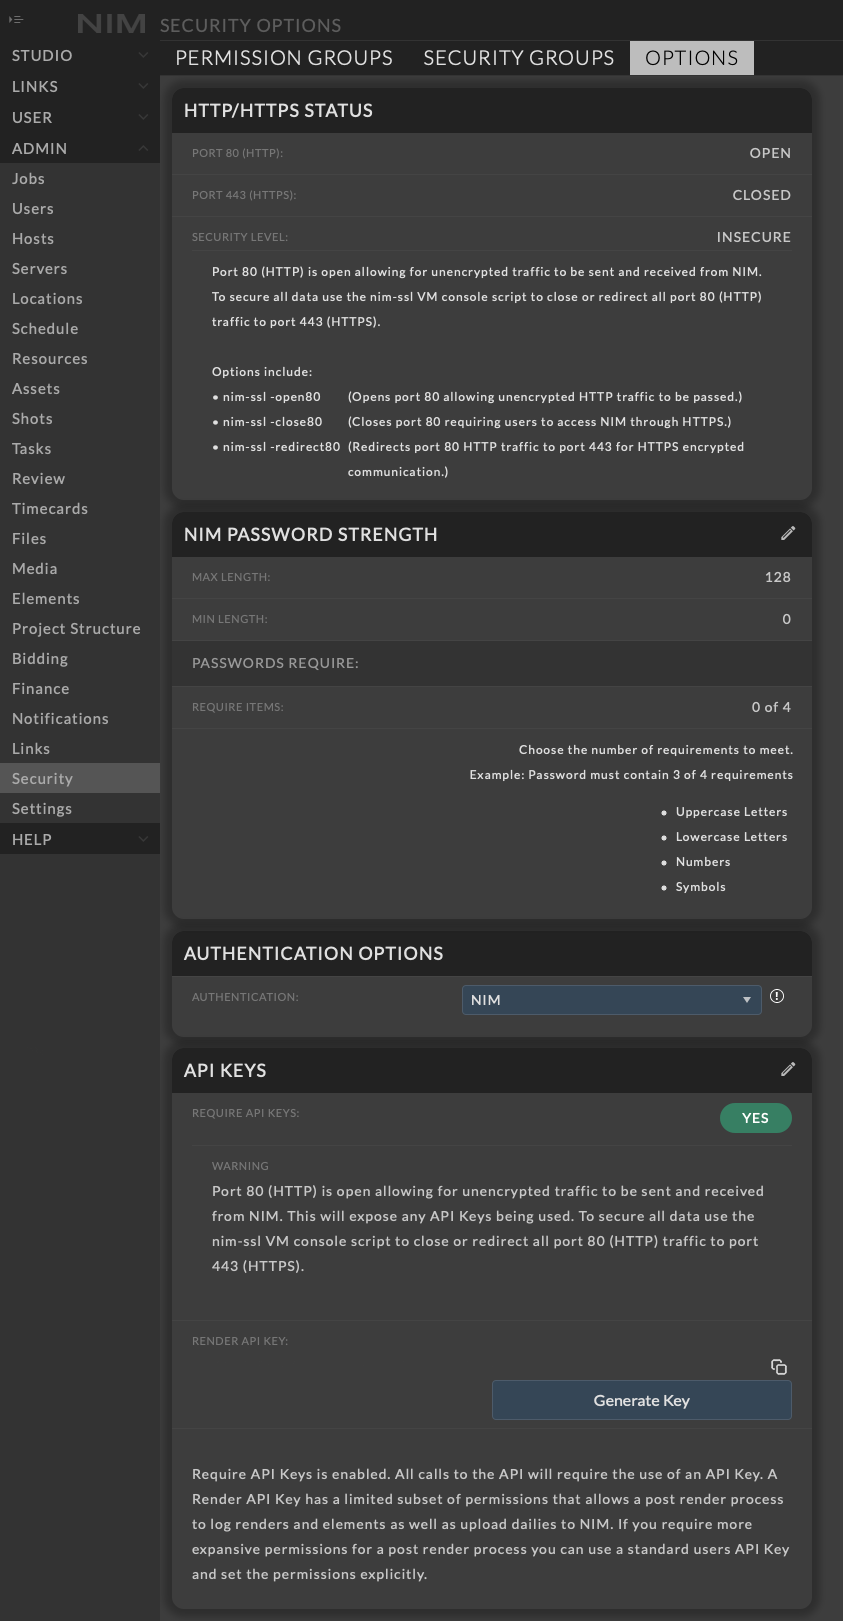
Security Level
The first 3 status lines provide the status of the HTTP and HTTPS ports as well as a general security level.

If Port 80 (HTTP) is open, unencrypted traffic is allowed to be sent and received from NIM.
Limiting NIM access to Port 443 (HTTPS) will ensure that all data sent to and from the NIM VM will be secure.
To secure all data, use the nim-ssl VM console script to close or redirect all port 80 (HTTP) traffic to port 443 (HTTPS). Please refer to the Virtual Machine Shell Scripts documentation for detailed information on using the nim-ssl command line script.
Password Strength
Password strength settings establish minimum requirements for password length and included character types. The maximum password length is fixed at 128 characters. The minimum password length can be set in this panel. Additionally, you may define how many of the following items are required to be included in a password:
Uppercase Letters
Lowercase Letters
Numbers
Symbols

Authentication
Active Directory or LDAP can be used to authenticate users for login as well as manage permission group and security group membership. To select the authentication type to use select one of the following from the Authentication dropdown:
NIM - Uses NIM’s internal authentication. (Default)
Active Directory - Uses the defined Active Directory servers to authenticate users.
LDAP - Users the defined LDAP servers to authenticate users.
For more information on Active Directory/LDAP integration please refer to the LDAP/Active Directory section of the documentation.
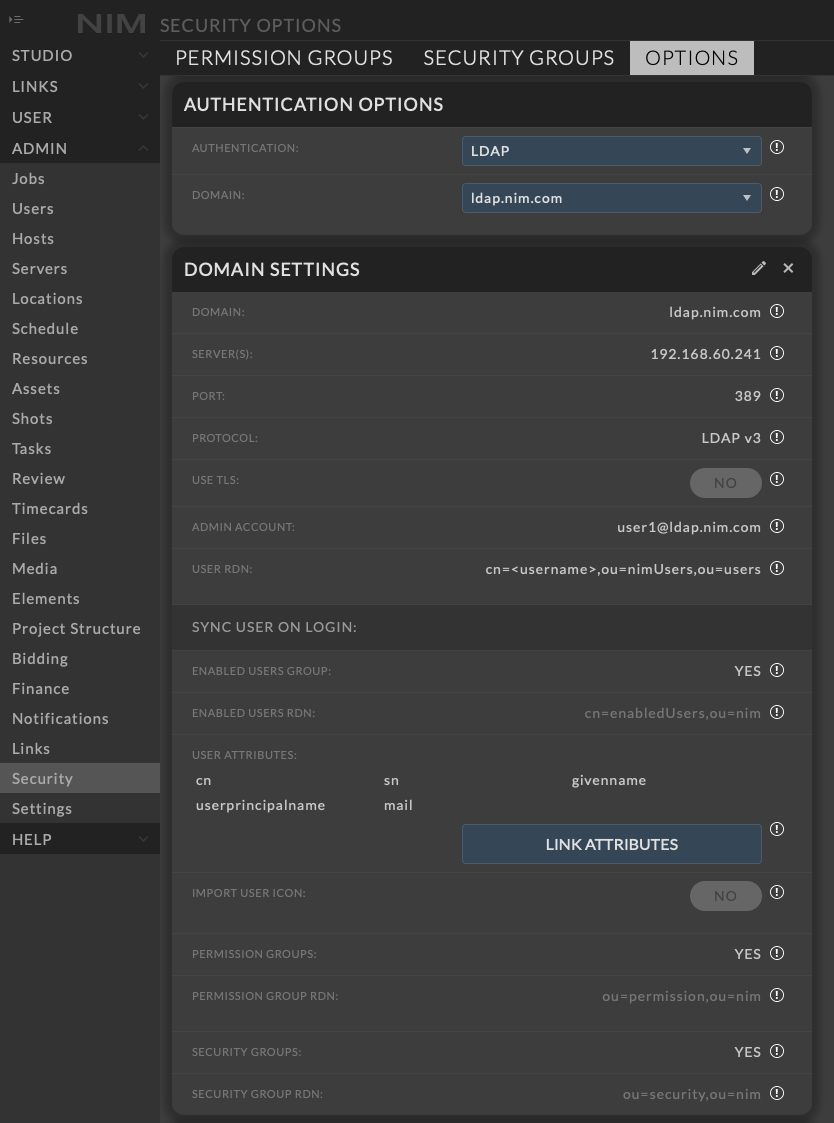
API Keys
NIM API keys are an optional security feature that restricts API access with time limited per user keys. Requiring API keys restricts access to only those users with an API key. Additionally, when API Keys are enabled, user access will be restricted by any established permission and security groups. When API Keys are disabled, API requests are fully accessible and not filtered by applied user permissions.
Please refer to the Users section of the documentation for information on generating user API keys.
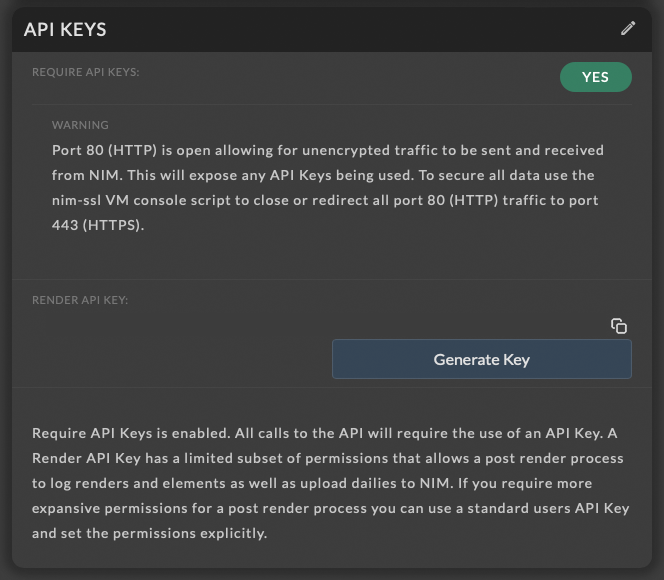
Require API Keys - Enabling this checkbox forces the NIM API to require users to pass an API when authenticating. The NIM Connectors will ask each user for their API key at the next connection attempt. This can be retrieved in the Admin > User info panel.
Note
User API keys are the equivalent of custom user passwords and should be treated as such. It is highly recommended to restrict all NIM VM access to HTTPS traffic when using API keys to maintain the highest level of security.
Render API Key - When Require API Keys is enabled, job access can be restricted through the use of security groups. The render API key is a unique key used for distributed rendering systems that need limited access all jobs in the system. A Render API Key provides limited subset of permissions that allows a post render process to log renders and elements as well as upload review items to NIM. This allows the render management system to seamless work across all jobs without needing per job permissions. If you require more expansive permissions for a post render process you can use a standard users API Key and set the permissions explicitly.
To create a Render API Key click the Generate Key button. A new key will be displayed. Clicking the Generate Key button again will reset the key and any existing keys logged with the render management system will need to be updated.
Settings
General settings related to NIM are set in this section. These include:
PDF Header
SMTP Settings
Local License File
Client Portal Settings
Misc Settings
PDF Header
This is the header image that is applied to all PDFs created by NIM.
Click the upload button or drag an image file onto it to upload an image that will be used as a header for all PDF documents generated with NIM. The file will be resized and/or cropped to 2500 x 270 pixels.
Multiple PDF headers can be uploaded and associated with users and locations. When exporting a bid, users can select the PDF header to use from the Bid - PDF Settings tab.
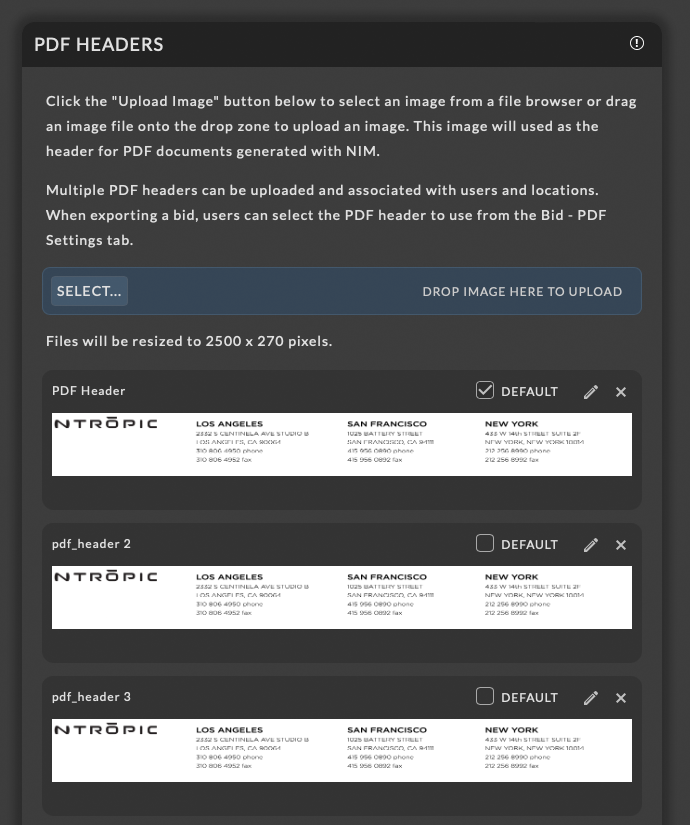
Note
When exporting a bid PDF, NIM will search the following items and uses the first associated header found: the Bid PDF Settings, the Job’s Bidding Location, the user’s PDF header setting, the user’s location, the header marked as default, or the earliest uploaded header.
When exporting a review notes PDF, NIM looks at these items: the Job’s Assigned Location, the user’s PDF header setting, the user’s location, the header marked as default, or the earliest uploaded header.
SMTP Settings
For NIM to provide email notification, a valid email and outgoing SMTP server information needs to be supplied. To test your email settings, enter an email address in the Test Address field and click the SEND button. Verification of success or failure to delivery mail with detailed information will appear in the panel below.
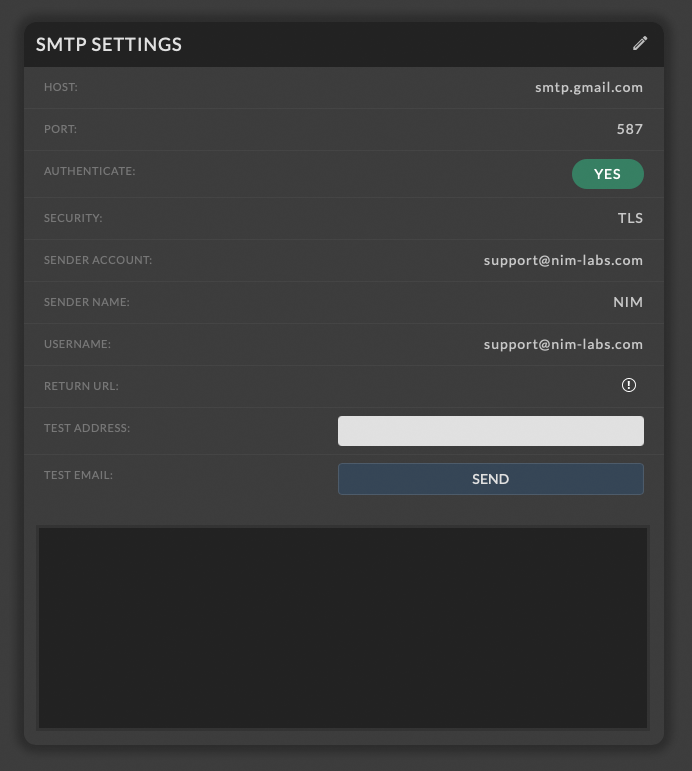
Available Options:
Host - The address of the outgoing server.
Port - The port to use for the outgoing server.
Authenticate - Does the outgoing server use authentication.
Secure - Chooses the type of security protocol for authentication.
Sender Account - The email account name for the outgoing server.
Sender Name - The display name used for the email.
Username - The username to use for server authentication.
Password - The password to user for server authentication.
Return URL - The URL used to access the NIM login page. This address will be used for return links sent in emails. If left blank NIM will try to determine the proper address to use.
Return URL Example:
Test Address - Enter an address to send a test email to.
Local License File
Use this area to update an existing NIM license file. If you have started a new trial, or have purchased an annual license you will receive a license file with a .lic extension. Upload the license file using the Upload License File button to update your current license. Monthly licenses do not require a license file update.
Click the Upload License File button to select a license or drag a valid NIM license file over the box to update the current license file.
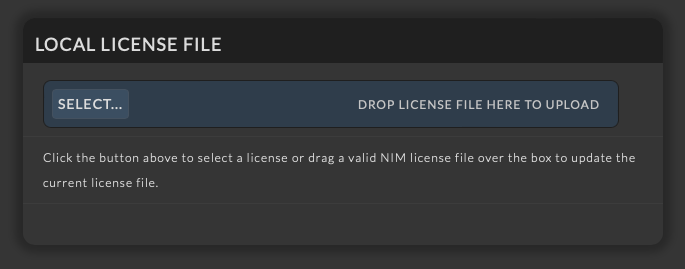
Client Portal Settings
Here you will enter your NIM Client Portal username and Client Key. This information will be provided to you by NIM Labs upon initial purchase. If you do not have this information please contact support at support@nim-labs.com.
Note
The username entered here for the NIM Client Portal account will be used to validate your account. The client portal key is a unique code assigned to the licensing account. This is different than your user account password and is in the format: XXXXX-XXXXX-XXXXX-XXXXX-XXXXX.
Warning
If you disable the user account used here in the NIM Client Portal you will NOT be able to access your monthly licenses. Please ensure that an active account is set here before making changes.
To view your current active monthly license total click the GET PORTAL LICENSE COUNT button. This will contact the NIM Client Portal and return the currently active monthly licenses for your company.
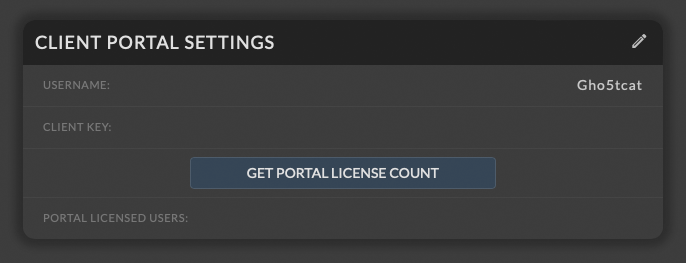
Misc Settings
This section defines various miscellaneous default settings.
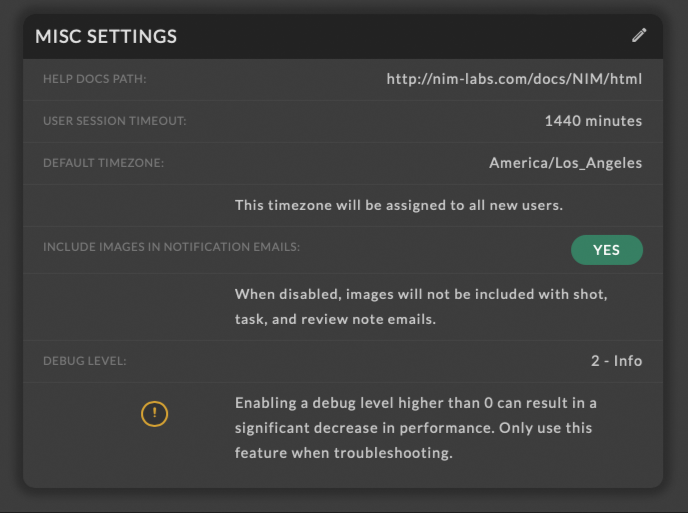
Help Docs Path - A browser accessible path for the NIM documentation. This can be directed to a network local path is internet access is unavailable from the users workstation. The path to the latest online documentation is at: http://nim-labs.com/docs/NIM/html
User Session Timeout - Sets the number of minutes before a users session will expire.
Default Timezone - This is the timezone that will be applied by default to new user accounts. User timezones can be modified in the Admin/Users section or directly in the user’s preferences.
Include Images in Notification Emails - When disabled, images will not be included with shot, task, and review item note emails.
- Debug Level - This setting enables additional debug information to be output to the NIM logs. This is useful for troubleshooting, however it is not recommended to be turned on for general production use as enabling any level of debug output comes with a significant performance hit. The available levels are:
0 - Errors : Displays only error messages (This is the default setting and should be used when not troubleshooting.)
1 - Warnings : Displays warning messages as well as errors
2 - Info : Displays all messages
Note
Enabling a debug level higher than 0 can result in a significant decrease in performance. Only use this feature when troubleshooting.