Task Views
Tasks are accessible through multiple views in NIM. The main entry point to create a task is on the asset or shot in a job. Once the task is created, there are several ways to interact with it via list, grid, and timeline views.
Tasks are represented differently dependent upon the view to maximize the visibility of information. These representations include:
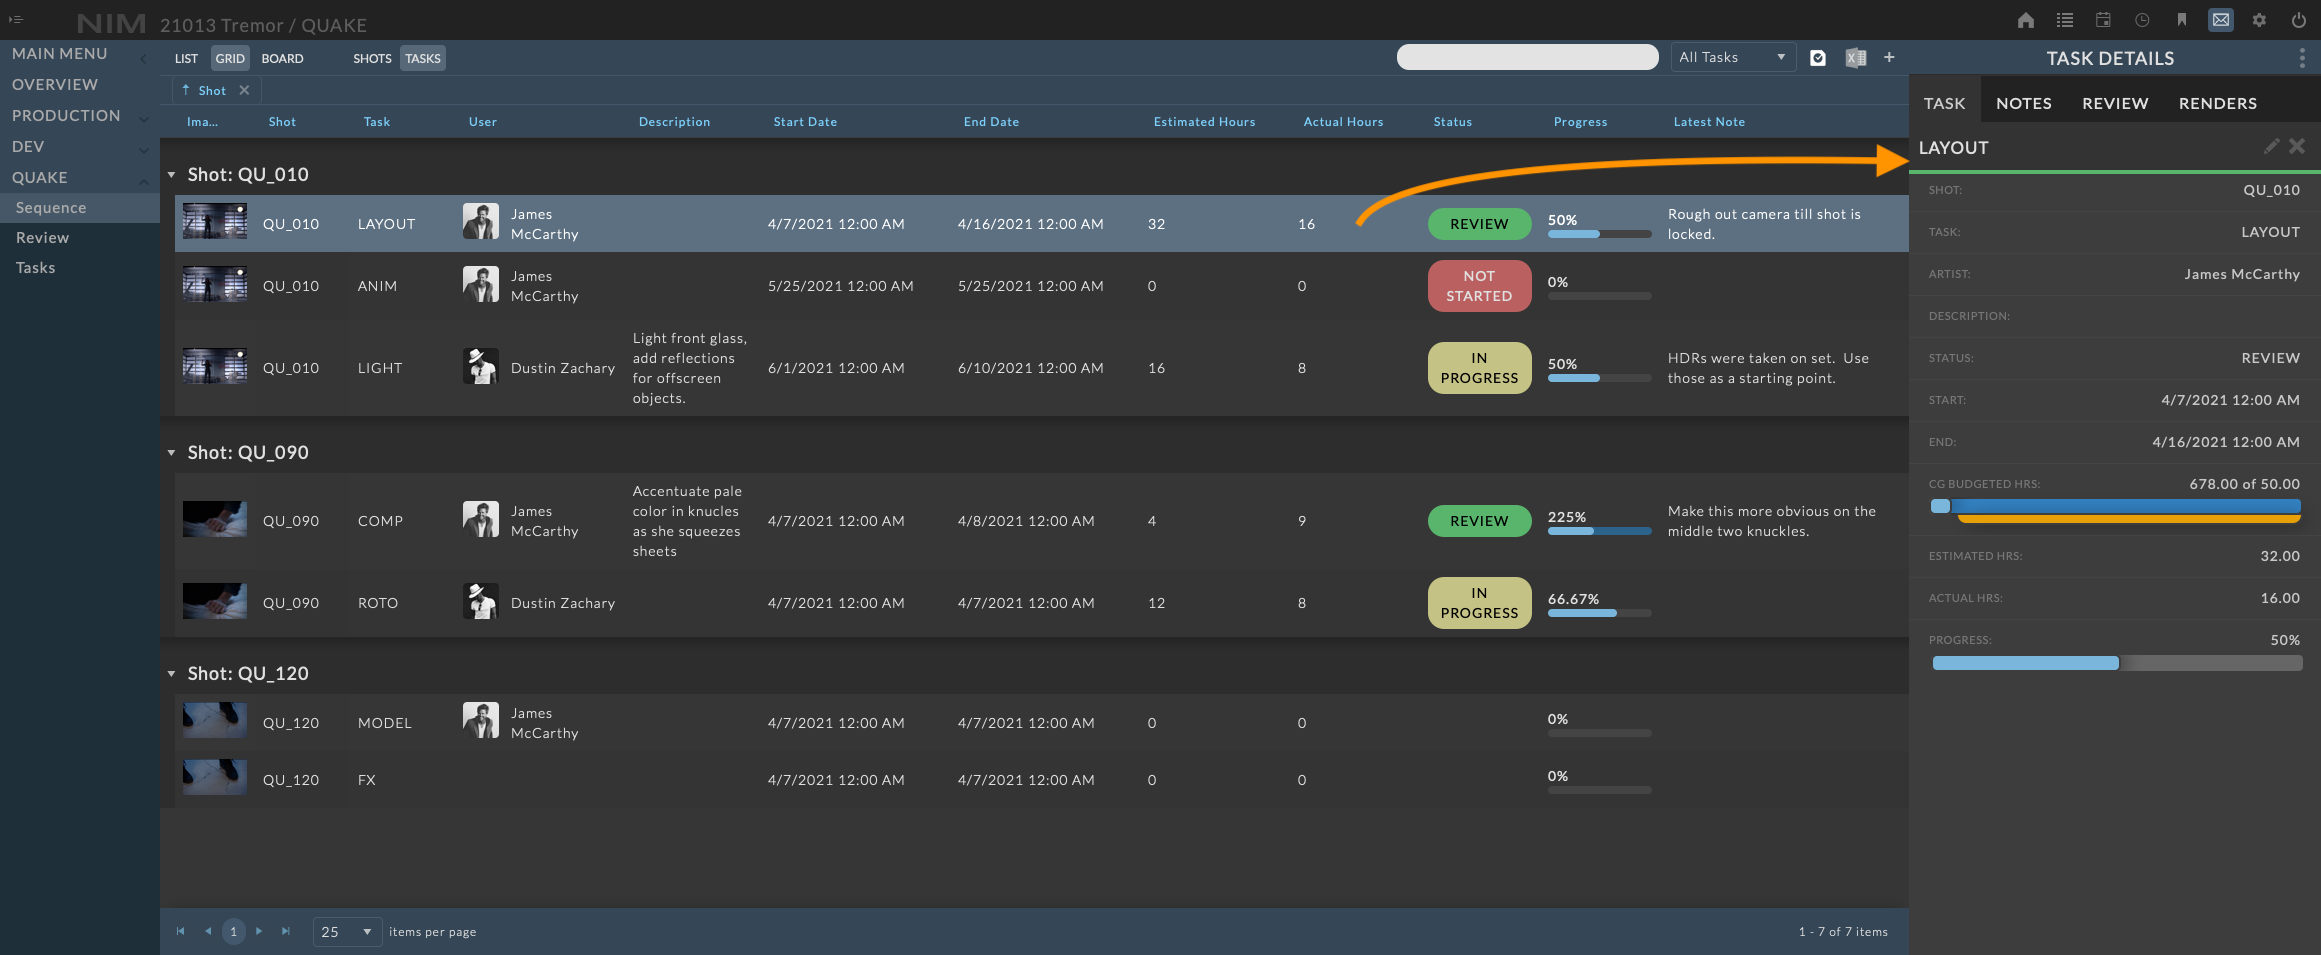
Full Details via the info panels
Compact view accessible in list views
Timeline based event on the task timeline
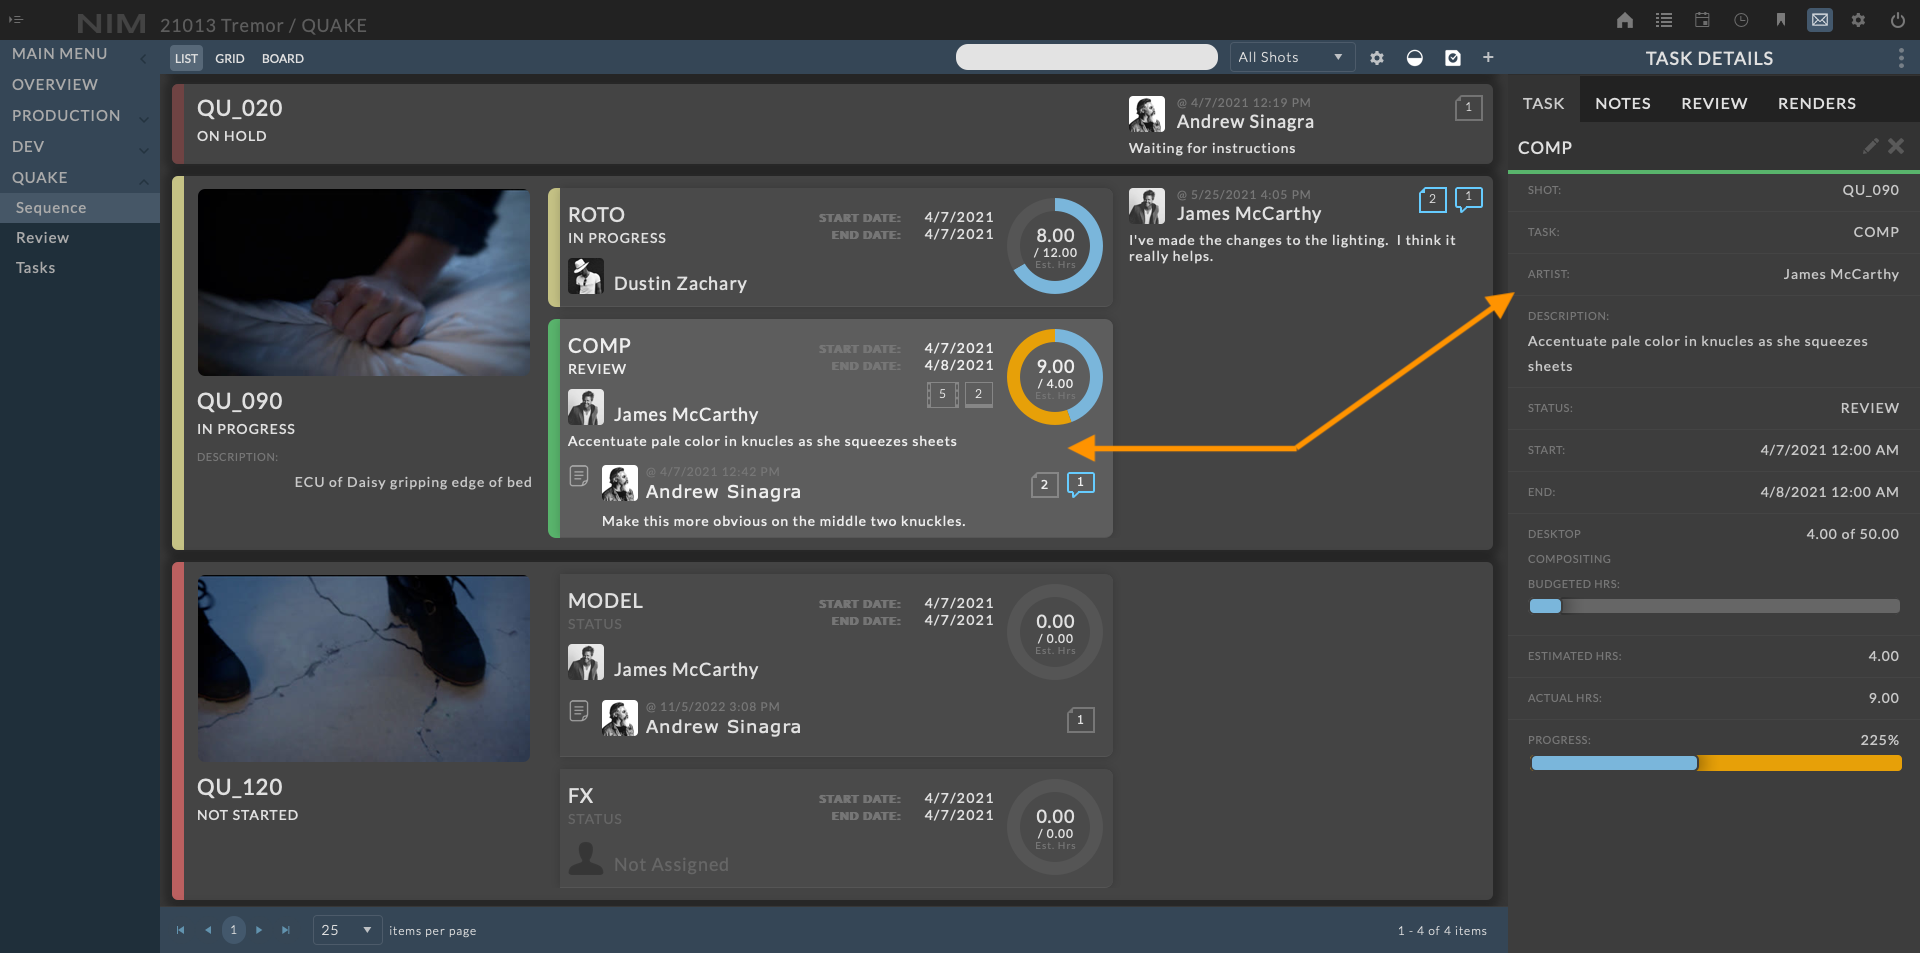
Within the info panel, tasks are accessible to be edited and have new notes, review items, and renders added to the task.
Each tab within the task info panel contains detailed information for each item type.
For more information on editing tasks, please refer to the Task Details section of the documentation.
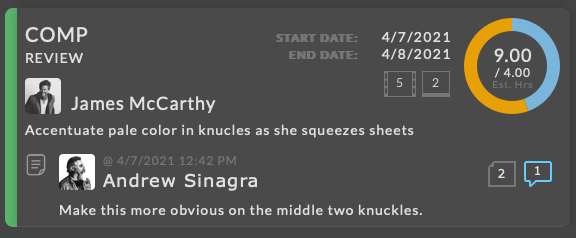
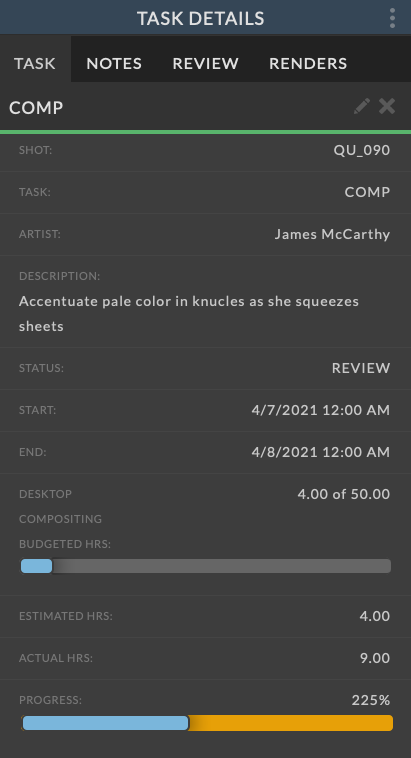
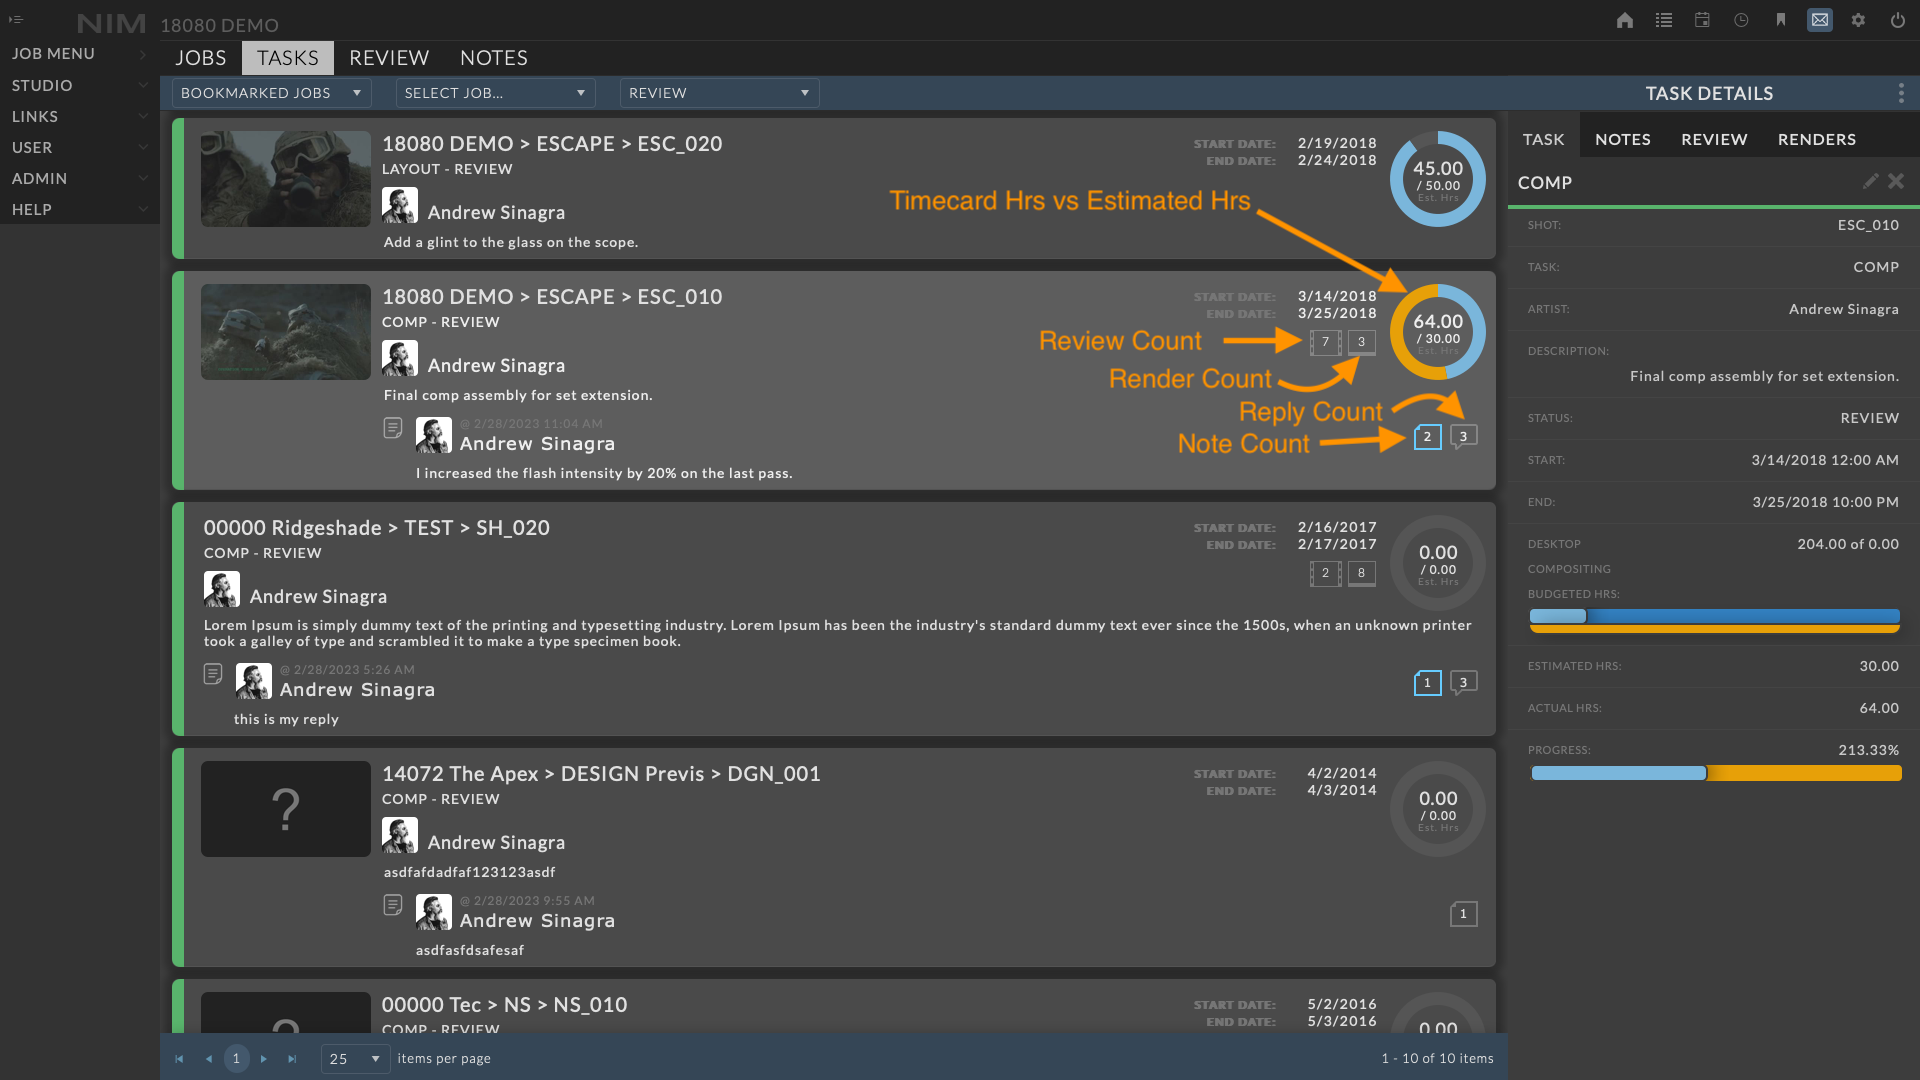
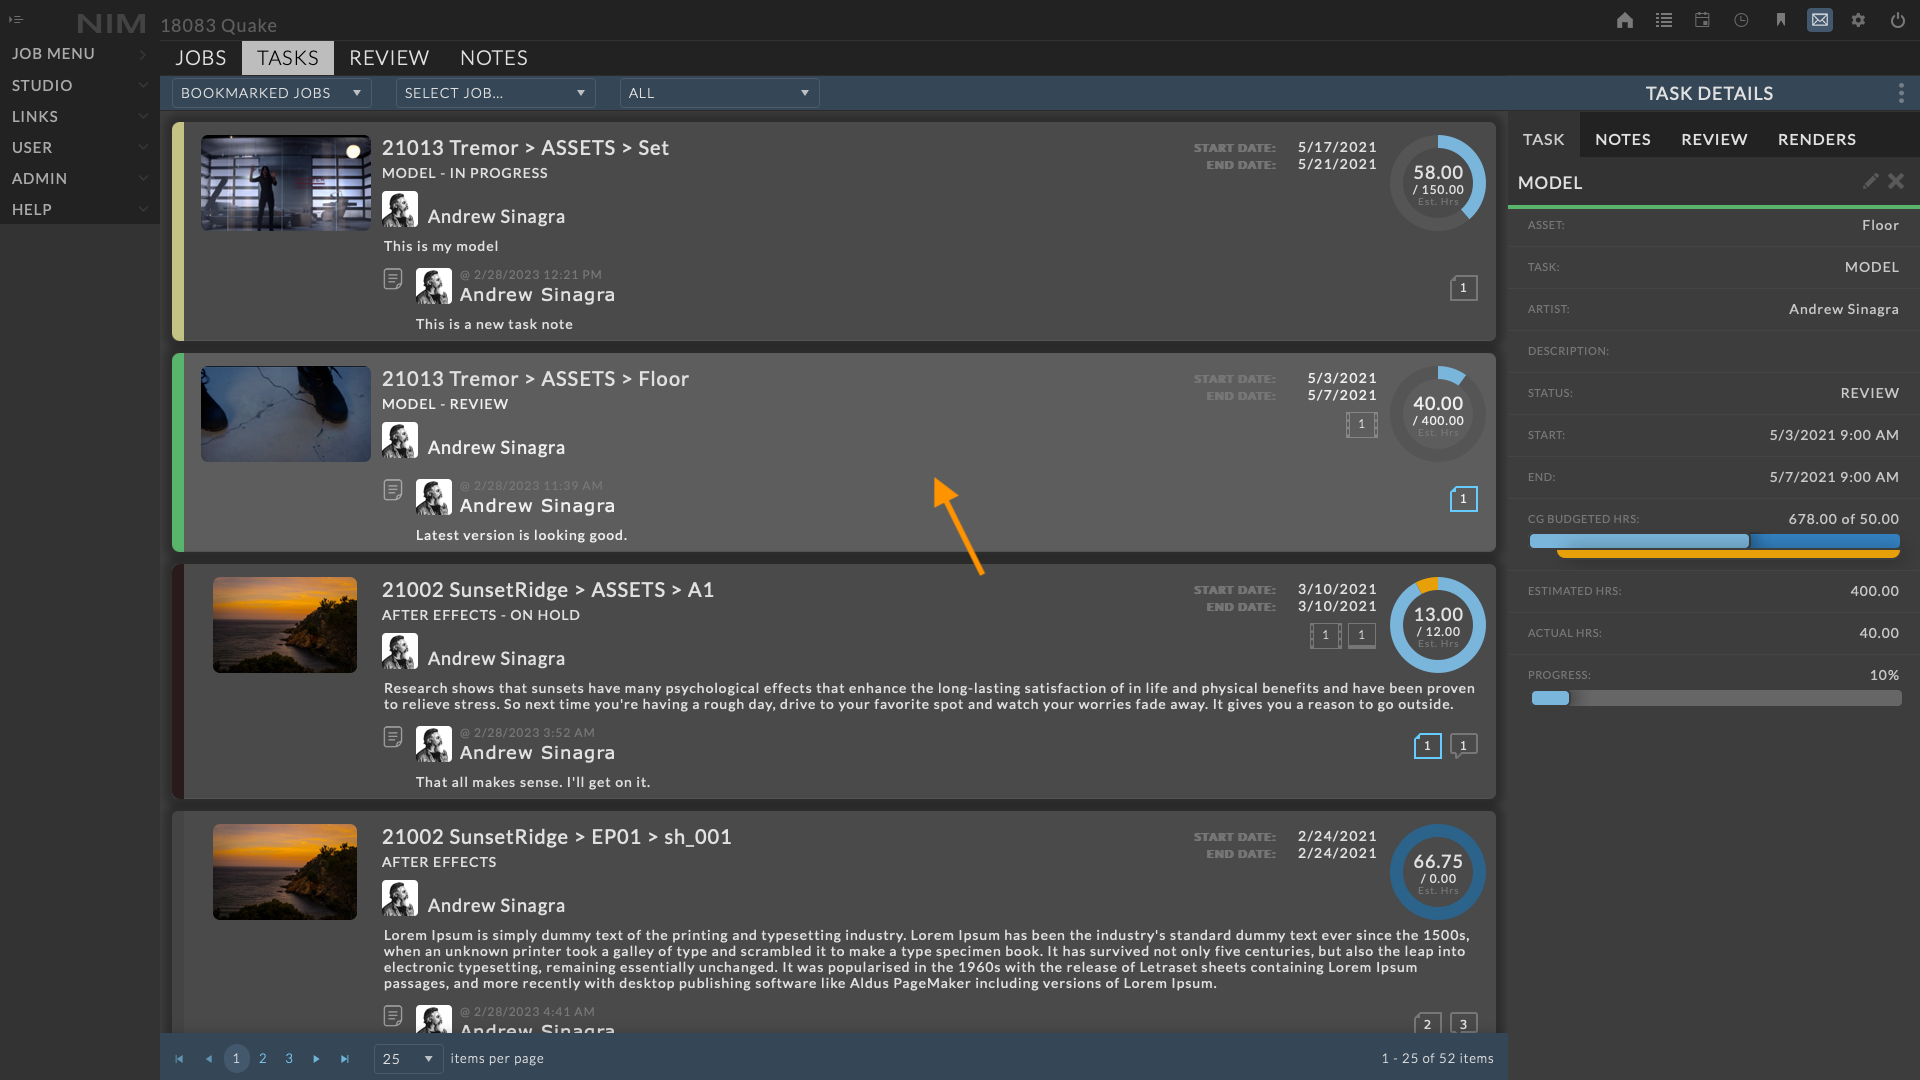
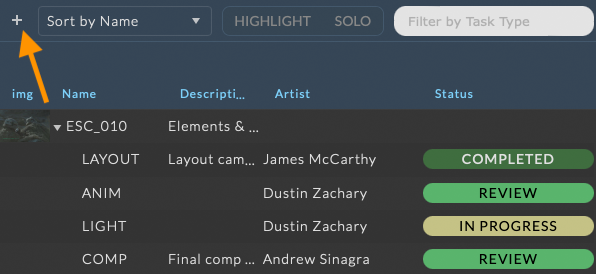
When viewed in a list, the task is displayed in a compact view (shown below) including the task type, status, user assignment, description, start and end date, hours estimated and used, as well as the latest note, and counters for the total number of review items, renders, notes, and replies attached to the task. If a note or reply is unread, the counter icon will be highlighted.
On the Task Timeline, tasks are viewed horizontally with the start and end date determining the placement of the task on the timeline. As users enter time against the task on timecards, the actual time will highlight the task with the percentage of time used vs the estimated time for task completion.

Dashboard
Once a task has been assigned to a user, the task will appear on the users dashboard. From the dashboard tasks tab, users can interact directly with tasks without needing to enter the job to update task information.
Filter Tasks
The list of tasks in the dashboard can be filtered using the dropdown menus in the toolbar.
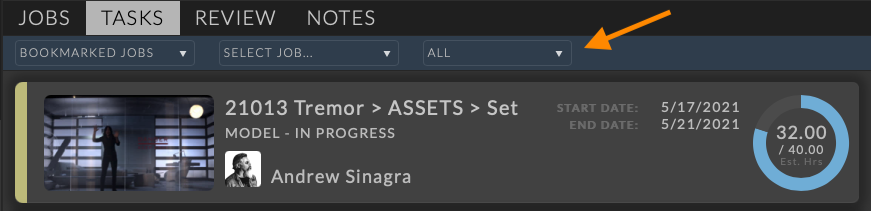
The first dropdown filters the tasks by the contained jobs.
Options include:
All Jobs
Includes all jobs where the user is assigned a task.
Active Jobs
Includes all jobs where the user is assigned a task and the job’s “Activity Status” is marked as “Active”
Bookmarked Jobs
Includes all jobs where the user is assigned a task and the job has been bookmarked by the user. For more information on bookmarking jobs, please refer to the Job Bookmarks section of the documentation.
The second dropdown filters the tasks by the selected job. The first dropdown will filter the list of available jobs in this dropdown.
Lastly the third dropdown will filter the list of available tasks by the selected task status.
Edit Tasks
Clicking on the task will open the task info panel where users can modify details of the task, add notes, upload review items, and log renders. Once the task info panel is open, click on the ellipsis menu at the top right of the info panel and choose Edit. Make the necessary changes and click the Save button at the bottom of the info panel to save your changes. Click the Cancel button to return to the view mode without saving changes.
For more information on editing tasks, please refer to the Task Details section of the documentation.
Delete Tasks
Delete a task entry by selecting the task, clicking the ellipsis menu in the task info panel, and selecting Delete. You will be prompted to confirm deletion of the task.
Load Job Task
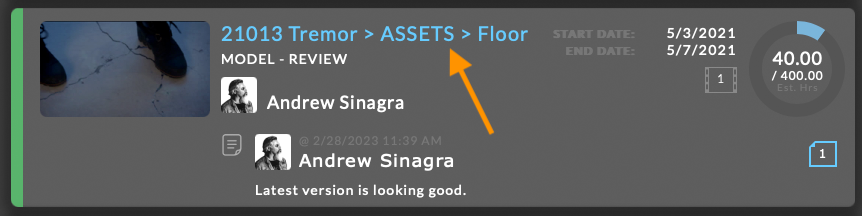
While working directly from the dashboard can be convenient, sometimes you need to see the task information in context. Clicking on the path at the top of the task will take you to the corresponding list view within the job and automatically open the task in the info panel.
Note
The path to the task will highlight when you are hovering over the link.
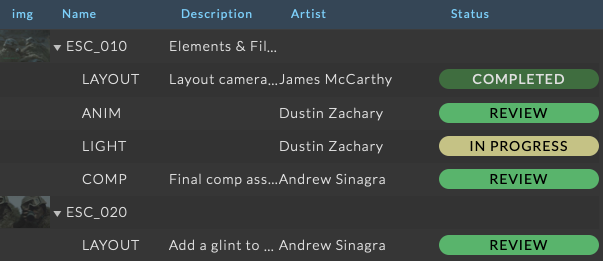
List View
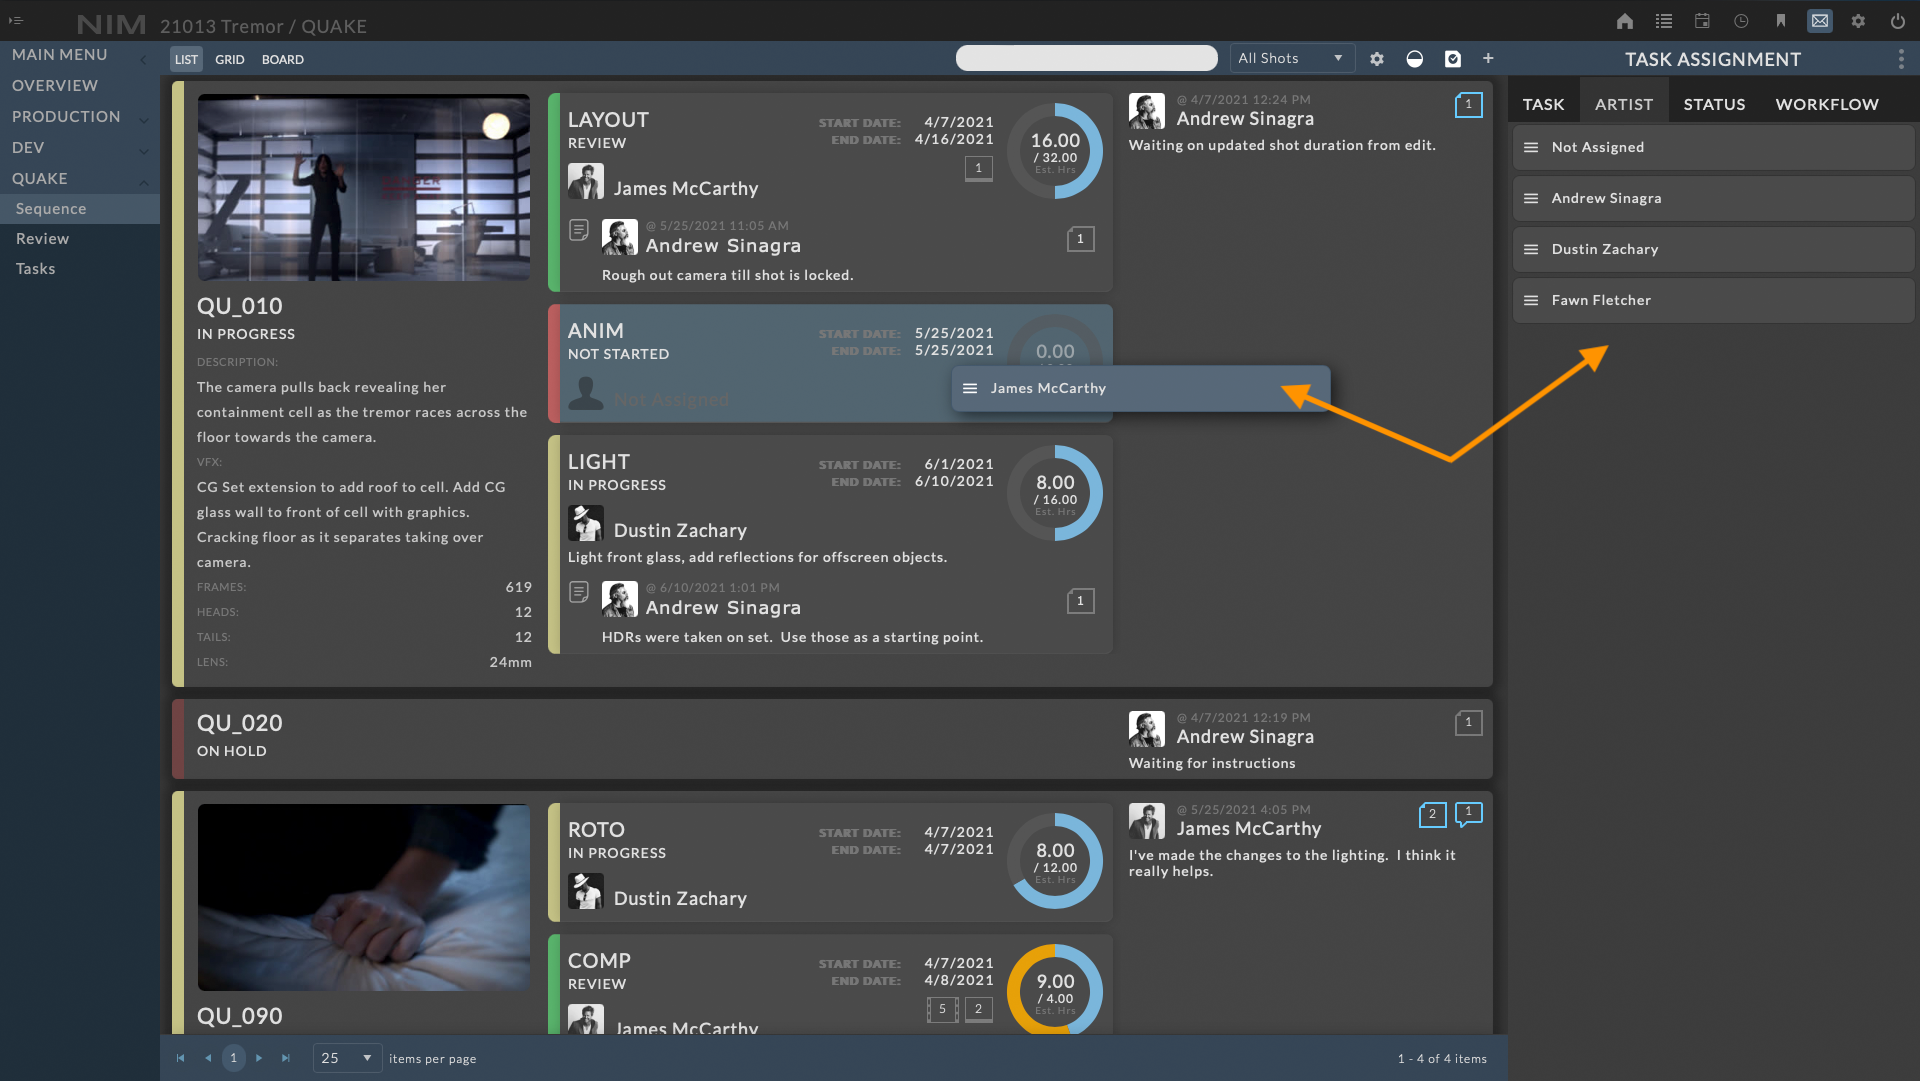
The list view for assets and shots is a combined view displaying detailed information for shots, tasks, and notes simultaneously. The UI is designed to allow for the quick drag and drop assignment of tasks and updating of details. The list view can be accessed by clicking the List button on the left of the asset or shot toolbar.
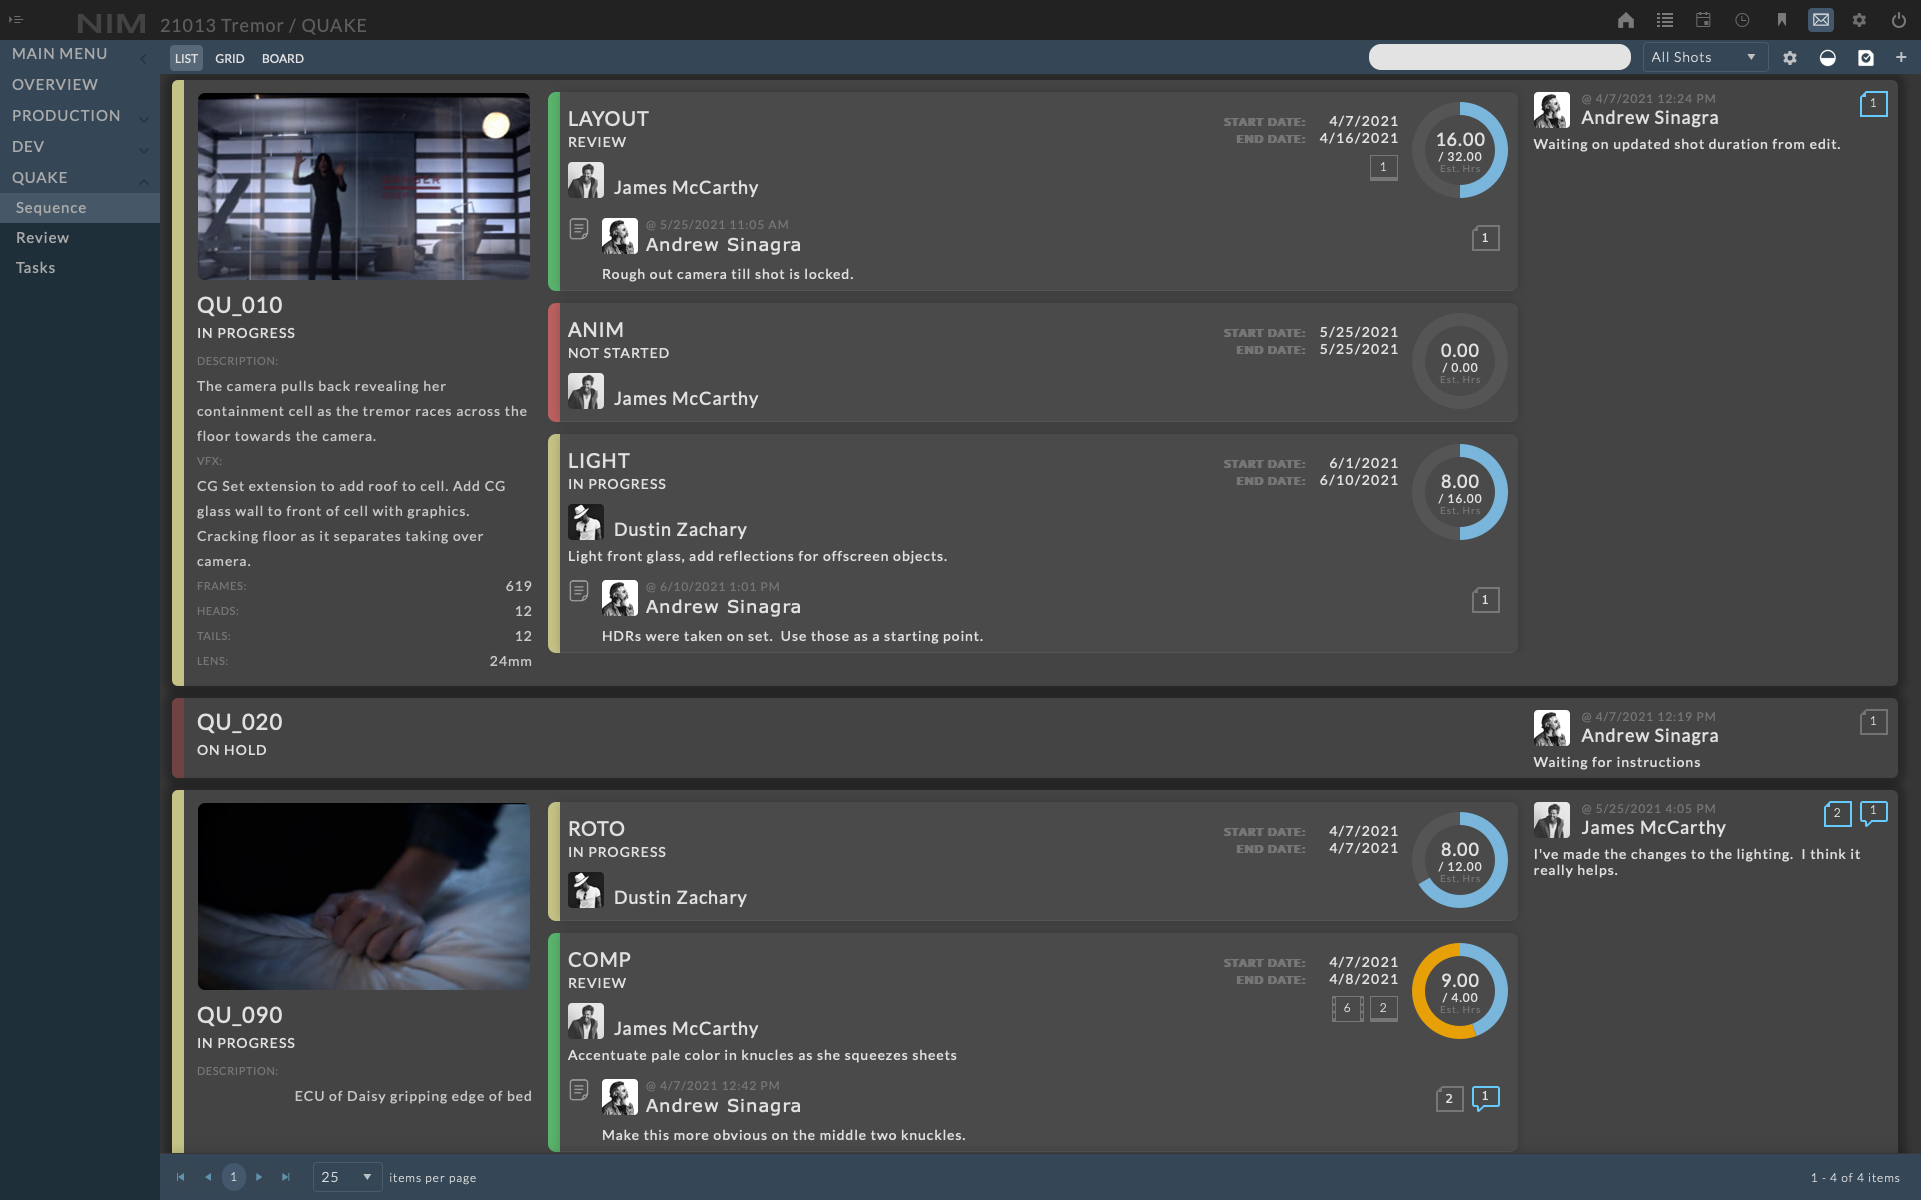
Each row in the list contains three columns of information.
Object Info |
Contains information relative to the asset or shot. |
Tasks |
Lists all tasks that have been attached to the object |
Notes |
Displays the latest asset or shot note |
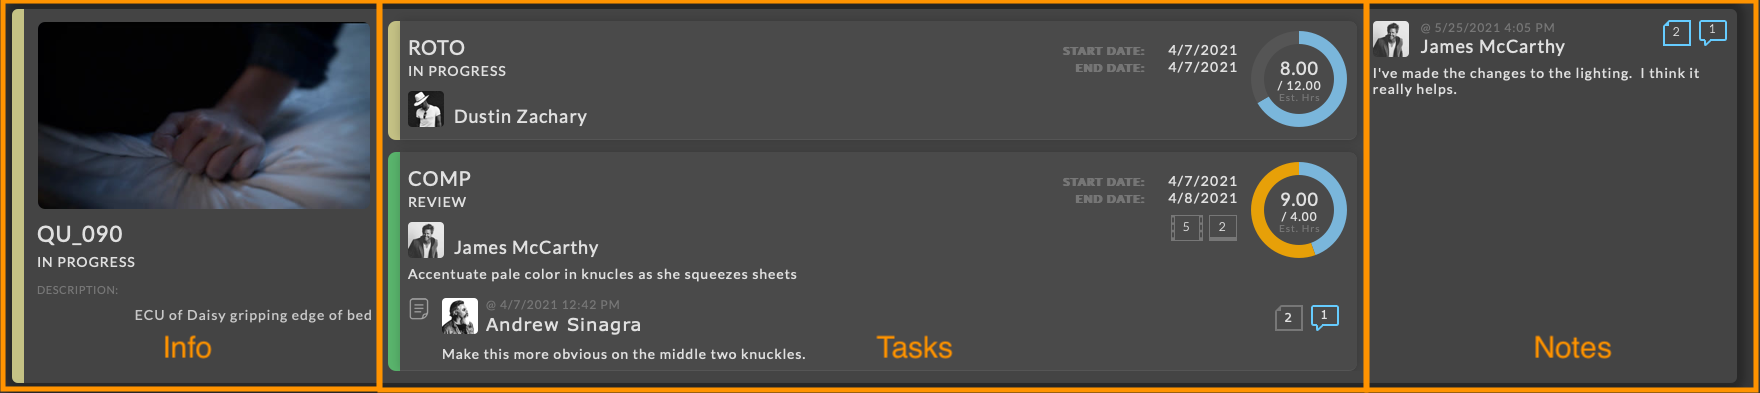
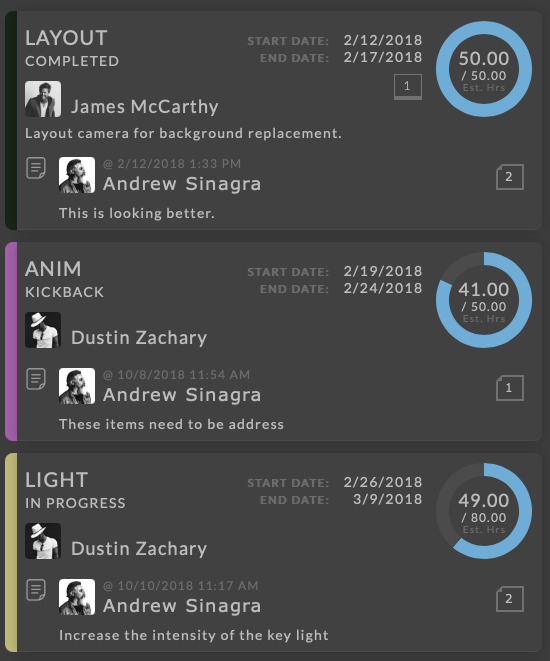
The second column displays the list of tasks attached to the object with information including the task assignment, duration, estimated time and time used, status, and latest note.
The task also includes counters for total number of review items, renders, notes, and replies. If an unread note or reply exists, the counter will be highlighted.
Creating Tasks
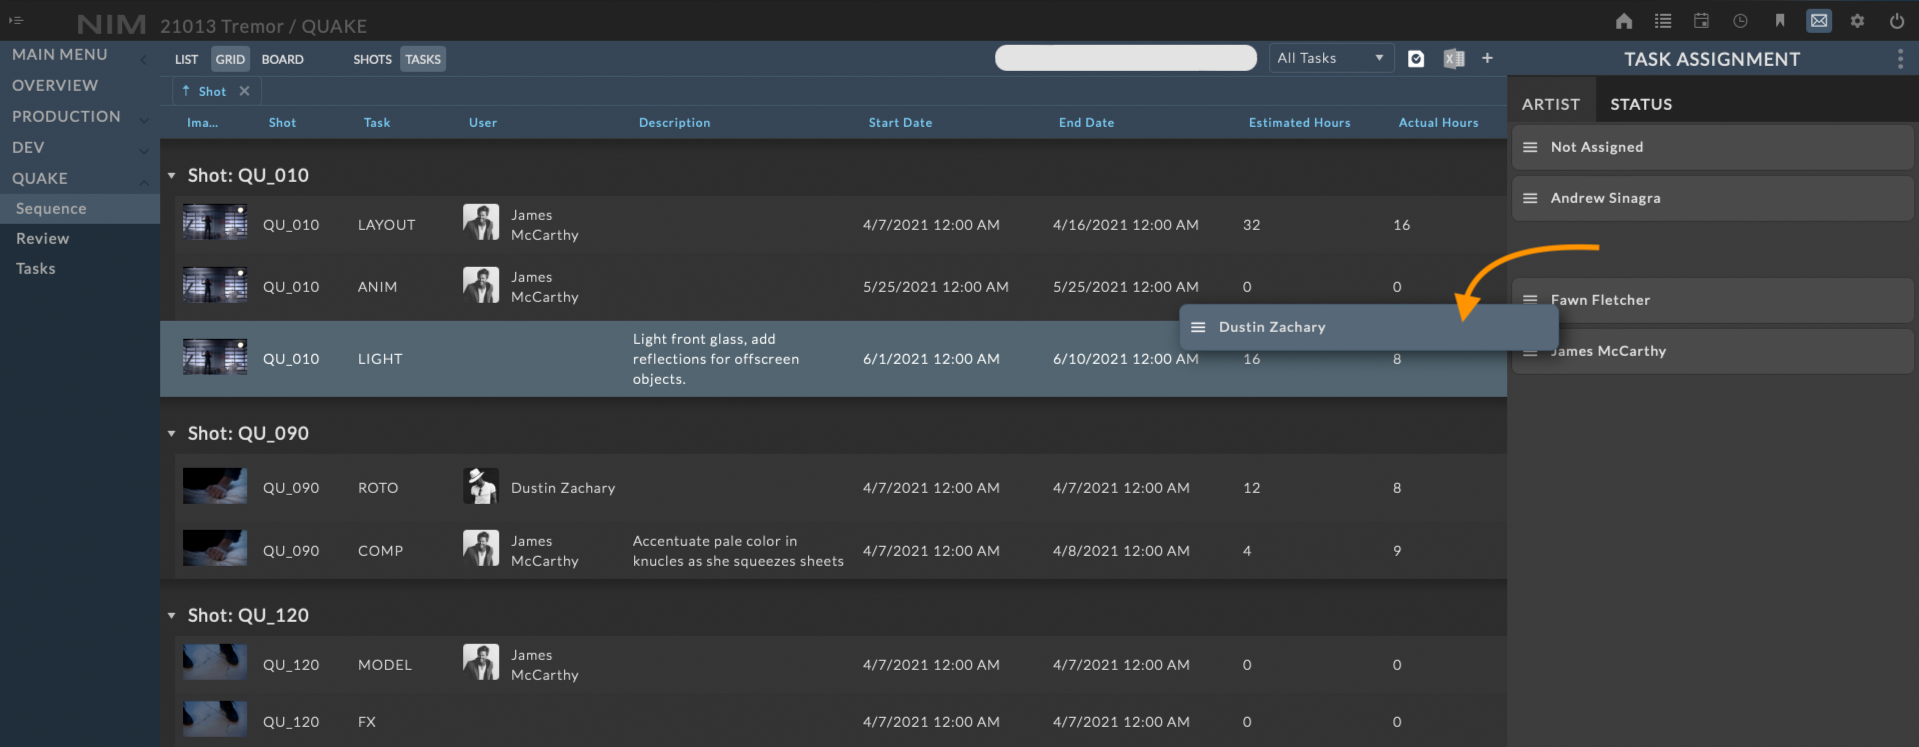
To create a new task in the list view, click the  button from the toolbar. The task assignment panel will appear to the right of the list view. Click and drag any of the tasks in the list over the target object. While holding a task over the object, the droppable area will be highlighted. Dropping the task on the object will add the task to the object.
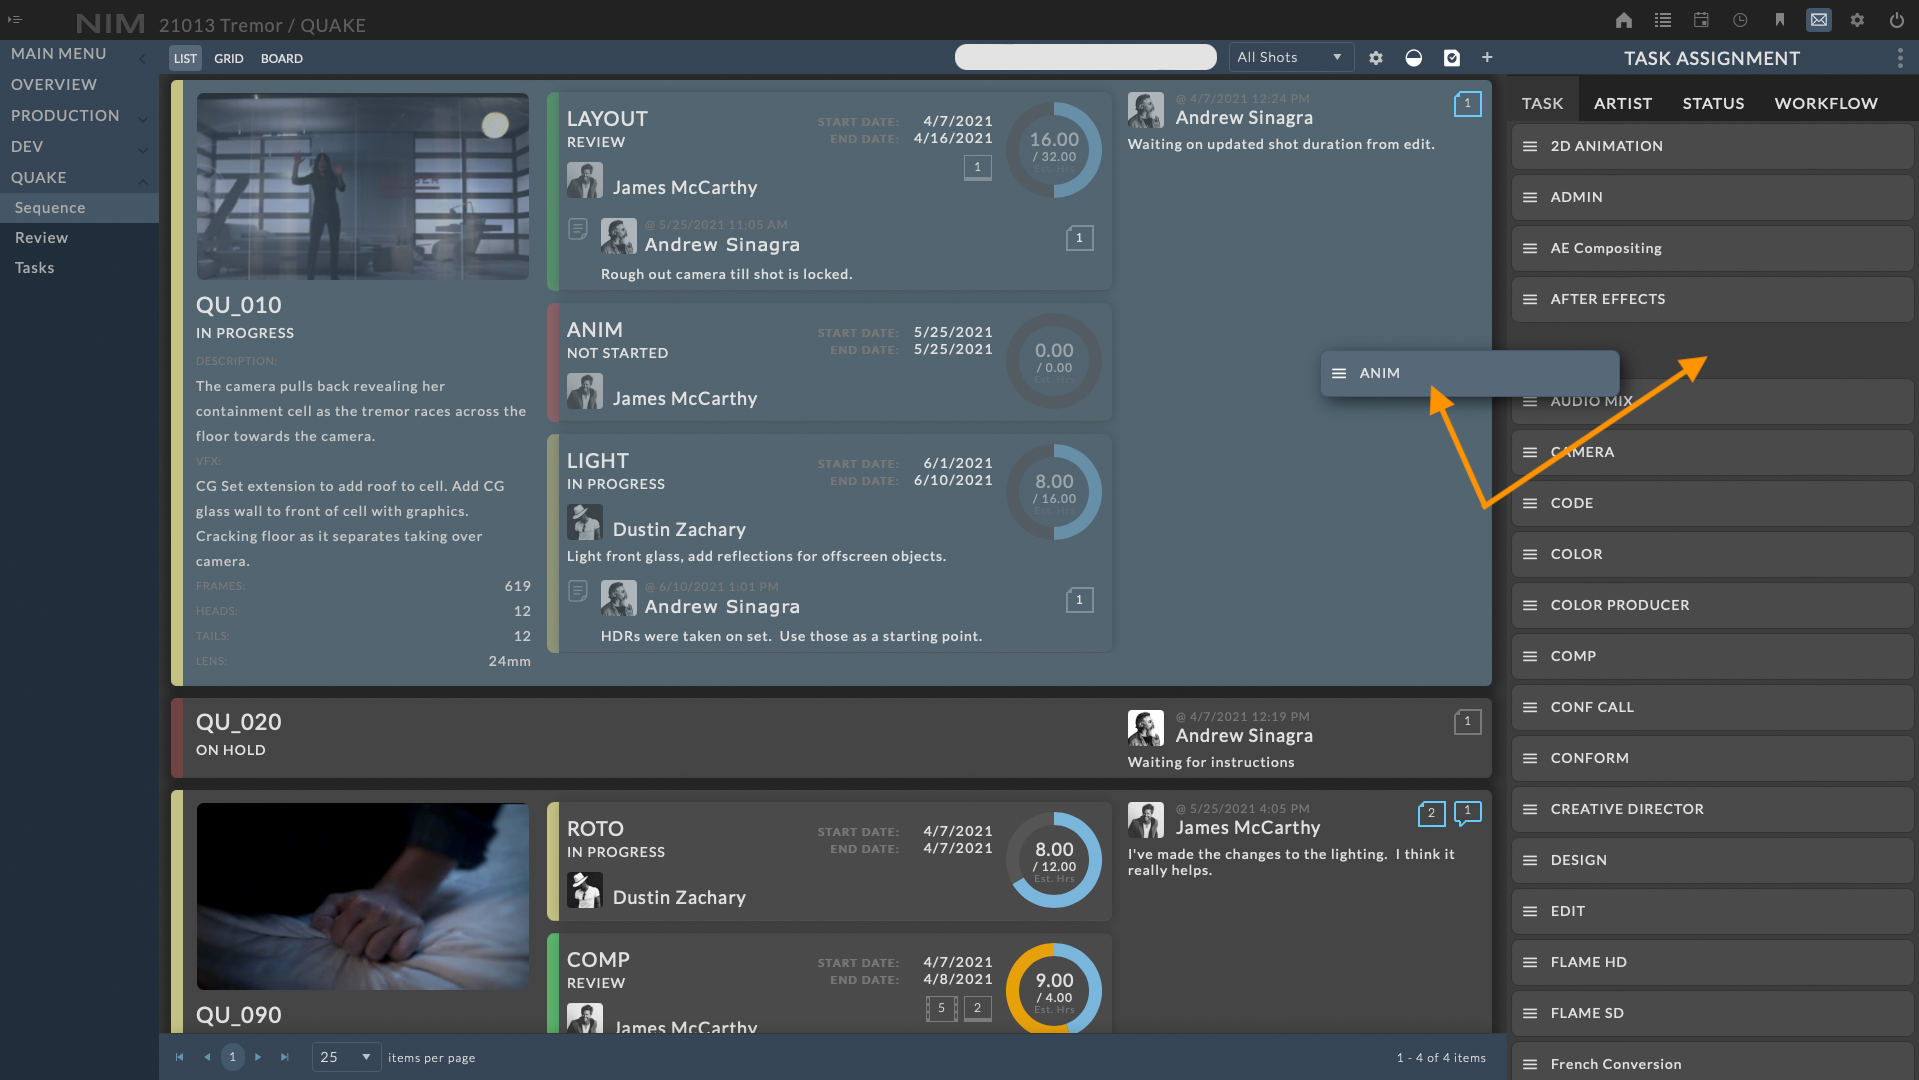
Workflows, which are groups of preassigned tasks, can be dropped on objects from this panel as well. For more information on adding and assigning tasks as well as task Workflows, please refer to the Task Creation and Workflows section of the documentation.
Edit Tasks
Clicking on the task will open the task info panel where users can modify details of the task, add notes, upload review items, and log renders. Once the task info panel is open, click on the ellipsis menu at the top right of the info panel and choose Edit. Make the necessary changes and click the Save button at the bottom of the info panel to save your changes. Click the Cancel button to return to the view mode without saving changes.
Delete Tasks
Delete a task entry by selecting the task, clicking the ellipsis menu in the task info panel, and selecting Delete. You will be prompted to confirm deletion of the task.
Task Assignment
In addition to being directly assigned from the task info panel, users can be assigned to tasks via drag and drop using the task assignment panel. Click and drag any users available from the “Artist” tab to the task they should be assigned to. Dropping the user on the task will immediately assign them to the task.
For more information on task assignment, please refer to the Task Assignment section of the documentation.
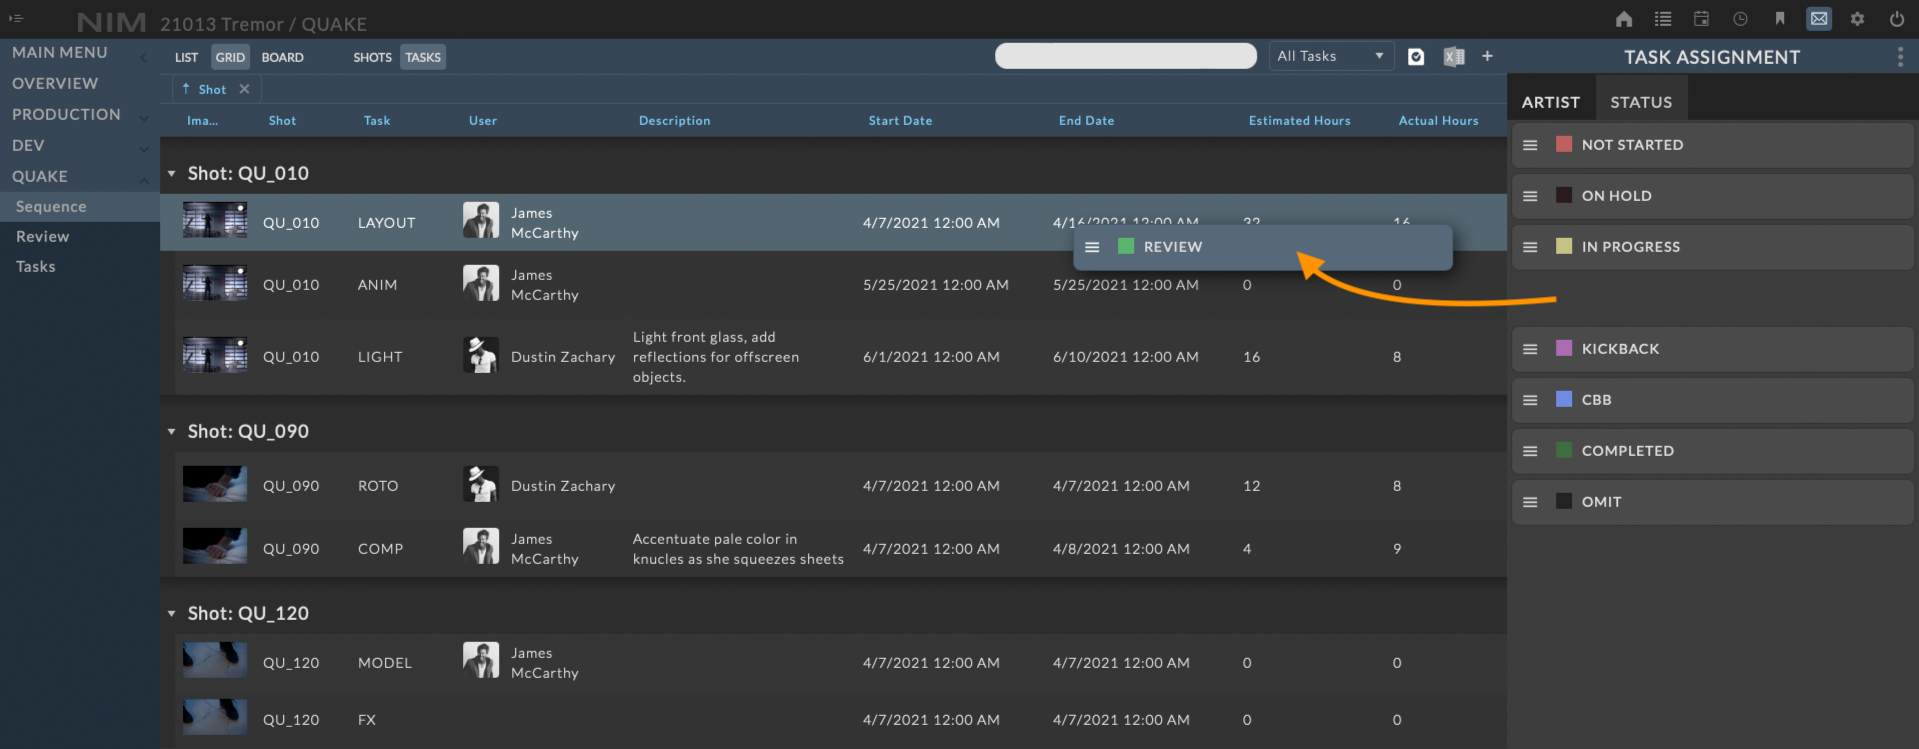
Task Status
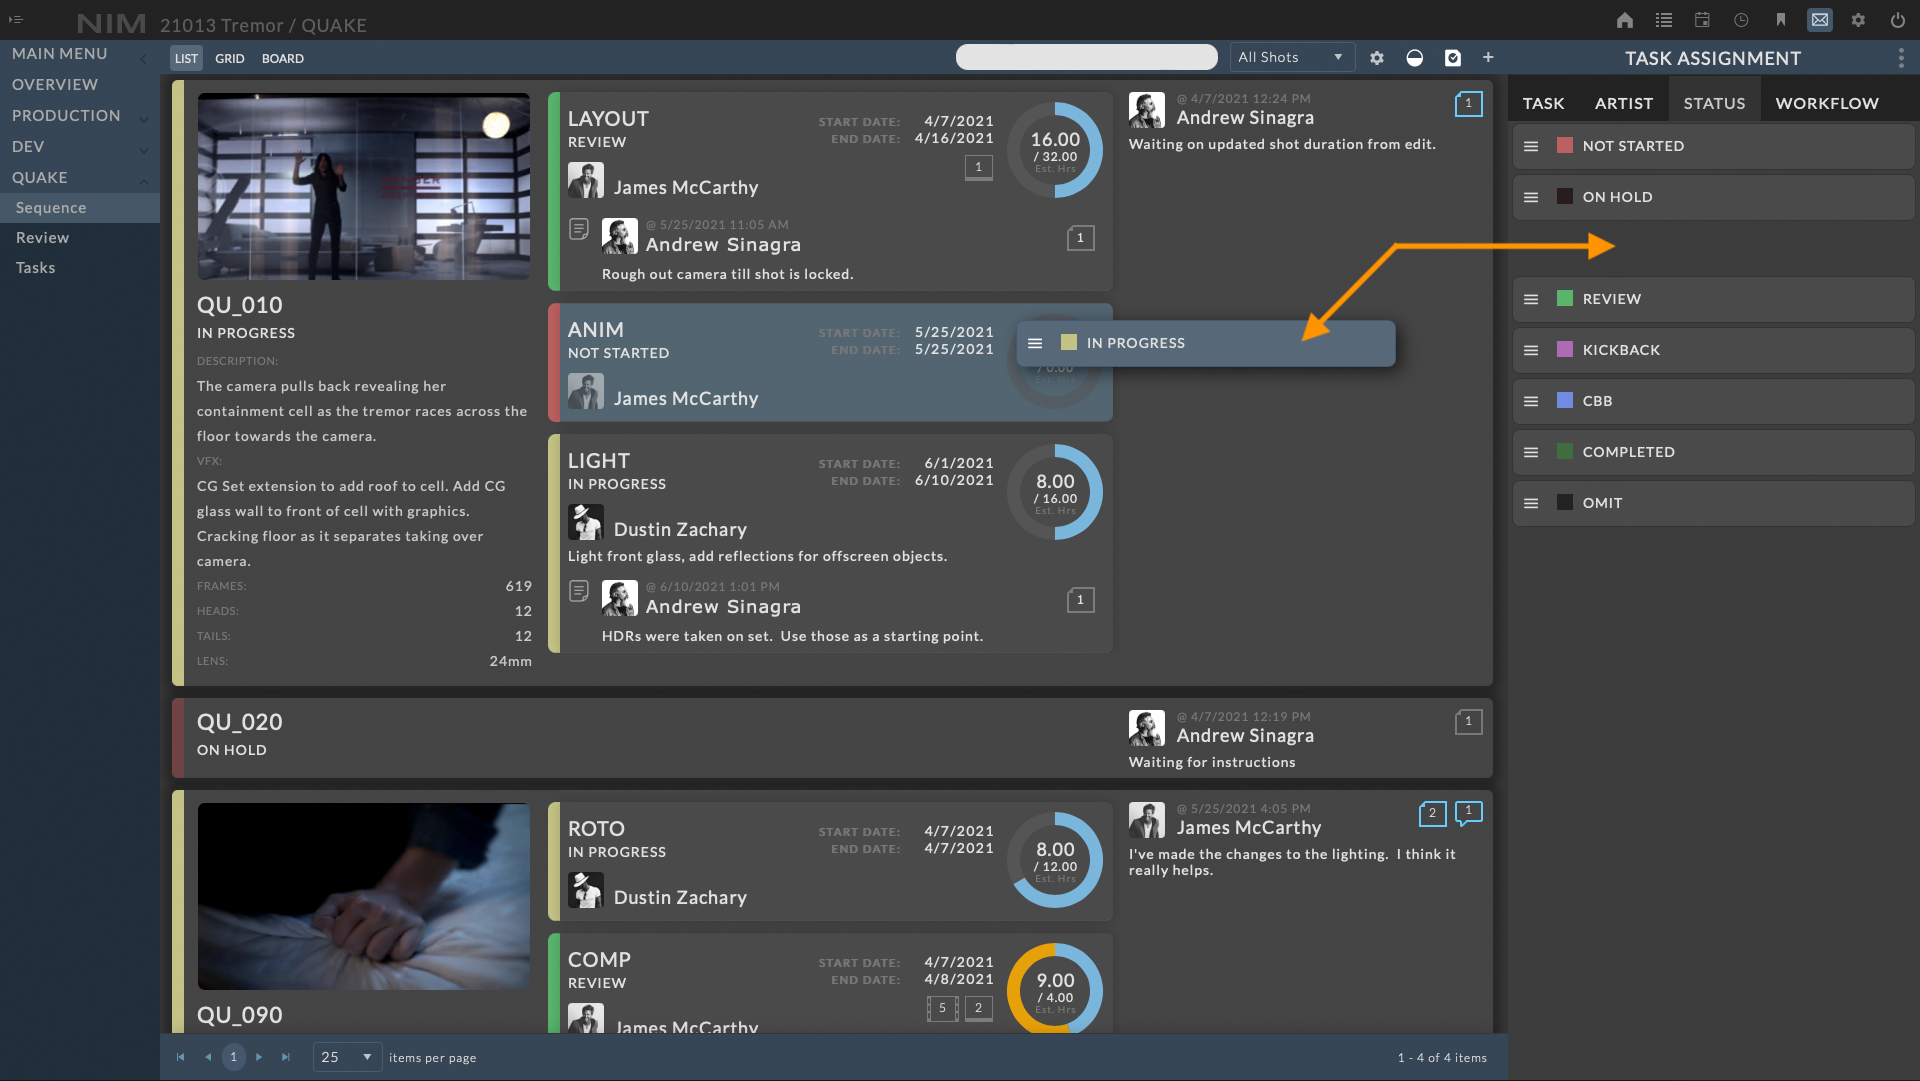
In addition to being directly modified from the task info panel, the task status can be set via drag and drop using the task assignment panel. Click and drag any available status from the “Status” tab to the task to set the new status. Dropping the status on the task will immediately set the new task status.
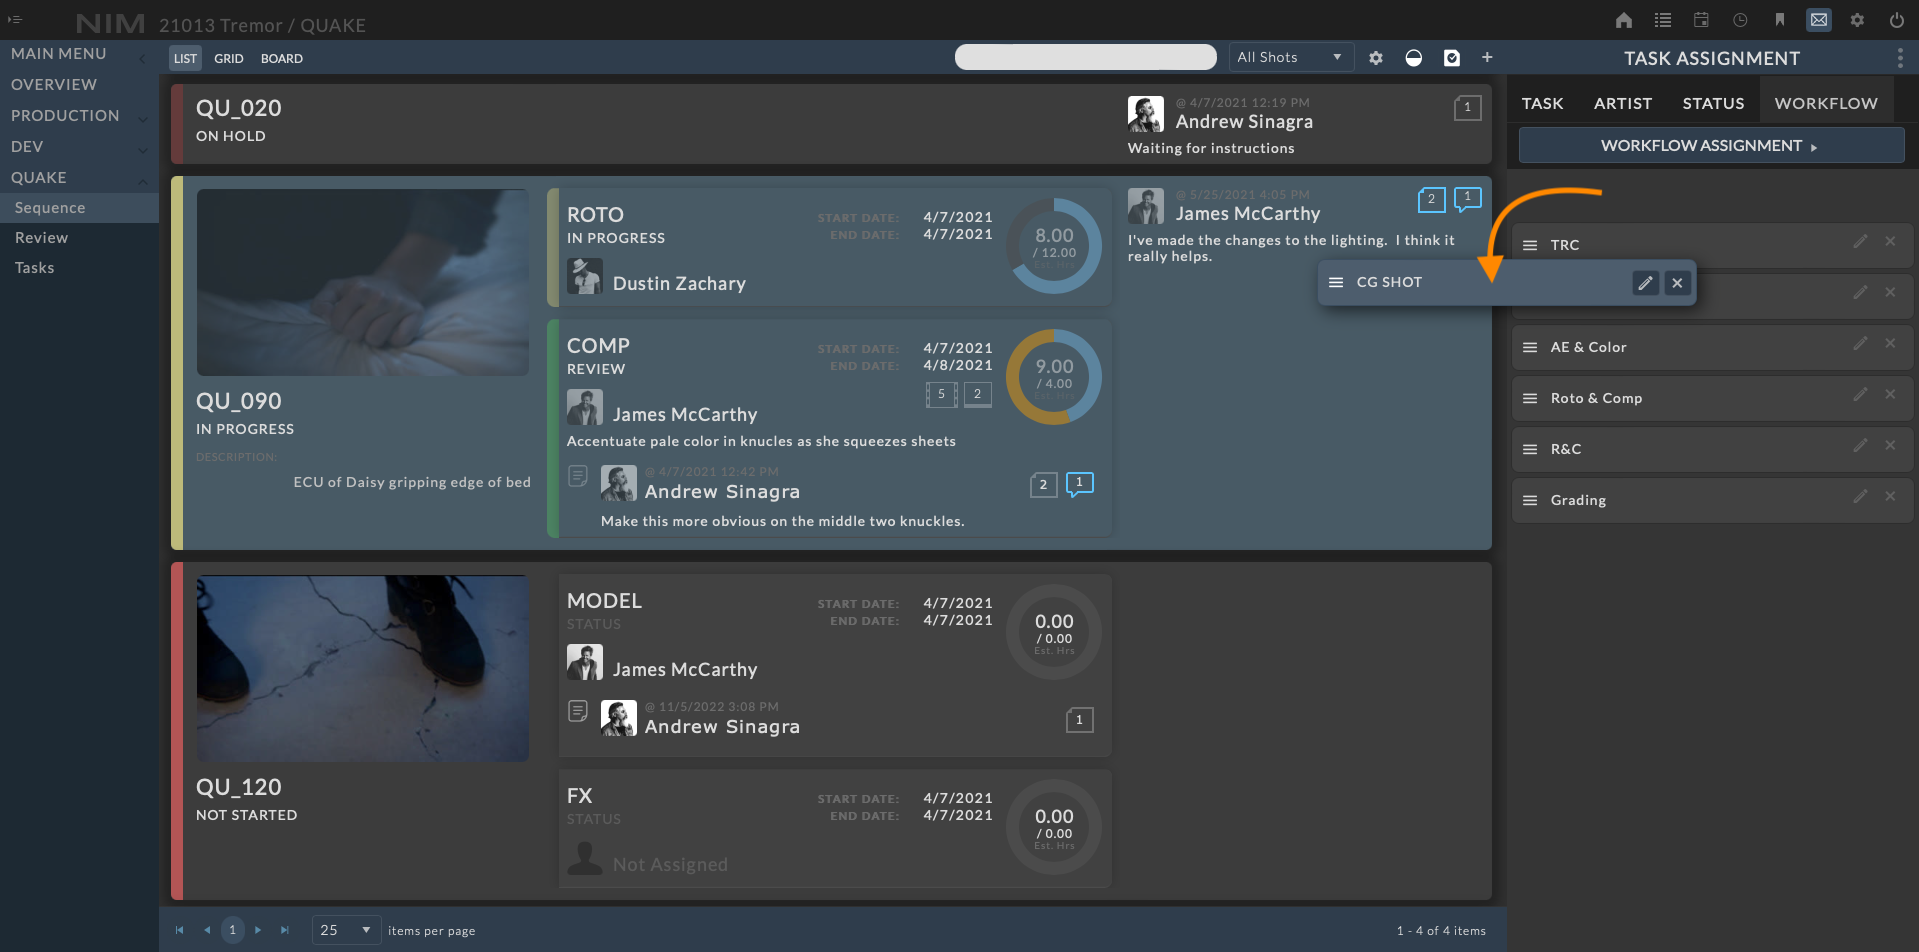
Workflows
Workflows, which are groups of preassigned tasks, can be created as well as dropped on assets and shots from the assignment panel. Dragging a workflow onto an object will add all of the tasks with their preassigned users, status, description, and estimated hours all at once. To add workflows to multiple objects simultaneously use the Workflow Assignment panel available by clicking the Workflow Assignment button at the top of the Workflow tab.
For more information on creating and assigning workflows, please refer to the Workflows section of the documentation.
Grid View
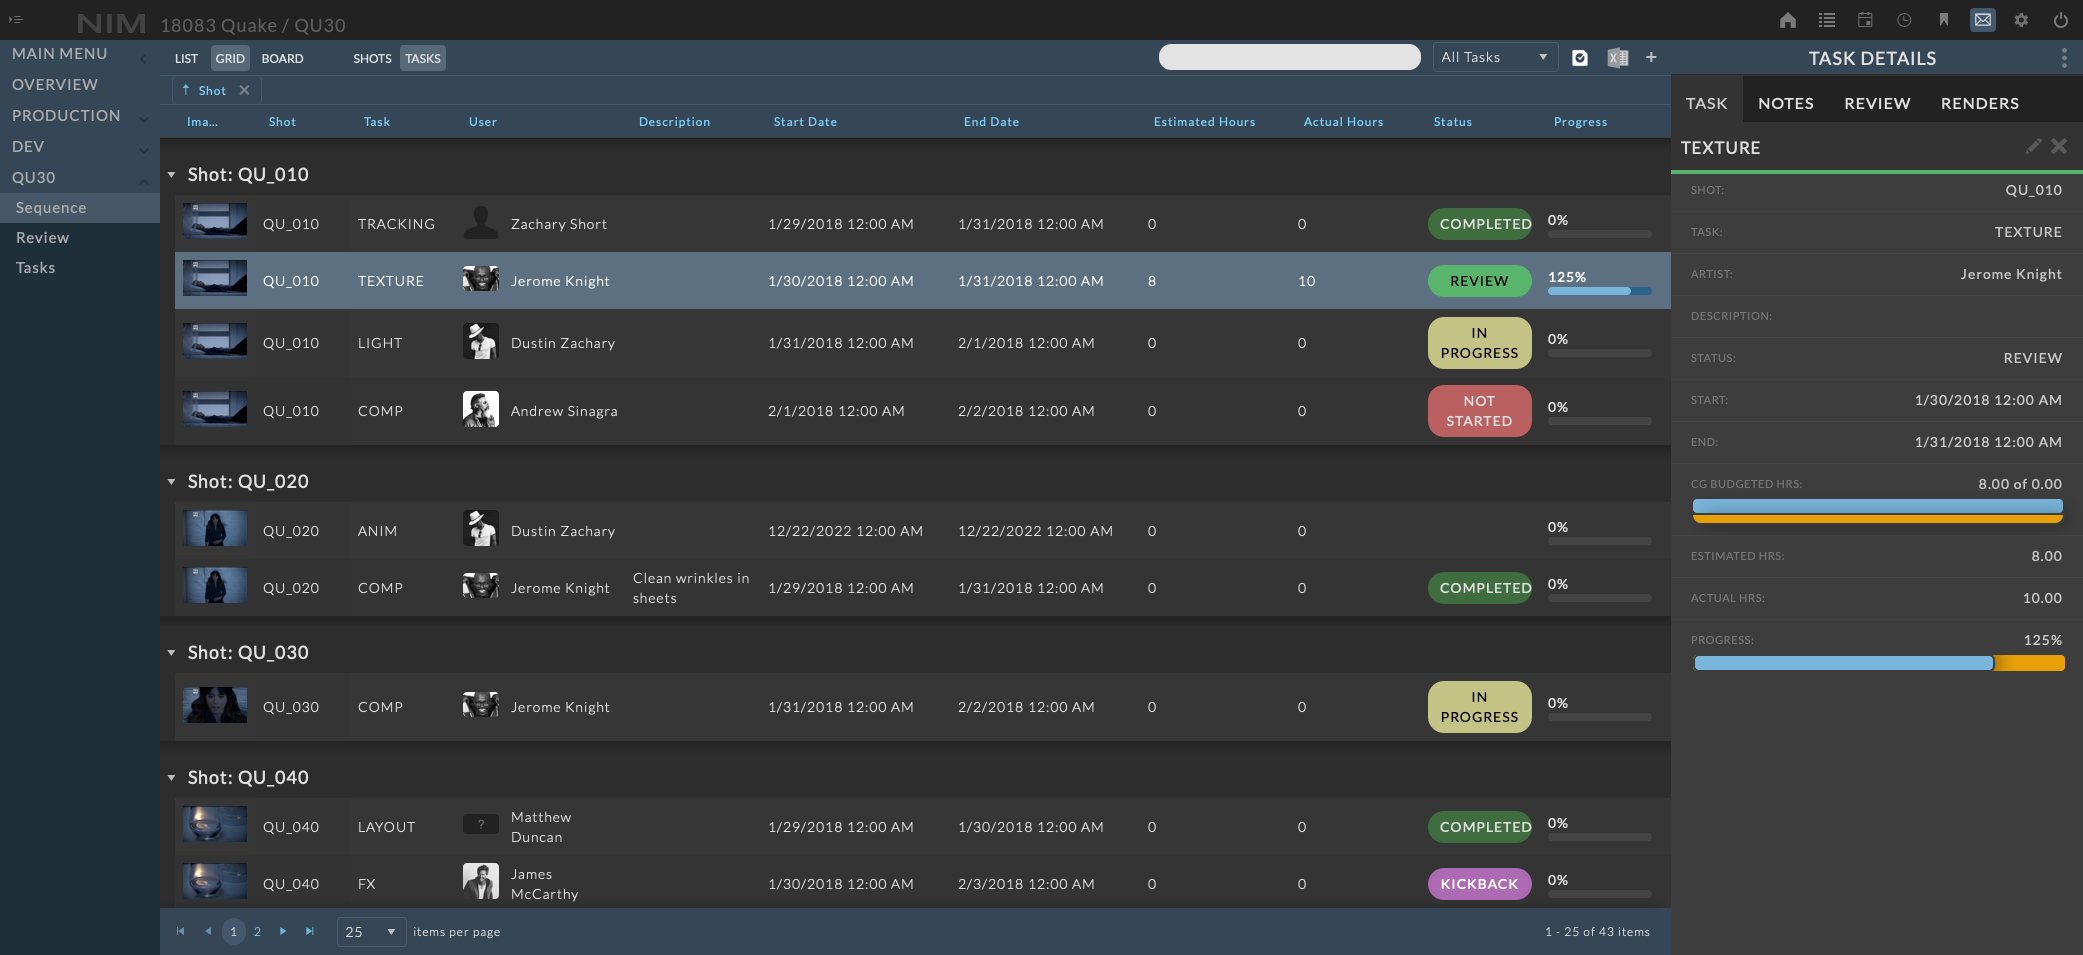
From the asset or shot grid view, a task-centric grid view is accessible via the Tasks button in the toolbar. In this view, each row represents a task and the associated task information. All task details are available including all custom fields, a progress bar displaying estimated vs time used, a color coded status column, and the latest note.
Creating Tasks
New tasks can be created from the Tasks Grid using the  button, however assets or shots can not be created when in this view. When creating a new task from the Tasks Grid, an additional field will appear to select the parent object for the new task.
Edit Tasks
Clicking on the task will open the task info panel where users can modify details of the task, add notes, upload review items, and log renders. Once the task info panel is open, click on the ellipsis menu at the top right of the info panel and choose Edit. Make the necessary changes and click the Save button at the bottom of the info panel to save your changes. Click the Cancel button to return to the view mode without saving changes.
Delete Tasks
Delete a task entry by selecting the task, clicking the ellipsis menu in the task info panel, and selecting Delete. You will be prompted to confirm deletion of the task.
Task Assignment
In addition to being directly assigned from the task info panel, users can be assigned to tasks via drag and drop using the task assignment panel accessed from the button in the toolbar. Click and drag any users available from the “Artist” tab to the task they should be assigned to. Dropping the user on the task will immediately assign them to the task.
For more information on task assignment, please refer to the Task Assignment section of the documentation.
Task Status
In addition to being directly modified from the task info panel, the task status can be set via drag and drop using the task assignment panel accessed from the button in the toolbar. Click and drag any available status from the “Status” tab to the task to set the new status. Dropping the status on the task will immediately set the new task status.
Multi-Task Edit / Delete
Tasks can be edited or deleted in groups from the Grid View.
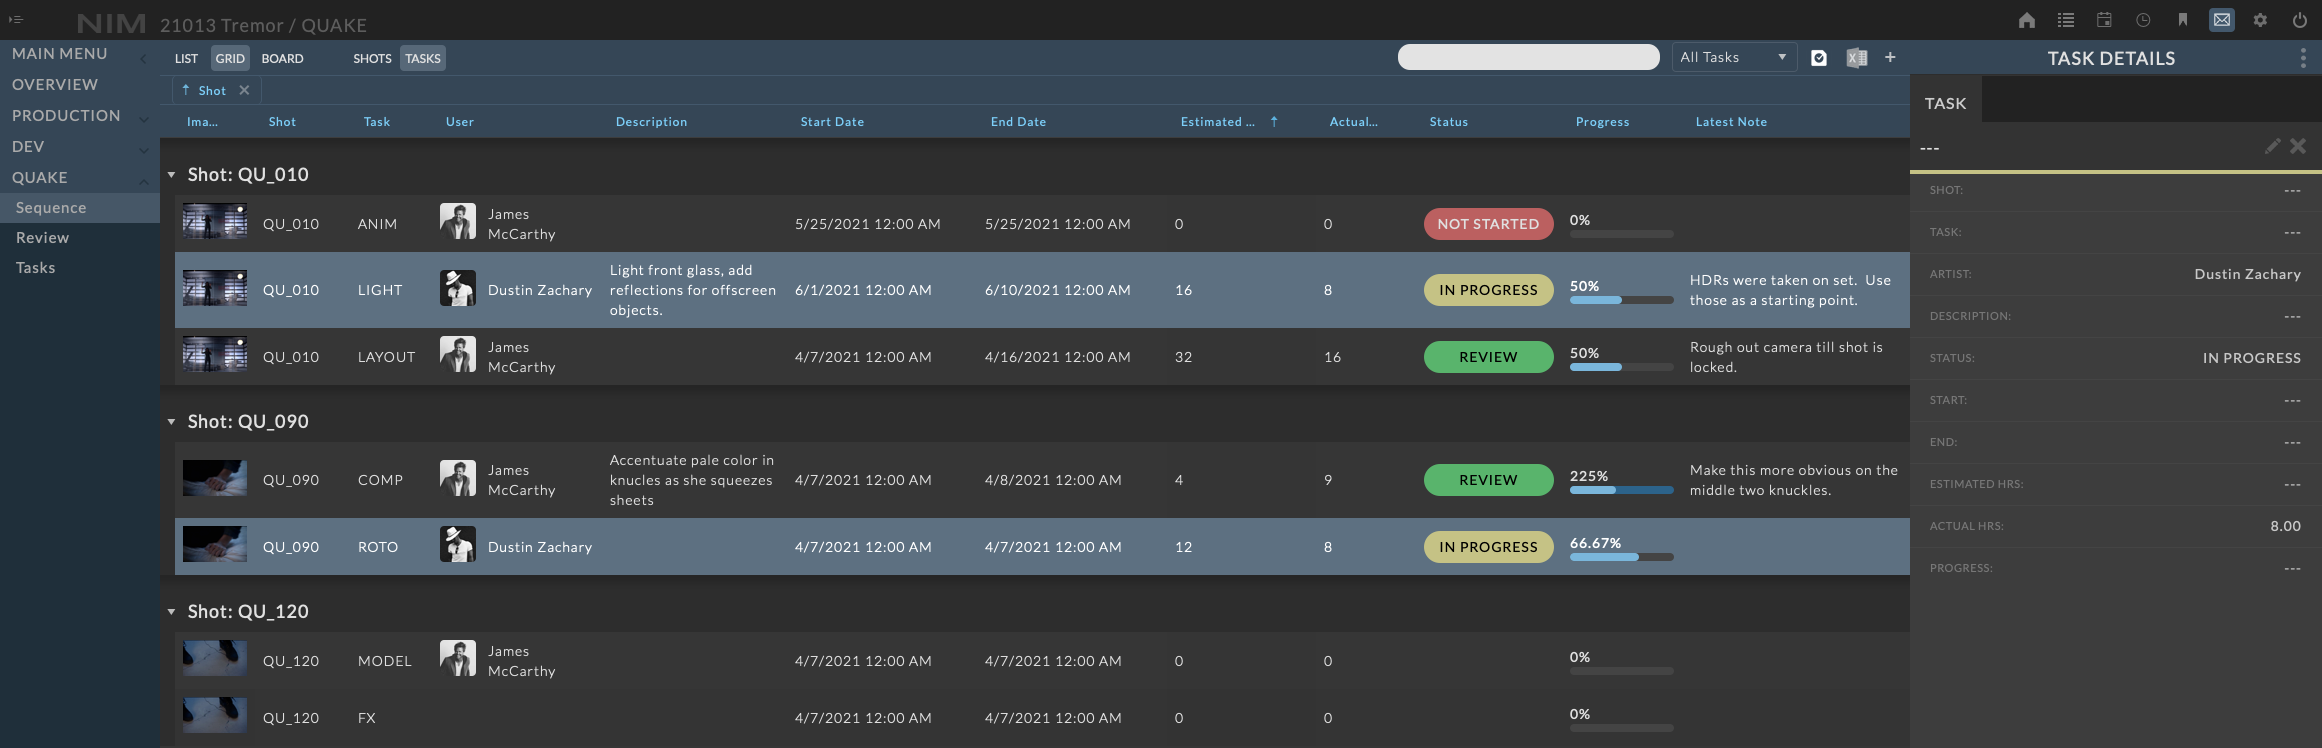
To edit or delete multiple tasks simultaneously, click on the first task to be edited. Then Shift-click a second task to select all tasks in between, or Ctrl-click / Command-click to add non-consecutive tasks.
The task info panel will appear from the right.
Click the  button in the task info panel to edit the task information.
Fields with matching values will be displayed as normal.
Fields with dissimilar values will be denoted as
---
Note
Only modified values will be saved, and all modified values will be saved for all selected tasks.
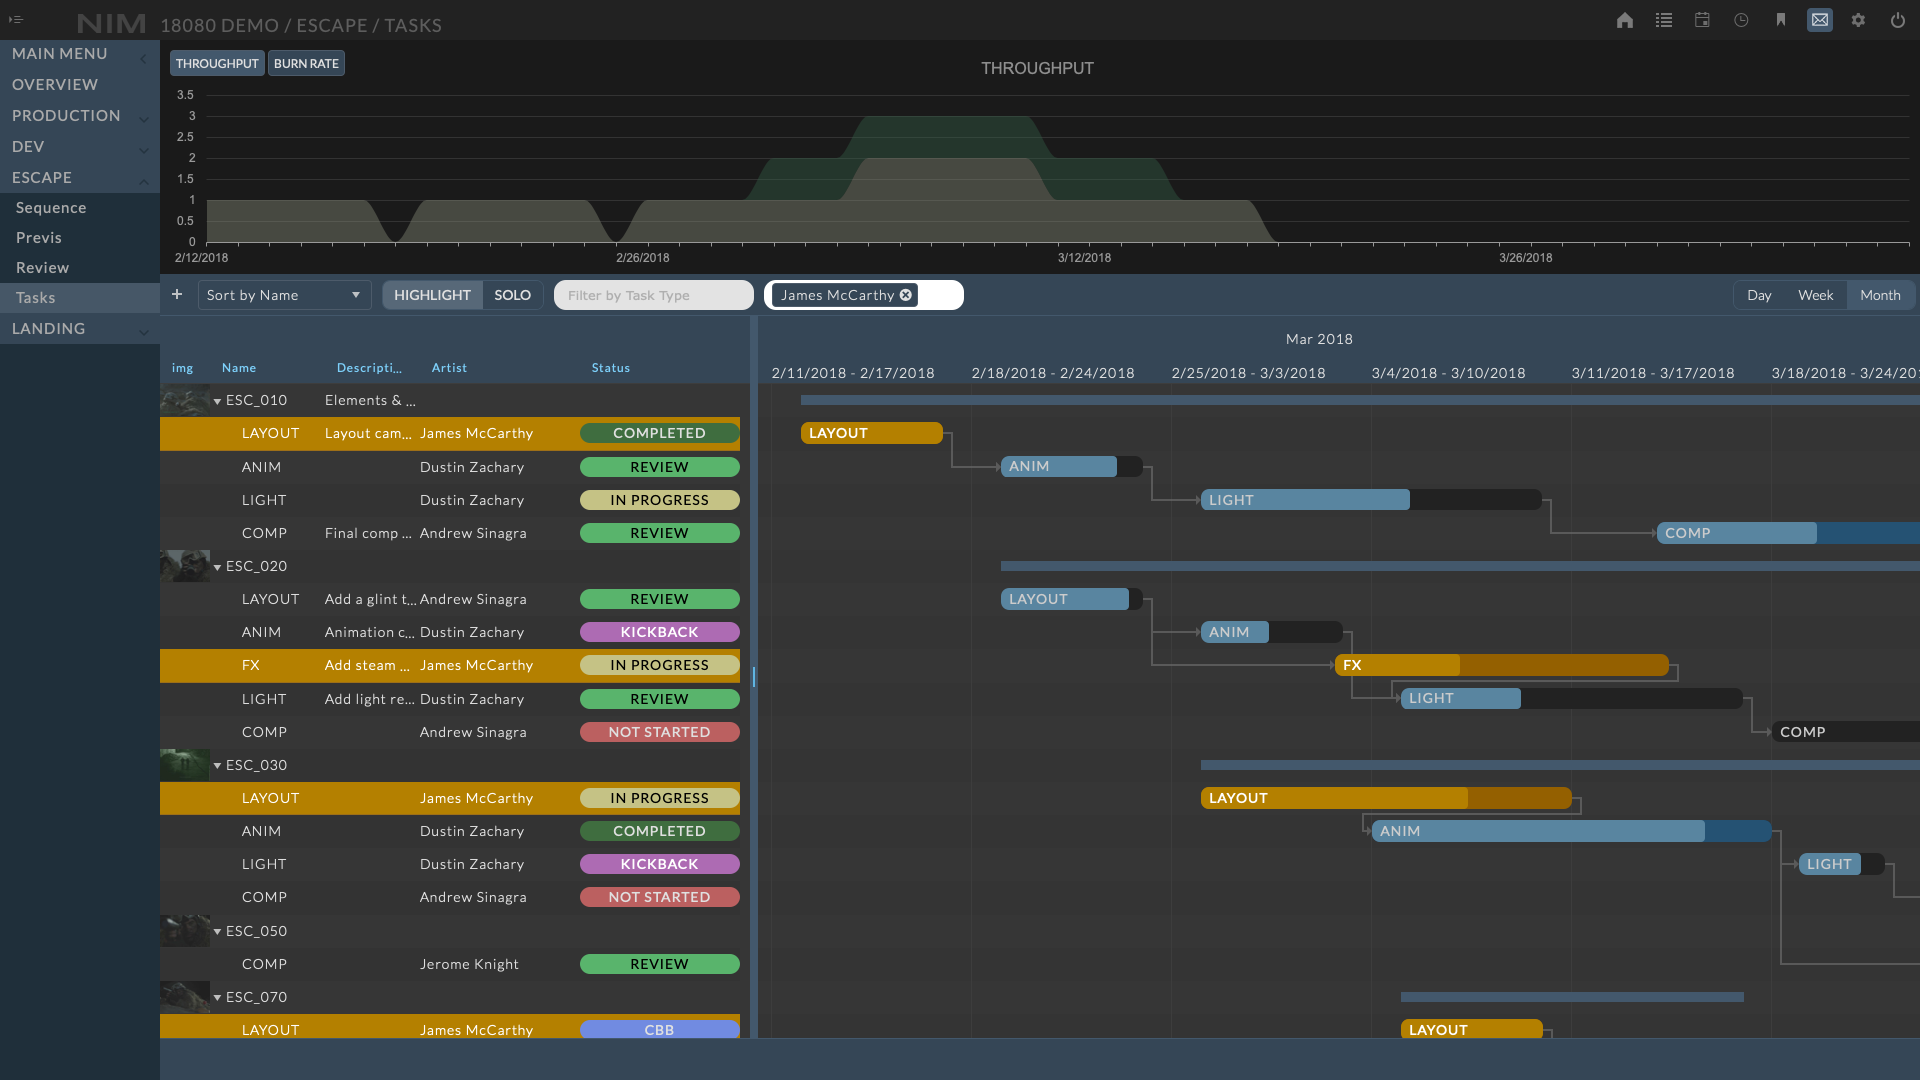
Task Timeline
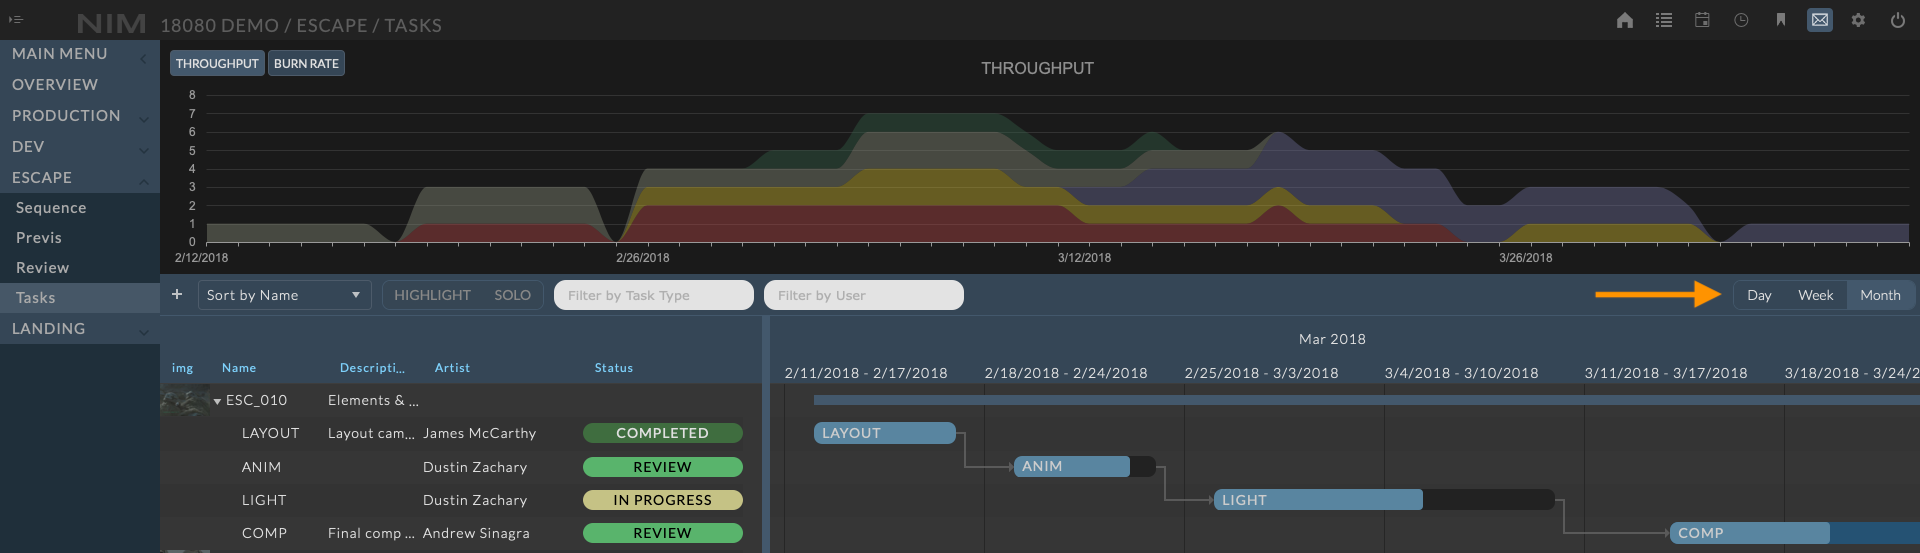
The Tasks Timeline displays tasks across all assets or shows within a job. The timeline can be accessed via the Dev > Tasks or Show > Tasks menu option. This view provides an overview of all task activity over the duration of the job. Filters can be applied to see all tasks for a job, location, user, or time period. Tasks can be added and edited directly from this view.
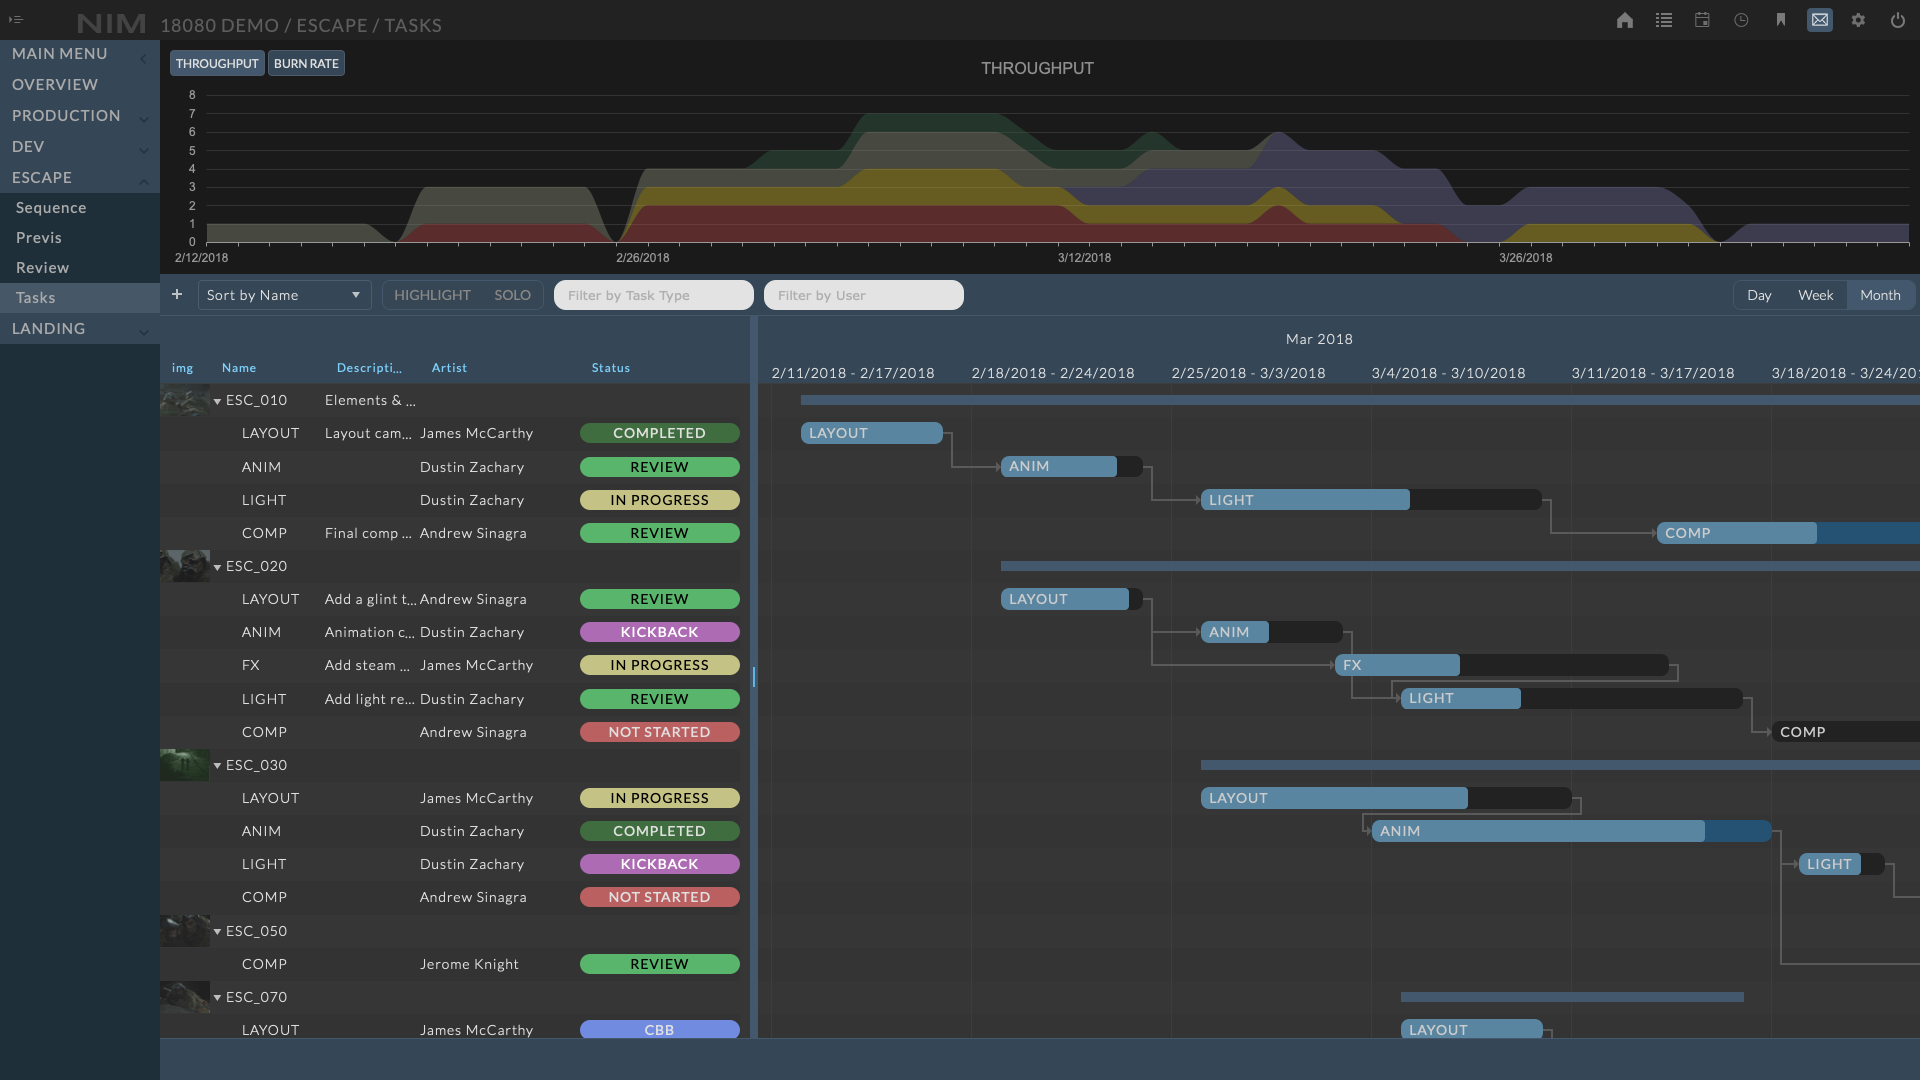
Navigation
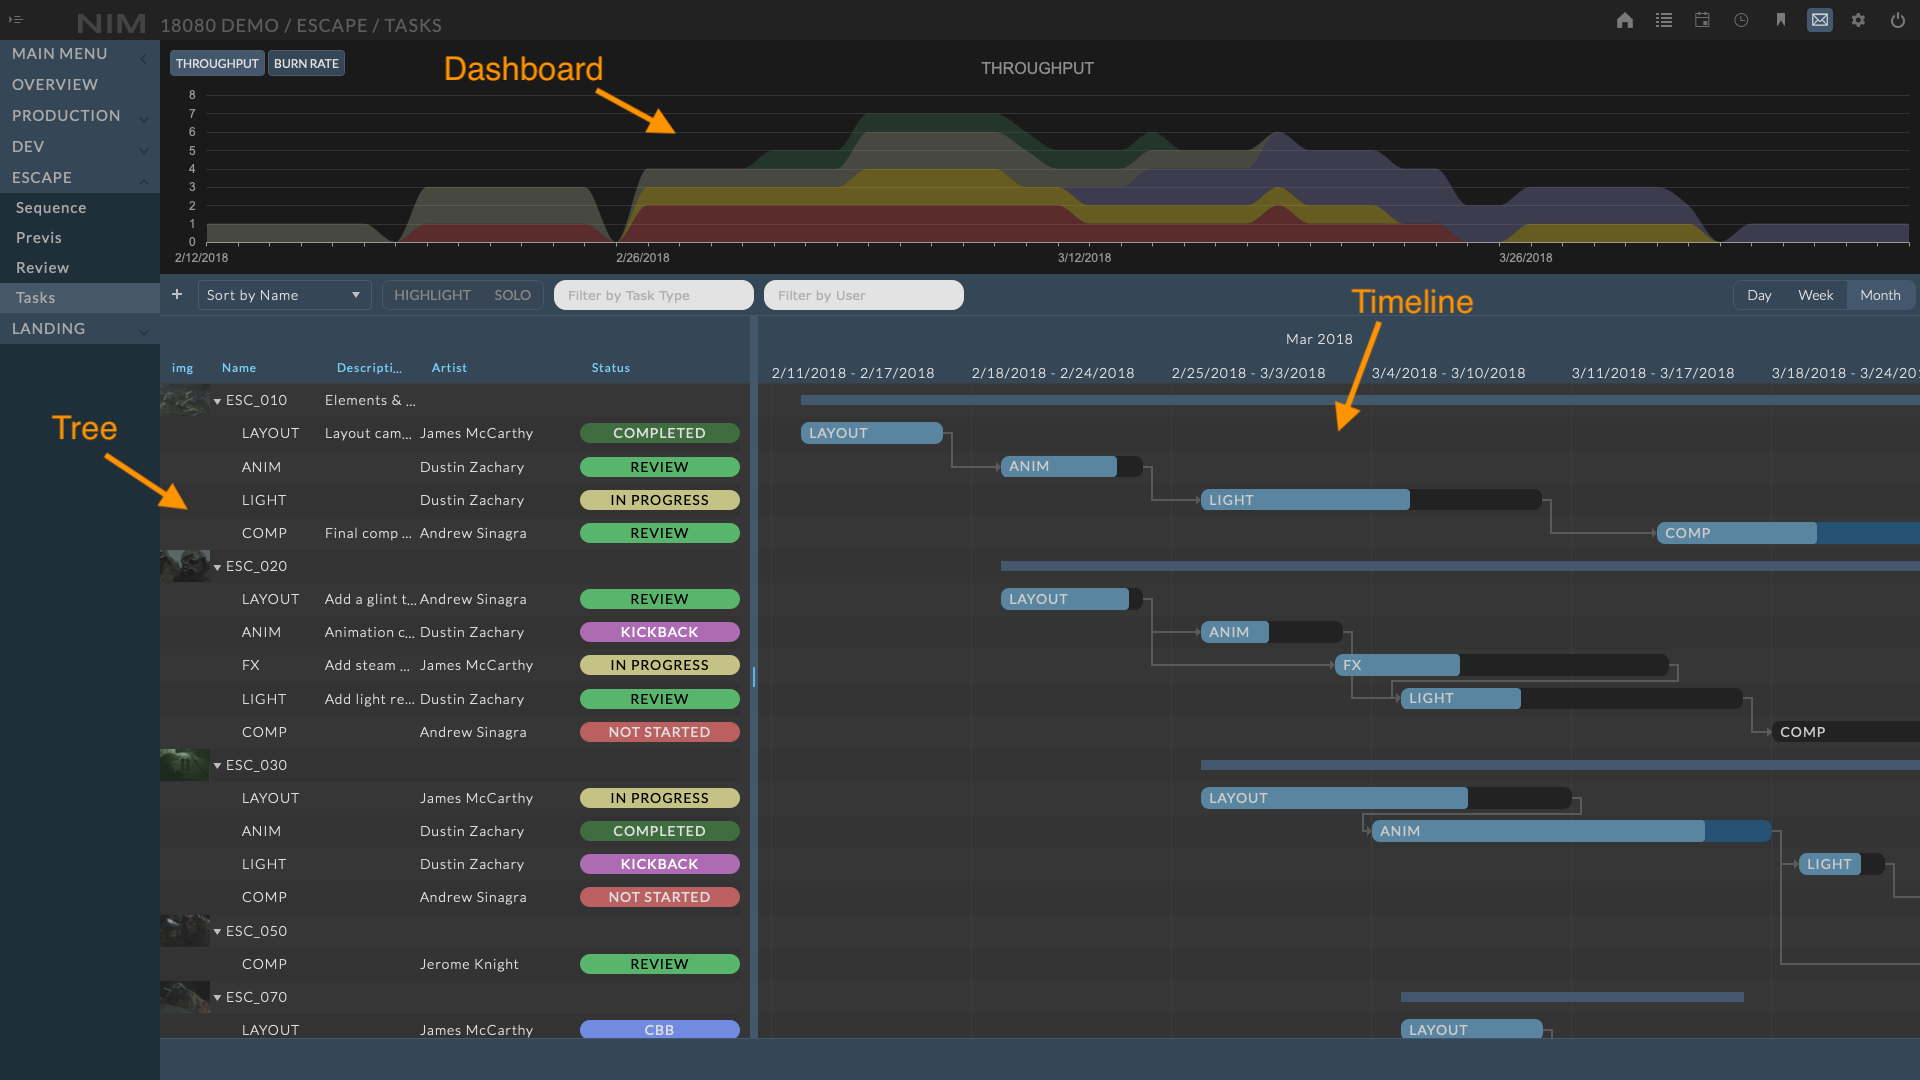
The task timeline is divided into three sections. The dashboard is at the top, with a collapsible tree view on the left, and the timeline on the right.
Dashboard
The dashboard contains options to display two charts for Throughput and Burn Rate. To access each chart, click on the corresponding buttons to the top left of the dashboard. Any filters applied to the timeline will be respected in the charts.
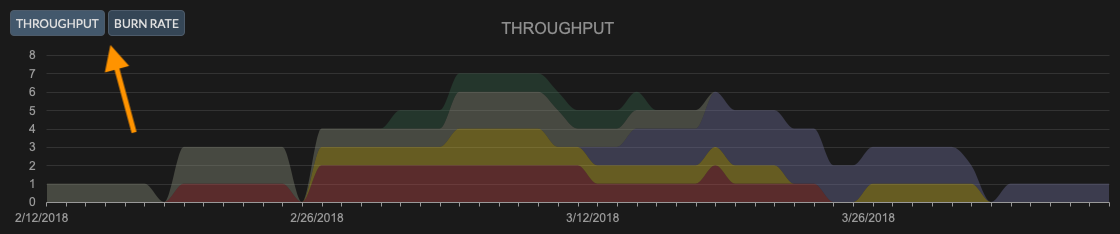
Throughput Chart
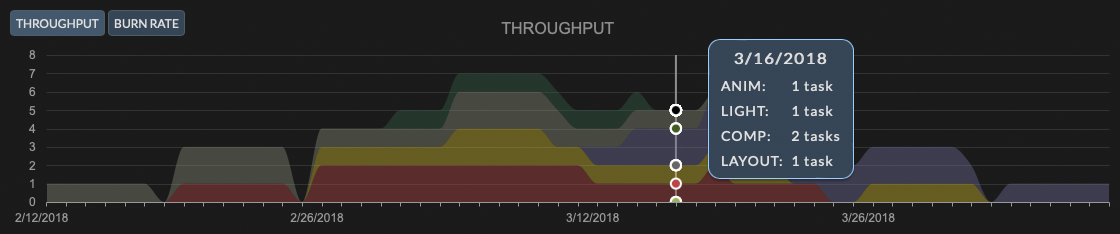
The “Throughput” chart depicts the total throughput of tasks over the course of the job. Task bands on the chart are color coded to the corresponding task color. This provides an overall view of how your workload is balanced. Moving tasks on the timeline will automatically update the chart to reflect the changes. Hovering over a section of the chart will display a tooltip with more detailed information for the given area.
Note
Use this chart to determine if you are front or end loading your work, need to even out tasks to maintain a consistent workload, or distribute the workload of individual users.
Burn Rate Chart
The Burn Rate chart displays the total amount of estimated time for all tasks minus the amount of time entered per assigned task on timecards. This view effectively displays the total amount of progression towards an end date on any given job and the rate at which the tasks are achieved. Spikes in a burn rate chart can be indiciate of work order changes where addtional tasks are added to a project or overloading a schedule during a particular time frame.
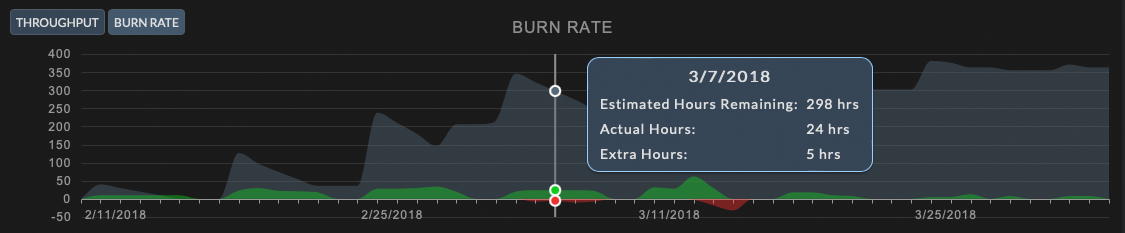
Note
A saw-tooth chart which spikes at the beginning of each week and ends each week with no leftover time would indicate that the team is completing the weekly workload. However, if the estimated time is progressively getting larger then either the team is falling behind or the amount of hours required was over-estimated.
Task Tree
The tree view displays the title of the item, icon (if applicable), the description, task assigned user and status.
The highlighted row denotes the currently selected task.
Items in the task tree are presented in the following format:
|-- First asset or shot
|  |-- Task 1
|  |-- Task 2
|-- Second asset or shot
|  |-- Task 3
|  |-- Task 4
To expand an item in the tree, click the arrow to the left of the title. The item will expand displaying its children.
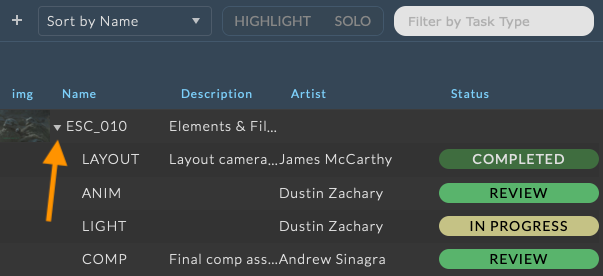
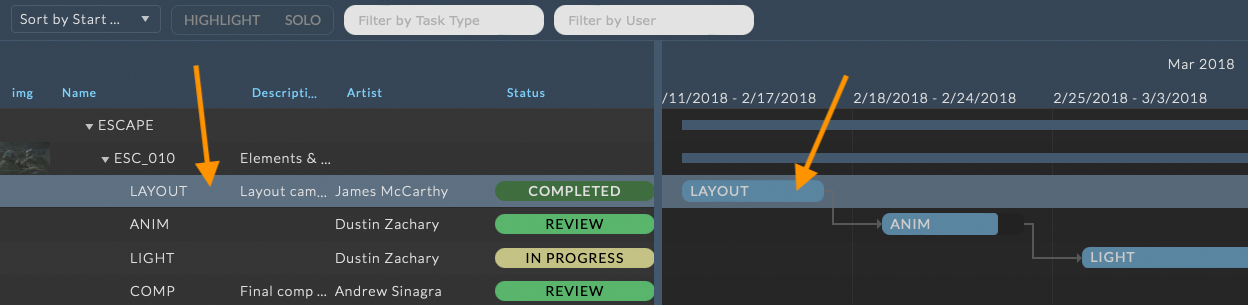
Clicking on a task from the tree will highlight the entire row and slide the timeline on right so that the selected task is visible within the timeline.

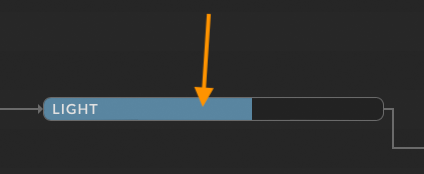
Task Timeline
The timeline displays the task with its duration spanning the start and end date of the task. The color of the task is dependent upon the defined “Estimated Time” for the task as well as timecards that have been entered against the task. The task bar will be filled from left to right depending on the percentage of hours entered via timecards vs the task’s estimated time. For tasks that are going over in hours, all hours that go beyond the estimated time will be depicted in a darker background color value.

Tooltips
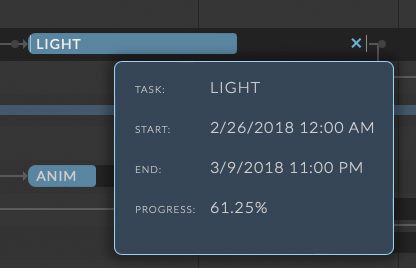
Hovering over a task on the timeline will display a tooltip with detailed task information.
The name of the task type will be shown along with the percentage of time used calculated from actual time entered via timecards / task estimated time, as well as the task start and end date.
Moving & Resizing Tasks
To move a task on the timeline click and drag the middle of the task to move the task horizontally in time without adjusting the start and end period.

To adjust the start and end period, click and drag on either the left or right side of the task. Adjusting a task by drag and drop will snap the edge to the current division of time in the view.
You can slide all tasks in a group of tasks together by selecting the parent bar above the task and dragging it along the timeline. This is helpful for moving all tasks under a parent at once.
Timeline Scale
The overall scale of the timeline view can be adjusted by clicking on the Day, Week, and Month options on the right of the toolbar. Selecting the Month option will provide the widest view, while the Day option will zoom in for more granular detail in time.
Sorting
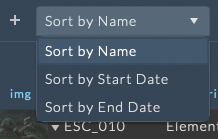
The list of objects at the left of the task timeline can be sorted via a dropdown on the task timeline toolbar.
The sorting dropdown allows you to sort objects in the timeline by:
Name
Start Date
End Date
Filters
The task timeline includes options for directly filtering tasks.

The options include:
Task Type - Filters tasks based on their selected task type
User - Filters tasks based on the user assigned
Note
When filtering by user, an Unassigned option is available to identify all tasks that have been created but not assigned to a user. Multiple filter items can be selected to compare users or tasks.
These filter modes have two options for displaying the selected data:
Highlight - Identifies tasks on the timeline by highlighting the row, keeping them in context with the other tasks on the timeline. Selected by default
Solo - This mode only displays tasks on the timeline that meet the filter criteria.
The image below demonstrates how the highlight mode is viewed.
Note
As filters are applied, the displayed dashboard charts will update with the corresponding data.
Creating Tasks
To create a new task from the timeline, first choose the object you wish to add the task to by selecting it from the tree view. Then click on the at the far left of the toolbar. A dialog will appear allowing you to edit the new task details.
Editing Tasks
Tasks can be selected for editing by double clicking the task from either the tree, or the timeline. A dialog will appear allowing you to edit the task information.
Available options are:
Task |
The dropdown contains a list of task types. |
Artist |
The artist to be assigned to this task. The list contains all users that are assigned to the job crew. |
Description |
A brief description of the task. |
Status |
The current status of the task. |
Start |
The date and time that the task is scheduled to start. |
End |
The date and time that the task is scheduled to end. |
Estimated Hrs |
The estimated number of hours that will be spent on this task. |
Actual Hrs |
The number of hours entered for this specific task via timecards. |
Progress |
A percentage of task completion. This is calculated by comparing actual hours to estimated hours. If actual hours exceed estimated hours, this completion percentage will rise above 100%. This completion percentage is reflected in the visual representation of each task in the timeline. The lighter portion represents its completion percentage. If it rises above 100%, the darker portion represents the amount beyond 100%. |
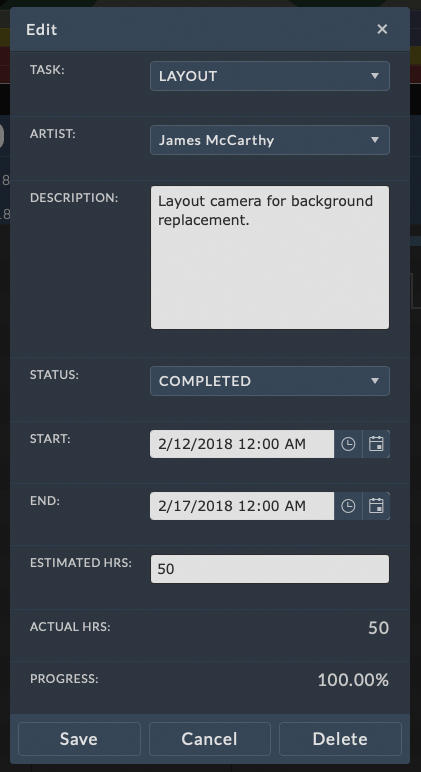
To save any changes click the SAVE button at the bottom of the edit window. Click the Cancel button to return to the view mode without saving changes.
To delete the task, click on the DELETE button at the bottom of the edit window. You will be prompted to confirm deletion of the task.
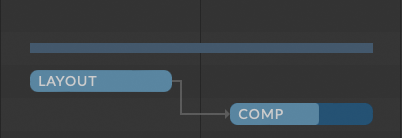
Task Connections
Connections can be made between tasks to visualize dependencies. Hovering your cursor over the ends of a task bar item in the timeline will reveal a circle at the edge of the task. You can click and drag to pull out a connection line. Dragging the end of the connection line to another task’s connection circle and letting go will connect the two tasks.

To delete a connection, click on the connection line and press the Delete key. You will be prompted to confirm deletion of the connection.
Note
This connection currently is for visualization purposes only.