Premiere
The Adobe® Premiere® connector provides integration with NIM from within Premiere to manage project versions, create published shots in NIM, add exported elements to NIM shots, export clips to NIM review items, and roundtrip NIM elements back to bins in the Premiere project.
For an in depth look at the NIM Premiere Connector functionality, check out the video here:
NIM Premiere Connector from NIM Labs on Vimeo.
Additional NIM videos can be found here: https://nim-labs.com/videos
Installation
The following procedures describes how to install the NIM Premiere connector. The connector is available as an extension in the Premiere > Window > Extensions menu option. The Premiere connector has been tested with Adobe® Premiere® Pro CC 12.1.2(Build 69).
There are two options to installing the Premiere connector.
Automatically managed using adobeexchange.com
Manual Installation
Automatic Installation
To install the connector automatically using the Adobe® Exchange, click on the following link:
NIM Premiere Connector - Automatic Installation
Follow the directions on the page to install the extension.
Manual Installation
If you are unable to install the connector via the Creative Cloud App, please follow the Adobe® instructions at the following link for steps on manually installing the connector.
NIM Premiere Connector - Manual Installation
The above steps will walk you through downloading and installing the connector via an Adobe compatible Extension Install Utility.
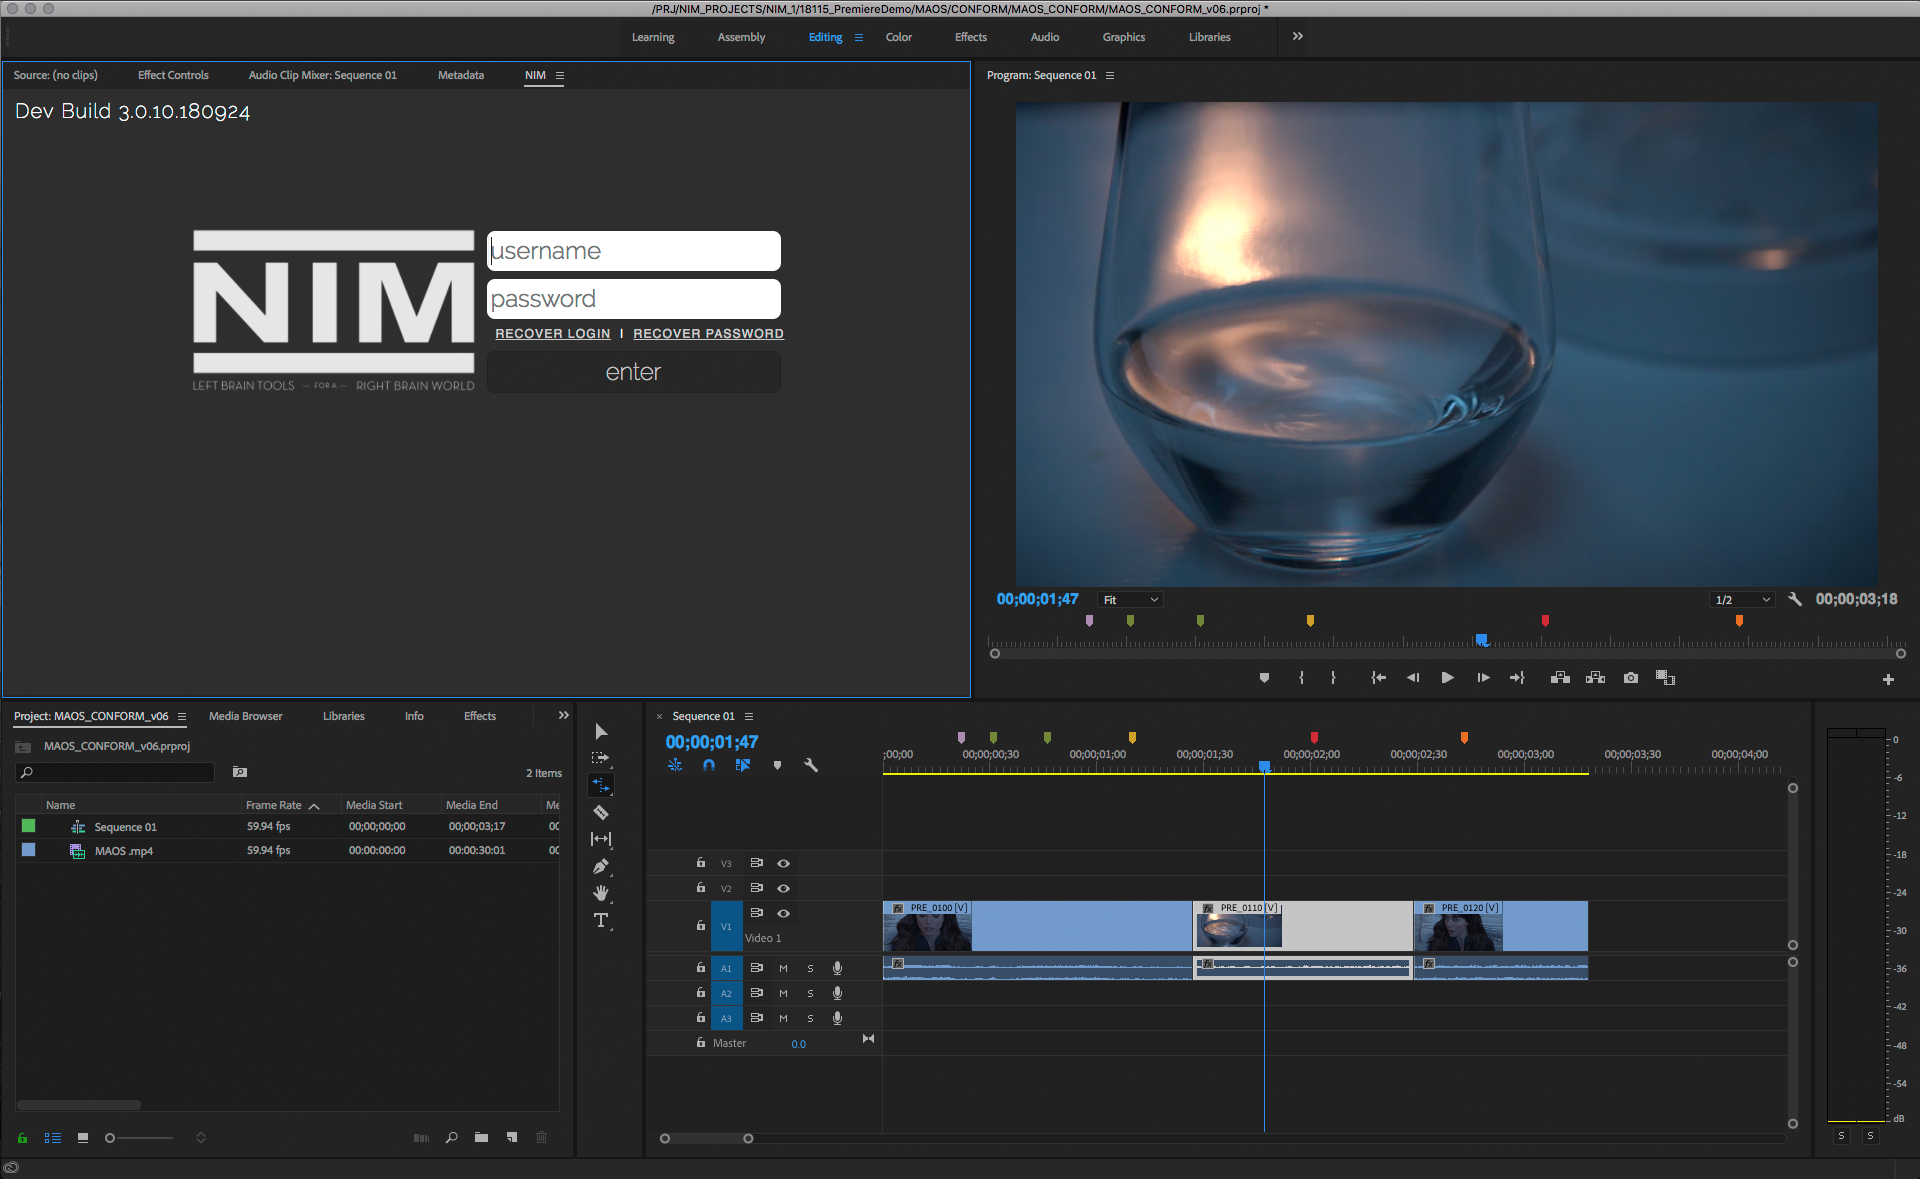
Log In
The Premiere connector requires that users login when the extension panel is opened.
Use your NIM username and password to login to the connector.
Note
This panel can be docked similar to panels in the Premiere UI.
Menu Options
The Premiere connector is organized into 3 tabs:
Project
Media
Review
Project
The project tab contains menu options to manage the premiere project with version control.
Open |
Opens a Premiere project that was previously logged to NIM |
Save As |
Saves the current project to the selected NIM show |
Version |
Incrementally saves a new version of the project file. |
Publish |
Incrementally saves a new version of the project file and creates a versionless version of the project which is flagged as published in NIM. |
Open
To open a Premiere project, hover over the Project tab and click on the Open menu option.
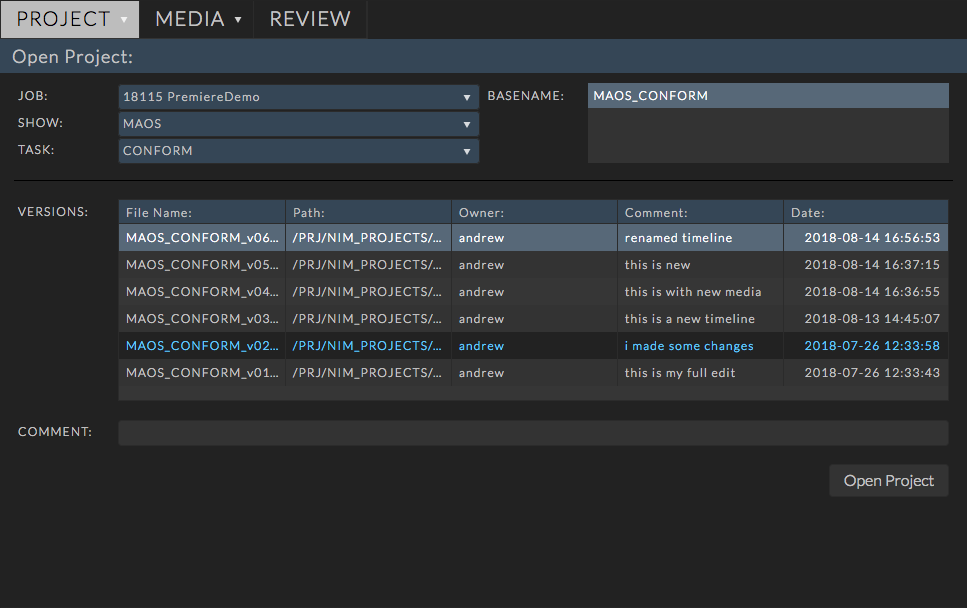
Premiere projects are associated with shows on a job. Available selection options are:
- Job:
This is a list of all jobs the user is assigned to.
Selecting a job from the Job dropdown to load available shows.
- Show:
Select the show that the project file was saved to.
- Task:
Select the NIM task type associated with the project file. Examples would be “Edit” or “Conform”.
- Basenames:
The available basenames for the selected task appear in the basename list.
Select the desired basename from the list
- Versions:
Choosing a basename will load all available versions in the versions list.
Select the working version from the Version list.
Click the OPEN button to load the project version.
Save As
Selecting Save As allows users to save a Premiere project file into the NIM project structure while logging the file information into NIM.
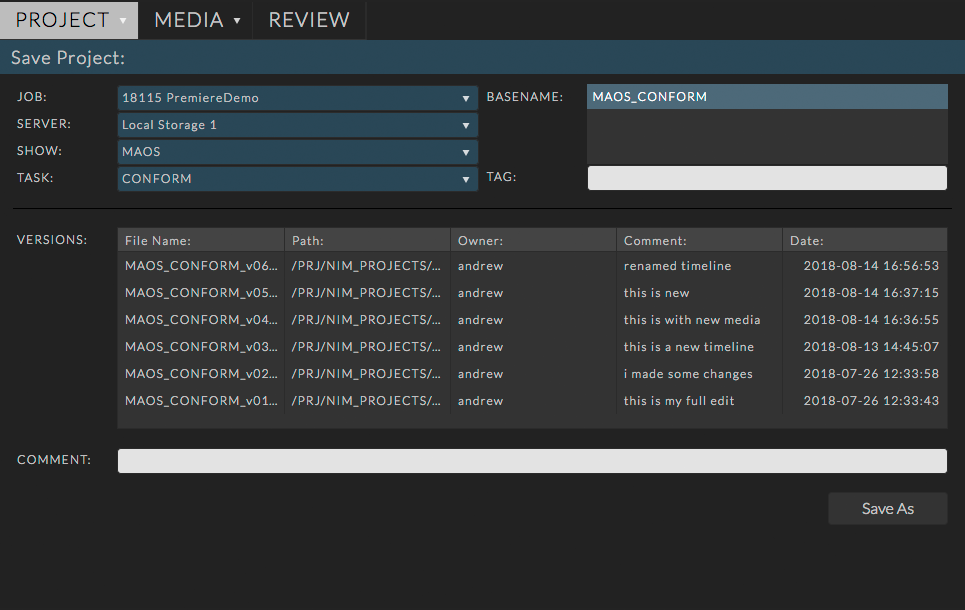
The following options are available when saving a project:
- Job:
This is a list of all jobs the user is assigned to.
Selecting a job from the Job dropdown to load available servers and shows.
- Server:
- Select the project server to save the project file to.
The project servers are defined in the NIM job under Production / Config
- Show:
Select the show to save the project file to.
- Task:
Tasks show all tasks that have been made available to the current application. This is defined in the Task Types Administrative section of NIM
Select the Task type from the Task dropdown.
- Basename:
A list of available basenames are displayed.
- To save into an existing basename:
Select the basename from the basename list
Enter a comment in the Comment field ( 7 )
- Click SAVE AS
The filename will be named automatically and versioned up in the current basename.
- The version information will be logged into NIM on the corresponding Show including:
File Name
Path
Owner
Comment
Date
- To create a new basename:
Enter a Tag ( 6 ) to append to the basename ( OPTIONAL )
Enter a comment in the Note field ( 7 )
- Click SAVE AS
- A new folder with the Task Folder name will be created under the NIM SHOW_ROOT
Task Folder names are defined in the Task Types Administrative section of NIM
A new folder will be created for the basename under the Task Folder with the basename as the name
All versions of this basename will be saved to the basename folder
- The file will be named according to the following convention
- File naming is defined as:
showname_taskShortName_version
- Adding a tag to a basename will append the tag in the following convention:
showname_taskShortName_tag_version
- The version information will be logged into NIM on the corresponding Show including:
File Name
Path
Owner
Comment
Date
- Tag:
Add a tag to append a descriptor to the defined basename
- Comment:
Add a comment that will be logged with the saved project
Version Up
To version up a file that is already part of a NIM version stream, choose VERSION UP from the Project menu.
The version panel will load with all the information found for the current project version.
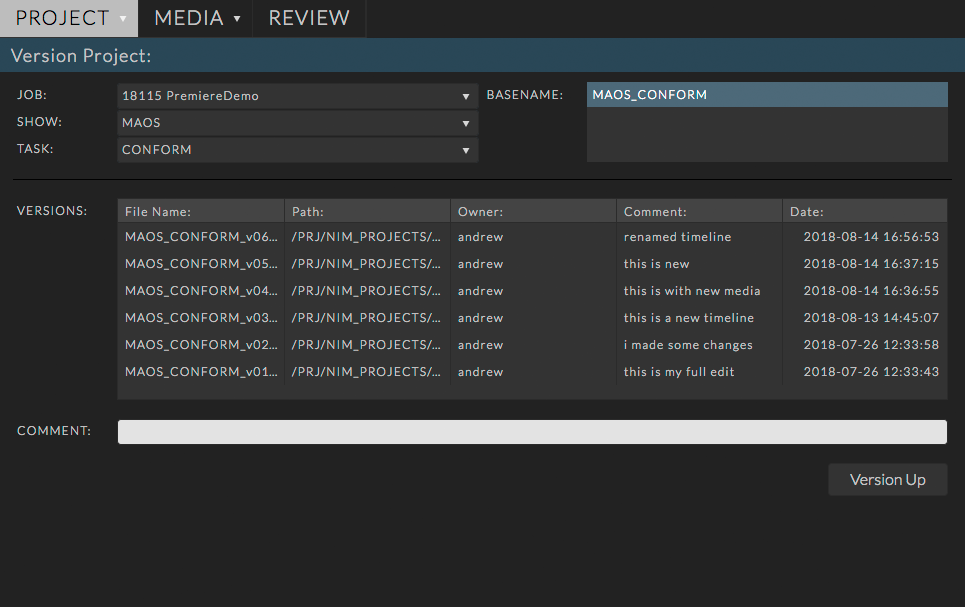
Enter the Comment and click Version Up.
The file will be saved to the appropriate location.
The filename will be automatically versioned up.
- The version information will be logged into NIM on the corresponding Show including:
File Name
Path
Owner
Comment
Date
A confirmation dialog box will appear. Click OK to close the dialog box and continue working
Publish
Publishing a version saves the working file, creates a published file, and generates a versionless version of the basename version stream:
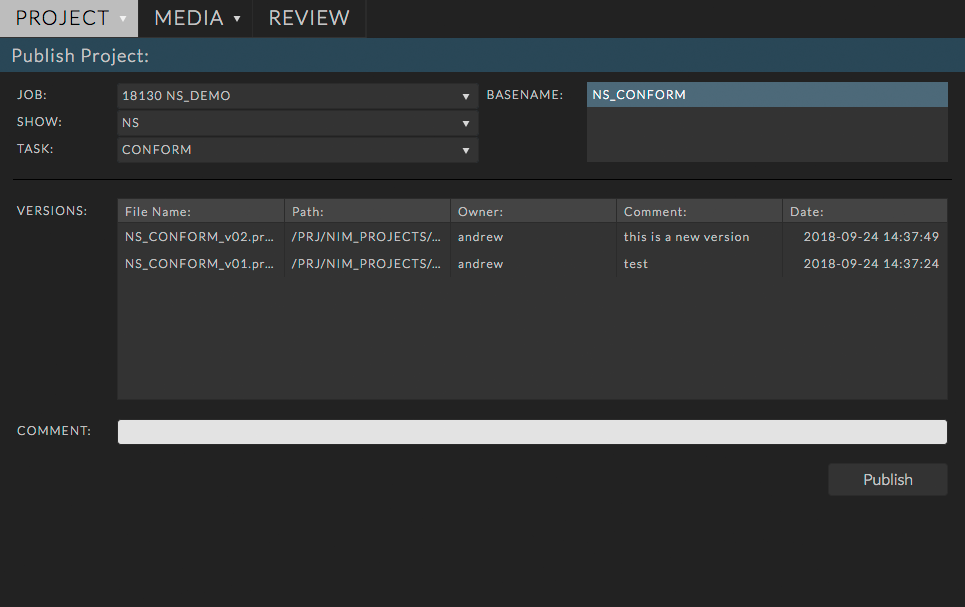
Follow these steps to publish a file:
Note
To publish a file you must be in an existing version stream
All non-editable fields will be greyed out
- Comment:
Enter the comment that will be saved with the version and published files
- Click Publish:
First this will save the current working version as a new version
- A new file with a _PUB tag appended to the name will be saved and flagged as the current published file.
These _PUB “published” files are not considered a “working” file and filtered out of the version stream when loading working files
Creating a separate publish file aids in the prevention of modifying a publish by accident
- A “versionless” version of the basename will be linked at the root level of the Task folder.
eg. SEQ_EDIT_v01.nk will be linked as SEQ_EDIT.nk
When a published file is saved the _PUB file is the currently loaded project.
Media
The media tab contains menu options to export and import media to and from NIM.
Export Edit for Review |
Uses Adobe® Media Encoder to build a movie of the current sequence and upload to NIM Review |
Rename Shots |
Utility to sequentially rename all shots on a timeline |
Export Shots |
Creates shots in NIM based on the current sequence. Optionally transcode media and create After Effects starting comps for shots. |
Import Elements |
Imports NIM elements for each shot in a show. |
Export Edit for Review
Select the “Export Edit for Review” option to create a movie of the current timeline and upload it directly to NIM for review. The connector will launch Adobe® Media Encoder to create a video file based on the settings selected and then upload directly to NIM.
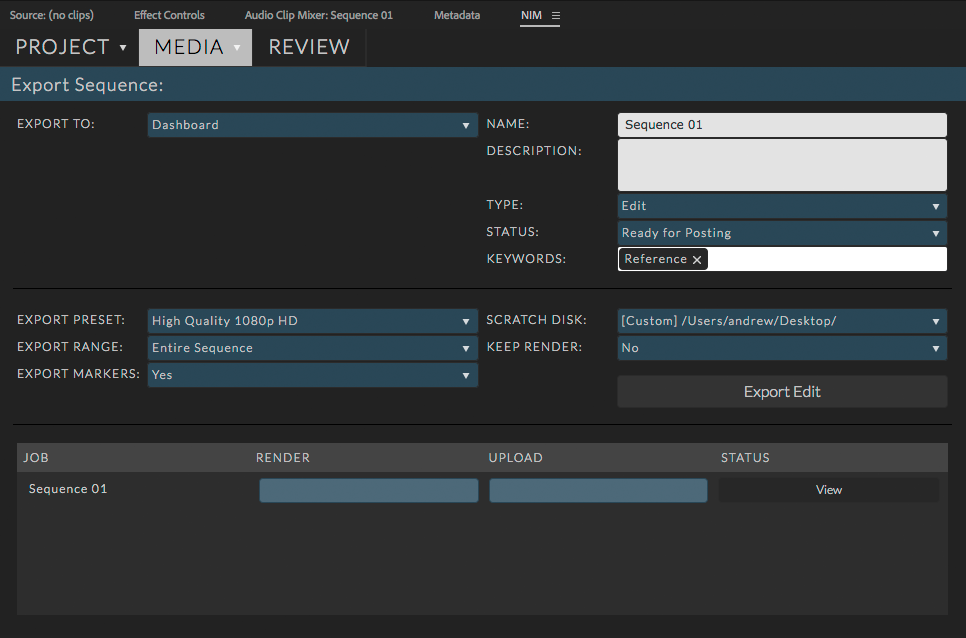
The settings on this panel allow users to select the context, review item details, and export options.
Options include:
Export To |
Selects the context for the review item. Available options are Dashboard, Job, Show, Shot, Task |
Name |
The name of the review item. (By default the sequence name is used) |
Description |
A description to include with the review item. |
Type |
The type of review item as defined by the list of review item types in NIM |
Status |
The status to use for the review item |
Keywords |
The list of available review item keywords |
Export Preset |
A Media Encoder preset to use for export. Several presets are shipped with the connector based on existing Media Encoder presets. You may also select your own custom preset by selecting the “Custom Preset” option. A file browser will appear allowing you to select the preset file directly. |
Export Range |
The range of the sequence to use for export. Options include:
|
Export Markers |
Selecting “Yes” will export Comment Markers as existing notes on the review item at the associated frame. |
Scratch Disk |
This is the location that Media Encoder will use to render the video file before upload |
Keep Render |
Selecting “Yes” will keep the video file created by Media Encoder. “No” will delete the file after it is uploaded to NIM. |
Click the “Export Edit” button to launch Media Encoder and start the render. You can monitor the render and upload through the progress bars in the grid at the bottom of the panel.
When the upload is complete, a “View” button will appear at the right of the grid for the completed job. Click the button to open the Review panel in the connector and view the newly uploaded media.
Rename Shots
The rename shots panel provides a utility to sequentially rename all shots on a timeline for the current sequence. An example of the naming convention will be displayed at the top right of the panel as changes to the settings are made. Once the settings are correct, click the “Rename Shots” button to start the renaming.
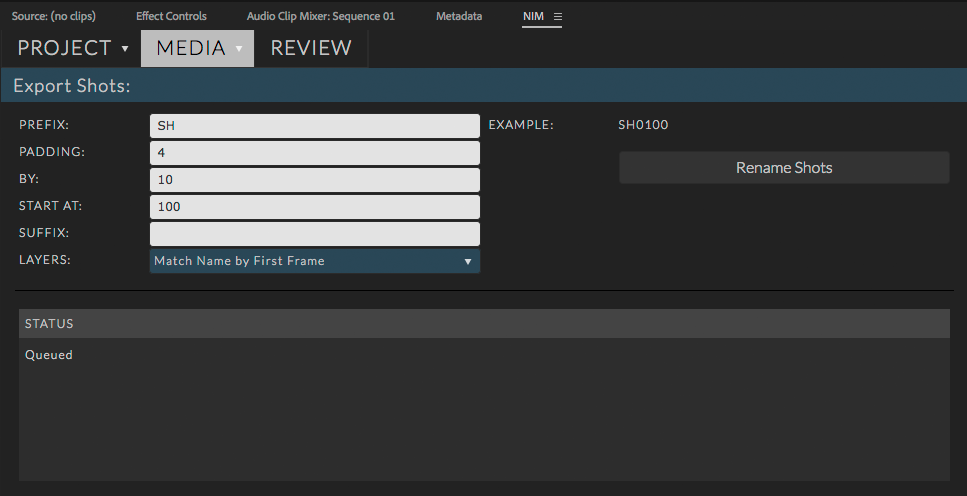
Options include:
Prefix |
A prefix to use at the beginning of the shot name. |
Padding |
The amount of padding to use for the number convention. A padding of 4 will add leading zeros to ensure 4 digits are used for the shot number (0001). |
By |
The amount to increment shot numbers by. A “By” value of 10 and padding of 4 would create the following ( 0010, 0020, 0030, 0040 ) |
Start At |
The first number to use in the sequence |
Suffix |
A suffix to use at the end of the shot name. |
Layers |
Determines how overlapping shots on multi-track timelines are named. Options include:
|
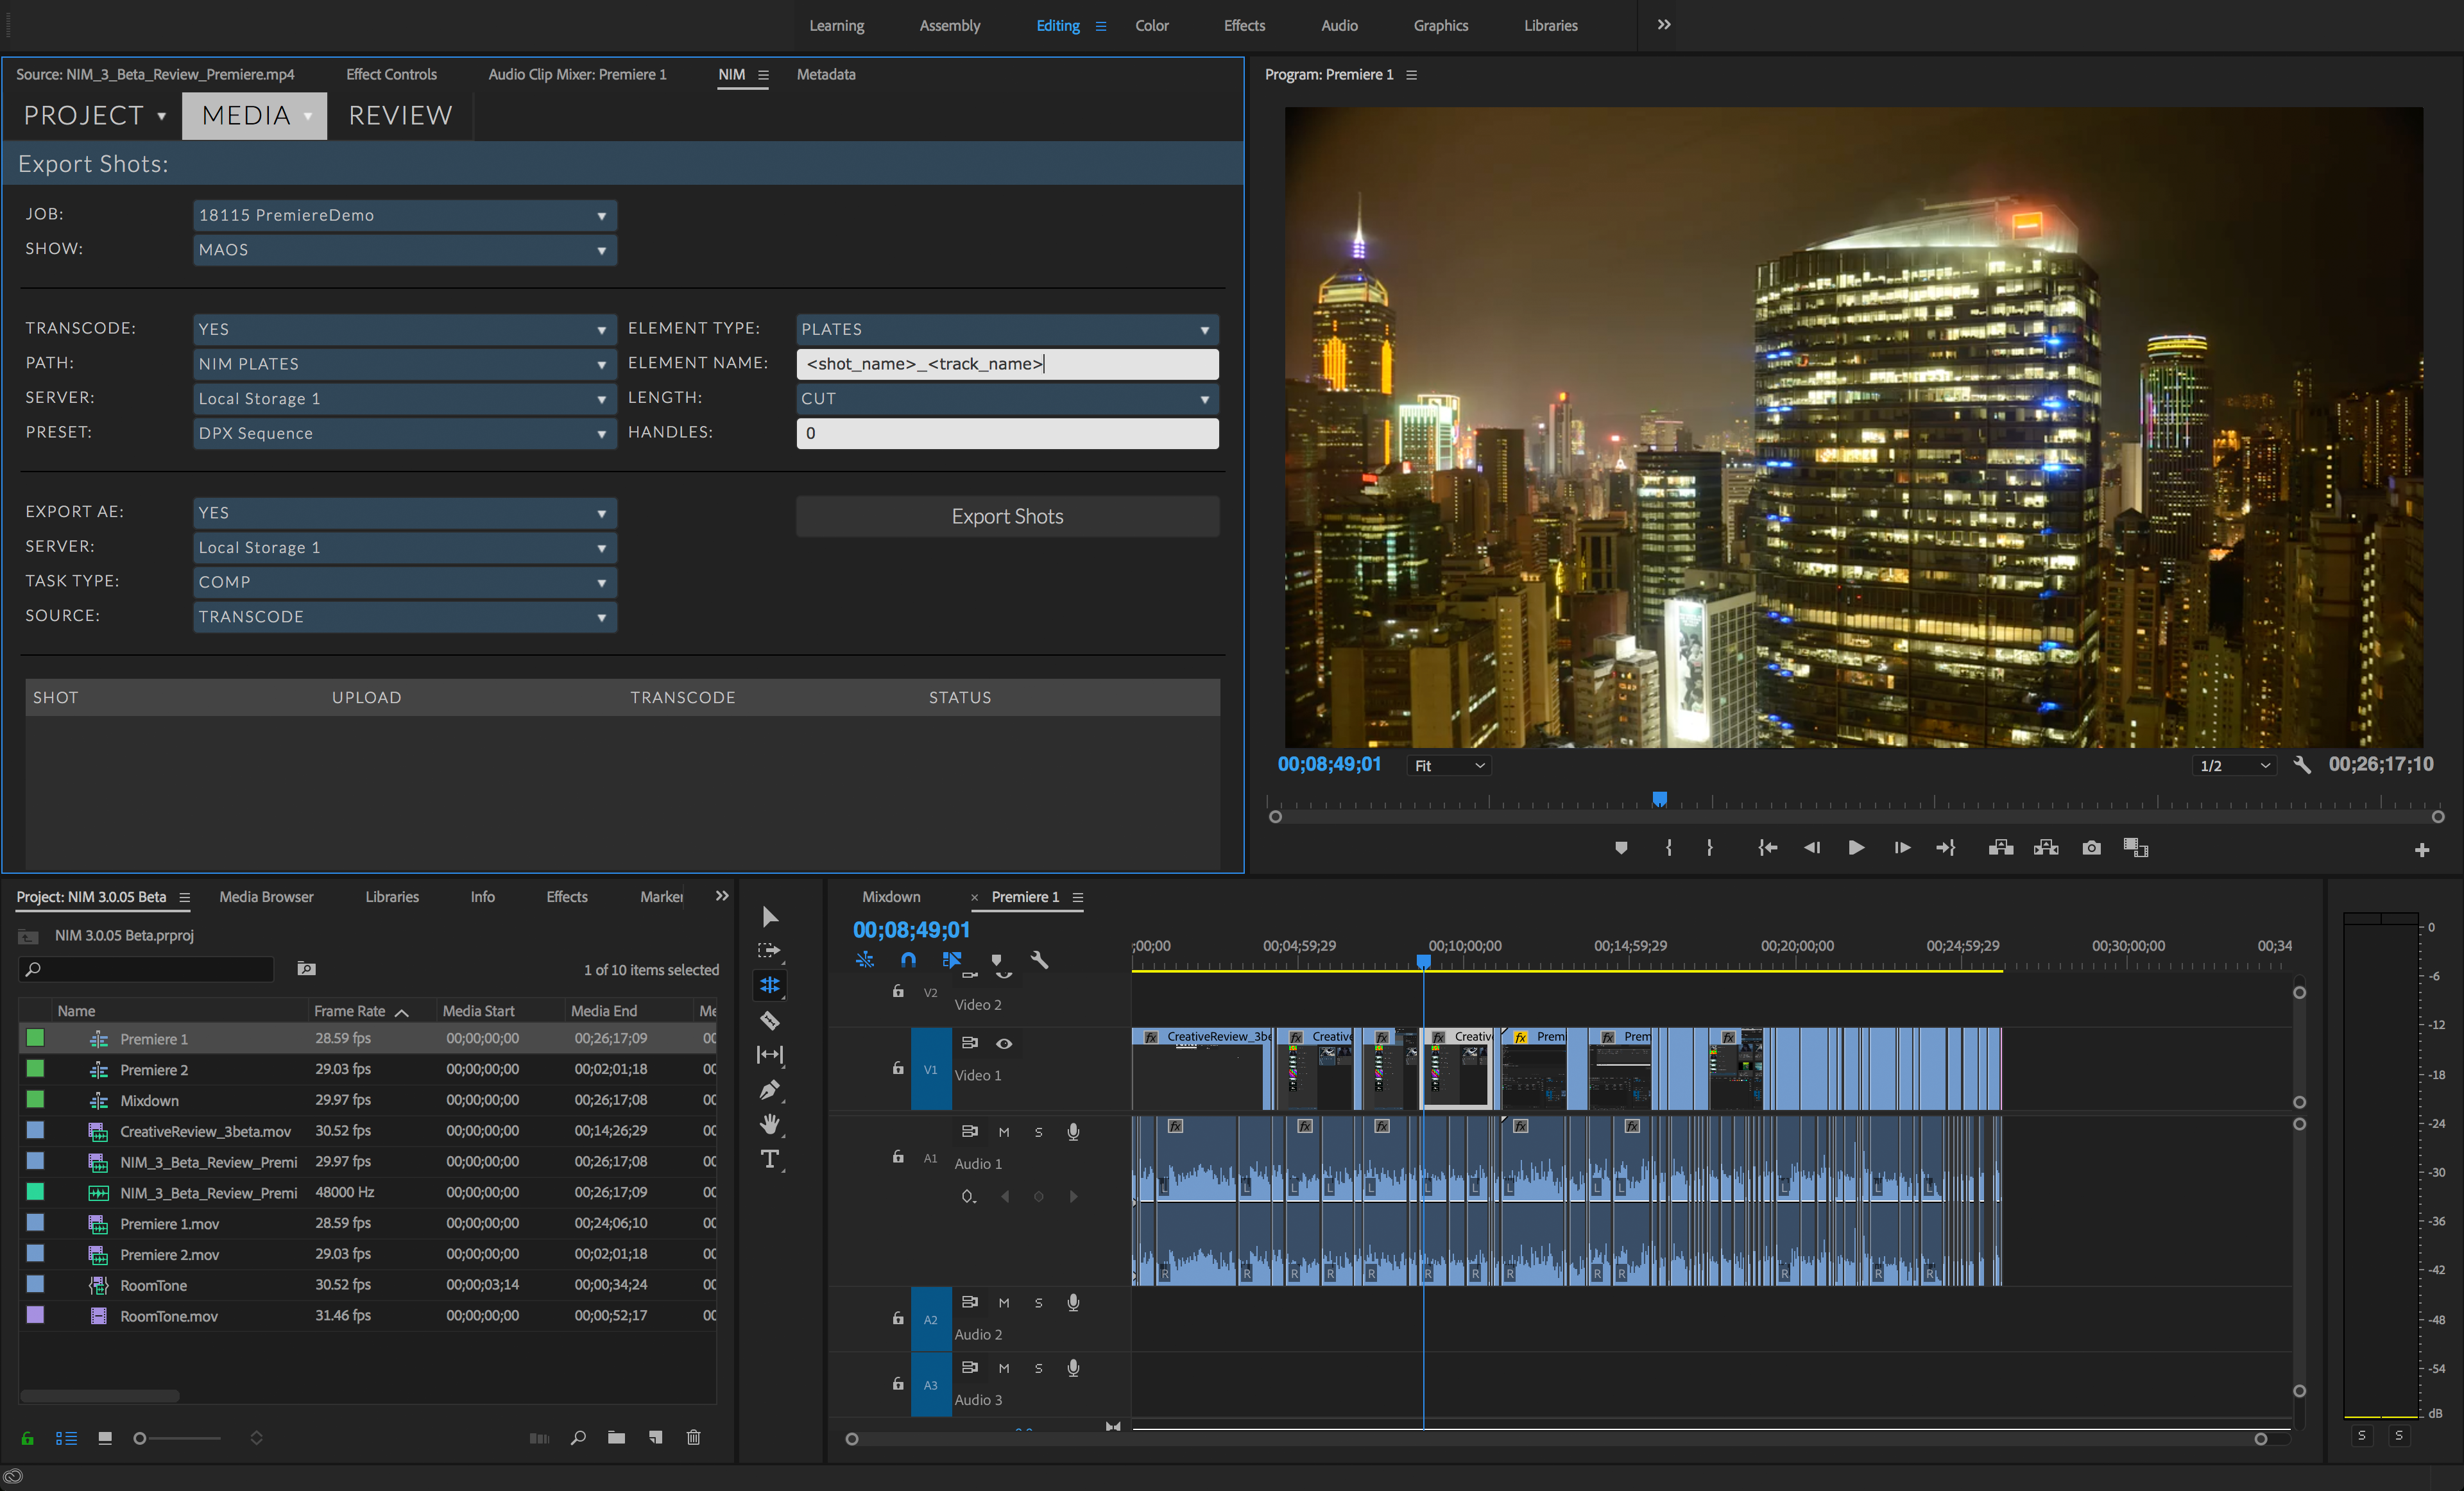
Export Shots
The export shots panel will use the shots on the current sequence timeline and create matching shots in NIM. Shot length and thumbnails will be uploaded for each shot to NIM. Optionally, the shots can be sent to Media Encoder to be transcoded and After Effects XML files can be generated including either the source or transcoded media.
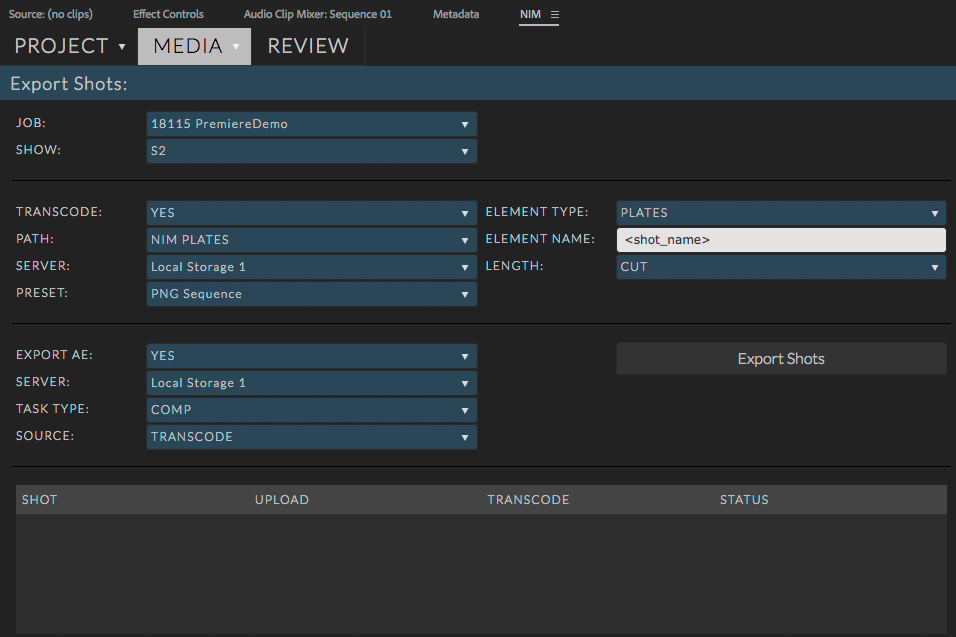
Options include:
Job |
A list of all NIM jobs where the user is a member of the crew. Select the job to update the list of shows. |
Show |
A list of shows for the currently selected job. This is the location that the new shots will be created. |
Transcode |
Select “Yes” to iterate through all shots on the timeline and create exports in Media Encoder for each item. Select “No” to skip this process |
Path |
The location the transcoded media will be exported to. Options include:
|
Server |
The NIM job server to use for export |
Preset |
A Media Encoder preset to use for export. Several presets are shipped with the connector based on existing Media Encoder presets. You may also select your own custom preset by selecting the “Custom Preset” option. A file browser will appear allowing you to select the preset file directly. |
Element Type |
The connector will log all transcoded items as elements on each shot. Use this dropdown to select the NIM element type to associate with the media. |
Element Name |
Determines the naming convention to use for the exported media. This field supports several keywords enclosed in <>. These are:
|
Length |
The length of each shot to use for transcoding. Options are:
|
Export AE |
Determines if each shot should have an After Effects XML (.aepx) file created containing the transcoded or source media. Select “Yes” to create the After Effects files for each shot. Select “No” to skip this process. |
Server |
The NIM job server to use for export |
Task Type |
The NIM task type to associate with the exported files logged in NIM |
Source |
Determines which media to include in the After Effects file. Options are:
|
Click the “Export Shots” button to start the export process. The grid at the bottom of the panel will populate will all export jobs created. You will be able to monitor the process through progress bars for Upload and Transcode. Upload indicates that the icons for each shot has been uploaded to NIM. Transcode monitors the Media Exchange render for each shot.
Import Elements
The import elements panel will search a show in NIM and import all elements matching the settings into per shot bins.
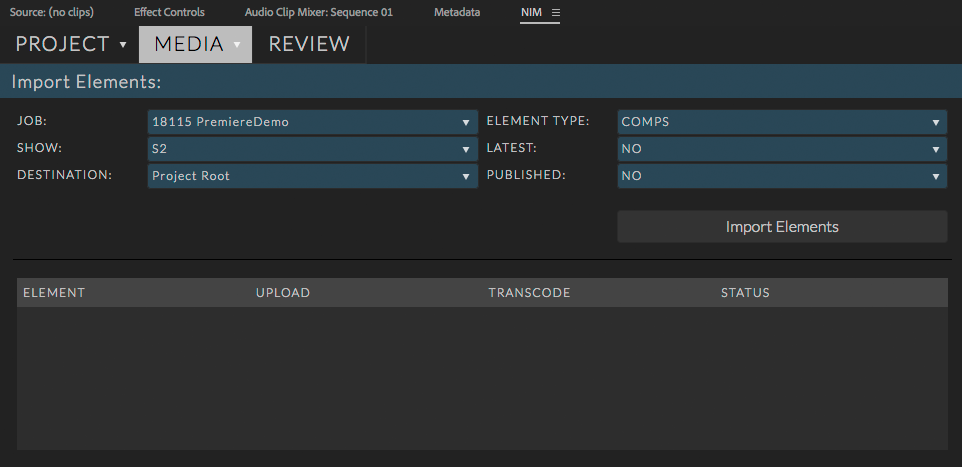
Select the options to import elements from the following:
Job |
A list of all NIM jobs where the user is a member of the crew. Select the job to update the list of shows. |
Show |
A list of shows for the currently selected job. This is the location that the new shots will be created. |
Destination |
Determines where the bins for each shot will be created. Options include:
|
Element Type |
Select a NIM element type to import. The connector will search all shots within in the show for elements matching this type. |
Latest |
This settings determines if you wish to import all matching element types or only the latest logged elements. To import only the latest elements select “Yes”. Select “No” to import all matching element types. |
Published |
This settings determines if you wish to import all matching element types or only the published logged elements. To import only the published elements select “Yes”. Select “No” to import all matching element types. |
Review
NIM Review is available directly from within the Premiere connector. Users can create bins, review media, create and respond to notes in NIM review all without leaving the application. Click on the Review tab to load the review dashboard. This view will display all review items owned by the logged in user.
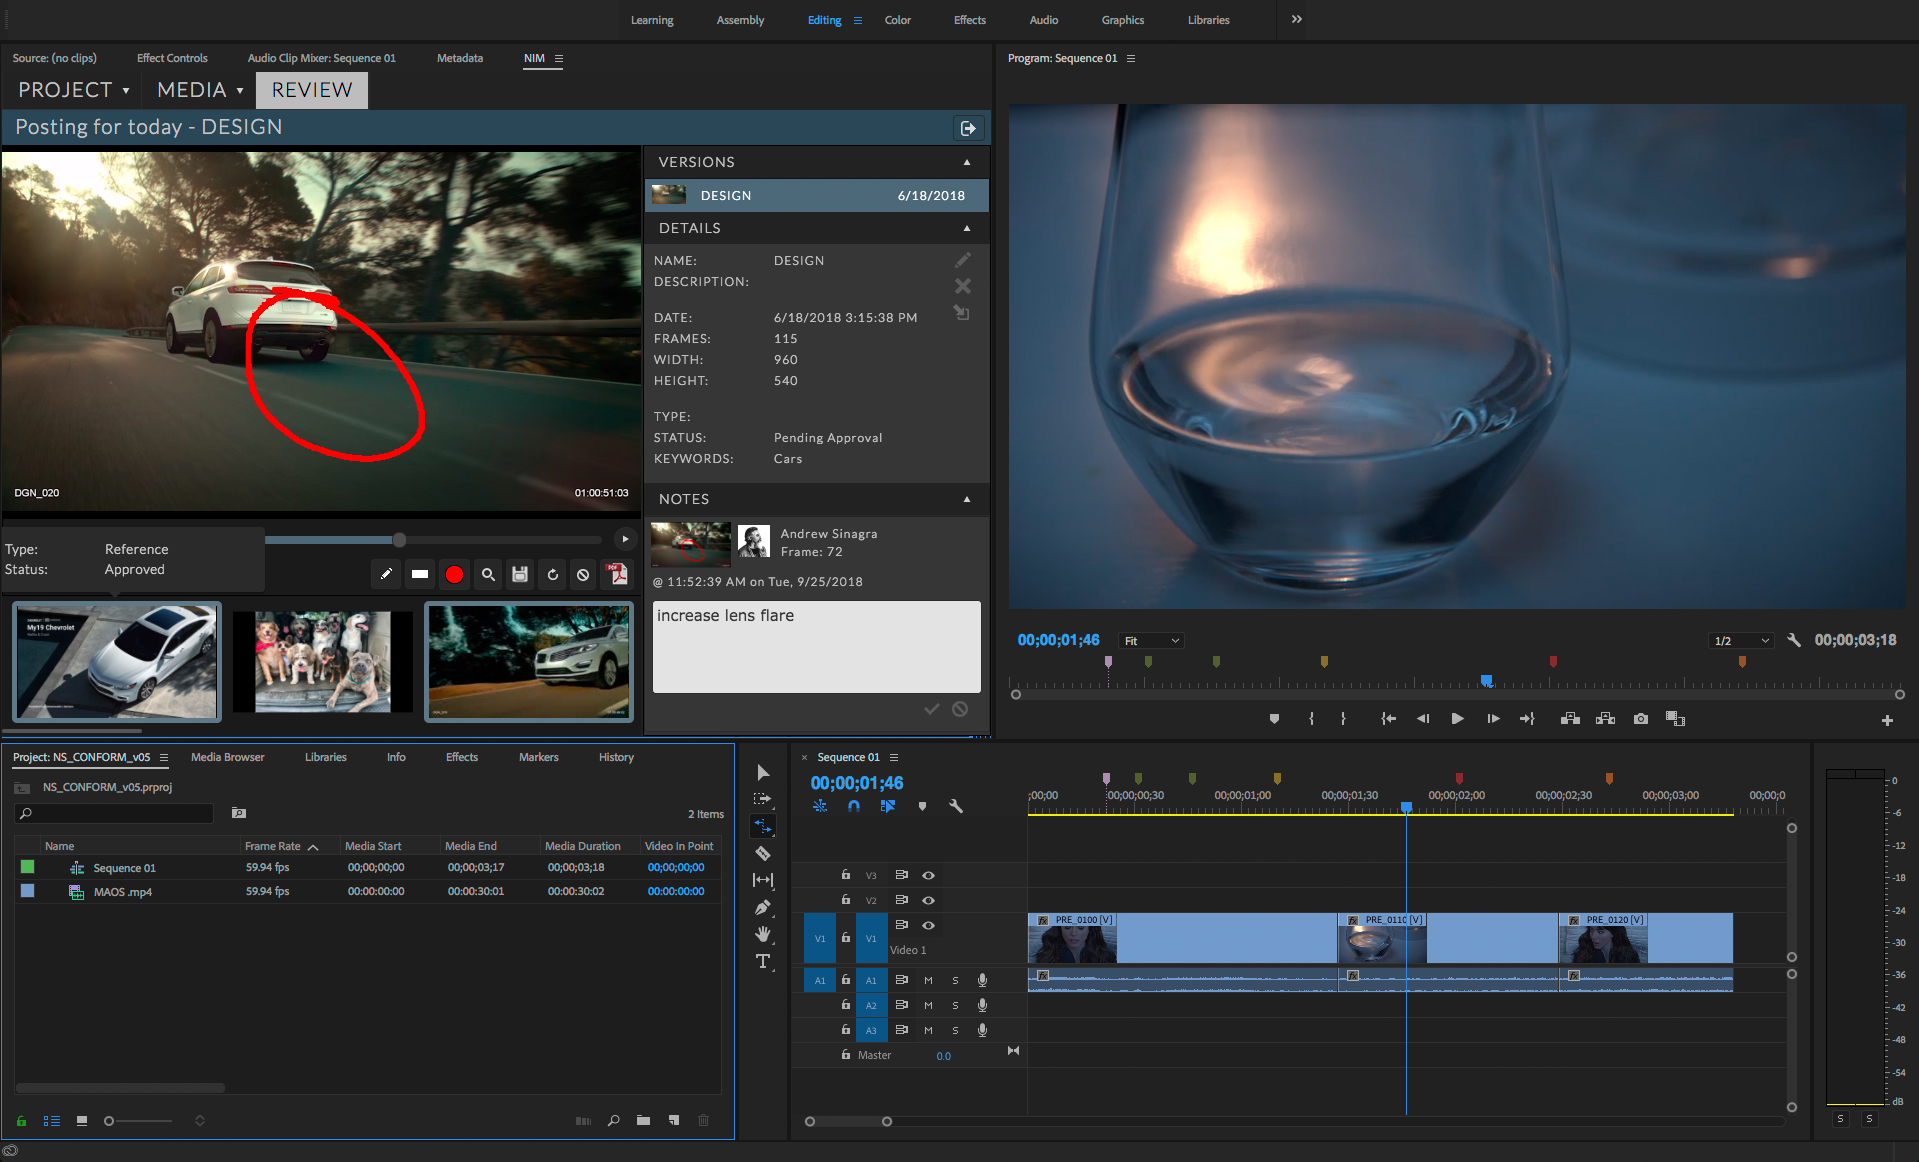
For full details on how to use NIM Review, Please refer to the Review section of the documentation.