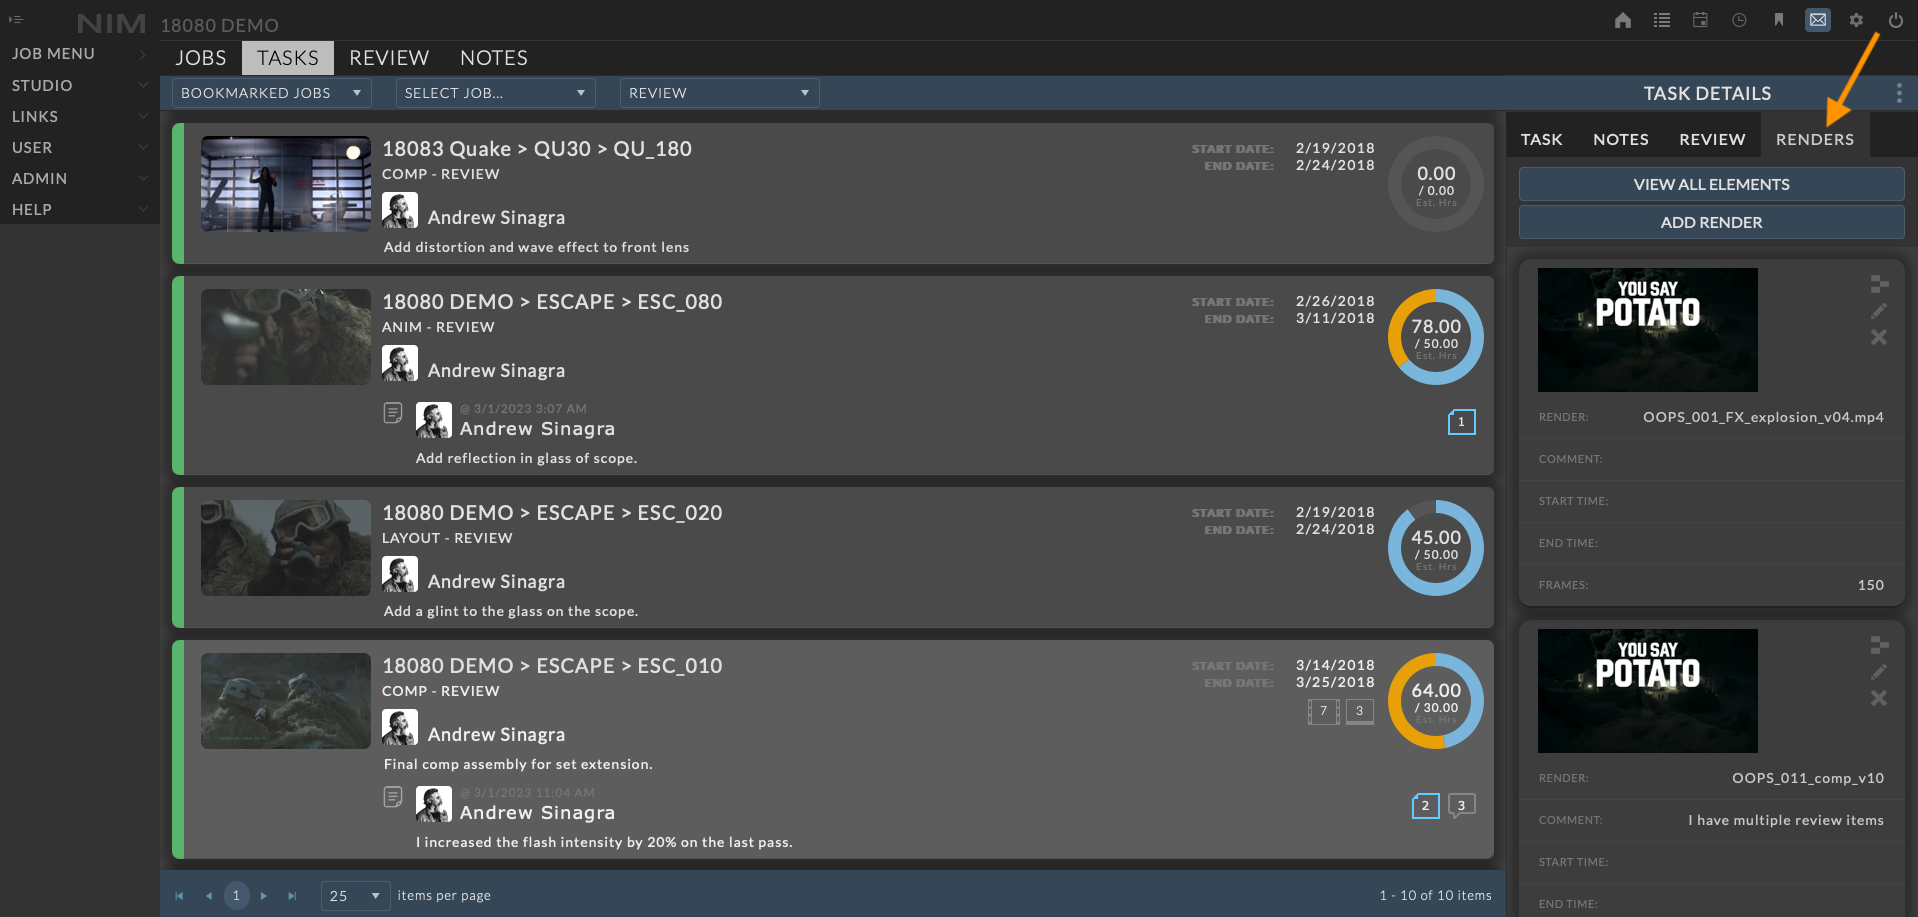
Renders
NIM Renders are containers to track information related to the renders of a scene file including associated render details, elements (render passes) and review items (proxies). Renders are logged directly to tasks assigned to users. To access a task’s renders, load the Task Details panel from dashboard tasks, or within the job’s list or grid views and click on the Renders tab. For more information on the Task Details panel see the Task Details section of the documentation.
Add A Render
Renders can be accessed via the Renders tab of the Task info panel. This section lists all renders that have been logged to a task.
The renders can be logged using the following methods:
User entry via the UI
Automatically from Deadline using the NIM Pipeline Integration
NIM API
Tip
When using Thinkbox Software® Deadline® pipeline integration tools, or a post render script from any render manager calling the NIM API, a render job can automatically log a render and each render layer of can be added as an element to the render. Additionally, proxy movies of the renders can be uploaded as review items and associated with the render.
User Entry
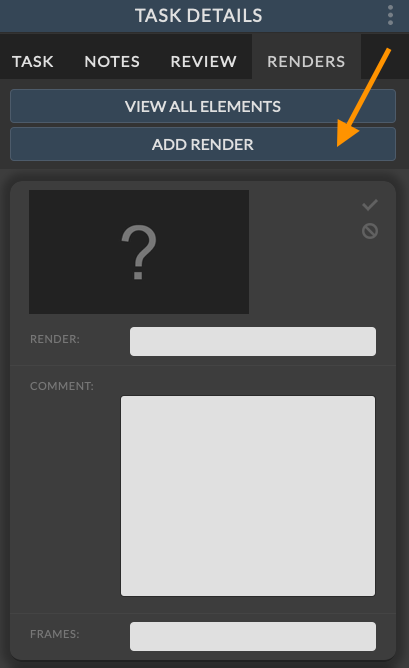
To add a render through the NIM UI, navigate to the Renders tab of the task details. Click the ADD RENDER button in the to add a render entry.
You will be presented with input fields to enter information for:
Render Name
Comment
Total Frame Count
Click the  button to save your changes.
To edit the render options, click the  to the right of the render. After making the necessary changes, click the check mark button to save. Click the cancel button to return to the view mode without saving changes.
To delete a render, click the  button. You will be prompted to confirm deletion of the render.
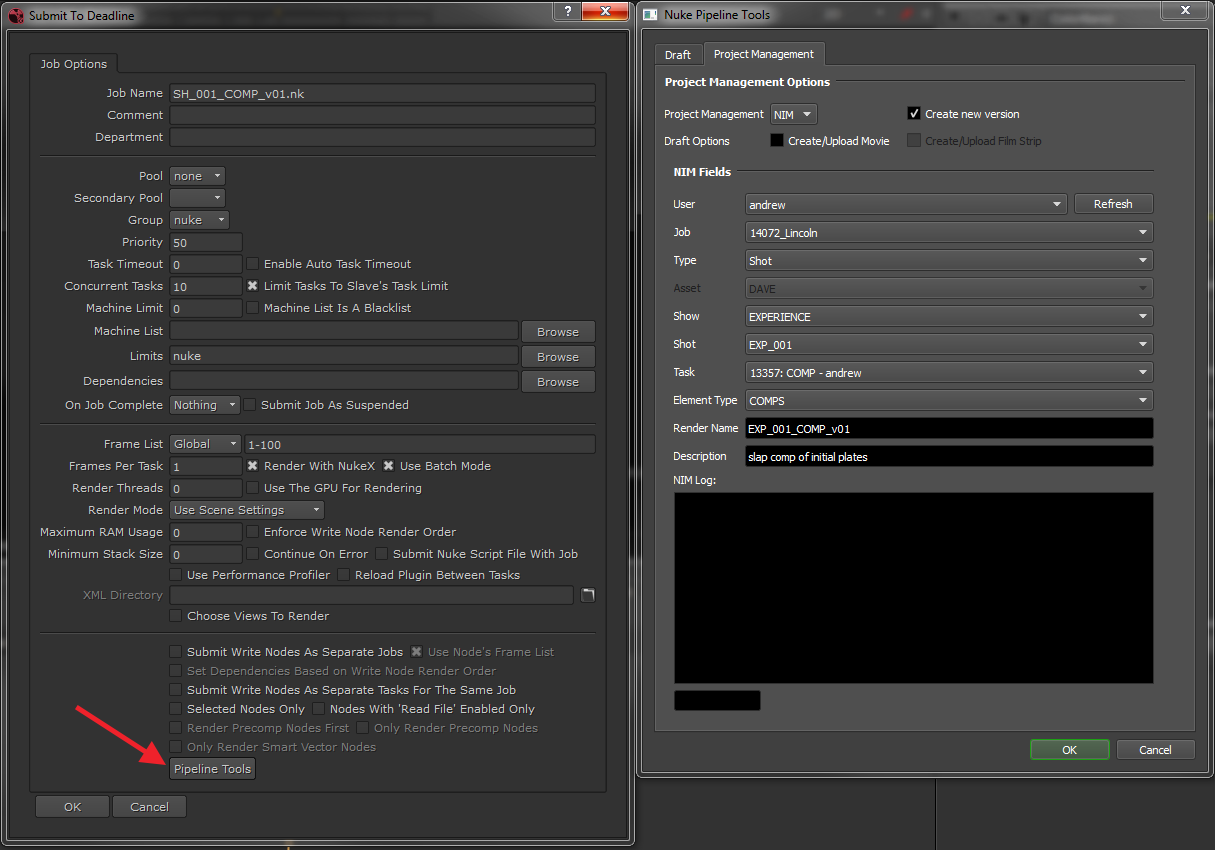
Deadline
NIM is integrated closely with Thinkbox Software® renderfarm management system Deadline®. Through the use of the Deadline® Pipeline Integration tools, renders managed via Deadline can be automatically logged to a user’s task with links to the render job’s passes as elements and Deadline® Draft’s uploaded as NIM review items. Please refer to the Deadline® documentation for the proper use and configuration of the Pipeline Integration.
Example:
The below image shows the Deadline® Nuke Submitter and the open Pipeline Tools / NIM Project Management window.
API
The NIM API can be used to directly log renders, elements, and upload review items. This can be employed by render farm manager applications that support script integration.
The python code below shows an example of using the NIM API to add a render, log elements, and upload a review item to a known task ID:
import nim_core.nim_api as nimAPI
result = nimAPI.add_render(taskID=14941, renderName='myRender')
if result['success'] == 'true':
   nimAPI.upload_renderIcon(renderID=result['ID'],img='/path/to/icon.jpeg')
   nimAPI.upload_reviewItem(renderID=result['ID'],path='/path/to/movie/myImages.mov',submit=0)
   nimAPI.add_element( parent='render', parentID=result['ID'], path='/path/to/frames', name='myImage.####.exr', \
                          startFrame=1, endFrame=128, handles=12, isPublished=False )
   nimAPI.add_element( parent='render', parentID=result['ID'], path='/path/to/frames', name='myImage_matte.####.exr', \
                          startFrame=1, endFrame=128, handles=12, isPublished=False )
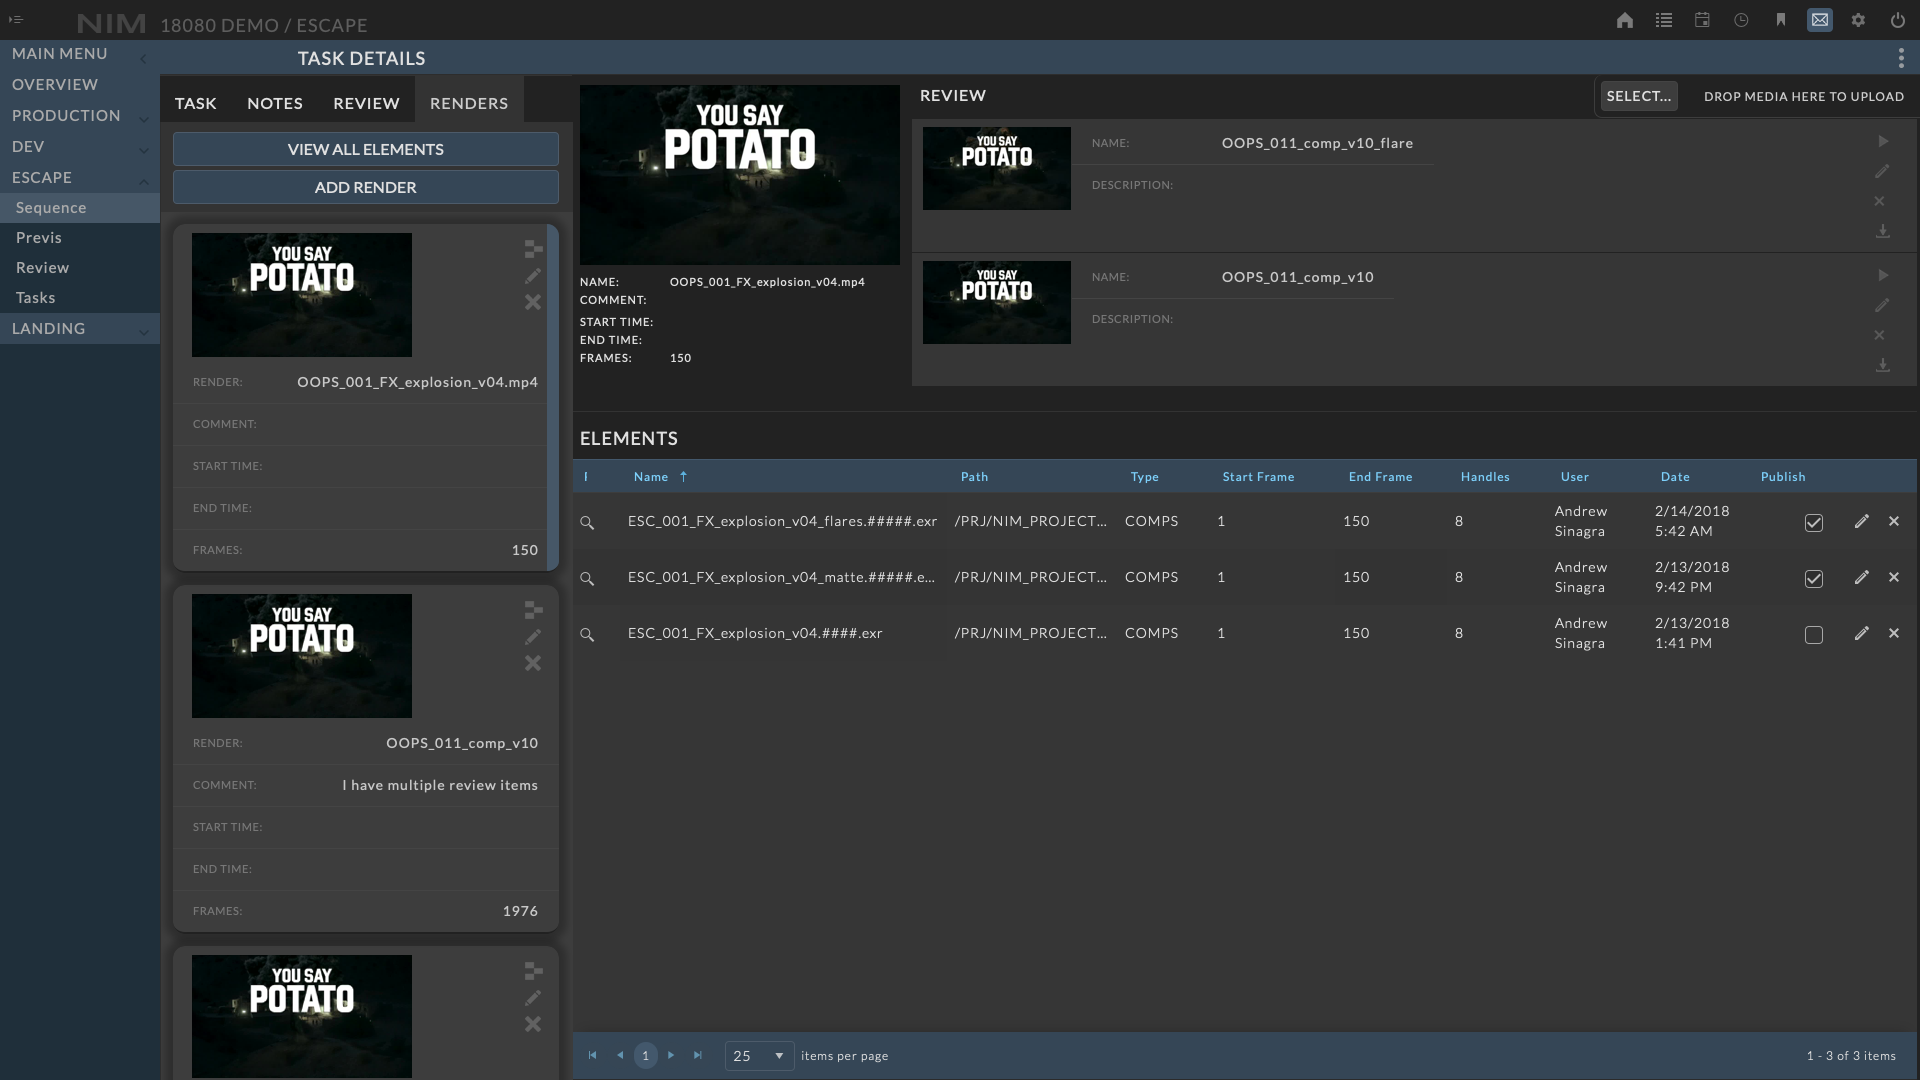
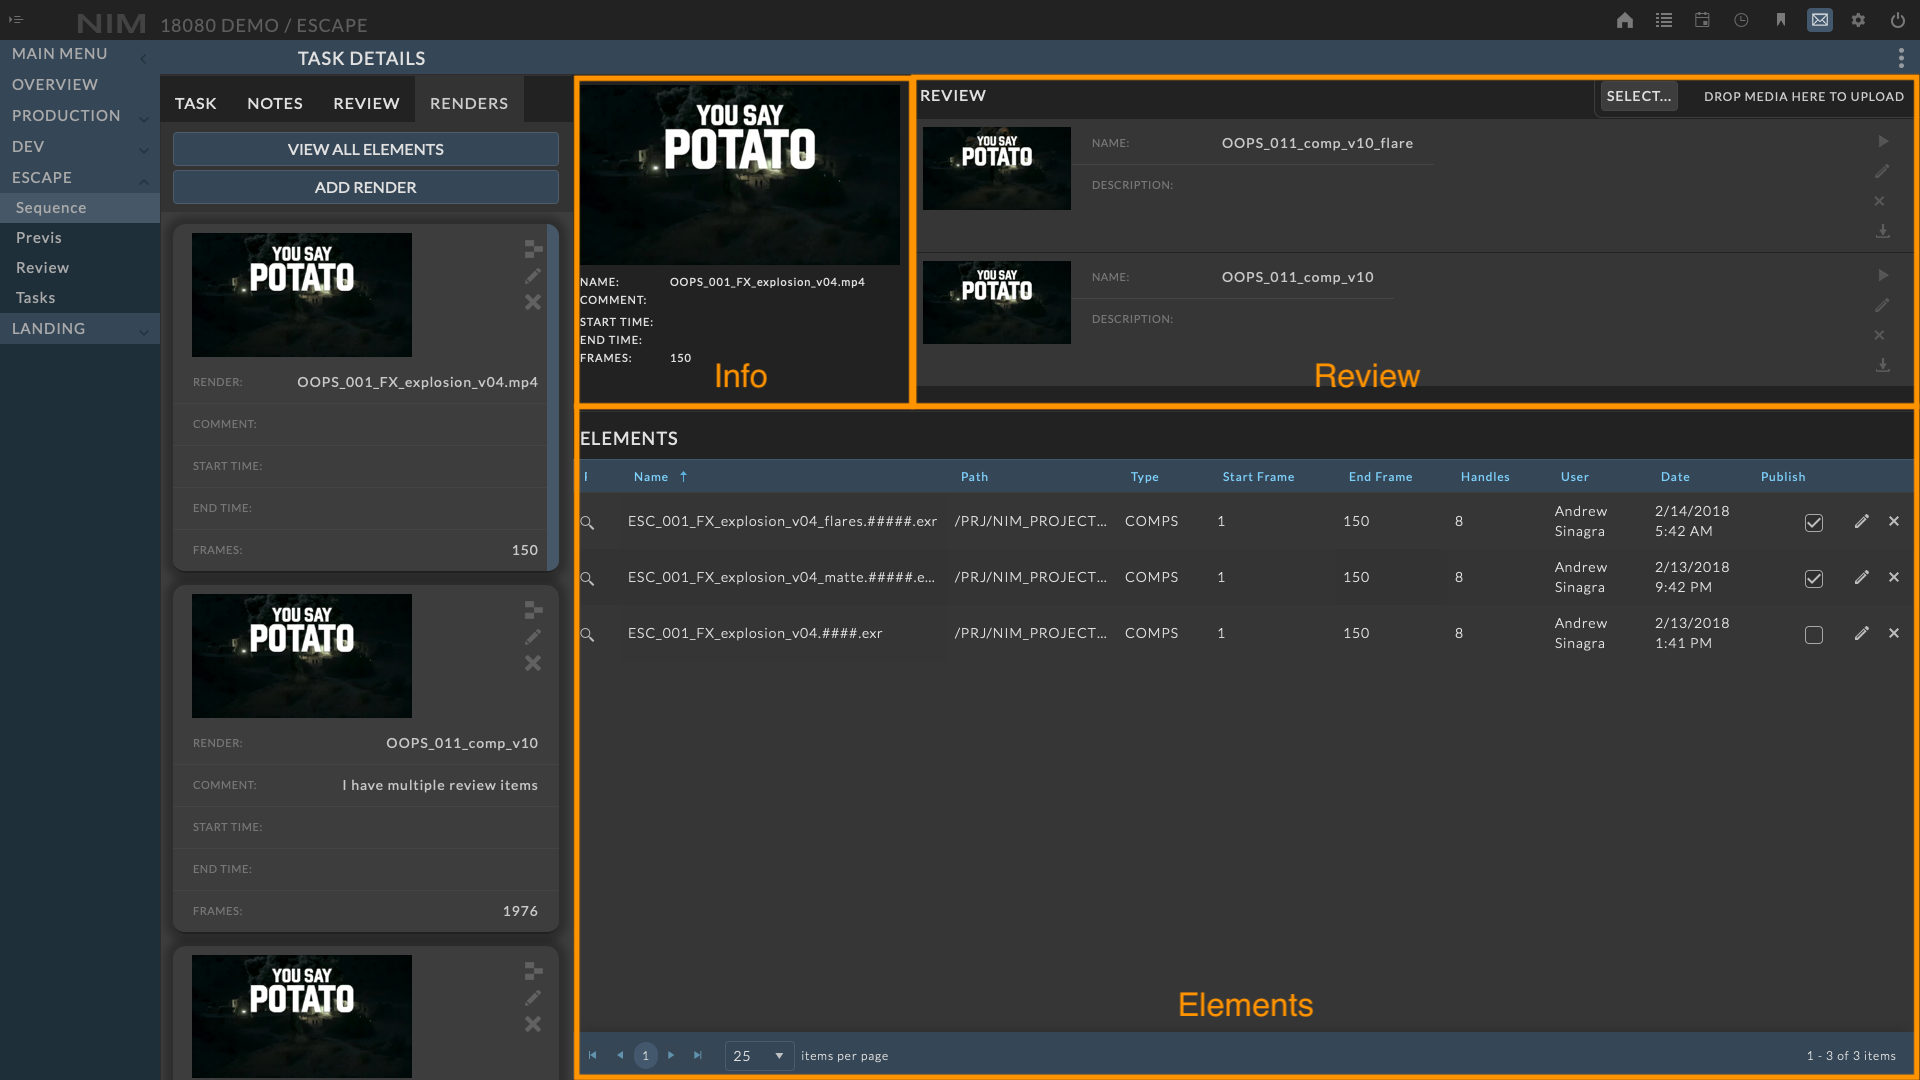
Render Details
To open the render details, click the  button from an item in the renders list. When a render item is selected, a bar at the right of the selected item will be highlighted.
The Render Info panel contains 3 sections:
Info |
General information about the render |
Review |
Associated review items. These can be proxies of the full resolution elements or any relative review media. |
Elements |
Associated output elements. These are typically passes from the render job. |
Info
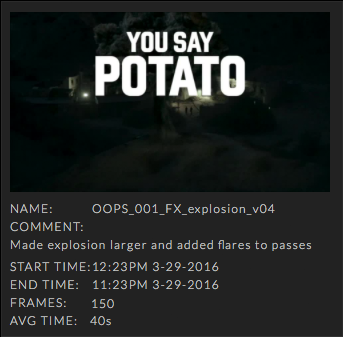
The top left section of the views contains the render info displaying general information about the render job including:
Name - The name of the render
Comment - An associated comment for the render
Start Time - The time the render started
End Time - The time the render finished
Frames - The total frame count
Avg Time - The average time per frame
Total Time - The total completion time
Review
The top right section of the review panel lists all associated review items that have been uploaded to the render. For more information on review items, please refer to the Review section of the documentation.
Upload
Upload a review item by clicking on the Upload Review button. You will be presented with a file browser to select a local file to upload.
You can also use drag and drop to add files directly from the desktop to this area. When dragging, the area that you can drop the file on is illuminated.

Note
Uploaded media files will be automatically converted to the proper size and format needed for NIM review if they do not meet the proper codec and maximum size limits established in the Admin > Review section.
Details
Basic details for each review item are available in this view. For full review item details and editing, please load the item in the review player. The following controls for each review item provide access to view the media, edit the details, or download the media.
|
Opens the selected review item in the review player |
|
Edits the review item details |
|
Deletes the review item |
|
Downloads the review item |


Elements
The lower section of the render panel lists all elements associated with the render. Render elements are typically linked to render passes of a render job. However, these can be used in any manner that fits your pipeline. For more information on elements, please refer to the Elements section of the documentation.
For example:
All versions of a render could be attached to a single render item, with each element being a unique version.

Add Element
To add a new element, click the ellipsis menu at the top right of the render toolbar and choose Add Element.
The new element dialog will appear and you can enter the details.
When done click the Update button at the bottom of the dialog to save your changes.
Click the Cancel button to return to the view mode without saving the new element.
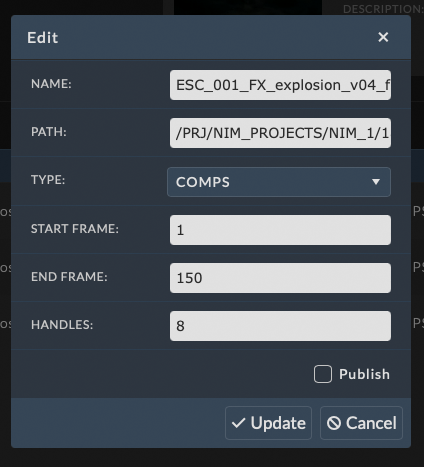
Details
To edit the element details, click the button at the right of the element row. Make the necessary changes and click the Save button at the bottom of the dialog to save your changes. Click the Cancel button to return to the view mode without saving changes.
Available element details include:
Name |
The file name of the element. For sequences of files, the convention of name.####.ext can be used. |
Path |
The path to the file not including the file name. |
Type |
The associated element type. Element types are defined in the Admin > Elements section of NIM. |
Start Frame |
The start frame of the element, if applicable. |
End Frame |
The end frame of the element, if applicable. |
Handles |
The number of handles the element contains, if applicable. |
Publish |
Individual elements can be flagged as published by checking the checkbox in the publish column. |
To delete an element, click the in element row you wish to delete.
Application Links
If Application Links have been set and enabled in Admin > Elements - Options, the first column in the grid will be a link to open the corresponding file with the application defined by the link. Click the  button to open the link. For more information on configuring application links, please refer to the Element Options section of the documentation.